

Pro ASP.NET 2.0 In CSharp 2005 (2005) [eng]
.pdf208 C H A P T E R 6 ■ S TAT E M A N A G E M E N T
Using the Query String
To store information in the query string, you need to place it there yourself. Unfortunately, there is no collection-based way to do this. Typically, this means using a special HyperLink control, or you can use a Response.Redirect() statement like the one shown here:
//Go to newpage.aspx. Submit a single query string argument
//named recordID and set to 10.
int recordID = 10;
Response.Redirect("newpage.aspx?recordID=" + recordID.ToString());
You can send multiple parameters as long as you separate them with an ampersand (&), as shown here:
//Go to newpage.aspx. Submit two query string arguments:
//recordID (10) and mode (full). Response.Redirect("newpage.aspx?recordID=10&mode=full");
The receiving page has an easier time working with the query string. It can receive the values from the QueryString dictionary collection exposed by the built-in Request object, as shown here:
string ID = Request.QueryString["recordID"];
Note that information is always retrieved as a string, which can then be converted to another simple data type. Values in the QueryString collection are indexed by the variable name.
■Note Unfortunately, ASP.NET does not expose any mechanism to automatically verify or encrypt query string data. This facility could work in almost the same way as the view state protection. Without these features, query string data is easily subject to tampering. In Chapter 25, you’ll take a closer look at the .NET cryptography classes and learn how you can use them to build a truly secure query string.
URL Encoding
One potential problem with the query string is using characters that aren’t allowed in a URL. The list of characters that are allowed in a URL is much shorter than the list of allowed characters in an HTML document. All characters must be alphanumeric or one of a small set of special characters, including $-_.+!*'(),. Some browsers tolerate certain additional special characters (Internet Explorer is notoriously lax), but many do not.
If you’re concerned that the data you want to store in the query string may not consist of URLlegal characters, you should use URL encoding. With URL encoding, special characters are replaced by escaped character sequences starting with the percent sign (%), followed by a two-digit hexadecimal representation. For example, the space becomes %20.
You can use the methods of the HttpServerUtility class to encode your data automatically. For example, the following shows how you would encode a string of arbitrary data for use in the query string. This replaces all the nonlegal characters with escaped character sequences.
string productName = "Flying Carpet"; Response.Redirect("newpage.aspx?productName=" + Server.UrlEncode(productName));
And here’s how you could decode the same information:
string ID = Server.UrlDecode(Request.QueryString["recordID"]);

C H A P T E R 6 ■ S TAT E M A N A G E M E N T |
209 |
Cross-Page Posting
One approach that’s new in ASP.NET 2.0 is to trigger a postback to another page. This technique sounds conceptually straightforward, but it’s a potential minefield, and if you’re not careful, it can lead you to create pages that are tightly coupled to one another and difficult to enhance and debug.
The infrastructure that supports cross-page postbacks is a new property named PostBackUrl, which is defined by the IButtonControl interface and turns up in button controls such as ImageButton, LinkButton, and Button. To use cross-posting, you simply set PostBackUrl to the name of another web form. When the user clicks the button, the page will be posted to that new URL with the values from all the input controls on the current page.
Here’s an example that defines a form with two text boxes and a button that posts to a page named CrossPage2.aspx:
<%@ Page Language="C#" AutoEventWireup="true" CodeFile="CrossPage1.aspx.cs" Inherits="CrossPage1" %>
<html>
<head runat="server"> <title>CrossPage1</title>
</head>
<body>
<form id="form1" runat="server" > <div>
<asp:TextBox runat="server" ID="txtFirstName"></asp:TextBox> <asp:TextBox runat="server" ID="txtLastName"></asp:TextBox> <asp:Button runat="server" ID="cmdSubmit" PostBackUrl="CrossPage2.aspx" Text="Submit" />
</div>
</form>
</body>
</html>
In CrossPage2.aspx, the page can interact with the CrossPage1.aspx objects using the Page.PreviousPage property. Here’s an example:
protected void Page_Load(object sender, EventArgs e)
{
if (PreviousPage != null)
{
lblInfo.Text = "You came from a page titled " + PreviousPage.Header.Title;
}
}
Note that this page checks for a null reference before attempting to access the PreviousPage object. If there’s no PreviousPage object, there’s no cross-page postback.
ASP.NET uses some interesting sleight of hand to make this system work. The first time the second page accesses Page.PreviousPage, ASP.NET needs to create the previous page object. To do this, it actually starts the page processing but interrupts it just before the PreRender stage. Along the way, a stand-in Response object is created to silently catch and ignore any Response.Write() commands from the previous page. However, there are still some interesting side effects. For example, all the page events of the previous page are fired, including Page.Load, Page.Init, and even the Button.Click event, for the button that triggered the postback (if it’s defined). Firing these events is mandatory, because they are required to properly initialize the page. Trace messages aren’t ignored like Response messages, which means you may see tracing information from both pages in a crossposting situation.

210 C H A P T E R 6 ■ S TAT E M A N A G E M E N T
Getting Page-Specific Information
In the previous example, the information you can retrieve from the previous page is limited to the members of the Page class. If you want to get more specific details, such as control values, you need to cast the PreviousPage reference to the appropriate type.
Here’s an example that handles this situation properly, by checking first if the PreviousPage object is an instance of the expected source (CrossPage1):
protected void Page_Load(object sender, EventArgs e)
{
if (PreviousPage != null)
{
CrossPage1 prevPage = PreviousPage as CrossPage1; if (prevPage != null)
{
// (Read some information from the previous page.)
}
}
}
You can solve this problem in another way. Rather than casting the reference manually, you can add the PreviousPageType control directive to your page, which indicates the expected type of the page initiating the cross-page postback. Here’s an example:
<%@ PreviousPageType VirtualPath="CrossPage1.aspx" %>
However, this approach is more fragile because it limits you to a single type. You don’t have the flexibility to deal with situations where more than one page might trigger a cross-page postback. For that reason, the casting approach is preferred.
■Tip Seeing as the PostBackUrl property can point to only one page, it may seem that cross-page posting can accommodate a fixed relationship between just two pages. However, you can extend this relationship with various techniques. For example, you can modify the PostBackUrl property programmatically to choose a different target. Conversely, a cross-post target can test the PreviousPage property, checking if it is one of several different classes. You can then perform different tasks depending on what page initiated the cross-post.
Once you’ve cast the previous page to the appropriate page type, you still won’t be able to directly access the control values. That’s because the controls are declared as protected members. You can handle this by adding properties to the page class that wrap the control variables, like this:
public TextBox FirstNameTextBox
{
get { return txtFirstName; }
}
public TextBox LastNameTextBox
{
get { return txtLastName; }
}
However, this usually isn’t the best approach. The problem is that it exposes too many details, giving the target page the freedom to read every control property. If you need to change the page later to use different input controls, it’s difficult to maintain these properties. Instead, you’ll probably be forced to rewrite code in both pages.
A better choice is to define specific, limited methods that extract just the information you need. Here’s an example:

C H A P T E R 6 ■ S TAT E M A N A G E M E N T |
211 |
public string GetFullName()
{
get { return txtFirstName.Text + txtLastName.Text; }
}
This way, the relationship between the two pages is well documented and easily understood. If the controls in the source page are changed, you can probably still keep the same interface for the public methods. For example, if you changed the name entry to use different controls in the previous example, you would still be forced to revise the GetFullName() method. However, once your
changes would be confined to CrossPage1.aspx, you wouldn’t need to modify CrossPage2.aspx at all.
■Tip In many cases, a better alternative to cross-page posting is to use some sort of control that simulates multiple pages or multiple steps, such as separate Panel controls or the MultiView or Wizard control. This offers much the same user experience and simplifies the coding model.
Performing Cross-Page Posting in any Event Handler
As you learned in the previous section, cross-page posting is available only with controls that implement the IButtonControl interface. However, there is a workaround. You can use an overloaded method of Server.Transfer() to switch to a new ASP.NET page with the view state information left intact. You simply need to include the Boolean preserveForm parameter and set it to true, as shown here:
Server.Transfer("CrossPage2.aspx", true);
This gives you the opportunity to use cross-page posting anywhere in your web-page code. Interestingly, there is a way to distinguish between a cross-page post that’s initiated directly
through a button and the Server.Transfer() method. Although in both cases you can access Page.PreviousPage, if you use Server.Transfer(), the Page.PreviousPage.IsCrossPagePostBack property is false. Here’s the pseudocode that explains it:
if (PreviousPage == null)
{
// The page was requested (or posted back) directly.
}
else if (PreviousPage.IsCrossPagePostBack)
{
// A cross-page postback through a button.
}
else
{
// A stateful transfer through Server.Transfer().
}
Cross-Page Posting and Validation
Cross-page posting introduces a few wrinkles when you use it in conjunction with the validator controls described in Chapter 4. As you learned in Chapter 4, when you use the validator controls, you need to check the Page.IsValid property to ensure that the data the user entered is correct. Although users are usually prevented from posting invalid pages back to the server (thanks to some slick client-side JavaScript), this isn’t always the case. For example, the client browser might not support JavaScript, or a malicious user could deliberately circumvent the client-side validation checks.

212 C H A P T E R 6 ■ S TAT E M A N A G E M E N T
When you use validation in a cross-page posting scenario, the potential for some trouble exists. Namely, what happens if you use a cross-page postback and the source page has validation controls? Figure 6-4 shows an example with a RequiredFieldValidator that requires input in a text box.
Figure 6-4. Using a validator in a page that cross-posts
If you click one of the buttons to perform the cross-page postback (both of which have CausesValidation set to true), you’ll be prevented by the browser’s client-side checks. Instead, the error message will appear. However, you should also check what happens when client-side script isn’t supported by setting the RequiredFieldValidator.EnableClientScript property to false. (You can change it back to true once you perfect your code.) Now when you click one of the buttons, the page is posted back, and the new page appears.
To prevent this from happening, you obviously need to check the validity of the source page in the target page before you perform any other action by examining Page.IsValid. This is the standard line of defense used in any web form that employs validation. The difference is that if the page isn’t valid, it’s not sufficient to do nothing. Instead, you need to take the extra step of returning the user to the original page. Here’s the code you need:
protected void Page_Load(object sender, EventArgs e)
{
if (PreviousPage != null)
{
if (!PreviousPage.IsValid)
{
// Display an error message or just do nothing.
}
else
{ ... }
}
}
It’s still possible to improve on this code. Currently, when the user is returned to the original page, the error message won’t appear, because the page is being re-requested (not posted back). To correct this issue, you can set a flag to let the source page know the page has been refused by the target page. Here’s an example that adds this flag to the query string:
if (!PreviousPage.IsValid)
{
Response.Redirect(Request.UrlReferrer.AbsolutePath + "?err=true");
}

C H A P T E R 6 ■ S TAT E M A N A G E M E N T |
213 |
Now the original page simply needs to check for the presence of this query string value and perform the validation accordingly. The validation causes error messages to appear for any invalid data.
protected void Page_Load(object sender, EventArgs e)
{
if (Request.QueryString["err"] != null) Page.Validate();
}
You could do still more to try to improve the page. For example, if the user is in the midst of filling out a detailed form, re-requesting the page isn’t a good idea, because it clears all the input controls and forces the user to start again from scratch. Instead, you might want to write a little bit of JavaScript code to the response stream, which could use the browser’s back feature to return to the source page. Chapter 29 has more about JavaScript.
Custom Cookies
Custom cookies provide another way you can store information for later use. Cookies are small files that are created on the client’s hard drive (or, if they’re temporary, in the web browser’s memory). One advantage of cookies is that they work transparently without the user being aware that information needs to be stored. They also can be easily used by any page in your application and even retained between visits, which allows for truly long-term storage. They suffer from some of the same drawbacks that affect query strings. Namely, they’re limited to simple string information, and they’re easily accessible and readable if the user finds and opens the corresponding file. These factors make them a poor choice for complex or private information or large amounts of data.
Some users disable cookies on their browsers, which will cause problems for web applications that require them. For the most part, cookies are widely adopted because so many sites use them. However, they can limit your potential audience, and they aren’t suited for the embedded browsers used with mobile devices.
Before you can use cookies, you should import the System.Net namespace so you can easily work with the appropriate types, as shown here:
using System.Net;
Cookies are fairly easy to use. Both the Request and Response objects (which are provided through Page properties) provide a Cookies collection. The important trick to remember is that you retrieve cookies from the Request object, and you set cookies using the Response object.
To set a cookie, just create a new System.Net. HttpCookie object. You can then fill it with string information (using the familiar dictionary pattern) and attach it to the current web response, as follows:
// Create the cookie object.
HttpCookie cookie = new HttpCookie("Preferences");
//Set a value in it. cookie["LanguagePref"] = "English";
//Add it to the current web response. Response.Cookies.Add(cookie);
A cookie added in this way will persist until the user closes the browser and will be sent with every request. To create a longer-lived cookie, you can set an expiration date, as shown here:
// This cookie lives for one year. cookie.Expires = DateTime.Now.AddYears(1);

214 C H A P T E R 6 ■ S TAT E M A N A G E M E N T
Cookies are retrieved by cookie name using the Request.Cookies collection, as shown here:
HttpCookie cookie = Request.Cookies["Preferences"];
//Check to see if a cookie was found with this name.
//This is a good precaution to take,
//because the user could disable cookies,
//in which case the cookie will not exist.
string language; if (cookie != null)
{
language = cookie["LanguagePref"];
}
The only way to remove a cookie is by replacing it with a cookie that has an expiration date that has already passed. The following code demonstrates this technique:
HttpCookie cookie = new HttpCookie("LanguagePref"); cookie.Expires = DateTime.Now.AddDays(-1); Response.Cookies.Add(cookie);
■Note You’ll find that some other ASP.NET features use cookies. Two examples are session state (which allows you to temporarily store user-specific information in server memory) and forms security (which allows you to restrict portions of a website and force users to access it through a login page).
Session State
Session state is the heavyweight of state management. It allows information to be stored in one page and accessed in another, and it supports any type of object, including your own custom data types. Best of all, session state uses the same collection syntax as view state. The only difference is the name of the built-in page property, which is Session.
Every client that accesses the application has a different session and a distinct collection of information. Session state is ideal for storing information such as the items in the current user’s shopping basket when the user browses from one page to another. But session state doesn’t come for free. Though it solves many of the problems associated with other forms of state management, it forces the web server to store additional information in memory. This extra memory requirement, even if it is small, can quickly grow to performance-destroying levels as hundreds or thousands of clients access the site.
Session Architecture
Session management is not part of the HTTP standard. As a result, ASP.NET needs to do some extra work to track session information and bind it to the appropriate response.
ASP.NET tracks each session using a unique 120-bit identifier. ASP.NET uses a proprietary algorithm to generate this value, thereby guaranteeing (statistically speaking) that the number is unique and that it’s random enough so a malicious user can’t reverse-engineer or guess what session ID a given client will be using. This ID is the only piece of information that is transmitted between the web server and the client. When the client presents the session ID, ASP.NET looks up the corresponding session, retrieves the serialized data from the state server, converts it to live objects, and places these objects into a special collection so they can be accessed in code. This process takes place automatically.
C H A P T E R 6 ■ S TAT E M A N A G E M E N T |
215 |
■Note Every time you make a new request, ASP.NET generates a new session ID until you actually use session state to store some information. This behavior achieves a slight performance enhancement—in short, why bother to save the session ID if it’s not being used?
At this point you’re probably wondering where ASP.NET stores session information and how it serializes and deserializes it. In classic ASP, the session state is implemented as a free-threaded COM object that’s contained in the asp.dll library. In ASP.NET, the programming interface is nearly identical, but the underlying implementation is quite a bit different.
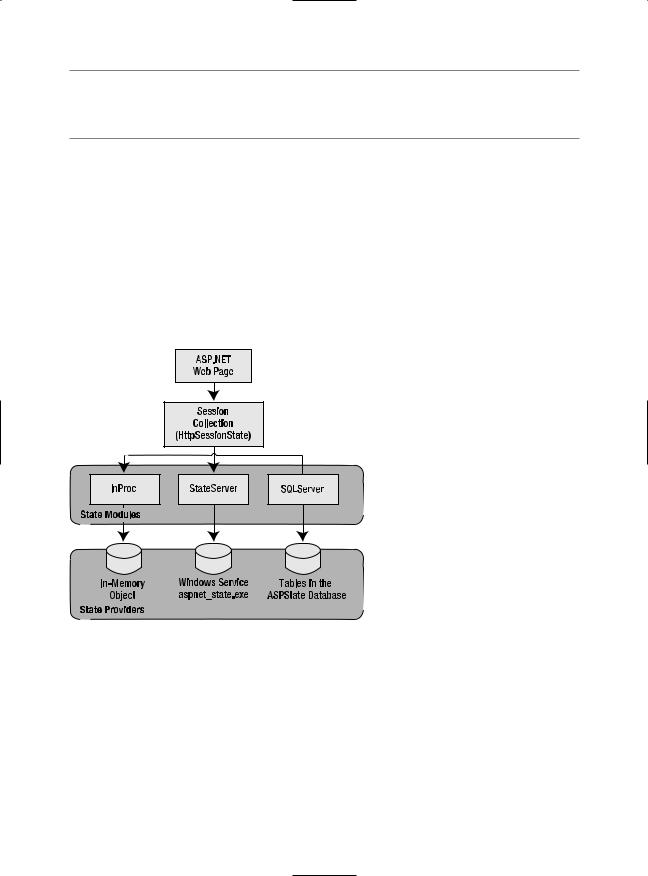
As you saw in Chapter 5, when ASP.NET handles an HTTP request, it flows through a pipeline of different modules that can react to application events. One of the modules in this chain is the SessionStateModule (in the System.Web.SessionState namespace). The SessionStateModule generates the session ID, retrieves the session data from external state providers, and binds the data to the call context of the request. It also saves the session state information when the page is finished processing. However, it’s important to realize that the SessionStateModule doesn’t actually store the session data. Instead, the session state is persisted in external components, which are named state providers. Figure 6-5 shows this interaction.
Figure 6-5. ASP.NET session state architecture
Session state is another example of ASP.NET’s pluggable architecture. A state provider is any class that implements the IStateClientManager interface, which means you can customize how session state works simply by building (or purchasing) a new .NET component. ASP.NET includes three prebuilt state providers, which allow you to store information in process, in a separate service, or in a SQL Server database.
The final ingredient in the puzzle is how the cookie is tracked from one request to the next. For session state to work, the client needs to present the appropriate session ID with each request. You can accomplish this in two ways:

216C H A P T E R 6 ■ S TAT E M A N A G E M E N T
•Using cookies: In this case, the session ID is transmitted in a special cookie (named ASP.NET_SessionId), which ASP.NET creates automatically when the session collection is used. This is the default, and it’s also the same approach that was used in earlier versions of ASP.
•Using modified URLs: In this case, the session ID is transmitted in a specially modified (or “munged”) URL. This is a new feature in ASP.NET that allows you to create applications that use session state with clients that don’t support cookies.
You’ll learn more about how to configure cookieless sessions and different session state providers later in the “Configuring Session State” section.
Using Session State
You can interact with session state using the System.Web.SessionState.HttpSessionState class, which is provided in an ASP.NET web page as the built-in Session object. The syntax for adding items to the collection and retrieving them is basically the same as for adding items to the view state of a page.
For example, you might store a DataSet in session memory like this:
Session["ds"] = ds;
You can then retrieve it with an appropriate conversion operation:
ds = (DataSet)Session["ds"];
Session state is global to your entire application for the current user. Session state can be lost in several ways:
•If the user closes and restarts the browser.
•If the user accesses the same page through a different browser window, although the session will still exist if a web page is accessed through the original browser window. Browsers differ on how they handle this situation.
•If the session times out because of inactivity. By default, a session times out after 20 idle minutes.
•If the programmer ends the session by calling Session.Abandon().
In the first two cases, the session actually remains in memory, because the web server has no idea that the client has closed the browser or changed windows. The session will linger in memory, remaining inaccessible, until it eventually expires.
In addition, session state will be lost when the application domain is re-created. This process happens transparently when you update your web application or change a configuration setting. The application domain may also be recycled periodically to ensure application health, as described in Chapter 18. If this behavior is causing a problem, you can store session state information out of process, as described in the next section. With out-of-process state storage, the session information is retained even when the application domain is shut down.
Table 6-4 describes the methods and properties of the HttpSessionState class.

C H A P T E R 6 ■ S TAT E M A N A G E M E N T |
217 |
Table 6-4. HttpSessionState Members
Member |
Description |
Count |
The number of items in the current session collection. |
IsCookielessSession |
Identifies whether this session is tracked with a cookie or with modified |
|
URLs. |
IsNewSession |
Identifies whether this session was just created for the current request. If |
|
there is currently no information in session state, ASP.NET won’t bother |
|
to track the session or create a session cookie. Instead, the session will be |
|
re-created with every request. |
Mode |
Provides an enumerated value that explains how ASP.NET stores session |
|
state information. This storage mode is determined based on the |
|
web.config configuration settings discussed later in this chapter. |
SessionID |
Provides a string with the unique session identifier for the current client. |
StaticObjects |
Provides a collection of read-only session items that were declared by |
|
<object runat=server> tags in the global.asax. Generally, this technique |
|
isn’t used and is a holdover from ASP programming that is included for |
|
backward compatibility. |
Timeout |
The current number of minutes that must elapse before the current |
|
session will be abandoned, provided that no more requests are received |
|
from the client. This value can be changed programmatically, giving you |
|
the chance to make the session collection longer term when required for |
|
more important operations. |
Abandon() |
Cancels the current session immediately and releases all the memory it |
|
occupied. This is a useful technique in a logoff page to ensure that server |
|
memory is reclaimed as quickly as possible. |
Clear() |
Removes all the session items but doesn’t change the current session |
|
identifier. |
|
|
Configuring Session State
You can configure session state through the <sessionState> element in the web.config file for your application. Here’s a snapshot of all the available settings you can use:
<?xml version="1.0" encoding="utf-8" ?> <configuration>
<system.web>
<!-- Other settings omitted. -->
<sessionState
mode="InProc"
stateConnectionString="tcpip=127.0.0.1:42424" stateNetworkTimeout="10" sqlConnectionString="data source=127.0.0.1;Integrated Security=SSPI" sqlCommandTimeout="30" allowCustomSqlDatabase="false" useHostingIdentity="true"
cookieless="UseCookies" cookieName="ASP.NET_SessionId" regenerateExpiredSessionId="false"
timeout="20"
customProvider=""
/>
</system.web>
</configuration>
The session attributes are described in the following sections.