

Pro ASP.NET 2.0 In CSharp 2005 (2005) [eng]
.pdf158 C H A P T E R 5 ■ A S P. N E T A P P L I C AT I O N S
Application_Error(): This method is invoked whenever an unhandled exception occurs in the application.
Session_End(): This method is invoked whenever the user’s session ends. A session ends when your code explicitly releases it or when it times out after there have been no more requests received within a given timeout period (typically 20 minutes). This method is typically used
to clean up any related data.
Application_End(): This method is invoked just before an application ends. The end of an application can occur because IIS is being restarted or because the application is transitioning to a new application domain in response to updated files or the process recycling settings.
Application_Disposed(): This method is invoked some time after the application has been shut down and the .NET garbage collector is about to reclaim the memory it occupies. This point is too late to perform critical cleanup, but you can use it as a last-ditch failsafe to verify that critical resources are released.
Application events are commonly used to perform application initialization, cleanup, usage logging, profiling, and troubleshooting. However, don’t assume that your application will need to use global application events. Many ASP.NET applications don’t use the global.asax file at all.
■Tip The global.asax file isn’t the only place where you can respond to global web application events. You can also create custom modules that participate in the processing of web requests, as discussed later in this chapter in the section “Extending the HTTP Pipeline.”
Demonstrating Application Events
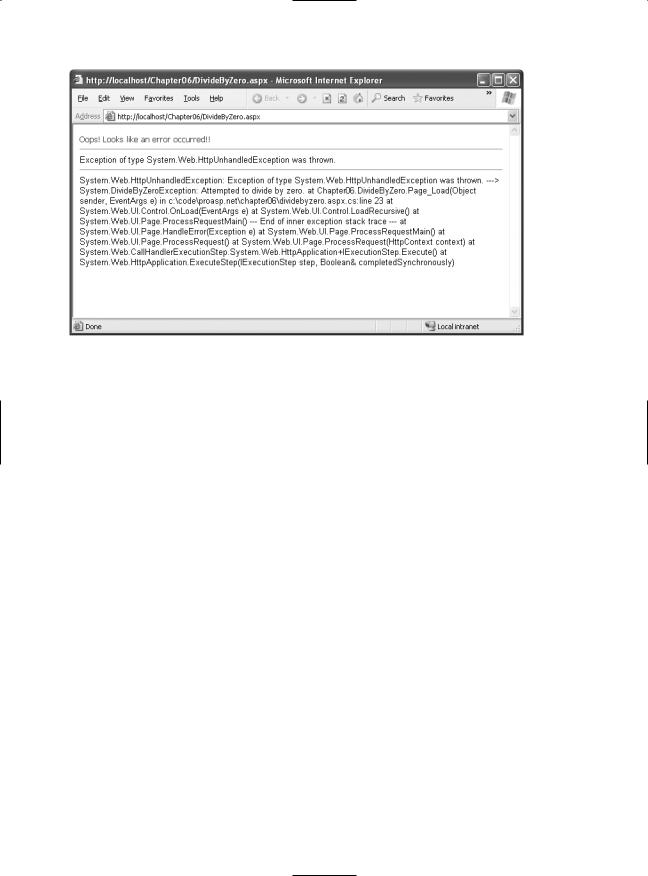
The following web application uses a global.asax file that responds to the Application_Error method. It intercepts the error and displays some information about it in a predefined format.
<script language="C#" runat="server">
protected void Application_Error(Object sender, EventArgs e)
{
Response.Write("<b>");
Response.Write("Oops! Looks like an error occurred!!</b><hr />"); Response.Write(Server.GetLastError().Message.ToString()); Response.Write("<hr />" + Server.GetLastError().ToString()); Server.ClearError();
}
</script>
To test this application event handler, you need to create another web page that causes an error. Here’s an example that generates an error by attempting to divide by zero when a page loads:
protected void Page_Load(object sender, EventArgs e)
{
int i = 0; int j = 1; int k = j/i;
}
If you request this page, you’ll see the display shown in Figure 5-2.
C H A P T E R 5 ■ A S P. N E T A P P L I C AT I O N S |
159 |
Figure 5-2. Catching an unhandled error
Typically, you wouldn’t use the Application_Error() method to control the appearance of a web page, because it doesn’t give you enough flexibility to deal with different types of errors (without coding painstaking conditional logic). Instead, you would probably configure custom error pages using the web.config file (as described in the next section). However, Application_Error() might
be extremely useful if you want to log an error for future reference or even send an e-mail about it to a system administrator. In fact, in many events you’ll need to use techniques such as these because the Response object won’t be available. Two examples include the Application_Start() and Application_End() methods.
ASP.NET Configuration
Configuration in ASP.NET is managed with XML configuration files. All the information needed to configure an ASP.NET application’s core settings, as well as the custom settings specific to your own application, is stored in these configuration files.
The ASP.NET configuration files have several advantages over traditional ASP configuration:
•They are never locked: As described in the beginning of this chapter, you can update configuration settings at any point, and ASP.NET will smoothly transition to a new application domain.
•They are easily accessed and replicated: Provided you have the appropriate network rights, you can modify a configuration file from a remote computer (or even replace it by uploading a new version via FTP). You can also copy a configuration file and use it to apply identical settings to another application or another web server that runs the same application in a web farm scenario.
•They are easy to edit and understand: The settings in the configuration files are humanreadable, which means they can be edited and understood without needing a special configuration tool.

160 C H A P T E R 5 ■ A S P. N E T A P P L I C AT I O N S
With ASP.NET, you don’t need to worry about configuring the IIS metabase or restarting the web server. However, you still can’t perform a few tasks with a web.config file. For example, you can’t create or remove a virtual directory. Similarly, you can’t change file mappings. If you want the ASP.NET service to process requests for additional file types (such as HTML or a custom file type you define), you must use IIS Manager, as described in Chapter 18.
The machine.config File
The configuration starts with a file named machine.config that resides in the directory c:\[WinDir]\ Microsoft.NET\Framework\[Version]\Config. The machine.config file defines supported configuration file sections, configures the ASP.NET worker process, and registers providers that can be used for advanced features such as profiles, membership, and role-based security.
In ASP.NET 2.0, the machine.config file has been streamlined dramatically. To optimize the initialization process, many of the default settings that used to be in the machine.config file are now initialized programmatically. However, you can still look at the relevant settings by opening the new machine.config.comments file (which you can find in the same directory). It contains the full text for the standard settings along with descriptive comments (this is similar to the machine.config file in ASP.NET 1.x). Using the machine.config.comments file, you can learn about the default settings, and then you can add settings that override these values to machine.config.
Along with the machine.config file, ASP.NET 2.0 uses a root web.config file (in the same directory) that contains additional settings. The settings register ASP.NET’s core HTTP handlers and modules, set up rules for browser support, and define security policy. In ASP.NET 1.x, these settings appeared in the machine.config file.
All the web applications on the computer inherit the settings in these two files. However, most of the settings are essentially plumbing features that you never need to touch. The following sections discuss the two most common exceptions.
<processModel>
This section allows you to configure how the ASP.NET worker process recycles application domains, and the Windows account it executes under, which determines its privileges. If you’re using IIS 6 (the version included with Windows 2003 Server), many of these settings are ignored, and you can configure similar settings through the IIS Manager utility.
Chapter 18 has more information about the <processModel> element.
<machineKey>
This section allows you to set the server-specific key used for encrypting data and creating digital signatures. You can use encryption in conjunction with several ASP.NET features. ASP.NET uses it automatically to protect the forms authentication cookie, and you can also apply it to protected view state data (as described in Chapter 6). The key is also used for authentication with out-of- process session state providers.
Ordinarily, the <machineKey> element takes this form:
<machineKey validationKey="AutoGenerate,IsolateApps" decryptionKey="AutoGenerate,IsolateApps" validation="SHA1" />
The AutoGenerate,IsolateApps value indicates that ASP.NET will create and store machinespecific, application-specific keys. In other words, each application uses a distinct, automatically generated key. This prevents potential cross-site attacks.
If you don’t need application-specific keys, you can choose to use a single key for all applications on the current computer, like so:

C H A P T E R 5 ■ A S P. N E T A P P L I C AT I O N S |
161 |
<machineKey validationKey="AutoGenerate" decryptionKey="AutoGenerate" validation="SHA1" />
If you’re using a web farm and running the same application on multiple computers, both of these approaches raise a problem. If you request a page and it’s handled by one server, and then you post back the page and it’s handled by another server, the second server won’t be able to decrypt the view state and the forms cookie from the first server. This problem occurs because the two web servers use different keys.
To resolve this problem, you need to define the key explicitly in the machine.config file. Here’s an example of a <machineKey> element with the two key attributes defined:
<machineKey
validationKey="61EA54E005915332011232149A2EEB317586824B265326CCDB3AD9ABDBE9D
6F24B0625547769E835539AD3882D3DA88896EA531CC7AFE664866BD5242FC2B05D"
decryptionKey="61EA54E005915332011232149A2EEB317586824B265337AF" validation="SHA1" />
■Tip You can also hard-code application-specific keys by adding a hard-coded <machineKey> in the web.config file that you place in the application virtual directory. You’ll need this approach if you’re in a situation that combines the two scenarios described previously. (For example, you’ll need this approach if you’re running your application on multiple servers and these servers host multiple web applications that need individual keys.)
The validationKey value can be from 40 to 128 characters long. It is strongly recommended that you use the maximum length key available. The decryptionKey value can be either 16 or 48 characters long. If 16 characters are defined, standard DES (Data Encryption Standard) encryption is used. If 48 characters are defined, Triple DES (or 3DES) will be used. (This means DES is applied three times consecutively.) 3DES is much more difficult to break than DES, so it is recommended that you always use 48 characters for the decryptionKey. If either the length of either of the keys is outside the allowed values, ASP.NET will return a page with an error message when requests are made to the application.
It doesn’t make much sense to create the validation and decryption keys on your own. If you do, they’re likely to be not sufficiently random, which makes them more subject to certain types of attacks. A better approach is to generate a strong random key using code and the .NET Framework cryptography classes (from the System.Security.Cryptography namespace).
The following is a generic code routine called CreateMachineKey() that creates a random series of bytes using a cryptographically strong random number generator. The CreateMachineKey() method accepts a single parameter that specifies the number of characters to use. The result is returned in hexadecimal format, which is required for the machine.config file.
public static string CreateMachineKey(int length)
{
// Create a byte array.
byte[] random = new byte[length/2];
//Create a cryptographically strong random number generator. RNGCryptoServiceProvider rng = new RNGCryptoServiceProvider();
//Fill the byte array with random bytes. rng.GetBytes(random);
//Create a StringBuilder to hold the result once it is
//converted to hexadecimal format.

162 C H A P T E R 5 ■ A S P. N E T A P P L I C AT I O N S
System.Text.StringBuilder machineKey = new
System.Text.StringBuilder(length);
//Loop through the random byte array and append each value
//to the StringBuilder.
for (int i = 0; i < random.Length; i++)
{
machineKey.Append(String.Format("{0:X2}", random[i]));
}
return machineKey.ToString();
}
You can use this function in a web form to create the keys you need. For example, the following snippet of code creates a 48-character decryption key and a 128-character validation key, and it displays the values in two separate text boxes:
txtDecryptionKey.Text = CreateMachineKey(48); txtValidationKey.Text = CreateMachineKey(128);
You can then copy the information and paste it into the machine.config file for each computer in the web farm. This is a much more convenient and secure approach than creating keys by hand. You’ll learn much more about the cryptography classes in the System.Security.Cryptography namespace in Chapter 25.
The web.config File
Every web application inherits the settings from the machine.config file. In addition, you can apply application-specific settings. For example, you might want to set a specific method for authentication, a type of debugging, a default language, or custom error pages. However, it’s important to understand that you can’t override every setting from the machine.config file. Certain settings, such as the process model settings, can’t be changed on a per-application basis. Other settings are application-specific. If you use these settings, you must place the web.config file in the root virtual directory of your application (not in a subdirectory).
The entire content of an ASP.NET configuration file is nested in a root <configuration> element. This element contains a <system.web> element, which is used for ASP.NET settings. Inside the <system.web> element are separate elements for each aspect of configuration.
Here’s the basic skeletal structure of the web.config file:
<?xml version="1.0" encoding="utf-8" ?>
<configuration xmlns="http://schemas.microsoft.com/.NetConfiguration/v2.0"> <system.web>
<!-- ASP.NET configuration sections go here. --> </system.web>
</configuration>
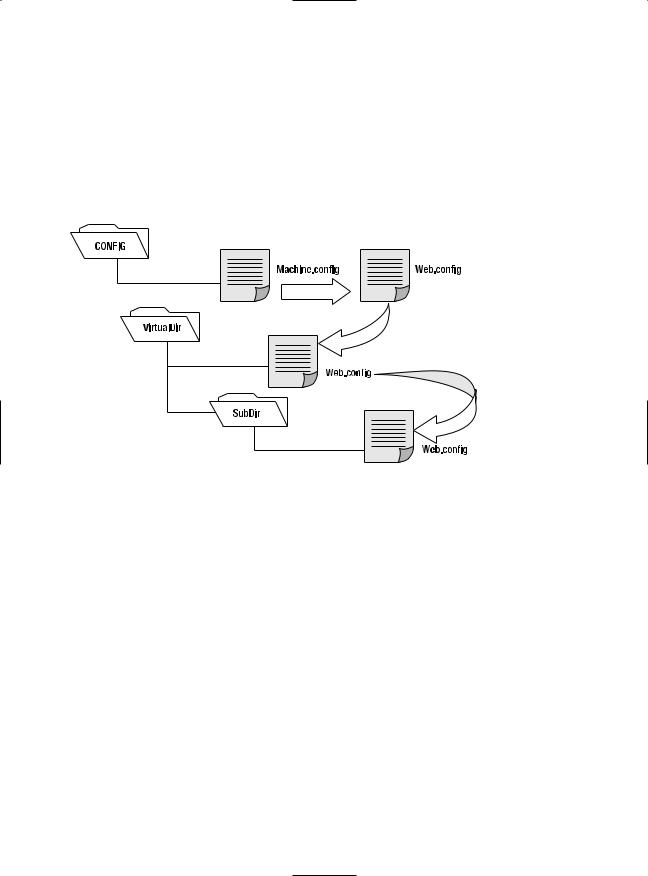
ASP.NET uses a multilayered configuration system that allows you to use different settings for different parts of your application. To use this technique, you need to create additional subdirectories inside your virtual directory. These subdirectories can contain their own web.config files with additional settings. ASP.NET uses configuration inheritance so that each subdirectory acquires the settings from the parent directory.
For example, consider the web request http://localhost/A/B/C/MyPage.aspx, where A is the root directory for the web application. In this case, multiple levels of settings come into play:
1.The default machine.config settings are applied first.
2.The web.config settings from the computer root are applied next. This web.config file is in the same Config directory as the machine.config file.
C H A P T E R 5 ■ A S P. N E T A P P L I C AT I O N S |
163 |
3.If there is a web.config file in the application root A, these settings are applied next.
4.If there is a web.config file in the subdirectory B, these settings are applied next.
5.If there is a web.config file in the subdirectory C, these settings are applied last.
In this sequence (shown in Figure 5-3), it’s important to note that although you can have an unlimited number of subdirectories, the settings applied in step 1 and step 2 have special significance. That’s because certain settings can be applied only at the machine.config level (such as the Windows account used to execute code), and other settings can be applied only at the application root level (such as the type of authentication your web application uses).
Figure 5-3. Configuration inheritance
In this way, subdirectories can specify just a small set of settings that differ from the rest of the web application. One reason you might want to use multiple directories in an application is to apply different security settings. Files that need to be secured would then be placed in a special directory with a web.config file that defines more stringent security settings than the root virtual directory.
If settings conflict, the settings from a web.config in a nested directory always override the settings inherited from the parent. However, one exception exists. You can designate specific locked sections that can’t be changed. The next section describes this technique.
Using <location> Elements
The <location> element is an extension that allows you to specify more than one group of settings in the same configuration file. You use the path attribute of the <location> element to specific the subdirectory or file to which the settings should be applied.
For example, the following web.config file uses the <location> element to create two groups of settings—one for the current directory and one that applies only to files in the subdirectory named Secure:
<configuration xmlns="http://schemas.microsoft.com/.NetConfiguration/v2.0"> <system.web>
<!-- Basic configuration settings go here. --> </system.web>

164 C H A P T E R 5 ■ A S P. N E T A P P L I C AT I O N S
<location path="/Secure"> <system.web>
<!-- Configuration settings for the Secure subdirectory go here. --> </system.web>
</location>
</configuration>
This web.config file essentially plays the role of two configuration files. It has the same result as if you had split the settings into two separate web.config files and placed one in the Secure subdirectory.
There’s no limit to how many different location elements you can use in a single configuration file. However, the <location> element isn’t used often, because it’s usually easier to manage and update configuration settings when they are separated into distinct files. But there is one scenario where the <location> element gives you functionality you can’t get any other way. This occurs when you want to lock specific settings so they can’t be overridden.
To understand how this technique works, consider the next example. It defines two groups of settings and sets the allowOverride attribute of the <location> tag to false on one group, as shown here:
<configuration xmlns="http://schemas.microsoft.com/.NetConfiguration/v2.0"> <system.web>
<!-- Unprotected configuration settings go here. --> </system.web>
<location allowOverride="false" > <system.web>
<!-- Locked configuration settings go here. --> </system.web>
</location>
</configuration>
In this case, you can’t override any of the settings in the <location> section. If you try, ASP.NET will generate an unhandled exception when you request a page in the web application.
The allowOverride attribute of the <location> element is primarily useful for web hosting companies that want to make sure certain settings can’t be changed. In this case, the administrator will modify the machine.config file on the web server and use the <location> element to lock specific sections.
■Tip When you lock settings in the machine.config file, you have two choices. First, you can lock the settings for all applications by omitting the path attribute of the <location> tag. Second, you can lock settings for a specific application by setting the path attribute to the appropriate web application name.
Configuration Settings
The <system.web> element contains all the ASP.NET-specific configuration settings. These settings configure various aspects of your web application and enable services such as security, state management, and tracing.
Table 5-2 lists the basic child elements that the <system.web> element can contain and their purpose. This list is not complete and is intended only to give you a rough idea of the scope of ASP.NET configuration.

C H A P T E R 5 ■ A S P. N E T A P P L I C AT I O N S |
165 |
Table 5-2. Some Basic Configuration Sections
Element |
Description |
authentication |
This element determines how you will verify a client’s identity when the client |
|
requests a page. This is set at the application level. |
authorization |
This element controls which clients have access to the resources within the |
|
web application or current directory. |
compilation |
This element contains the <assemblies> element, which lists the assemblies |
|
your web application uses. These assemblies are then made available to your |
|
code (as long as they can be found in the Bin directory or the GAC). The |
|
<compilation> element can also contain mappings to language compilers, |
|
although this is typically done only at the machine.config level. |
customErrors |
This element allows you to set specific redirect URLs that should be used |
|
when specific (or default) errors occur. For example, this element could be |
|
used to redirect the user to a friendly replacement for the dreaded 404 (page |
|
not found) error. |
identity |
Controls the security identity of the ASP.NET application. You can use this |
|
setting to cause the web application to temporarily assume the identity of |
|
another Windows account and its permissions and restrictions. Typically, |
|
this is set at the application level. |
sessionState |
Configures the various options for maintaining session state for the |
|
application, such as whether to maintain it at all and where to maintain it |
|
(SQL, a separate Windows service, and so on). This is set at the application |
|
level. |
trace |
Configures tracing, an ASP.NET feature that lets you display diagnostic |
|
information in the page (or collect it for viewing separately). |
webServices |
Controls the many settings used for web services. This allows you to tweak the |
|
various protocol and configuration settings for communicating with any web |
|
service contained within the application. |
|
|
You can include as few or as many configuration sections as you want. For example, if you need to specify special error settings, you could add just the <customErrors> section and leave out the others. When you run an ASP.NET web application project in Visual Studio, you’re prompted to create a basic web.config file. Visual Studio adds comments to describe the purpose and syntax of various options. XML comments are bracketed with the <!-- and --> character sequences, as shown here:
<!-- This is the format for an XML comment. -->
■Note Like all XML documents, the web.config file is case-sensitive. Every setting uses camel case and starts with a lowercase letter. That means you cannot write <CustomErrors> instead of <customErrors>.
The following sections give a brief overview of several of the more important sections.
<configuration>
<configuration> is the root element that contains all the configuration details. Every web.config file must have a configuration element. The <configuration> element can contain several other subelements, but in an ASP.NET application you’re likely to see only two: <system.web> and <appSettings>.

166 C H A P T E R 5 ■ A S P. N E T A P P L I C AT I O N S
<system.web>
<system.web> acts as a container for the predefined ASP.NET-specific settings, many of which are detailed in the following sections. The schema of the <system.web> section is fixed—in other words, you can’t change the structure or add your own custom elements here.
Throughout this book, you’ll consider different parts of the web.config file as you learn about features such as authentication, session state management, and tracing.
■Note The configuration file architecture is a .NET standard, and other types of applications (such as Windows applications) can also use configuration files. For that reason, the root <configuration> element isn’t tailored to web application settings. Instead, web application settings are contained inside the dedicated <system.web> section.
<customErrors>
This element allows you to configure the behavior of your application in response to various HTTP errors. For example, you can redirect the dreaded 404 error to a page that prints a user-friendly error message to the users of your web application by creating a section like this:
<customErrors defaultRedirect="standarderror.aspx" mode="remoteonly"> <error statuscode="404" redirect="filenotfound.htm"/>
</customErrors>
In this example, if the error is code 404 (file not found), it will redirect the user to filenotfound.htm. If any other error occurs (including an HTTP error or an unhandled .NET exception in the web page), the user will be redirected to the page standarderror.aspx. Because the error mode is set to remoteonly, local administrators will see the actual error message rather than being redirected. Remote clients will see only the custom error page.
The following is a list of the modes supported for the mode attribute:
•on: Indicates that custom errors are enabled. If no defaultRedirect attribute is supplied, users will see a generic error.
•off: Custom errors are disabled. This allows full error details to be displayed.
•remoteonly: Custom errors are shown only to remote clients while full detailed errors are displayed to local clients.
Keep in mind that the custom error settings you define in a configuration file come into effect only if ASP.NET is handling the request. For example, if you request the nonexistent page whateverpage.aspx in an application with the previous settings shown, you’ll be redirected to filenotfound.aspx, because the .aspx file extension is registered to the ASP.NET service. However, if you request the nonexistent page whateverpage.html, ASP.NET will not process the request, and the default redirect setting specified in IIS will be used. Typically, this means that the user will see the page c:\[WinDir]\Help\IISHelp\common\404b.htm. You could change the set of registered ASP.NET file types to include .html and .htm files, but this will slow down performance for these file types (and give additional work to the ASP.NET worker process).
■Note What happens if an error occurs in the error page itself? If an error occurs in a custom error page (in this case, DefaultError.aspx), ASP.NET will not be able to handle it. It will not try to reforward the user to the same page. Instead, it will display the normal client error page with the generic message.

C H A P T E R 5 ■ A S P. N E T A P P L I C AT I O N S |
167 |
<connectionStrings>
This section, which is new in ASP.NET 2.0, allows you to define connection strings that will be used elsewhere in your application. Seeing as connection strings need to be reused exactly to support connection pooling and may need to be modified without recompiling the web application, it makes perfect sense to store them in the web.config file.
You can add as many connection strings as you want. For each one, you need to specify the ADO.NET provider name (see Chapter 7 for more information).
Here’s an example that defines a single connection string:
<?xml version="1.0" encoding="utf-8" ?>
<configuration xmlns="http://schemas.microsoft.com/.NetConfiguration/v2.0">
<connectionStrings>
<add name="NorthwindConnection" connectionString=
"Data Source=localhost;Integrated Security=SSPI;Initial Catalog=Northwind;" providerName="System.Data.SqlClient" />
</connectionStrings>
<system.web>...</system.web> </configuration>
<appSettings>
You add custom settings to a web.config file in a special element called <appSettings>. Here’s where the <appSettings> section fits into the web.config file:
<?xml version="1.0" encoding="utf-8" ?>
<configuration xmlns="http://schemas.microsoft.com/.NetConfiguration/v2.0">
<appSettings>
<!-- Custom application data goes here. --> </appSettings>
<system.web>...</system.web> </configuration>
The custom settings that you add are written as simple string variables. You might want to use a special web.config setting for several reasons. Often, you’ll want the ability to record hard-coded but changeable information for connecting to external resources, such as database connection strings, file paths, and web service URLs. Because the configuration file can be modified at any time, this allows you to update the configuration of an application as its physical deployment characteristics change without needing to recompile it.
Custom settings are entered using an <add> element that identifies a unique variable name (the key) and the variable contents (the value). The following example adds two new custom configuration settings:
<?xml version="1.0" encoding="utf-8" ?>
<configuration xmlns="http://schemas.microsoft.com/.NetConfiguration/v2.0"> <appSettings>
<add key="websiteName" value="My New Website"/>
<add key="welcomeMessage" value="Welcome to my new Website, friend!"/> </appSettings>
<system.web>...</system.web> </configuration>
Once you’ve added this information, .NET makes it extremely easy to retrieve it in your webpage code. You simply need to use the ConfigurationSettings class from the System.Configuration namespace. It exposes a property called AppSettings, which contains a dynamically built collection of available application settings for the current directory. For example, if the ASP.NET page class