

Pro ASP.NET 2.0 In CSharp 2005 (2005) [eng]
.pdf218 C H A P T E R 6 ■ S TAT E M A N A G E M E N T
Mode
The mode session state settings allow you to configure what session state provider is used to store session state information between requests. The following sections explain your options.
Off
This setting disables session state management for every page in the application. This can provide a slight performance improvement for websites that are not using session state.
InProc
InProc is similar to how session state was stored in classic ASP. It instructs ASP.NET to store information in the current application domain. This provides the best performance but the least durability. If you restart your server, the state information will be lost.
InProc is the default option, and it makes sense for most small websites. In a web farm scenario, though, it won’t work at all. To allow session state to be shared between servers, you must use the out-of-process or SQL Server state service. Another reason you might want to avoid InProc mode is because it makes for more fragile sessions. In ASP.NET, application domains are recycled in response to a variety of actions, including configuration changes, updated pages, and when certain thresholds are met (regardless of whether an error has occurred). If you find that your application domain is being restarted frequently and contributing to prematurely lost sessions, you can try to counter the effect by changing some of the process model settings (see Chapter 18), or you can change to one of the more robust session state providers.
Before you use either the out-of-process or the SQL Server state service, keep in mind that more considerations will apply:
•When using the StateServer or SqlServer mode, the objects you store in session state must be serializable. Otherwise, ASP.NET will not be able to transmit the object to the state service or store it in the database.
•If you’re hosting ASP.NET on a web farm, you’ll also need to take some extra configuration steps to make sure all the web servers are in sync. Otherwise, one might encode information in session state differently than another, which will cause a problem if the user is routed from one server to another during a session. The solution is to modify the <machineKey> section of the machine.config file so it’s consistent across all servers. For more information, refer to Chapter 5.
•If you aren’t using the in-process state provider, the SessionStateModule.End event won’t be fired, and any event handlers for this event in the global.asax file or an HTTP module will be ignored.
StateServer
With this setting, ASP.NET will use a separate Windows service for state management. Even if you run this service on the same web server, it will be loaded outside the main ASP.NET process, which gives it a basic level of protection if the ASP.NET process needs to be restarted. The cost is the increased time delay imposed when state information is transferred between two processes. If you frequently access and change state information, this can make for a fairly unwelcome slowdown.
When using the StateServer setting, you need to specify a value for the stateConnectionString setting. This string identifies the TCP/IP address of the computer that is running the StateServer service and its port number (which is defined by ASP.NET and doesn’t usually need to be changed). This allows you to host the StateServer on another computer. If you don’t change this setting, the local server will be used (set as address 127.0.0.1).
C H A P T E R 6 ■ S TAT E M A N A G E M E N T |
219 |
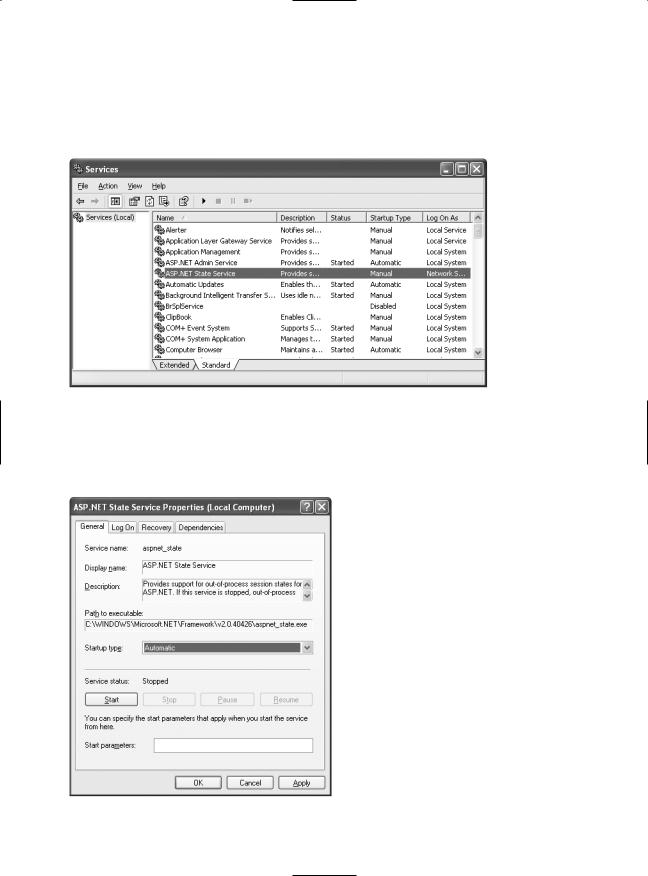
Of course, before your application can use the service, you need to start it. The easiest way to do this is to use the Microsoft Management Console. Select Start Programs Administrative Tools Computer Management (you can also access the Administrative Tools group through the Control Panel). Then select the Services and Applications Services node. Find the service called ASP.NET State in the list, as shown in Figure 6-6.
Figure 6-6. The ASP.NET state service
Once you find the service in the list, you can manually start and stop it by right-clicking it. Generally, you’ll want to configure Windows to automatically start the service. Right-click it, select Properties, and modify the Startup Type setting to Automatic, as shown in Figure 6-7.
Figure 6-7. Service properties

220 C H A P T E R 6 ■ S TAT E M A N A G E M E N T
■Note When using StateServer mode, you can also set an optional stateNetworkTimeout attribute that specifies the maximum number of seconds to wait for the service to respond before canceling the request. The default is 10 seconds.
SqlServer
This setting instructs ASP.NET to use an SQL Server database to store session information, as identified by the sqlConnectionString attribute. This is the most resilient state store but also the slowest by far. To use this method of state management, you’ll need to have a server with SQL Server installed.
When setting the sqlConnectionString, you follow the same sort of pattern you use with ADO.NET data access (which is described in Part 2). Generally, you’ll need to specify a data source (the server address) and a user ID and password, unless you’re using SQL integrated security.
In addition, you need to install the special stored procedures and temporary session databases. These stored procedures take care of storing and retrieving the session information. ASP.NET includes a Transact-SQL script for this purpose called InstallSqlState.sql. It’s found in the c:\[WinDir]\Microsoft.NET\Framework\[Version] directory. You can run this script using an SQL Server utility such as OSQL.exe or Query Analyzer. It needs to be performed only once. If you decide to change your state service, you can use UninstallSqlState.sql to remove the state tables.
The session state timeout still applies for SQL Server state management. That’s because the InstallSqlState.sql script also creates a new SQL Server job named ASPState_Job_DeleteExpired Sessions. As long as the SQLServerAgent service is running, this job will be executed every minute.
Additionally, the state tables will be removed every time you restart SQL Server, no matter what the session timeout. That’s because when you use InstallSqlState, the state tables are created in the tempdb database, which is a temporary storage area. If this isn’t the behavior you want, you can use the InstallPersistSqlState.sql and UninstallPersistSqlState.sql scripts instead of InstallSqlState.sql and UninstallSqlState.sql. In this case, the state tables are created in the ASPState database and are permanent.
Ordinarily, the state database is always named ASPState. As a result, the connection string in the web.config file doesn’t explicitly indicate the database name. Instead, it simply reflects the location of the server and the type of authentication that will be used:
<sessionState sqlConnectionString="data source=127.0.0.1;Integrated Security=SSPI"
... />
If you want to use a different database (with the same structure), simply set allowCustomSqlDatabase to true and make sure the connection string includes the Initial Catalog setting, which indicates the name of the database you want to use:
<sessionState allowCustomSqlDatabase="false" sqlConnectionString=
"data source=127.0.0.1;Integrated Security=SSPI;Initial Catalog=CustDatabase"
... />
When using the SqlServer mode, you can also set an optional sqlCommandTimeout attribute that specifies the maximum number of seconds to wait for the database to respond before canceling the request. The default is 30 seconds.
Custom
When using custom mode, you need to indicate what session state store provider to use by supplying the customProvider attribute. The customProvider attribute points to the name of a class that’s part of your web application in the App_Code directory or in a compiled assembly in the Bin directory or the GAC.

C H A P T E R 6 ■ S TAT E M A N A G E M E N T |
221 |
Creating a custom state provider is a low-level task that needs to be handled carefully to ensure security, stability, and scalability. Custom state providers are also beyond the scope of this book. However, if you’d like to try creating your own, you can find a sample at http://weblogs.asp.net/ ngur/articles/371952.aspx.
Cookieless
You can set the cookieless setting to one of the values defined by the HttpCookieMode enumeration, as described in Table 6-5.
Table 6-5. HttpCookieMode Values
Value |
Description |
UseCookies |
Cookies are always used, even if the browser or device doesn’t support |
|
cookies or they are disabled. This is the default. If the device does not |
|
support cookies, session information will be lost over subsequent requests, |
|
because each request will get a new ID. |
UseUri |
Cookies are never used, regardless of the capabilities of the browser or |
|
device. Instead, the session ID is stored in the URL. |
UseDeviceProfile |
ASP.NET chooses whether to use cookieless sessions by examining the |
|
BrowserCapabilities object. The drawback is that this object indicates what |
|
the device should support—it doesn’t take into account that the user may |
|
have disabled cookies in a browser that supports them. Chapter 27 has more |
|
information about how ASP.NET identifies different browsers and decides |
|
whether they support features such as cookies. |
AutoDetect |
ASP.NET attempts to determine whether the browser supports cookies by |
|
attempting to set and retrieve a cookie (a technique commonly used on the |
|
Web). This technique can correctly determine if a browser supports cookies |
|
but has them disabled, in which case cookieless mode is used instead. |
|
|
Here’s an example that forces cookieless mode (which is useful for testing)
<sessionState cookieless="UseUri" ... />
In cookieless mode, the session ID will automatically be inserted into the URL. When ASP.NET receives a request, it will remove the ID, retrieve the session collection, and forward the request to the appropriate directory. A munged URL is shown here:
http://localhost/WebApplication/(amfvyc55evojk455cffbq355)/Page1.aspx
Because the session ID is inserted in the current URL, relative links also automatically gain the session ID. In other words, if the user is currently stationed on Page1.aspx and clicks a relative link to Page2.aspx, the relative link includes the current session ID as part of the URL. The same is true if you call Response.Redirect() with a relative URL, as shown here:
Response.Redirect("Page2.aspx");
The only real limitation of cookieless state is that you cannot use absolute links, because they will not contain the session ID. For example, this statement causes the user to lose all session information:
Response.Redirect("http://localhost/WebApplication/Page2.aspx");
By default, ASP.NET allows you to reuse a session identifier. For example, if you make a request and your query string contains an expired session, ASP.NET creates a new session and uses that

222C H A P T E R 6 ■ S TAT E M A N A G E M E N T
session ID. The problem is that a session ID might inadvertently appear in a public place—such as in a results page in a search engine. This could lead to multiple users accessing the server with the same session identifier and then all joining the same session with the same shared data.
To avoid this potential security risk, it’s recommended that you include the optional regenerateExpiredSessionId attribute and set it to true whenever you use cookieless sessions. This way, a new session ID will be issued if a user connects with an expired session ID. The only drawback is that this process also forces the current page to lose all view state and form data, because ASP.NET performs a redirect to make sure the browser has a new session identifier.
■Tip You can test if a cookieless session is currently being used by checking the IsCookielessSession property of the Session object.
Timeout
Another important session state setting in the web.config file is the timeout. This specifies the number of minutes that ASP.NET will wait, without receiving a request, before it abandons the session.
<sessionState timeout="20" ... />
This setting represents one of the most important compromises of session state. A difference of minutes can have a dramatic effect on the load of your server and the performance of your application. Ideally, you will choose a time frame that is short enough to allow the server to reclaim valuable memory after a client stops using the application but long enough to allow a client to pause and continue a session without losing it.
You can also programmatically change the session timeout in code. For example, if you know a session contains an unusually large amount of information, you may need to limit the amount of time the session can be stored. You would then warn the user and change the timeout property. Here’s a sample line of code that changes the timeout to ten minutes:
Session.Timeout = 10;
Securing Session State
The information in session state is very secure, because it is stored exclusively on the server. However, the cookie with the session ID can easily become compromised. This means an eavesdropper could steal the cookie and assume the session on another computer.
Several workarounds address this problem. One common approach is to use a custom session module that checks for changes in the client’s IP address (see http://msdn.microsoft.com/msdnmag/ issues/04/08/WickedCode for a sample implementation). However, the only truly secure approach is to restrict session cookies to portions of your website that use SSL. That way, the session cookie is encrypted and useless on other computers.
If you choose to use this approach, it also makes sense to mark the session cookie as a secure cookie so that it will be sent only over SSL connections. That prevents the user from changing the URL from https:// to http://, which would send the cookie without SSL. Here’s the code you need:
Request.Cookies["ASP.NET_SessionId"].Secure = true;
Typically, you’ll use this code immediately after the user is authenticated. Make sure there is at least one piece of information in session state so the session isn’t abandoned (and then re-created later).

C H A P T E R 6 ■ S TAT E M A N A G E M E N T |
223 |
Another related security risk exists with cookieless sessions. Even if the session ID is encrypted, a clever user could use a social engineering attack to trick a user into joining a specific session. All the malicious user needs to do is feed the user a URL with a valid session ID. When the user clicks the link, they join that session. Although the session ID is protected from this point onward, the attacker now knows what session ID is in use and can hijack the session at a later time.
Taking certain steps can reduce the likelihood of this attack. First, when using cookieless sessions, always set regenerateExpiredSessionId to true. This prevents the attacker from supplying a session ID that’s expired. Next, explicitly abandon the current session before logging in a new user.
Application State
Application state allows you to store global objects that can be accessed by any client. Application state is based on the System.Web.HttpApplicationState class, which is provided in all web pages through the built-in Application object.
Application state is similar to session state. It supports the same type of objects, retains information on the server, and uses the same dictionary-based syntax. A common example with application state is a global counter that tracks how many times an operation has been performed by all of the web application’s clients.
For example, you could create a global.asax event handler that tracks how many sessions have been created or how many requests have been received into the application. Or you can use similar logic in the Page.Load event handler to track how many times a given page has been requested by various clients. Here’s an example of the latter:
protected void Page_Load(Object sender, EventArgs e)
{
int count = (int)Application["HitCounterForOrderPage"]; count++;
Application["HitCounterForOrderPage"] = count; lblCounter.Text = count.ToString();
}
Once again, application state items are stored as objects, so you need to cast them when you retrieve them from the collection. Items in application state never time out. They last until the application or server is restarted or until the application domain refreshes itself (because of automatic process-recycling settings or an update to one of the pages or components in the application).
Application state isn’t often used, because it’s generally inefficient. In the previous example, the counter would probably not keep an accurate count, particularly in times of heavy traffic. For example, if two clients requested the page at the same time, you could have a sequence of events like this:
1.User A retrieves the current count (432).
2.User B retrieves the current count (432).
3.User A sets the current count to 433.
4.User B sets the current count to 433.
In other words, one request isn’t counted because two clients access the counter at the same time. To prevent this problem, you need to use the Lock() and Unlock() methods, which explicitly allow only one client to access the Application state collection at a time, as follows:

224 C H A P T E R 6 ■ S TAT E M A N A G E M E N T
protected void Page_Load(Object sender, EventArgs e)
{
// Acquire exclusive access. Application.Lock();
int count = (int)Application["HitCounterForOrderPage"]; count++;
Application["HitCounterForOrderPage"] = count;
// Release exclusive access. Application.Unlock();
lblCounter.Text = count.ToString();
}
Unfortunately, all other clients requesting the page will now be stalled until the Application collection is released. This can drastically reduce performance. Generally, frequently modified values are poor candidates for application state. In fact, application state is rarely used in the .NET world because its two most common uses have been replaced by easier, more efficient methods:
In the past, application state was used to store application-wide constants, such as a database connection string. As you saw in Chapter 5, this type of constant can now be stored in the web.config file, which is generally more flexible because you can change it easily without needing to hunt through web-page code or recompile your application.
Application state can also be used to store frequently used information that is time-consuming to create, such as a full product catalog that requires a database lookup. However, using application state to store this kind of information raises all sorts of problems about how to check if the data is valid and how to replace it when needed. It can also hamper performance if the product catalog is too large. A similar but much more sensible approach is to store frequently used information in the ASP.NET cache. Many uses of application state can be replaced more efficiently with caching.
Application state information is always stored in process. This means you can use any .NET data types. However, it also introduces the same two limitations that affect in-process session state. Namely, you can’t share application state between the servers in a web farm, and you will always lose your application state information when the application domain is restarted—an event that can occur as part of ASP.NET’s normal housekeeping.
■Note Application state is included primarily for backward compatibility with classic ASP. In new applications, it’s almost always better to rely on other mechanisms for global data, such as using databases in conjunction with the Cache object.
Static Application Variables
You can store global application variables in one other way. You can add static member variables to the global.asax file (which was introduced in Chapter 5). These members are then compiled into the custom HttpApplication class for your web application and made available to all pages. Here’s an example:
public static string[] fileList;

C H A P T E R 6 ■ S TAT E M A N A G E M E N T |
225 |
The key detail that allows this to work is that the variable is static. That’s because ASP.NET creates a pool of HttpApplication classes to serve multiple requests. As a result, each request might be served with a different HttpApplication object, and each HttpApplication object has its own instance data. However, there is only one copy of the static data, which is shared for all instances.
Another requirement is that you must supply the ClassName attribute in the Application directive. This assigns a name to the global application class, which you’ll need to use to retrieve the static value you’ve just created.
Of course, for the best encapsulation (and the most flexibility), you should use property procedures:
private static string[] fileList; public static string[] FileList
{
get { return fileList; }
}
When you add a member variable to the global.asax file, it has essentially the same characteristics as a value in the Application collection. In other words, you can use any .NET data type, the value is retained until the application domain is restarted, and state isn’t shared across computers in a web farm. However, there’s no automatic locking. Because multiple clients might try to access or modify a value at the same time, you should use the C# lock statement to temporarily restrict the variable to a single thread. Depending on how your data is accessed, you might perform the locking in the web page (in which case you could perform several tasks at once with the locked data) or in the property procedures or methods in the global.asax file (in which case the lock would be held for the shortest possible time). Here’s an example of property procedure that maintains a thread-safe global collection of metadata:
private static Dictionary<string, string> metadata = new Dictionary<string, string>();
public void AddMetadata(string key, string value)
{
lock (metadata)
{
metadata[key] = value;
}
}
public string GetMetadata(string key)
{
lock (metadata)
{
return metadata[key];
}
}
Using static member variables instead of the Application collection has two advantages. First, it allows you to write custom code in a property procedure. You could use this code to log how many times a value is being accessed, to check if the data is still valid, or to re-create it. Here’s an example that uses a lazy initialization pattern and creates the global object only when it’s first requested:
private static string[] fileList; public static string[] FileList
{
get
{
if (fileList == null)
{
fileList = Directory.GetFiles(

226 C H A P T E R 6 ■ S TAT E M A N A G E M E N T
HttpContext.Current.Request.PhysicalApplicationPath);
}
return fileList;
}
}
This example uses the file access classes described in Chapter 13 to retrieve a list of files in the web application. This approach wouldn’t be possible with the Application collection.
The other benefit of using static member variables is that the code that consumes them can be typesafe. Here’s an example that uses the FileList property:
protected void Page_Load(object sender, EventArgs e)
{
StringBuilder builder = new StringBuilder(); foreach (string file in Global.FileList)
{
builder.Append(file + "<br />");
}
lblInfo.Text = builder.ToString();
}
Notice that no casting step is required to gain access to the custom property you’ve added.
Summary
State management is the art of retaining information between requests. Usually, this information
is user-specific (such as a list of items in a shopping cart, a user name, or an access level), but sometimes it’s global to the whole application (such as usage statistics that track site activity). Because ASP.NET uses a disconnected architecture, you need to explicitly store and retrieve state information with each individual request. The approach you choose for storing this data can have a dramatic effect on the performance, scalability, and security of your application. To perfect your state management solution, you’ll almost certainly want to consider adding caching into the mix, as described in Chapter 11.

P A R T 2
■ ■ ■
Data Access