

The Microcontroller Idea book (Jan Akelson, 1997)
.pdfChapter 4
Table 4-2. |
Parts list for Figure 4-5. |
Semiconductors |
|
D2,D3 |
1N270 or similar germanium diode |
Q1,Q2 |
PN2907 or similar PNP general-purpose transistor |
U10 |
75453 dual peripheral OR driver |
Resistors (1/4-watt, 5% tolerance) |
|
R11,R14 |
4,700-ohm |
R12,R13 |
10,000-ohm |
R15,R16 |
10,000-ohm |
Capacitors(16WVDC, 20% tolerance) |
|
C15 |
0.1-microfarad ceramic disc |
Miscellaneous |
|
J5-J6 |
SIP header, 3-terminal, and shorting block |
|
|
When BASIC-52 executes a programming command, PGM EN goes low, pin 3 of U10 goes low, and Q1 switches on. This brings VPP to 12.5 volts. Diode D2 prevents current from flowing into the 5V supply. When programming is finished, PGM EN goes high again, and VPP returns to +4.7V.
Resistor R10 limits U10A’s output current, and R11 ensures that pin 3 of U10 pulls up to 12.5V. Capacitor C14 provides power-supply decoupling.
If you happen to have an older 21V EPROM, the circuit should also work with a +21V supply in place of +12.5V.
FPROG Circuits
If you want to use the FPROG commands for faster EPROM programming, additional circuits are required. These are identical to the circuits that switch VPP, except that they instead switch VCC to +6V during programming.
With the FPROG circuits shown in Figure 4-5, during normal (non-programming) operation, VCC is actually slightly less than +5V, due to D3’s voltage drop. This should cause no
60 |
The Microcontroller Idea Book |

Saving Programs
problems with EPROMs that have a 10 percent power-supply tolerance; in other words, ones that are guaranteed to operate from supplies of 4.5 to 5.5V. You do want to be sure that your main supply is a solid +5V, or even a little higher.
The data sheets for some EPROMs specify 5-percent tolerance: the supply must be between 4.75 and 5.25V to guarantee operation within the specifications. In this case, you will be operating near or just below the recommended supply voltage, especially if your main supply is slightly under +5V. When you are not programming the EPROM, you can move J6 to connect pin 28 directly to +5V. But overall, 10-percent-tolerance EPROMs are a better choice for this circuit.
If you are using a NVRAM or EEPROM, set J6 to +5V, since VCC must remain at 5V for these devices.
Power Supplies for Programming
You have several options for creating the programming power supplies of +12.5V and, optionally, +6V.
Benchtop Supply
For occasional use, if you have a benchtop supply that can supply the needed outputs, you can add terminals to the appropriate connections in your BASIC-52 system, and connect the supply leads to them when needed.
Adjustable Regulator
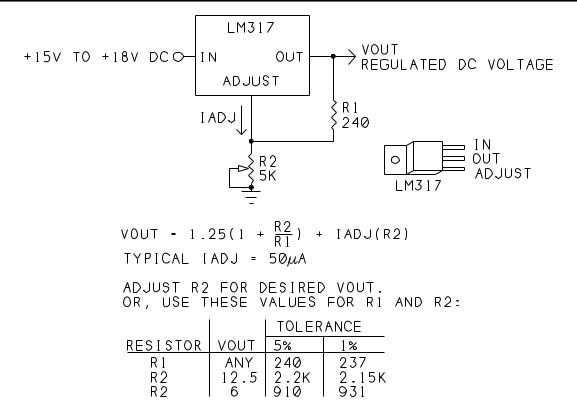
Figure 4-6 shows a circuit that regulates a DC supply of 15 to 18V to 12.5V or 6V. For the 15V supply, you can use a benchtop supply, a wall-transformer AC-to-DC adapter, or even two 9-volt transistor batteries connected in series. The supply must have a DC output, but it doesn’t have to be regulated. You’ll need one LM317 and an R1 and R2 for each output voltage, but you can power both LM317’s from the same supply.
Typical current requirements for programming an NMOS 2764A are 50 milliamperes at 12.5V and 75 milliamperes at 6V, or 125 milliamperes total. For a CMOS 27C64, it’s 30 milliamperes for each, or 60 milliamperes total.
Each regulating circuit uses an LM317 adjustable regulator. You set the output voltage of the LM317 with R1 and R2, using the formula shown. The LM317 creates a constant 1.25V reference across R1. The current through R1 also flows through R2, and the voltage across the pair of resistors is the regulator’s output.
Intel’s EPROM data sheets specify this range for the programming voltages:
The Microcontroller Idea Book |
61 |
Chapter 4
Figure 4-6. Power supply circuit for EPROM-programming voltages.
VPP: 12V to 13V
VCC: 5.75V to 6.25V
If you use 5%-tolerance resistors for R1 and R2, you may have to vary the value of R2 for the proper output, especially to meet the requirement for Vcc. Or, you can use a 5K potentiometer for R2 and adjust for the desired output, or use 1%-tolerance resistors for a more precise output.
You can wire the LM317 circuits to your 8052-BASIC circuit board, and add terminals or jacks for connecting a 15V supply. Wire the LM317’s output to the appropriate connections in Figure 4-5.
Switching Regulators
A third way to generate programming voltages is to use switching regulators like those available from Maxim Semiconductor. These can create the programming voltages from your +5V supply. For example, the MAX633 can create outputs of 6 and 12.5V from a +5V
62 |
The Microcontroller Idea Book |

Saving Programs
supply. The chip requires an additional inductor and capacitor, plus two resistors to set the output voltage. Maxim’s data books have more details about this and similar chips.
Storing Programs on Disk
With BASIC-52’s ability to store programs in on-board memory, disk storage isn’t necessary. But storing programs on the host system’s disk is convenient, since you can save as many programs as you want without worrying about running out of program memory. Since the programs are stored as ASCII text, you can write or edit them with any text editor, and then upload them as needed to the target system.
Most communications software allows you to upload and download files. In Procomm Plus, you use the PGUP and PGDN keys. In the Windows Terminal Accessory, use the Transfers menu.
Uploading to the 8052-BASIC System
When you upload a program to the 8052-BASIC system, you have to ensure that BASIC-52 has enough time to process each line before the next one arrives. If there isn’t enough time, you’ll have missing characters or lines in uploaded programs. There are a couple of ways to ensure that your uploads are complete.
Most software allows you to add delays after each transmitted line or character. You can experiment with different values to find the shortest delays that allow you to upload reliably. If you keep your program lines short, the delays between lines can be shorter.
If these options aren’t available, try using a slower baud rate, which gives BASIC-52 a little more time to process each line before the next one arrives.
Downloading to the Host Computer
To download a BASIC-52 program from the target’s RAM to the host’s disk, type LIST to list the current program, but before you press ENTER to execute the command, set up your host’s software to download, or receive, an ASCII file. When prompted, specify a filename. When the transfer is ready to go, press ENTER to send your program to the host. When you see the READY prompt, end the transfer by whatever means your software requires. (In Procomm Plus, press ESCAPE.) You should now have a file on disk containing the program you just listed.
You can test your download by erasing the program in the 8052-BASIC system’s RAM, and then uploading it back into RAM.
The Microcontroller Idea Book |
63 |

Chapter 4
First, type NEW to erase the program. To restore your program by uploading it from disk, set up your host’s software to upload, or send, an ASCII file, and enter the name of your previously downloaded file. As the file loads, you’ll see each program line on screen. The file will contain a READY prompt after the program listing. This causes BASIC-52 to display an error message, which you can ignore. Type LIST to view the uploaded program, and type RUN to run it.
With BASIC-52 programs on disk, you can use any text editor to view or modify the program. Save the file as pure ASCII text, with no formatting commands added. You can also use your text editor to create a program from scratch, then upload it to BASIC-52, rather than typing the lines using BASIC-52’s line editor.
64 |
The Microcontroller Idea Book |

Programming
5
Programming
When you have your 8052-BASIC system up and running, you’re ready to start writing and running your own programs. This chapter is an introduction to the BASIC-52 programming language. It includes a summary of BASIC-52’s abilities, some examples that illustrate what you can do with it, plus tips for writing and debugging programs.
For a complete reference to BASIC-52, see the BASIC-52 programming manual (either version), which includes many more examples and details about the language and how it works. You can learn a lot about BASIC-52 by browsing through the programming manual and experimenting on your own.
Programming Basics
Like other BASIC programs, BASIC-52 programs are built around a set of keywords, or reserved words. Each keyword has a specific meaning to the BASIC-52 interpreter. or example, the program line PRINT XTAL tells BASIC-52 to find the stored value of the XTAL operator and send it to the console input device (the serial port of the host computer), which will then display the value it receives.
If you’re familiar with BASIC programming, most of BASIC-52’s keywords and conventions will be familiar. If you have little programming experience, or if your experience is with assembly language, C, Pascal, or another language, you’ll have more to learn. But on the whole, BASIC-52 makes it easy to quickly write and test your programs.
The Microcontroller Idea Book |
65 |

Chapter 5
Writing a short BASIC-52 program involves these steps:
Define what you want to do
Write program lines to accomplish it
Test the results
As necessary, revise and retest
Longer programs involve the same basic steps, except that you can divide the program into a series of smaller tasks, or modules, and program and test each individually. Then, when the modules are working, you can combine them in one big program and test the result.
Modular programming can save a lot of headaches by limiting the amount of untested program code you have to work with at one time. A long, untested program almost certainly contains many errors will be hard to find and fix. It’s much easier in the long run to test the pieces first, and BASIC-52 makes this easy to do.
Command and Run Modes
BASIC-52 has two modes of operation: command and run. Command mode refers to anything you type without a line number. BASIC-52 executes these lines immediately after you press ENTER. Run mode refers to running stored programs with the RUN command. A program consists of a series of program lines, with each line beginning with a line number.
BASIC-52 includes some keywords that you can use only in command mode, but not in programs. PROG is an example. Most of BASIC-52’s other keywords are usable in either command or run mode. A few, such as DO...WHILE, are usable in RUN mode only.
Tips for Writing BASIC-52 Programs
The following advice is intended to make your programs easier to write and debug, and to help you avoid some common mistakes:
•Number program lines by 10s. Each line in a BASIC-52 program must begin with a line number. BASIC-52 uses the numbers to order the statements. Traditionally, BASIC programs begin at line 10, and count up in multiples of 10: 20, 30, and so on. This way, if you later discover that you need to add a few lines in the middle, you can, using the unused numbers that remain.
•Divide long programs into modules. Break up big projects. Use subroutines for independent functions. A subroutine is a block of statements that the main program jumps to with a GOSUB statement. At the end of the subroutine, a RETURN statement causes the program to jump back to the program line following the GOSUB statement.
66 |
The Microcontroller Idea Book |

Programming
Subroutines have two advantages. First, they help you to break up your program code into discrete units, with each having a specific purpose. This makes the program code easier to debug and easier to understand in general, especially if you return to it a week, month, or year after writing it when the details are no longer fresh in your mind. Second, subroutines make it easier to reuse your code if you have a similar task in another project. For example, all or most of the code involved with controlling a display module can usually be written as a subroutine, or perhaps a series of subroutines. This way, if you want to use the same display module in more than one project, you can reuse the code without having to pick through your previous programs to find the program lines that you need.
•Keep program lines short. Short lines are easier to edit with BASIC-52’s line editor, which requires retyping the entire line to make a change. They’re also easier to read. If you upload programs from disk, shorter lines can eliminate problems caused by BASIC-52’s not having enough time to process each line before the next one arrives. Although BASIC-52 allows you to place multiple statements on one line, with up to 79 characters per line, shorter is better.
There are two situations where you might want to combine a series of short lines into fewer, longer program lines: when the program has to execute as fast as possible, or when you need to store the program in the smallest possible space. Even then, though, you can develop the program with short lines, and combine them only after the program is debugged and ready for permanent storage.
•Check syntax and spelling carefully. BASIC-52’s syntax consists of the rules of grammar and punctuation that your program lines must follow. For example, a FOR loop must include a variable, limits, and a NEXT instruction. Leave any of these out, and your loop won’t work. There’s no room for spelling errors either. BASIC-52 doesn’t know that you meant LIST when you typed LSIT.
•Document your programs. Many of BASIC-52’s keywords aren’t too hard to decipher. For example, it makes sense that the STOP instruction halts program execution. But your own comments throughout the program can help you remember why you wrote each program line, and what it’s supposed to accomplish.
BASIC-52 allows you to add comments, preceded by REM (remark). Try to write comments that do more than just define the keywords in the line. Also explain the purpose behind what you are doing. For example, this comment
10 REM read value from external memory
20 A=XBY(0FE00H)
does nothing more than define the BASIC-52 instruction that follows. In contrast,
The Microcontroller Idea Book |
67 |

Chapter 5
10 REM Read the states of switches 1-8 20 A=XBY(0FE00H)
tells you why you are executing the instruction.
The problem with adding comments to BASIC-52 programs is that they slow program execution. They also make the program longer, so that it needs more memory. So you might want to keep comments to a minimum in the final version that you store in NV memory.
You can, however, store fully documented copies of your program on disk. If you wish, you can use your personal computer’s text editor to add comments on unnumbered lines, like this:
REM Read the states of switches 1-8 20 A=XBY(0FE00h)
Then, as you upload the program to your 8052-BASIC system, all of the lines will display on the host computer, but BASIC-52 will store only the numbered lines, discarding the unnumbered remarks.
•Use short variable names for faster execution speed. BASIC-52 allows variable names of up to eight characters. Programs with shorter variable names will run faster and require less memory to store. Even if you limit yourself to 1- and 2-letter variables, you still have hundreds to choose from. Longer names, such as REVERSE, QUIT, and so on have the advantage of being more meaningful—it’s easier to guess their meaning without adding comments. So there are times when you might choose a longer name. But longer names can cause other problems, as the next paragraph explains.
•Be sure that variable names don’t contain keywords. In BASIC-52 you can’t name a variable ON, because ON is already defined by BASIC-52. You also can’t name a variable MONTH, ONE, ACTION, or any other word that contains ON. Short variable names are much less likely to contain an embedded keyword. Also be aware that BASIC-52 identifies a variable only by its first and last characters, plus its length, so, for example, it considers MAXIMUM and MINIMUM to be the same variable, while MAX and MIN are different.
•Avoid variables that begin or end with the letter F. BASIC-52 has a couple of bugs relating to variable names that begin or end in F. Specifically, when F is the last character in a variable name followed by a space, BASIC-52 drops the F from the variable name. And, if you should name a variable FP, FPR, or FPRO, and follow the name by a space, BASIC-52 will also drop the F from the name. The easiest way to avoid problems is to avoid any variable name that begins or ends in F.
68 |
The Microcontroller Idea Book |

Programming
•Hexadecimal numbers that begin with A through F must have a leading 0, and all hexadecimal numbers must end in H. Here are some examples of valid hexadecimal numbers:
Valid Hex Number |
Decimal Equivalent |
|
|
0DH |
208 |
0AH |
10 |
15H |
21 |
0FFFFH |
65,535 |
0CH |
12 |
Here are some invalid hex numbers, and a valid hex number that doesn’t have its intended value:
Invalid Hex Number |
Problem |
FFH |
no leading 0 |
0C |
no trailing H |
10 (intended as decimal 16) |
no trailing H. BASIC-52 will interpret at |
|
decimal 10 (0AH) |
BASIC-52 Bugs and Things to Watch Out For
This section is a summary of other bugs and other minor problems with BASIC-52 to be aware of as you program. Many of BASIC-52’s bugs and limits have been eliminated in newer versions of BASIC-52 developed by other sources, described in Chapter 15.
Assembly-language Issues:
In external code memory, if 2002h contains 5Ah and bit 5 at 2048h is set, BASIC-52 will try to call a user-written token table. If 2001h contains 0AAh, BASIC-52 will try to call a user-written reset routine at 2090h. If the expected table or routine isn’t present, the system will crash. (See Chapter 13.) Solution: avoid writing to code memory at 2001h, 2002h, and 2048h. (In Figure 3-1’s circuit, the RAM in this area (if any) is accessed as data memory only, so you don’t have to worry about this.)
The Microcontroller Idea Book |
69 |