

SECTION 4 – NAV/COM &
TRANSPONDER
4.6FREQUENCY AUTO-TUNING
Auto-tuning on the PFD
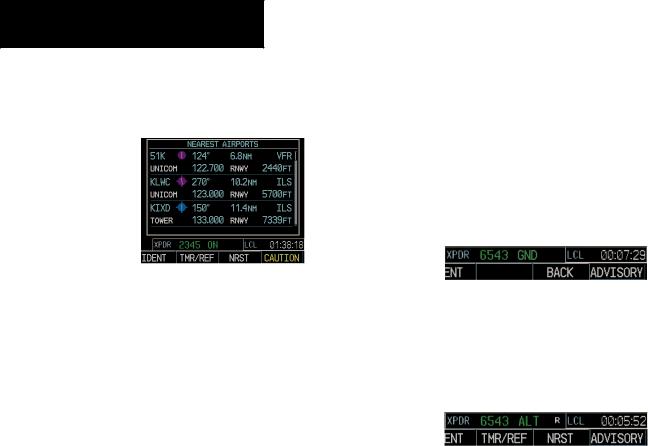
Figure 4-9 Nearest Airports Window (PFD)
1.Press the NRST softkey to display the Nearest Airports Window.
2.Turn either FMS knob to highlight the desired frequency.
3.Press the ENT key to place the frequency in the standby field of the active COM.
4.Press the Frequency Toggle key to place the frequency in the active field.
NAV frequencies are entered automatically in the NAV window upon approach loading or approach activation.
Auto-tuning on the MFD
Auto-tuning on the MFD is done in much the same way as on the PFD. Use the FMS knobs to select the desired frequency on any of the information pages. Pressing the ENT key then loads the selected frequency into the standby frequency window of the appropriate radio.
4.7TRANSPONDER
Mode Selection
The STBY, ON and ALT softkeys can be accessed by pressing the XPDR softkey.
Ground Mode (Automatic)
GND is displayed when the aircraft is on the ground.
Figure 4-10 Ground Mode
Reply Status
When the transponder sends replies to interrogations, an “R” indication appears momentarily in the reply status field.
Figure 4-11 Reply Indication
Code Selection
1.Press the XPDR softkey to display the transponder Mode Selection softkeys.
2.Press the CODE softkey to display the transponder Code Selection softkeys,which includes the digit softkeys.
3.Press the appropriate digit softkeys to enter the code in the four-digit code field of the Transponder Status bar. Five seconds after the fourth digit has been entered,the transponder code becomes activated.
When entering a code, press the BKSP softkey as needed to back up and change code digits.
4-4 |
Garmin G1000 Cockpit Reference Guide for the Cessna Nav III |