

Microsoft Windows XP Networking Inside Out
.pdf3: Network Connectivity
Part 3: Network Connectivity
Configuring Other Windows XP Computers
Once the first network client is configured, which should be the ICS host on a system that shares a single Internet connection, you should then run the Network Setup Wizard on the other Windows XP network clients. If you are using ICS, keep in mind that the Network Setup Wizard will ask you to choose how the computer connects to the Internet (see step 6 in the preceding section). Select the This Computer Connects To The Internet Through Another Computer On My Network Or Through A Residential Gateway option, as shown in Figure 10-3, page 295. The Network Setup Wizard will locate the ICS host and
proceed with the setup. Remember too that if you need to use a network bridge, the bridge does not have to be located on the ICS host. In fact, several of your Windows XP clients can potentially function as bridges. As long as the computers have two or more NICs installed, the option appears when running the wizard, as described in steps 9 and 10.
Configuring Computers Running Earlier Windows Versions
10 Chapter
Computers running Microsoft Windows 95, Microsoft Windows 98, Microsoft Windows Millennium Edition (Windows Me), Microsoft Windows NT 4.0, and Windows 2000 clients can also join your Windows XP workgroup. These clients can be configured for networking manually (discussed next), or you can run the Network Setup Wizard on computers running Windows 98, Windows 98 Second Edition, or Windows Me. To use the Network Setup Wizard on these versions of Windows, you can either use the floppy disk that you created in step 15 when you configured the Windows XP clients, or you can use the Windows XP installation CD to run the Network Setup Wizard.
note You can use any device that supports IP networking, including computers running variations of UNIX, Macintoshes, or even the Xbox, on your network with your Windows computers, and some of them can even share files and printers with your Windows systems! However, any computer that does not have support in the Network Setup Wizard (including older versions of Windows) will require you to manually configure their networking settings in order to properly work with your Windows XP workgroup.
To run the Network Setup Wizard from the CD, follow these steps:
1Insert the Windows XP installation CD into the computer you want to add to the workgroup.
2When the Welcome To Microsoft Windows XP screen appears, select Perform Additional Tasks.
3On the Welcome To Microsoft Windows XP screen, select Set Up A Home Or Small Office Network.
4Depending on the computer’s version of Windows, the Network Setup Wizard might need to copy some additional files to your computer and restart it. Click Yes to continue.
298
3: Network Connectivity
Chapter 10: Managing Network Connections
5At this point, the Network Setup Wizard opens. Complete the wizard as you did for the Windows XP computer. Follow the steps in “Setting Up the Workgroup,” page 294, for guidance.
Configuring Network Clients Manually
If you’re using an earlier version of Windows that isn’t compatible with the Network Setup Wizard, you can add those computers to the workgroup manually. However, you should use the Network Setup Wizard whenever possible because it ensures that your network clients are all configured in the same way and reduces the likelihood of connectivity problems. If you need to configure your computers manually or you just want to know what goes on behind the scenes of the Network Setup Wizard, follow these steps:
1 Choose Start, Control Panel, and open Network Connections.
note Earlier versions of Windows use different arrangements of dialog boxes to configure network connections. Refer to the documentation for your particular version of Windows to accomplish the tasks described in this section that apply to versions
of Windows that can run the Network Setup Wizard (Windows 98, Windows Me, and Windows XP).
2In the right pane of the Network Connections window, right-click the network connection you want to configure, such as Local Area Connection, and choose Properties.
3If Client For Microsoft Networks and File And Printer Sharing For Microsoft Networks aren’t listed on the General tab of the properties dialog box, click the Install button.
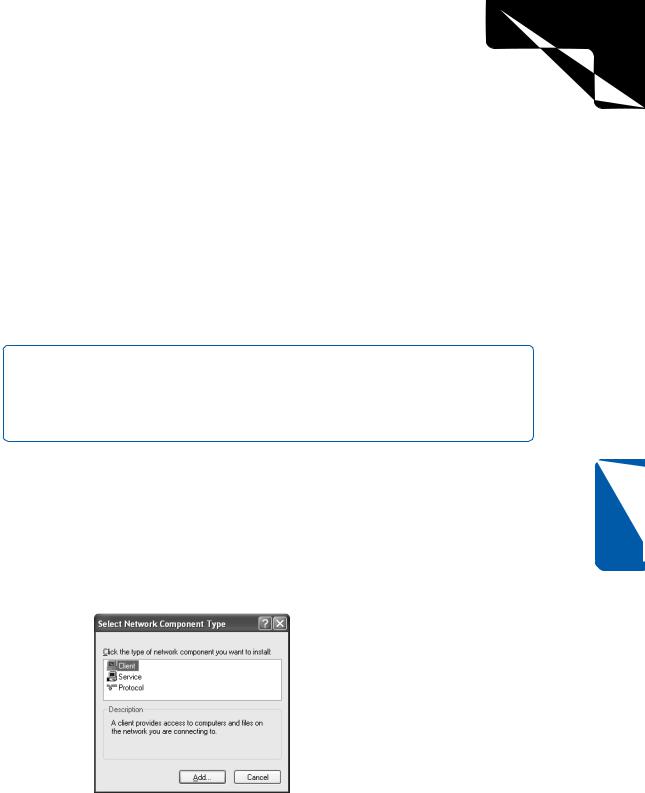
4In the Select Network Component Type dialog box, shown in Figure 10-6, select the Client option and click Add.
Chapter 10
Figure 10-6. The Select Network Component Type dialog box allows you to add additional networking components.
299

3: Network Connectivity
Part 3: Network Connectivity
10 Chapter
5In the Select Network Client dialog box that appears, select Client For Microsoft Networks, and click OK. The client software is installed for the connection.
6On the General tab, click the Install button again. In the Select Network Component Type dialog box, select Service and click Add.
7In the Select Network Service dialog box, select File And Printer Sharing For Microsoft Networks, and click OK. The service is installed for the connection.
8Make sure the check boxes next to the client and service are selected, and click OK.
note The client and service you just installed are needed for Windows XP to participate in a workgroup. However, a properly configured IP address is also necessary. To review the IP address settings, double-click Internet Protocol (TCP/IP) on the General tab of the properties dialog box.
If you are using a residential gateway device that provides DHCP services, configure all your computers to receive their IP configuration information automatically. If DHCP is not available, Windows 2000 and Windows XP will attempt to use Automatic Private IP Addressing (APIPA) to configure these settings; however, if you are using any other operating systems on your network, APIPA will most likely fail, and you will have to manually configure these settings. See the next section for details. To learn more about configuring TCP/IP under Windows XP, see “Configuring IP Settings in Windows XP,” page 35.
Changing the IP Configuration
When you run the Network Setup Wizard, if DHCP is unavailable APIPA is used to automatically avoid IP address conflicts with network clients. Computers in your workgroup are assigned an APIPA address in the 169.254.x.x range. Each computer receives a unique IP address, and a query method is used during setup to make sure that the IP address being assigned is not in use.
If you want to manually assign different IP addresses to the clients in your workgroup, you can easily do so by selecting Internet Protocol (TCP/IP) on the General tab of the connection’s properties dialog box and clicking Properties. However, you should seriously ask yourself why before doing so. APIPA is designed to service workgroups and was specifically developed for networks where no centralized DHCP server is in use. The fact is, manual IP address configuration can be complicated and problematic, so before changing your computer’s automatic IP addressing to a static addressing scheme, keep the following points in mind:
●Each client on your network must have a unique IP address in the same range with an appropriate subnet mask.
300
3: Network Connectivity
Chapter 10: Managing Network Connections
●You must manually change the IP address properties of each client on the network to the appropriate address range so they can communicate with one another.
●If you use ICS, the default gateway assigned to your network clients must be the address of the ICS host. See the next section for more information.
Using Internet Connection Sharing
As described in “Setting Up the Workgroup,” page 294, the Network Setup Wizard gives you the option of using ICS when you set up a home or small office network. Using ICS, a single computer on the network becomes the ICS host, and all other computers on the network access the Internet through the ICS host’s Internet connection. Of course, you are not required to use ICS, but if you plan on sharing a single Internet connection and if you want all traffic entering and leaving your network controlled
by one ICF configuration, ICS is an option.
ICS, Residential Gateway, or a Hub?
If you want to share an Internet connection, you can do so by using ICS or a device such as a residential gateway or router. In some cases, depending on your Internet connection, you can attach the DSL or cable modem to a hub or a switch and have all other computers on the network connect to the Internet directly through the hub instead of a single host computer. A basic hub or switch, however, provides no additional security, so each client on your network must turn on ICF on the Internet connection to protect your network from being accessed by people on the Internet. Enabling ICF will protect the individual computers, but in this configuration, ICF will also protect your network computers from each other, so your network will not work without a great deal of custom configuration! This occurs because you’re using the same IP address range for your private network and for the Internet connection. In this case, ICF can’t protect you from one IP address without protecting you from all IP addresses. If you disable ICF on each computer, your network will work, but it will be wide open to attacks from the Internet. This configuration can lead to more management problems and more security holes. In other words, you should never run a network from a hub that has an Internet connection plugged directly into the hub and is operating in the same IP address range.
Other options include the use of residential gateways, which often use firewalls and network address translation (NAT) to protect your computer against outside threats. The difference with the residential gateway solution is that the IP address of the Internet connection (your DSL or cable modem plugs into the in port of the router)
(continued)
Chapter 10
301

3: Network Connectivity
Part 3: Network Connectivity
Inside Out (continued) is translated into a private IP address (or range of addresses if the residential gateway has a built-in network hub) that isn’t visible to the Internet. Your computers can safely network behind the residential gateway’s firewall and still share a connection to the Internet that operates in a completely separate IP address range. Although residential gateways work well, their cost is approximately $100 and up, depending on certain features, such as an integrated network hub or switch. Some experts believe a hardware router is more secure because the Internet traffic never directly enters any of the computers on the network, as it must for ICF and ICS to work. Also, with ICS, the ICS host computer must be running for the other computers on your network to have Internet access, whereas only the residential gateway needs to be powered up for any computer on your network to access the Internet.
The choice, of course, is yours, but keep in mind that ICF and ICS are easy to use, they work well, and perhaps best of all, they impose no further damage to your pocketbook. However, if you can afford one, a residential gateway is the simplest solution to administer, and it provides a number of features beyond those provided by ICF and ICS.
10 Chapter
How ICS Works
When you enable the ICS host, the ICS host computer becomes an Internet gateway for the other computers on your network. When ICS is enabled, the ICS host uses the IP address of 192.168.0.1. All other ICS clients on your network see this computer as the gateway, and no other computer on your network can use the same address. When a client computer needs to access the Internet, a request is sent to the shared connection, which causes the ICS host to connect to the Internet and retrieve the requested information. To ICS client users, it appears as though their computers are directly connected to the Internet. Clients can use the Internet and retrieve e-mail seamlessly.
When you choose an ICS host while using the Network Setup Wizard, the following items are configured on the ICS host, which gives ICS its functionality:
●The local area connection for your internal NIC is configured as 192.168.0.1 with a subnet mask of 255.255.255.0. If the ICS host has more than one NIC for your workgroup, such as in the case of a multi-segment network, you need to bridge those connections so that both network segments can use ICS.
●The DHCP Allocator service is configured on the ICS host. When additional network clients are added to the network, this service automatically assigns IP addresses to those clients. The IP addresses range from 192.168.0.2 through 192.168.0.254 with a subnet mask of 255.255.255.0. A DNS proxy is also enabled so that additional DNS servers are not required on your network. These services run automatically in the background, and they require no additional configuration.
302
3: Network Connectivity
Chapter 10: Managing Network Connections
●The ICS service is installed and runs automatically on the ICS host.
●If a modem connection is used on the ICS host, autodial is turned on by default so that the connection is automatically dialed when an ICS client makes a request to the Internet.
You want to use ICS with earlier versions of Windows.
Once you set up the ICS host, you can easily set up your workgroup computers running Windows XP and other versions of Windows. Computers running Windows 98, Windows Me, Windows 2000, and Windows NT 4.0 should be able to use ICS for Internet access. Because not all of these versions of Windows support ICS, use the appropriate steps in the following list for the operating system you’re attempting to use:
●Windows 98 and Windows Me. Run the Network Setup Wizard from the Windows XP installation CD or from a setup disk you create. The wizard enables ICS Discovery and Control on the non-XP clients so that they can access the ICS host.
●Windows 2000 and Windows NT 4.0 (as well as non-Windows platforms).
Configure the computers to use DHCP to automatically obtain IP configuration information; they will then contact the DHCP service running in memory on the ICS host, which will send them the appropriate configuration data. You will not be able to use ICS Discovery and Control, but you will still have access to the Internet.
When using ICF with its default settings, remember that some traffic might not be allowed to pass through the firewall from the Internet. To learn how to adjust ICF settings to allow ICF to pass through additional types of traffic, see Chapter 5, “Using Internet Connection Firewall.”
Chapter 10
Managing ICS
For the most part, ICS is easy to set up via the Network Setup Wizard and operates without any problems. However, there are a few settings you might need to change, depending on your desired Internet connection.
ICS Host Settings
You access the ICS and ICF settings for the shared Internet connection by opening Network Connections on the host computer. Right-click the shared Internet connection
(the icon appears with a hand under it to indicate it is shared), and choose Properties. In the properties dialog box, click the Advanced button.
303

3: Network Connectivity
Part 3: Network Connectivity
On the Advanced tab, shown in Figure 10-7, there are three options concerning ICS:
●Allow Other Network Users To Connect Through This Computer’s
Internet Connection. This option essentially enables or disables ICS. If you want to stop sharing the connection at some point in the future, clear this check box, which automatically clears the other check box options as well.
●Establish A Dial-Up Connection Whenever A Computer On My Network Attempts To Access The Internet. You’ll only see this option if you are sharing a dial-up connection. This option allows Windows XP to automatically dial the connection when another computer in the workgroup attempts to use the Internet. If this selection is cleared, ICS clients will only be able to use the Internet when the ICS host computer is dialed up to the Internet. Under most circumstances, enabling this autodial setting is the best choice.
●Allow Other Network Users To Control Or Disable The Shared Internet Connection. This option, which is new in Windows XP, allows ICS clients to essentially control the connection. In a small home or office network, this setting might work well. Basically, users can manage the shared connection as though it was physically located on their computers. There are a few issues to consider though, and you can learn more about them in the next section.
10 Chapter
Figure 10-7. Manage ICS properties using the Advanced tab of the Internet connection’s properties dialog box on the host computer.
304
3: Network Connectivity
Chapter 10: Managing Network Connections
ICS Client Connection Management
In previous versions of ICS, client management could be a problem. After all, what do you do if you do not have access to the ICS host computer, but you need to disconnect the dial-up Internet connection to free up a shared telephone line? How can you find out if the connection appears to be working? ICS in Windows XP addresses these problems by allowing users to control and disconnect the Internet connection from any ICS client computer (not just from the ICS host computer). This feature is provided by ICS Discovery and Control, which broadcasts availability of shared Internet connections from the host to client computers so they can use them. If you are using a broadband or always-on connection, these issues are not as important, but by default, client control of the Internet connection is enabled. When ICS Discovery and Control is in effect, the ICS host allows the ICS clients to discover the connection and manage it. Specifically, network clients can:
●View Internet connection statistics and monitor the status of the connection.
●Connect and disconnect the connection to the ISP.
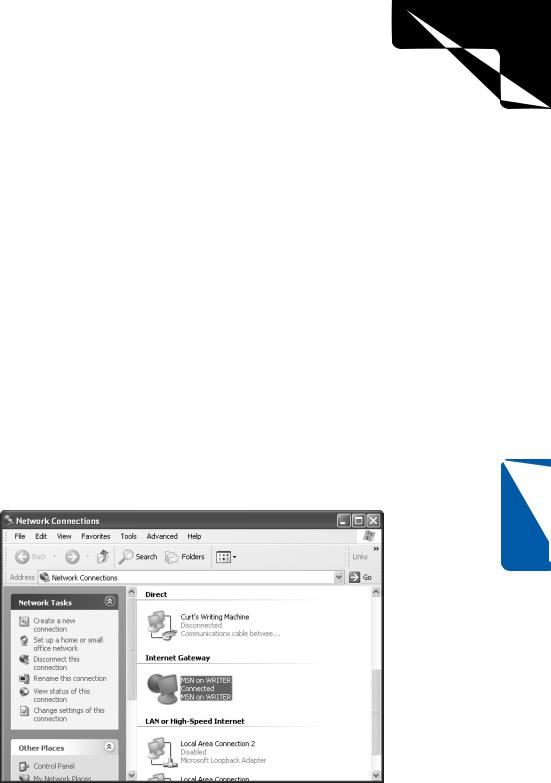
●As long as the ICS host administrator does not disable ICS Discovery and Control by clearing the Allow Other Network Users To Control Or Disable The Shared Internet Connection check box on the Advanced tab of the shared connection’s properties dialog box, clients can perform these actions. Once ICS is set up, ICS clients will see a category named Internet Gateway in the Network Connections folder, which contains the icon of the shared Internet connection, as shown in Figure 10-8.
Chapter 10
Figure 10-8. Access to the shared connection is provided under Internet Gateway in Network Connections.
305
3: Network Connectivity
10 Chapter
Part 3: Network Connectivity
To use Internet Gateway to control the shared connection, follow these steps:
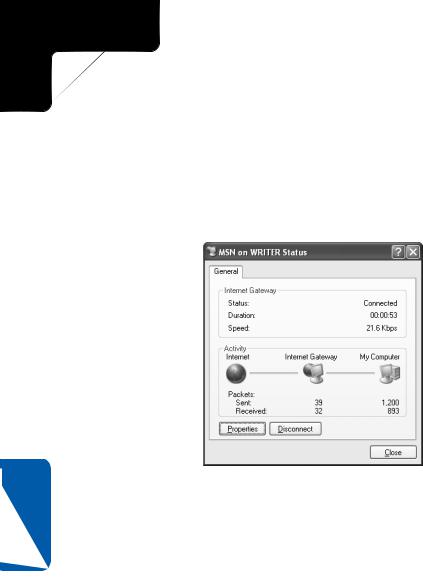
1Right-click the connection listed under Internet Gateway and choose Status. A status dialog box appears, as shown in Figure 10-9. You can view the status, duration of the connection, its speed, and a count of packets sent and received through the gateway. Notice that you click Disconnect to close the connection. Of course, if other users are accessing the Internet at the time, they are disconnected as well.
Figure 10-9. From the status dialog box, you can view the status of the Internet connection and disconnect it.
2Click the Properties button. A simple dialog box appears telling you which connection you are using, as shown in Figure 10-10. You can select Show Icon In Notification Area When Connected at the bottom of this dialog box to give yourself quick access to this Internet connection from the Windows desktop. Click the Settings button.
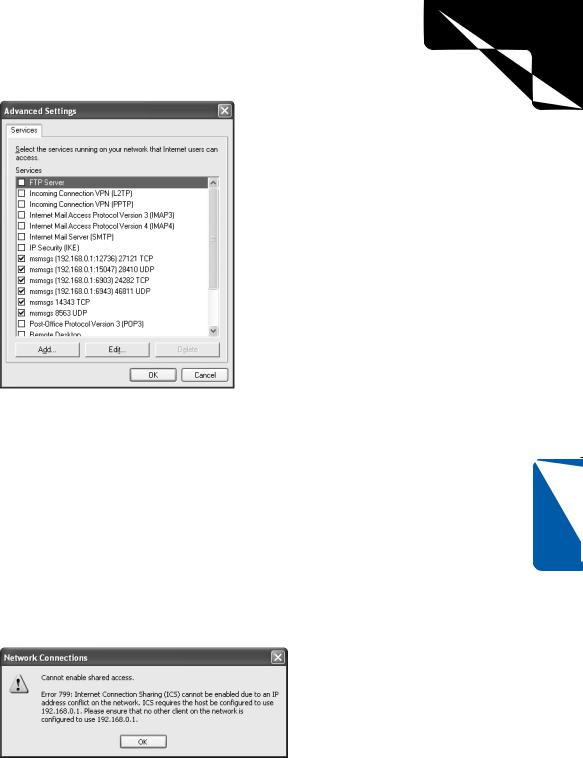
3The Services tab of the Advanced Settings dialog box appears, as shown in Figure 10-10. This dialog box lets you select which services you want ICF to allow to run on your network. By default, most of these services are disabled for security reasons, and you don’t need to enable them for typical Internet activities. Do not enable any services that you don’t actually need to use without knowing the security risks involved. See Chapter 5, “Using Internet Connection Firewall,” to learn more about setting these ICF options.
306
3: Network Connectivity
Chapter 10: Managing Network Connections
Figure 10-10. Use the Advanced Settings dialog box to configure ICF to allow or prohibit designated types of IP traffic.
Changing ICS Hosts
Networks, like life, change over time. You might add new client computers or remove existing client computers, or you might even need to change the Windows XP computer that is functioning as the ICS host. So you might wonder how you can change the ICF and ICS host computer on an established network that currently uses an ICS host, considering it is currently running the show.
Windows XP will not allow another computer on the network to become the ICS host until you remove ICS sharing on the original host. If you try to enable another computer as the ICS host, you’ll receive the Network Connections error message shown in Figure 10-11.
Chapter 10
Figure 10-11. You cannot enable two ICS hosts at the same time.
307