

Publishing history - Basic Armouring
.pdfChapter 11 — Body Armour
Particularly vulnerable areas on the body are the kidneys, groin, spine, collarbone and ribs. Under the armpit hurts too but I’ve yet to find a way of armouring there!
Kidney belt
This is simply a wide leather belt that covers the kidneys and some of the lower back and stomach. A less wide version can be worn under other body armour to act as extra protection over the kidneys. It also makes a convenient thing to hang your leg armour off.
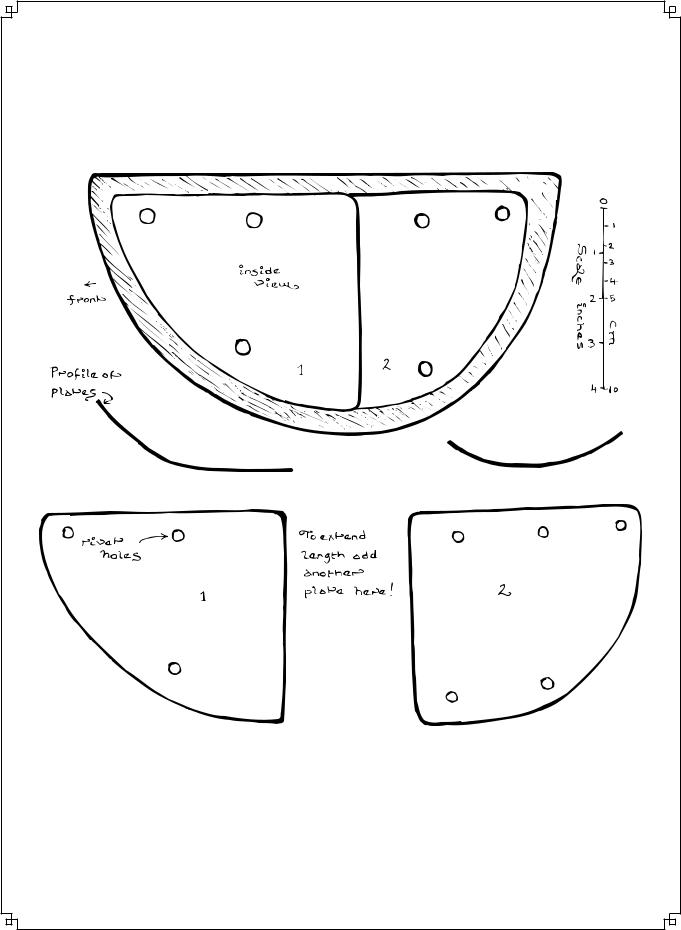
Coat of Plates
Excavation of graves from the battle of Wisby in 1361 revealed a number of Coats of Plates; a popular fourteenth century style of body armour often worn as re-enforcement over mail. The design given here is based on Wisby number 6 (the simplest) with the tie loops from number 1 to make it more comfortable to wear. If you look up the reference in Chapter 20 you can get a lot more patterns! The plates mount onto the inside of a coat, shaped a bit like a Poncho, which goes over the head and buckles at the back. This simple style leaves the top of the spine exposed but you could always add an extra plate or two to cover things there!
1. Make the coat. This can be cut from leather or sewn from canvas with a material covering on the outside. The coat should be fairly sturdy—its going to take a beating!
2.Cut out and shape the plates. These can be made from thin steel, thick or Cuir Bouilli leather or thermo plastic. Note how the indi-
45

BODY ARMOUR
Figure 11-1: Coat of Plates
46

BODY ARMOUR
vidual plates and the rows overlap, coats of plates work by spreading the force of an impact over several plates.
3.Drill rivet holes in plates. Rivet the plates to the inside of the coat in numerical order. Remember, if the rivet holes on a plate will be covered the plate needs to be riveted on before the covering plate! The rivets can be plate or as ornate as those on armour number 7.
4.Rivet the straps and tie loops in place; a key ring makes a good circular attachment point for the laces.
Brigandine
A front opening style of body armour popular in the 15C. If you are not wearing mail it’s a good idea to add tassets, plates covering the hips, using the diagram in figure 11-2. This design is based on one found at Chalcis and gives very good overall protection. As with the Coat of Plates, the plates can be made from thin steel, thick or Cuir Bouilli leather or thermo plastic. Making the shoulder plates of leather makes it more comfortable to wear. Rather than show patterns for lots of very similar plates I’ve simply given an internal view of the completed coat then the dimensions and shapes of a few of the plates. To size the coat to fit first measure your body length and circumference then scale up the diagram, in figure 11-3, to these dimensions. From this, and the diagrams, in figure 11-4, you should be able to work out the various plate sizes.
1.Sew the coat from cloth and canvas or cut from leather. It opens at the front and at both shoulders.
2.Cut and shape the plates then drill out the rivet holes; the original has six rivets per plate, four will do. Note that many of the plates are the same size. Numbering them after shaping saves a lot of confusion!
47
BODY ARMOUR
3.Now rivet the plates to the coat in the order that they are numbered.
4.Add buckles at front and at shoulders.
5.Sew covers for tassets if required. Cut plates to fit then rivet into covers. Rivet covers to Brigandine.
48
BODY ARMOUR
Figure 11-2: Patterns for Tassets
49

BA
50

BODY ARMOUR
Figure 11-4: Bringandine Plates
51
BODY ARMOUR
52

Chapter 12 — Arms
Your arms move into target range every time you attack someone! Armouring them is therefore a good idea, especially if you favour two-handed weapons. When making patterns for forearms be careful to allow room for wrist rotation; a common problem is making them too long. Likewise with the upper arm allow room for the biceps; your upper arm changes shape when you flex it—if not go to the gym.
Splint Vanbrace
An early design for protecting the forearm. 1. Scale then cut the splints from steel.
2.Rivet splints onto two leather straps that both keep the plates in place and hold them on your arm.
3.Add buckles and wear.
Cuir Bouilli Forearm Guard
This design protects the forearm and part of the elbow.
1. Carve a block of wood into a former the shape of your padded
forearm.
2. Scale template to your arm then cut from a piece of thick
natural tan/tooling leather. Don’t make it too close fitting or
you won’t be able to get your arm in it after hardening!
3. Soak leather in water until it becomes malleable then stretch
it around the wooden former. Hold in place with carpet
pins. If you want you can now make pretty patterns all over
it; look up carving in a leather working book!
4. Place into a warm oven and allow to dry slowly.
5. Remove from former. Either shave off area with pinholes,
use them for decorative stitching or to stitch a lining in
place. Drill holes for laces.
6. Cover with wax to waterproof.
53

ARMS
Articulated Elbow
An articulated elbow will join the forearm and upper arm protection while allowing the elbow to flex. When working out how to get articulations to work it is easier to use a separate wing (one less bit to get in the way). Once the technique is established the cop and wing can be made in one piece. After making a couple of these you will get an eye for where the articulation points should be, and all will be easy.
1. Size the elbow cop as shown then cut it out from steel.
2. If cop and wing are one piece then shape the wing part, see details later.
3. Mark the bend and centre working lines onto the inside of the cop. Note that as the cop goes
further around the outside of the arm than the inside, the bend line is not in the midway between the ends.
4. Start dishing the cop around where the two working lines meet.
5. Once a reasonable depression has been produced commence hammering further out so as to curve the sides of the cop. Try to work evenly and methodically so as to give a smooth finish.
54