

Publishing history - Basic Armouring
.pdfChapter 5 — Leather Working Techniques
Lots of books have been written on sewing, leather and metal work so it doesn’t really make sense to repeat all that information here! Pop down to the library and have a browse - the bits in the next few sections are really just notes to get you started. For a useful book list see Chapter 20.
Shaping
Leather is a flexible material and can generally just be bent to shape. Hard leather such as sole leather needs to be made flexible by wetting it. When wet tooling leather can, surprise-surprise, be tooled (pressed down on to give interesting patterns). When making straps and the like remember that leather stretches — add a few extra holes!
Cuir Bouilli
If you soak vegetable (natural) tan leather, stretch it around a former, wood is good, then dry it slowly in a low oven it goes rock hard. Polish it on the outside to keep water out and you have a nice piece of armour.
15
LEATHER WORKING TECHNIQUES
16
Chapter 6 — Metal Working Techniques
Riveting
There are two purposes to riveting. The first is to hold things firmly together, as on a helmet, the other is to form a pivot, as in an articulated knee.
For a firm fit drill a hole in both pieces the same diameter as your rivet then pein the rivet fully down to the inner plate.
For an articulation make the hole one size bigger than the rivet and pein the head over lightly. A washer on the inside is helpful. A leather washer between the two plates surfaces has several purposes, it holds the two moving surfaces apart giving them room to move, stops the rivet falling out (if its a tight fit on the shank) when you turn everything over for peining and allows you to keep the rivet loose without rattling.
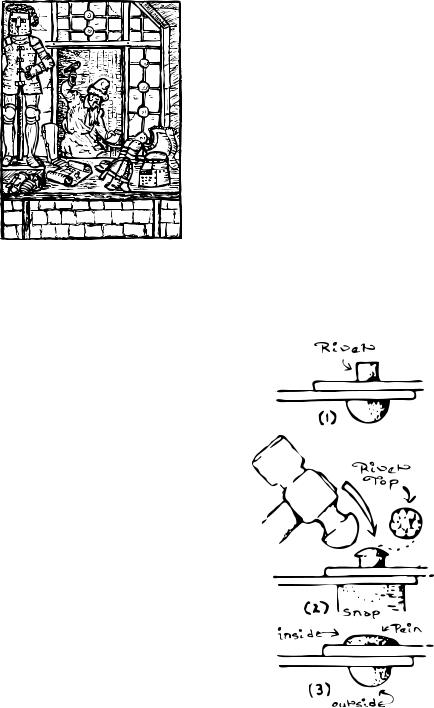
Peining simply involves hammering the end of the rivet to form a second head — bring on the ball pein hammer! Place the rivet through the holes in your pieces with the head on the out-
side. Place the head down onto a hard flat surface, into a rivet snap or into a cut out that matches its head. Now using the ball
end of the hammer hit the top of the exposed shank to mushroom it. Smooth out the pein using the flat face of the hammer. Remember this is the inside of your armour — you want something smooth and relatively flat pointing at your skin don’t you?
Bending
It’s very easy to push a bit a metal and bend it at that point; what is trickier is to get a curve over the entire length. Long bends are best achieved by hammering down over a former; a bit of metal tube, a log, pipe, stake, whatever — provided it’s curved. Start by curving the entire length. Don’t worry unduly about how much just get the metal moving. Now hammer it some more, push it with your hand, and hammer it back if you have gone too far, until you reach the desired shape. Use a soft mallet to avoid marking the metal.
17
METAL WORKING TECHNIQUES
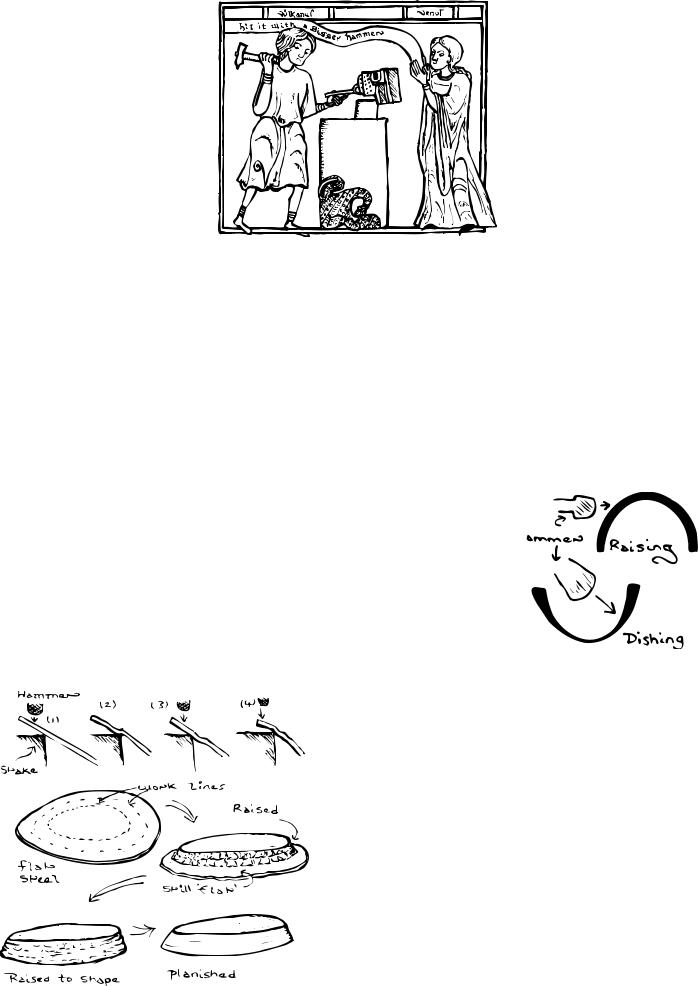
Dishing
Think of a piece of clay; if you push your thumb into it a number of times you can squeeze it out into a bowl shape. If you push it into a bowl shaped former it is even easier to form it. This is in essence what you are going to do with your piece of steel using a hammer and a dishing block.
There are two theories of dishing depending on whether you are a Tinsmith or a Silversmith. One says work from the outside in, the other says work from the middle out; I find it makes no difference.
To dish a piece first mark some guide lines; when you start you may want to draw lots of concentric lines, when you get more experienced you may just want to mark the centre. Place the piece over your dishing hole and start hammering around your guidelines. Holding the piece in a glove cuts down the vibrations to your hand, ear defenders cut down the noise to your ears. What ever you do don’t put your hand between the block and the bit you are about to hit. I’ve seen it done — ouch! Work evenly around the shape. On each pass (time round the entire piece) try to even out the hammer marks from the previous pass. If the piece starts to bend dramatically, in a fashion you don’t want, straighten it out either by putting it in the vice and pulling or by hitting it over a stake with a flat-faced hammer. If the edges start to crinkle, flatten them out immediately over a former with a flatfaced hammer (otherwise the metal may crack). If your surface is uneven either finish it off by doing a final pass on a flat surface or by planishing (see later). A selection of hammers, with different curves to their faces makes life easier. Dishing can be done onto a flat metal surface, such as the face of an anvil. This is very noisy!
Polishing
Even bright mild steel comes with a protective coating, to stop it instantly rusting, which has to be removed to achieve that bright polished look. You can either polish by hand or by machine. Start with the coarsest grade working in one direction. Continue with a finer grade working across the direction of the last grade, so you can see when all the marks have gone. Keep going with progressively finer grades of grit then polishing compound until you reach the finish you need. Doing a bit of initial polishing on things while they are still flat will save a lot of time! Keep things shiny with coatings of car body polish or wax (neutral shoe polish) and avoid rain. Ha! Fat chance!
18
Chapter 7 — Advanced Metal Working Techniques
Annealing
This is heating metal to stress relieve it. If you hammer repeatedly on a piece of metal it will work harden and become less pliable and more brittle. Mild steel is remarkably resistant to this — stainless steel isn’t! For steel, to relieve the stressing, heat the offending piece to red heat using a forge, or blowtorch then allow it to cool slowly. Note that brass and other materials work differently — look them up before you start.
Raising
Think of the piece of clay again, this time fold it down over your 
thumb squeezing the folds flat as you go. Raising can be considered the superior forming technique because, unlike dishing, it
does not thin the piece out as you go. It also requires the most work; lots of hammering leads to work hardening, even on a relatively small piece, so annealing may well be required. You
dish on the inside and raise on the outside of the piece. Most
period pieces were probably raised; most modern pieces are probably dished.
For raising you will need a stake that is a bit of bar stock or the like you can hold in the vice to fold your metal down onto. Before you start, mark the area to be raised; as with dishing the number of lines you use will depend on your experience with the technique. There are several ways of working all of which use the same premise — place the piece at an angle against the stake, strike the portion projecting above the stake to drive it down. You can start at the top or bottom of the area to be raised. You can also start by crimping the edge (bit like a bottle cap) by hammering it into a V shaped former, in which case you start raising from the inner
19
ADVANCED METAL WORKING TECHNIQUES
edge. Work in circles driving the metal evenly down. After each complete pass anneal the metal and start again driving it further down. Finish by planishing.
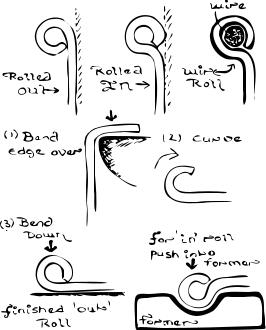
Edge Rolling & Wire edging
One of the primary ways of strengthening pieces and persuading them to stay in shape while others clout them with swords, axes and the like. There are two ways of rolling, with the roll on the outside or inside, and wire edging is just a roll with something solid in the middle; which you use depends
on personal choice and what period you are trying
to reproduce. All three methods start off the same way fold/raise a lip onto the top of the piece; about
1cm is good but it will vary depending on wire thickness, effect you want. The important thing is
that it is even and flat especially at the ends, which
fold easily, and around curves in the middle, which require more raising. As always work in stages and work evenly. Next bend the lip over in a curve; if
you are wire edging, trap the wire under the lip as you bring it down. Again the trick is to work in stages and work evenly. If you push a section down
on its own it’s liable to crease and ruin the effect. For a roll on the outside that’s it. For a roll on the inside you have to push the roll back. To do this finish your roll on a former with a notch cut in it the same size as your roll.
Planishing
Or how to polish with a hammer. Planishing gives you a nice even surface without grinding or the like. Useful for getting surfaces flat, blending hammer marks in or getting rid of the odd mistake. Simply place your piece, outside facing up, over a former of the same shape and hit it with a flat polished hammer. Do this to the entire surface, working evenly, to achieve the desired effect. Think lots of little strikes not one huge one. What you hit onto only has to match the shape where you hit it so a bar with its top ground can be used for a large piece. Dome stakes have various curves on them so you can move you piece about to get a match.
Welding
You want one of those nice open faced helms with a barred grill or a fancy basket hilt? Then you are going to need to weld it. Welders aren’t cheap but can be hired, along with the necessary eye shield, from tool hire shops. Some people cut- and-weld to achieve complex forms—period armourers used a hammer which, incidentally, also works well for the starting armourer. Period craftsmen also used to forge weld but we are definitely not going to get into that. Even modern arc welding is not really in the remit of Basic Armouring so consult your library or
20
ADVANCED METAL WORKING TECHNIQUES
local tech college course to learn more. Failing that ask a friend with a welder to do it for you; Hey, who said you had to do all the work?
Articulations
You will need articulations to make all those nice shoulders, gauntlets, elbows and knees with the neatly fitting lames. However many starting armourers shy away from them as being, “horribly complicated!” This
is largely due to a misconception of what an articula-
tion is; consider “Articulate, (a) Having joints; connect by, divide with, joints.” So anything holding two plates apart and allowing them to move can be considered an articulation. Riveting a piece of leather between two plates articulates them—and you can’t get much simpler that that can you? Well actually you can! Lacing the pieces of your arm armour onto your gamberson controls the distance between them and their relative movements—who said this was complicated?
Leather Straps
Leather straps provide movement on a wide variety of period armours. Consider the following when using them:
1. Rivets pull through leather—use a washer next to the
leather to spread the load.
2. Don’t make your straps to narrow or they will break!
3. Don’t make your straps out of very thin leather or they will
break!
4. One long strap is easier than lots of little ones!
5. The plates will need room to move; if the edge of the plate
is millimetres away from the rivet in the next plate it will only be able to move millimetres!
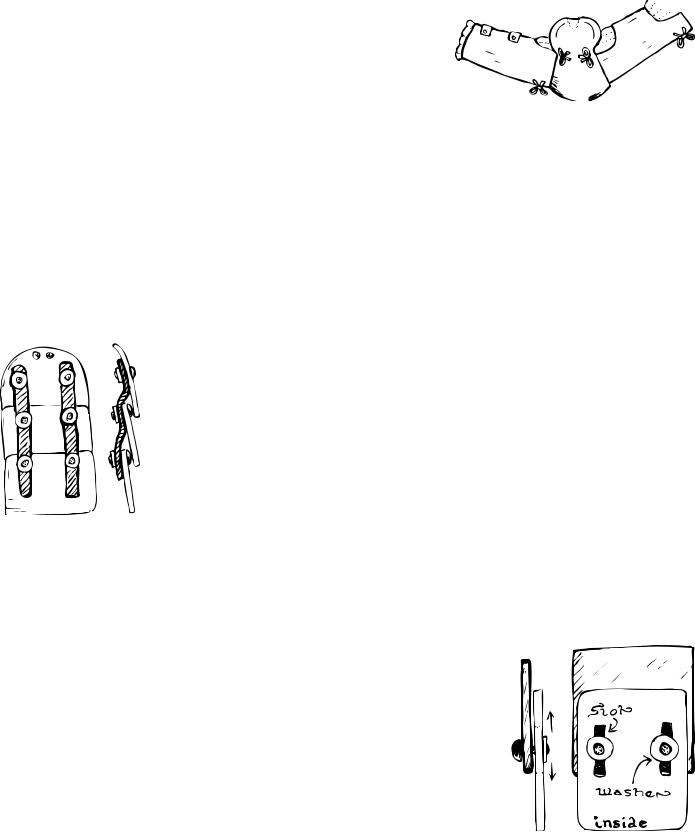
Sliding rivets
These provide a ‘side to side’ or ‘up and down’ type of movement. To produce a sliding rivet simply file one rivet hole (generally the inside one) into a slot them loosely rivet the plates in place; you generally need a sliding joint on both sides the get the plates to move. Useful hints:
1. The slot goes in the direction of movement - it can be a
curve if necessary. 2. For ‘side to side’ movement the slots need to be close to
the front of the inner plate or everything will lock up and jam.
21
ADVANCED METAL WORKING TECHNIQUES
Rotating joints
These are particularly useful on elbows and knees. The trick is to get the plates to articulate smoothly to a certain point then lock against each other and stop. If they don’t lock they will keep moving and gap; gaps allow weapons to get in. Gaps are bad!
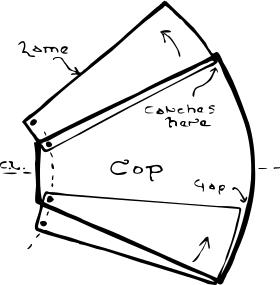
The diagram to the right shows how the lames work; the upper lame is shown rotated fully out, the lower one rotated fully in. Note how the curvature of the lame matches that of the cop when it is in the fully out position.
Everything depends on where you place the rivet holes:
1. Rivet holes are symmetrical; if the hole on the right side of the lame is 1cm in the hole on the left should be 1cm in.
2. Note how, with the lower plate fully in, the line of rivet holes are on a curve not a straight line.
3.In the fully in position the lame project below the surface of the cop, therefore you
need to allow room for it between you and the cop, that is the cop isn’t a skintight fit to the joint.
4.Remember to make the rivet holes one size larger than the rivet or else the rivet shank will compress, as you pein it, locking everything in place!
22
Chapter 8 — Padding
Because you need to build your armour around your padding you need to know how to make it first!
Gamberson
This supplies basic padding under the body armour and something to hang your arm armour off. Some people rely on their gamberson (with a few minor additions such as a kidney belt) as their torso protection. This gives them excellent mobility at the expense of protection. If you are learning to fight, as well as armour, you are liable to get hit a lot so body armour might not be a bad idea—your choice!
Making a gamberson is a sewing job;
go get a needle and thread or borrow a sewing machine. The material you
make it from should be relatively 


 tough (it’s going to take a beating),


 adsorbent (you are going to sweat into it), colour fast (unless you want to start a new fashion in oddly coloured flesh) and washable (see sweating above). Period gambersons were made from multiple layers of cloth stitched together or padded with raw wool or similar material, modern ones often use an internal fill of cotton or polyester batting to achieve the same look with less weight. A description of an arming doublet of the 15th century is “a dowbelet of ffustean (a type of heavy woollen broad cloth) lyned with satene cutte full of hoolis”. A heavy outer material, such as canvas or calico, is therefore appropriate with a softer lining next to the skin. For extra ventilation you can add buttonholes down the quilting seams.
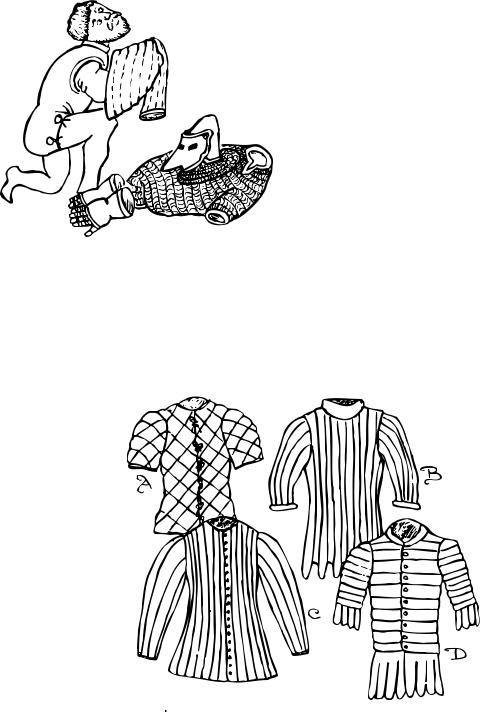
The shape of your gamberson (see illustrations above) depends on the period you are trying to portray. From a practical point of view it should allow you to
23
PADDING
move. Arm movement is especially important; if you can’t cross your arms in front of you or move your arm above your head the design is too constricting.
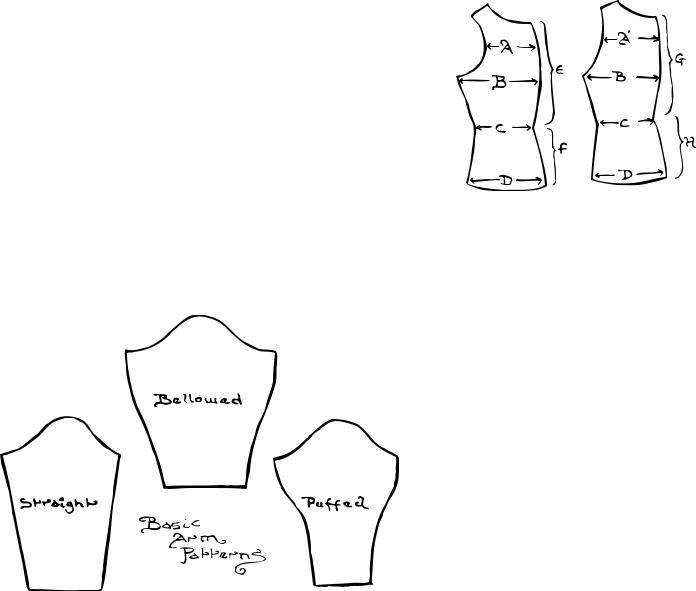
A pattern that will work well for most gambersons is as follows: 1. Take measurements as shown to the left.
A= 1/2 upper chest (arm to arm)
A’= 1/2 upper back (armpit to armpit)
B= 1/4 chest measurement C= 1/4 waist measurement D= 1/4 hips measurement plus 2 to 5 cm E= collarbone to waistline
F= waistline to bottom of skirt
G= back of neck to waistline H= waistline to bottom of skirt (back)
Note that the waistline in the late medieval period tended to be higher than today’s and was
measured just under the ribs. This will give you the basic torso.
For earlier period gambersons the measurement C should be about the same as measurement D giving a tubular trunk. Later period tended to have a more pronounced waistline following the whims of fashion, in which case measurement C should be a rather snug fit. For a flared skirt increase measurement D. Remember to keep the armholes large for
ease of movement.
2. Cut out one set of panels, baste together (long, easily removable stitches) and try it on. Go through your range
of fighting motions and
make sure that it does
not pinch or bind. Cut and modify to suit then remove the stitches,
add 5 to 8cm extra (2 -3 inches) to the measurements to allow for the quilting then use the adjusted pieces as patterns to cut the rest of the cloth.
3.You can make gambersons out of pre-quilted cloth, or you can sew your own quilting - simply cut two identical panels, one of the outer and one of the inner fabric, machine stitch rows down them then stuff the rows with whatever you have at hand.
4.Cut out, sew and pad arms in the same manner. These can be attached to the body either by hand stitching or by points and ties, which have the advantage of leaving the armpits open and ventilated.
5.Add closures down the front (laces or buttons) and arming points; laces to attach your arm and shoulder armour.
24