

Publishing history - Basic Armouring
.pdfMATERIALS
Rivets for Armour
|
Type |
Material |
Use |
Looks Like |
|
|
|
|
|
|
|
|
Flat Head |
Mild Steel |
Helms |
|
|
|
('cos they wreck rattan swords less!) |
|
|
||
|
|
|
|
|
|
|
|
|
|
|
|
|
Round Head |
Mild Steel |
Articulations |
|
|
|
('cos they look nice!) |
|
|
||
|
|
|
|
|
|
|
|
|
|
|
|
|
Flat/Round |
Brass |
Decoration |
|
|
|
|
|
|
|
|
|
|
Alaminium, often |
Riveting onto leather or cloth. |
|
|
|
Tubular |
coated to give |
Not authentic but great for straps, |
|
|
|
|
Brass effect) |
buckels, etc. |
|
|
|
|
|
|
|
|
|
Nails |
Mild Steel |
Can't find a rivet? |
|
|
|
Cut a nail down! |
|
|
||
|
|
|
|
|
|
|
|
|
|
|
|
|
Roofing Nails |
Mild Steel |
Riviting onto leather or cloth |
|
|
|
—very cheap! |
|
|
||
|
|
|
|
|
|
|
|
|
|
|
|
Wood
Plywood makes good shields — obtainable from any DIY shop, builders merchant or the like.
Brass
Expensive, heavy and not strong enough for important pieces; brass is however great for decoration.
Aluminium
Not at all period. However sometimes turns up as scrap and can be used to make lightweight body plates or the like. Dural, aircraft grade aluminium alloy, is much tougher and can be used to make shields.
Thermoplastic
Not period, surprise! Ideal for lightweight body plates or hidden stiffeners under leather or cloth; sort of inauthentic hard leather. Great for keeping your total armour weight down so as to avoid excess baggage charges when flying to events around Europe. Can shatter if it gets too cold, for exaple, Finland in winter. Guess how I found that out?
Cloth
Used to make undergarments or to hold armour together as in coat of plates and the like. Markets, material remnant shops, re-enactors markets, charity shops, sewing shops and the like are good places to look for materials at reasonable prices. If you are looking for canvas you can also try a tent maker or camping shop.
5
MATERIALS
6
Chapter 3 — Tools
You are going to have to acquire a few basic tools, as you progress you will probably acquire a few more! New tools can be expensive so start looking around second hand tool shops, junk shops, steam rallies, agricultural or engineering auctions or tool sales. You will also need a place to work, somewhere where the noise won’t drive the neighbours mad. You are also going to need somewhere with a good floor or you will hammer through it! A shed or garage is fine.
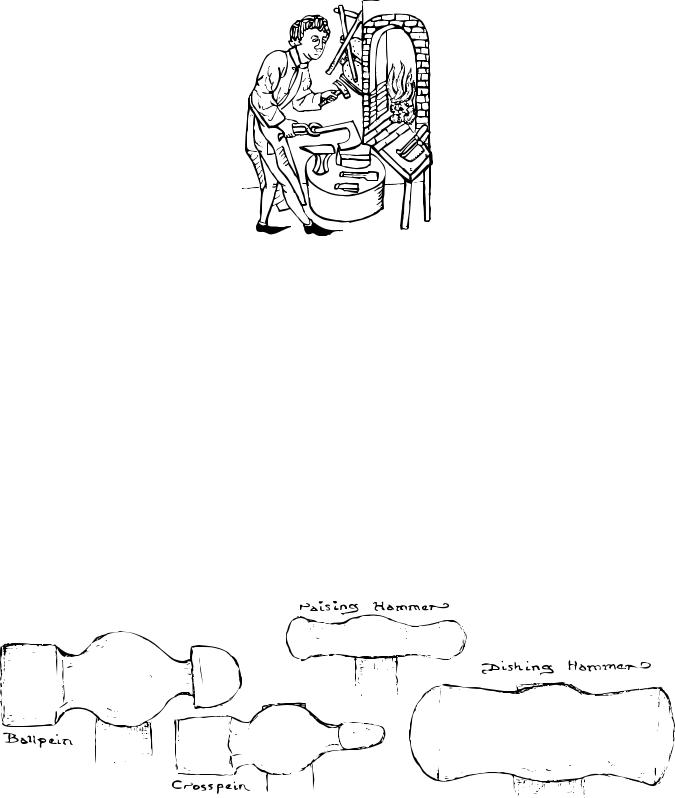
Hammers
You will need a hammer to rivet with; a small ballpein, about a pound weight, is ideal. You will also need a soft hammer to bend things with, look for a relatively hefty rubber or rawhide mallet. These you should be able to find easily. It’s also useful to have a thumping stick for bashing things like nails or cold chisels; basically a fairly heavy hammer whose face you don’t mind chewing up!
For shaping work you will need hammers with polished faces. Any marks you put into them will be transferred to your work so keep them separate from the general use hammers. A dishing hammer (for making elbows, knees etc.) is a must; anything relatively hefty with a curved face will do. A large round end ballpein can be used, although the curve will be a bit extreme, or you could always grind a flat faced hammer down a bit. It is probably better though to look for a purpose made dishing hammer. Purchasing one new is a good investment although finding one second-hand shouldn’t be too much of a problem. Collecting a variety of dishing hammers will be very useful. A planishing hammer is used to
7
TOOLS
smooth surfaces and remove hammer marks; any flat-faced hammer will do. If you need to do any raising you will need a hammer for this; a large purpose raising hammer is best but the back of a cross pein can be used.
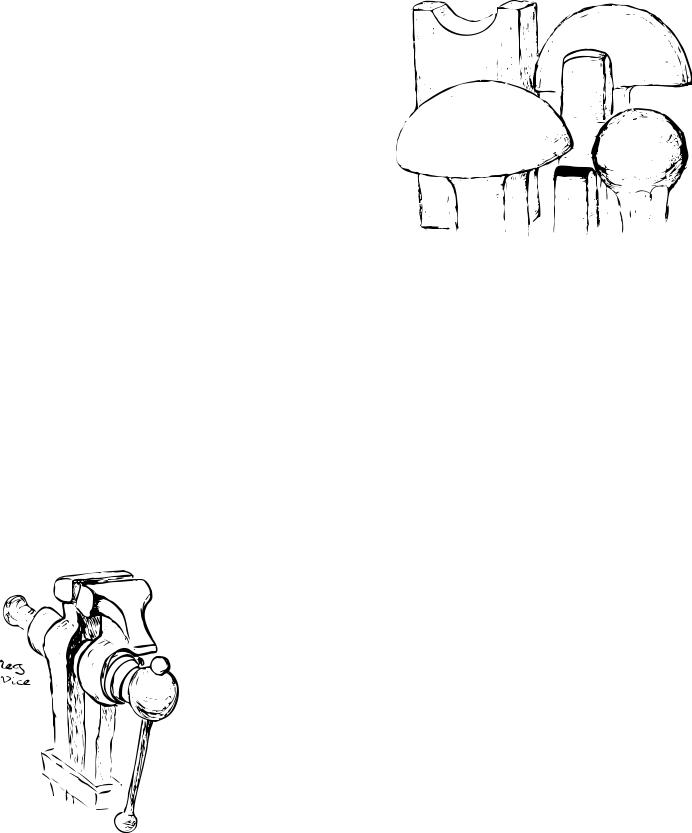
Formers
You will now need something to hammer onto. No don’t rush out and buy an anvil — they can be helpful but are hardly essential, unless you want to be a blacksmith as well. Instead find yourself a tree stump. If you cut
a slight hollow into one part of the top this 


 will form a dishing block. The rest can be used


 for hammering onto. Also look for pieces of


 hardwood as these can be cut into very useful


 shapes for forming things around. Other


 things to keep your eyes open for are lengths


 of metal tube (for bending things over or
 around), bowling balls and odd chunks of metal. Be inventive, failing that buy
some stakes — these come in a variety of shapes and sizes, the mushroom shaped being probably the most useful. Unless you are rich buy them second hand.
Riveting Block
You will need a smooth, flat, hard, surface to rivet onto. If you want to use round head rivets you will need a rivet snap of the correct size. I use an old lump of stainless steel with curved holes drilled into it.
Workbench
Something for marking things out on, holding a vice or clamps, bashing things on etc. Get something the right height. (Workmates tend to be very low.) I made mine out of an old bed frame and scrap wood.
Vice
For holding things like formers, what you’re filing, what you want to thump and a hundred other jobs. The easiest to get is an engineers vice; unfortunately these don’t like being thumped! Instead try to get a leg vice, some times called a blacksmiths vice, they are fairly common second hand and are designed to be hammered onto. Mount it onto your workbench.
Cutters
Making armour will involve cutting lots of devious shapes from pieces of metal; a decent cutter is therefore a good invest-
8
TOOLS
ment. A decent cutter is perhaps the most awkward tool to find at a reasonable price.
The cheapest tool I’ve ever seen used was a cold chisel. Simply chisel the shapes out on an anvil, then grind them into something useable. Very noisy and time consuming — not recommended.
At the bottom end of the more practical range of tools is the humble hack saw — cheap, cheerful but will take you forever. You can use an electric jigsaw but they tend to be very noisy and rather time consuming as well. Make sure you use the correct blade and support the steel to prevent it bouncing around.
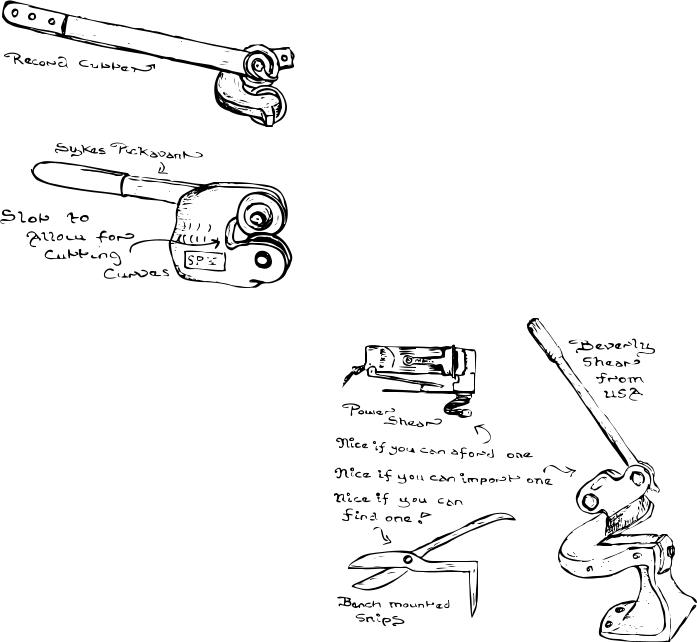
Snips, sometimes sold as Tinsnips or Shears will cut thin steel but you will need a gigantic pair to cut 1.2mm or above with any ease. This is actually very period. Compound action snips or Aviation snips give you a mechanical advantage when cutting; they only handle up to 1.2mm steel though.
Once upon a time just about every engineering shop in Britain had a pair of Record wheel cutters — then someone invented power tools. You can still occasionally find them second hand, though as one dealer said “They are as common as rocking horse shit.” They operate like a giant can opener and can cut lines, curves or complex shapes into 1.6mm or thinner steel. They are supposed to mount into a special block, though I’ve never seen one, but a vice works fine. They also come with an extra handle so you can use them hand held; great for cutting sheets in half. If you see a pair buy them! A similar machine is a Sykes Pickavant Mini Cutter which can also handle up to 16 gauge mild steel.
Modern workshops use floor or bench mounting shears, power nibblers or power shears — yep they all sound expensive. The benchmounted shears are giant guillotines, which cut straight lines very well; they aren’t so hot on curves. Nibblers work by punching lots of small lumps out of your sheet, rather messy and very noisy. Power shears are great if you afford them (around £300) and aren’t left handed like me. Depending on the input power they can handle thick plates (for example, a Bosch GSC2.8 will cut up to 2.8mm steel). I have seen a nibbler attachment for an electric drill
9
TOOLS
made by Falcon Tools that claims to cut up to 1.5mm steel but have never tried one. Good hunting!
Hole Maker
To put rivets in you need holes. For cloth push a sharp point through, thus cutting as few fibres as possible. For leather get a punch — belt punches are far superior to the hand punches, with the rotating head, which tend to bend if used a lot. For metal a good old electric drill does fine; use HSS drills not wood working ones, or if you want to drill stainless use Boron Carbine tipped drills. If you put a leather washer on the drill next to the chuck you will prevent it scratching if you push your drill in too far. Period armourers probably punched their holes, the modern equivalent is to use a hand punch such as a ‘Whitney metal punch’. I invested in one of their “No.5 junior hand punch” sets a few years ago and found it saved a lot of time and effort! It punches 3/32 to 9/23 inch holes in up to 16 gauge steel. You will also need a centre punch to mark where your holes will go (and give a drill tip something to start off on). After years of cursing the automatic spring loaded punches I gave up and went over to using a good old solid punch and a hammer. So much for modern technology.
Files
A hand file will remove rough edges, finish or shaping your piece or remove that awkward little bit that is jamming things — a small round file will correct that hole that isn’t quite in the right place. Files come in a variety of shapes and degrees of coarseness — it’s worth having a selection. Keep them clean with a file brush (to stop the teeth clogging) and always use them with a handle.
Polishing
A simple polishing and fine grinding machine can be made by mounting a foam sanding wheel on the front of an electric drill. If you mount the drill in a stand things work even better! 150 grit fine belts will remove sharp edges and do fine shaping; when they get worn they can be used to polish. DIY shops only sell 150 or less grit. The less the number the coarser the paper. Tool shops sell finer grades normaly for belt sanders but they fit wheels, just check the diameter when you buy. I find 220 or 280 grit give a nice finish.
A fine polishing machine can be made from a cheap bench grinder. Take the grinding wheels off and replace them with mops. OK they don’t run up to the same speed as a proper polishing machine but they cost a tenth of the price and don’t need a three phase electric supply! If you put a Sisal mop on one side, a stitched cloth finishing mop on the other and use stainless steel polishing compound you can get a mirror finish with a bit of effort.
Other useful bits
Fine felt tip pen for marking things out, scissors, cardboard and sticky tape for templates, nuts and bolts to hold bits together before you rivet them, cold chisel
10
TOOLS
for getting things apart when you rivet them in the wrong place, G-clamp to give you that extra hand (evolving without a tail was definitely a mistake), washers, trimming knife for cutting leather, pliers, even more hammers.
11
TOOLS
12

Chapter 4 — Safety
If you are going to do something do it well and do it safely. Wear leather gloves whenever possible to stop you getting cuts; hey they even make ones with Kevlar in these days. Throw away sharp edged off cuts, swarf, etc. somewhere safe; not the floor or the bench you are about to put your hand. Remove sharp edges before holding bits with your hands and before wearing it! Wear eye protection especially when drilling, grinding, sanding or polishing. Wear a dust mask when polishing, sanding, grinding, etc. When drilling make sure the item is held firmly and remove any swarf caused by the drilling. Ear protectors are a good idea especially when dishing or using a noisy cutter. Wear toe protection footwear and wear sensible clothing.
Armouring is fun; injuring yourself isn’t! DIY shops and industrial clothing/ safety shops will sell protective bits — they are a good inexpensive investment,
Honest!
13
SAFETY
14