

Professional Java.JDK.5.Edition (Wrox)
.pdfChapter 5
drawing program. You will not be implementing any actual image manipulation functionality in the application, but merely persistence and serialization code to show how to save the application’s data model to disk — how to persist the state of the application.
Since your application is merely a placeholder for learning serialization, you will delve into designing a data model for the Imager’s configuration settings. Many applications have various preferences, settings, and options available for users to change and modify. Web browser’s can store a user’s HTTP proxy settings; mail client programs store the server names and passwords for a user’s e-mail account. These preferences are generally stored on disk, sometimes in the user’s home directory, sometimes in the application’s root directory. The first step to building any sort of data model that can eventually be persisted to disk is identifying attributes you want to save. Your Imager program probably should have settings for, at the least, the following properties:
Location of the user’s home directory or default directory to load and save files
A list of recent files loaded or saved by the user
Whether or not the application should use a tabbed windowed interface or a multiple document interface (MDI) with child windows
Foreground and background colors last used (for drawing or painting operations)
The last positions of the tool and palette windows within the application when the application was last closed
In a full-fledged paint or photo editing application, there would probably be many more configuration options that users could potentially persist to a file. However, the process is the same, and can also be applied to saving application data such as a custom image format, or reading and writing other image formats into your application’s structure. Persisting information in Java objects to the file system is the same whether it is application configuration data or simply application domain data itself. Figure 5-2 shows the actual model of the data in UML and Figure 5-3 shows an example object graph of an actual instance of the data model.
Configuration |
|
-userHomeDirectory : string |
|
-showTabs : bool |
1 |
-recentFiles : string[] |
|
1 |
|
-backgroundColor, foregroundColor
2
2 |
-paletteWindowPosition, toolsWindowPosition |
java.awt.Point
-…
java.awt.Color
-…
Figure 5-2
226
Persisting Your Application Using Files
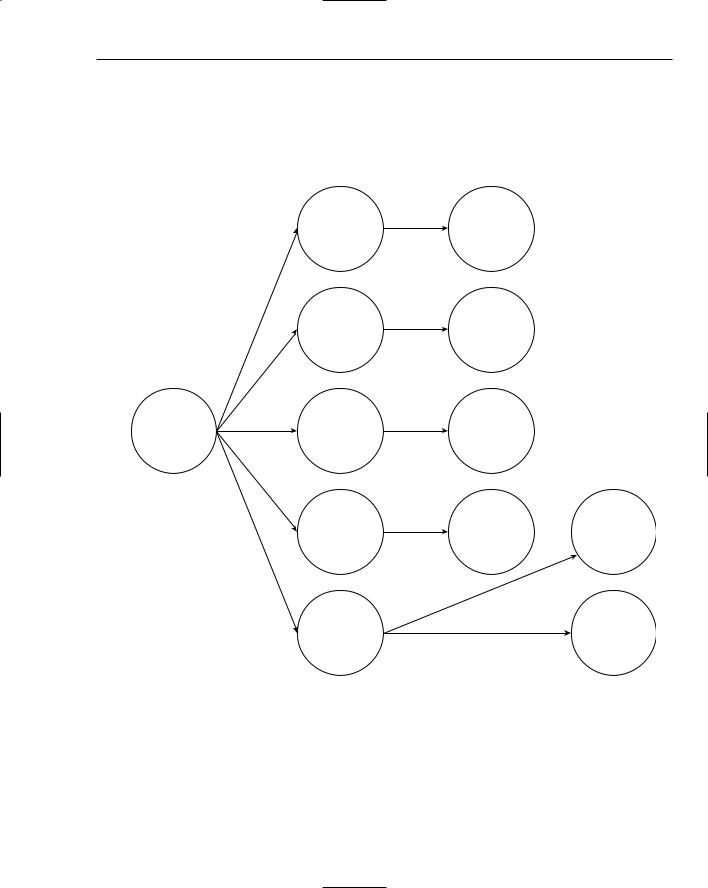
Configuration is the root object. It uses classes from java.awt to represent colors and points. In the object graph below, you can see that an instance of configuration also contains references to instances of java.awt.Color and java.awt.Point. When you persist the information in a Configuration instance to disk, you must also save the information contained in the Color and Point instances (and any other class instances they may also reference), if you want to be able to recreate your Configuration object at a later point in time.
Configuration
Figure 5-3
foreground (instance of Color)
background (instance of Color)
palettePos (instance of Point)
toolsPos (instance of Point)
recentFiles (instance of String [])
…
…
…
… |
"file1.txt" |
"file2.txt"
You will design Configuration using the Java Beans architecture (getXXX and setXXX for all properties in your class). Your application itself will read the configuration settings from this class and appropriately apply them throughout the application. It is typical to use Java Beans conventions to store data in Java-based data models. The standard mechanism by which to set and get data properties allows the designer to use many tools that are based on those standards (XMLEncoder/Decoder as you will later see for one). Object-relational-mapping tools allow the developer to map Java objects to a database. Almost all of these tools require the data to be accessible by using Java Beans conventions. It is just good practice and design.
227

Chapter 5
Java Serialization: Persisting Object Graphs
One approach to saving a data model to disk is to write all of the object instances in the data model’s object graph to disk, and then simply reload them at a later time. This is the approach taken by the Java Serialization API. It saves actual object in-memory instances to disk. Serializing an object is the process of writing its data members to disk. Deserializing an object is the process of reconstructing the object instance from the data members written to disk. Suppose you have a simple class MyPoint:
package book;
public class MyPoint { public int x;
public int y;
public void doSomething() { ... }
}
To save an instance of MyPoint to disk, its two data members must be written to disk. Saving x and y allow you to create a new instance of MyPoint at a later point in time and set its x and y values to the ones saved to disk — effectively recreating the original instance. The method doSomething() is already specified in the compiled class file, and there is no need to store any method information in the serialization process. All a class instance is in memory is the values for all of its attributes. To serialize an instance to disk, all of its data members must be saved. What if a data member is a reference to another object instance? The reference itself is just a memory address and would obviously be meaningless to save. The object instance the reference points to also would need to be saved as well. Suppose you add a color attribute to MyPoint:
package book;
import java.awt.Color;
public class MyPoint { public int x;
public int y;
private Color pointColor;
public void doSomething() { ... }
}
The data members of the instance of java.awt.Color must now also be saved. As you can see, the entire object graph of an object instance must be saved when it is serialized to disk. If only x and y were saved from MyPoint and then subsequently recreated in MyPoint later, its color information would be lost. So how is an external API able to access all of the fields of a particular class? Java’s reflection mechanism allows the dynamic ability to find out the fields and field values of any class, whether those fields are marked public or private. Thankfully, the Java Serialization API takes care of all these details for us, and it is easy to serialize object instances to disk.
Note: It is important to note that the file format used by the Java Serialization API is a special binary file format developed specifically for Java Serialization and therefore not human-readable. It is an efficient format, but also specific to Java.
228

Persisting Your Application Using Files
Key Classes
The Java Serialization API hides most of the complexity required to save off object graphs to disk (such as circular references and multiple references to the same object). There are really only two interfaces and two classes that need to be learned in order to use the API. ObjectInputStream and ObjectOutputStream are two stream classes that can be wrapped around any type of java.io. InputStream or java.io.OutputStream, respectively, making it possible to send serialized objects over a network or simply save them to disk. The two interfaces, Serializable and Externalizable,
allow for implementing classes to be serialized. If a class does not implement one of these two interfaces, it cannot be serialized using the API. This means that if a class that does implement either Serializable or Externalizable contains a reference to a class that does not implement that interface somewhere in its object graph, it cannot be serialized successfully without some modification (discussed later on in this chapter).
Class or Interface (From java.io) |
Function |
|
|
Serializable |
Interface for marking the fact that a class supports |
|
serialization |
ObjectInputStream |
Input stream used to read object instances that were writ- |
|
ten by an ObjectOutputStream |
ObjectOutputStream |
Output stream used to write object instance data that can |
|
later be read by an ObjectInputStream |
Externalizable |
Interface that extends Serializable to give a class com- |
|
plete control over how it is read and written to streams |
|
|
Serializing Your Objects
Performing the actual serialization of objects is straightforward. There are four main steps.
1.Make sure the class to be serialized has a default constructor (one that takes no arguments).
2.Implement the Serializable or Externalizable interface to mark the class as supporting serialization.
3.Use ObjectOutputStream to serialize a class instance.
4.Use ObjectInputStream to read a serialized instance back into memory.
Classes you wish to serialize must have default constructors. This is because the serialization API needs to create blank instances of the class when it recreates object instances saved to disk — it does so by calling the default constructor. After it creates the new class, it simply populates the data members of the class via reflection (so accessor and mutator methods are not required for private data members). The class must also be marked as serializable by implementing the Serializable interface. The Serializable interface contains no method definitions; it is simply a marker to the serialization API to indicate that the class is indeed serializable. Not all classes store their data — the classic example is java.sql.ResultSet, which is used in the Java DataBase Connectivity API (JDBC) to access data from a database. The ResultSet object is querying the database for data when its methods are called and hence it does not store the information it returns. Since it is a mediator between the client and the
229

Chapter 5
database, it has no information to serialize! The Serializable interface exists to give developers the ability to mark certain classes as potentially serializable — essentially meaning the author of a particular class planned for the fact that the class may be saved to disk. The Externalizable interface gives developers more control over the actual serialization process, and it will be discussed in more detail later on in this chapter.
Configuration Example: Saving Your App’s Configuration to Disk
Earlier, you developed the high-level data model for a sample configuration for your generic image manipulation application. Suppose that now you want to develop that data model and the UI components to save and load it from disk. The first step is translating your data model into code. You will have one class, Configuration, represent the application’s configuration. You will model it using the Java Bean conventions, implicitly provide it a default constructor (by having no constructors), and implement the Serializable interface. The two classes referenced in Configuration, java.awt.Point, and java.awt.Color also both implement Serializable, so the entire graph is guaranteed to serialize. The code for Configuration is as follows:
package book;
import java.awt.Color; import java.awt.Point; import java.io.Serializable;
public class Configuration implements Serializable {
private String userHomeDirectory;
private Color backgroundColor; private Color foregroundColor;
private boolean showTabs;
private Point paletteWindowPosition; private Point toolsWindowPosition;
private String[] recentFiles;
public Color getBackgroundColor() { return backgroundColor;
}
public void setBackgroundColor(Color backgroundColor) { this.backgroundColor = backgroundColor;
}
public Color getForegroundColor() { return foregroundColor;
}
public void setForegroundColor(Color foregroundColor) { this.foregroundColor = foregroundColor;
}
230

Persisting Your Application Using Files
public Point getPaletteWindowPosition() { return paletteWindowPosition;
}
public void setPaletteWindowPosition(Point paletteWindowPosition) { this.paletteWindowPosition = paletteWindowPosition;
}
public String[] getRecentFiles() { return recentFiles;
}
public void setRecentFiles(String[] recentFiles) { this.recentFiles = recentFiles;
}
public boolean isShowTabs() { return showTabs;
}
public void setShowTabs(boolean showTabs) { this.showTabs = showTabs;
}
public Point getToolsWindowPosition() { return toolsWindowPosition;
}
public void setToolsWindowPosition(Point toolsWindowPosition) { this.toolsWindowPosition = toolsWindowPosition;
}
public String getUserHomeDirectory() { return userHomeDirectory;
}
public void setUserHomeDirectory(String userHomeDirectory) { this.userHomeDirectory = userHomeDirectory;
}
}
Writing the Configuration to Disk
With your configuration data model in hand, you can write the code to serialize and deserialize instances of Configuration. Saving an instance of Configuration is almost too easy. First, you create an ObjectOutputStream object, and since you want to save your instance of Configuration to a file, you wrap it around a FileOutputStream:
ObjectOutputStream out = new ObjectOutputStream(
new FileOutputStream(“appconfig.config”));
231

Chapter 5
Now you can create an instance of Configuration and save it to the file appconfig.config:
Configuration conf = new Configuration(); // ... set its properties
out.writeObject(conf);
Now all you have to do is close the stream:
out.close();
Note: Multiple object instances (of potentially differing types) can be written to the same ObjectOutputStream. Simply call writeObject() more than once, and the next object is appended to the stream. Also note that the file extension config, appended to the file, was arbitrarily chosen.
Reading the Configuration from Disk
Deserializing objects back into memory is as easy as serializing them. To read your configuration data model from disk, you create an ObjectInputStream wrapped around a FileInputStream (since in this case you saved your Configuration instance to a file):
ObjectInputStream in = new ObjectInputStream(
new FileInputStream(“appconfig.config”));
The counterpart to ObjectOutputStream’s writeObject() is readObject() in ObjectInputStream. If more than one object was explicitly written with multiple calls to writeObject(), readObject() can be called more than once. The method readObject() returns an Object that needs to be cast the proper type — so the developer must know some of the details about the order in which object instances were saved to the stream. In addition to potentially throwing a java.io.IOException if the stream was corrupted or other I/O error, readObject() can throw a java.lang.ClassNotFoundException. The ClassNotFoundException occurs if the VM cannot find the class for the type of the object instance being deserialized on the classpath. The following line of code reads your Configuration object back into memory:
Configuration conf = (Configuration) in.readObject();
After reading the object back in, you can use it like you use any normal Java object. After you are done with your ObjectInputStream, you close it as you do any other subclass of InputStream:
in.close();
As you can see, reading and writing objects using ObjectInputStream and ObjectOutputStream is a simple process with powerful functionality. Later on in this Java Serialization section there will be talk about customizing and extending the serialization process, as well as some of the pitfalls that can occur along the way.
Wrapping Serialization and Deserialization Code into Swing Actions
Now that you have seen how to create and store data models, it is time to see your configuration data model serialization and deserialization code in the context of a real application. Since your application is
232
Persisting Your Application Using Files
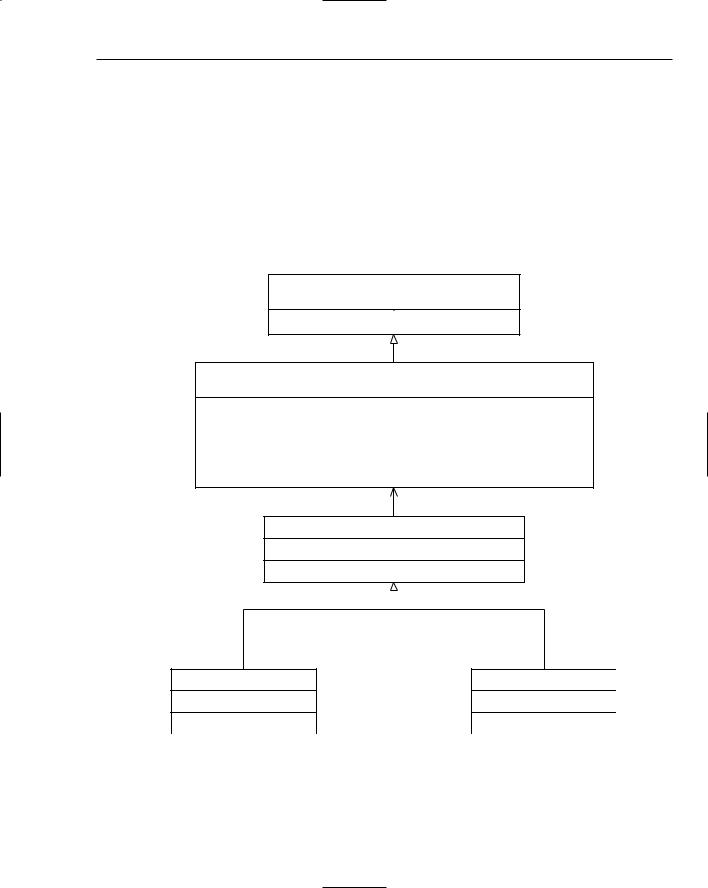
a JFC-based Swing application, you will integrate your code to serialize and deserialize Configuration into the UI framework via Swing’s javax.swing.Action interface. Actions are a useful way to generalize UI commands — such as a save or open command. These commands usually appear in multiple places in a UI. In the case of save and open, usually in the File menu and on the application’s toolbar. Swing components such as menus and toolbars allow actions to be added and they create the necessary events and properties to control them. Actions abstract away some of the UI code, and allow the developer to concentrate on the logic of an action, like saving a file to disk. Your actions will need a reference to your application, to get and set its configuration before it serializes or deserializes the Configuration instance. Your actions will inherit from the class javax.swing.AbstractAction as that class takes care of all of the methods in the Action interface except for the event method actionPerformed(). The class diagram that follows in Figure 5-4 illustrates where your actions, LoadConfigurationAction and
SaveConfigurationAction, fit with respect to Action and AbstractAction.
«interface»
ActionListener
+actionPerformed(in event : ActionEvent) : void
«interface»
javax.swing.Action
+addPropertyChangeListener(in listener : PropertyChangeListener) : void +getValue(in key : String) : Object
+isEnabled() : bool
+putValue(in key : String, in value : Object) : void +removePropertychangeListener(in listener : PropertyChangeListener) : void +setEnable(in enabled : bool) : void
javax.swing.AbstractAction
-…
+actionPerformed(in event : ActionEvent) : void
LoadConfigurationAction
-myApp : Application
Figure 5-4
SaveConfigurationAction
-myApp : Application
All of the code for both of these actions will reside in the event-driven method, actionPerformed(). When the user of the application clicks the save configuration menu item or button, this code will be invoked. The same goes for the action to load the application’s configuration.
233

Chapter 5
The main area of interest in any Action implementation is the actionPerformed() method. This method is called when a user clicks the menu item or button containing the Action. For your save action, you want the user first to be prompted to choose a file location, and then save the application’s Configuration object instance to that file location. The implementation is fairly straightforward. First, a file chooser is displayed, and if the user selects a file, the application’s Configuration instance is retrieved:
public void actionPerformed(ActionEvent evt) { JFileChooser fc = new JFileChooser();
if (JFileChooser.APPROVE_OPTION == fc.showSaveDialog(myApp)) { try {
Configuration conf = this.myApp.getConfiguration();
Now that you know the file location to save to, you simply serialize the Configuration object to disk to eventually be loaded at a later point in time:
ObjectOutputStream out = new ObjectOutputStream(
new FileOutputStream(fc.getSelectedFile()));
out.writeObject(conf);
out.close();
}catch (IOException ioe) {
JOptionPane.showMessageDialog(this.myApp, ioe.getMessage(), “Error”,
JOptionPane.ERROR_MESSAGE);
ioe.printStackTrace();
}
}
}
The load action is similar to the save action. Again, the user is first prompted for a file. If the user selects a file, you will try to open it. To read your Configuration object instance back into memory so it can then be loaded into the application, you must create an ObjectInputStream. The ObjectInputStream is creating a FileInputStream, which reads the data from the file the user selected:
public void actionPerformed(ActionEvent evt) { JFileChooser fc = new JFileChooser();
if (JFileChooser.APPROVE_OPTION == fc.showOpenDialog(myApp)) {
try {
ObjectInputStream in = new ObjectInputStream(
new FileInputStream(fc.getSelectedFile()));
If the user selects a file that is not a serialized instance of Configuration, an IOException will be thrown when readObject() is called. If the instance of Configuration is successfully read, load it into the application via the application’s setConfiguration() method. It’s that simple — the application has now loaded a previously saved instance of Configuration:
234

Persisting Your Application Using Files
Configuration conf = (Configuration) in.readObject();
in.close();
myApp.setConfiguration(conf);
}catch (IOException ioe) { JOptionPane.showMessageDialog(this.myApp,
“File is not a configuration file!”, “Error”, JOptionPane.ERROR_MESSAGE);
ioe.printStackTrace();
}catch (ClassNotFoundException clEx) { JOptionPane.showMessageDialog(this.myApp,
“Classpath incorrectly set for application!”, “Error”, JOptionPane.ERROR_MESSAGE);
clEx.printStackTrace();
}
}
}
Giving Your Application a Time-based License Using
Serialization
Serialization can be used in a variety of helpful ways. It is easy to save Java Beans and the data models for various kinds of application data as seen in the last example. Serialization, though, is not limited to simply saving objects to disk. Since ObjectInputStream and ObjectOutputStream are subclasses of InputStream and OutputStream, respectively, they can be used in any situation that a normal stream could be. Objects can be serialized over the network or read from a JAR file. Serialization is a fundamental aspect of Java’s Remote Method Invocation (RMI) — it is the technology behind passing objects by value in RMI method calls.
To continue with the Imager Application example, suppose you want to give it a time-based license. For the demo version of the application, it should only be fully active for 30 days. After 30 days, users will be required to purchase a full license to use the product. There are many ways to do this, but using the serialization API could be an effective way to produce a time-based license file. The biggest challenge to creating time-based licenses is making it difficult for the user to overcome the license, which they usually can do by setting their computer’s clock to an incorrect time, or by modifying whatever license file gets distributed (or registry key for some Windows’ based applications, et cetera). Since Java’s serialization produces a binary format that is unfamiliar to anyone except Java developers, it will make a good format for the application’s license file. The application will also need some mechanism to guard against users setting the incorrect date on their computer clock to give them a longer license. To do so, the application will authenticate the license file against a timeserver on your network. The high-level design is shown in Figure 5-5.
235