

Introduction to V-Ray
.pdfINTRODUCTION TO V-RAY Chapter01-V-RayGlobalIllumination
Fig.26 Light Cache only for GI – 50 samples, sample size 0.02
Fig.27 Light Cache only for GI – 250 samples, sample size 0.02
Fig.28 Light Cache only for GI – 500 samples, sample size 0.02
Fig.29 Light Cache only for GI – 1000 samples, sample size 0.01
Fig.30 Light Cache only for GI – 2000 samples, sample size 0.01
Fig.31 IR map + Light Cache only for GI – 1000 samples – the base for a great GI solution!
PHOTON MAP
A decent solution for previews, due to the fact that it generates the GI for the entire scene, when compared to just the camera angle; however, it’s very inaccurate, it only works with Vray materials, and does not support environment lighting.
It can be used as a primary GI engine, but is much slower than other solutions; Photon
Mapping is viable as a Secondary GI solution with Irradiance Map.
Bounces: Increase for better image quality, but this increases render times.
Auto Search Distance: Will let V-Ray calculate the search distance to use; it can be checked most of the time, but results should be better by taking time and experimenting with it.
|
|
|
|
|
www.3dtotal.com |
page11 |
Chapter01 |
Search Distance: Lets you control the search distance: reduce to render faster with a high amount of noise; increase for the opposite reaction.
Max Photons: Set to 0 to use all available photons.
Max Density: Limits the memory usage of the Photon Map.
Convert to Irradiance Map: Converts the Photon Map to an Irradiance Map; this is not the same as Irradiance Map, this will render faster than a standard Photon Map.
Inter Samples: Same setting as in Irradiance Mapping.
Convex Hull Area Estimate: Check this if you have issues with dark corners; it will slow down rendering.
Store Direct Light: Self explanatory!
Retrace Threshold: If above 0.0, this will add
Brute Force GI solution for fine details; it will be slower and might be noisier.
Chapter01-V-RayGlobalIllumination INTRODUCTION TO V-RAY
Retrace Bounces: Similar to Brute Force bounces, it only affects if the Retrace Threshold is greater than 0.0.
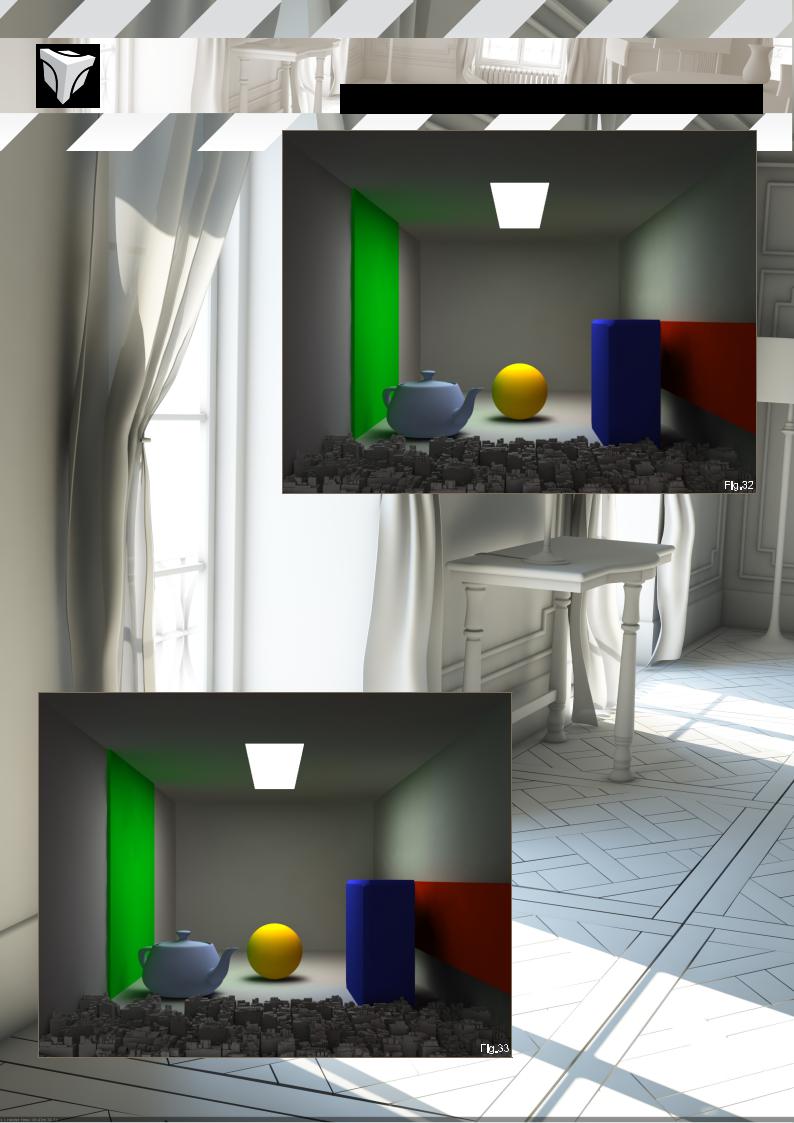
Fig.32 IR Map + Photon Map – some incorrect results, and quite a long render time
Fig.33 IR Map + Photon Map converted to Irradiance Map – same results but much faster render
I usually stick with Light Cache and/or Irradiance Map; Brute Force can be used, but get ready for a long wait if you don’t like noise!
HOW TO
CREATE AMBIENT OCCLUSION
In the Global Switches tab, check Override Mtl and plug in a VRayDirt Map. This will replace all of the scene materials during the render as the one plugged (more details to follow in Chapter 2: Materials).
USE PROGRESSIVE PATH TRACING
Select Light Cache for both primary and secondary bounces in the GI settings; select the mode, Progressive Path Tracing.
Check Show Calc. Phase
Set the Subdivs to 2000 and the sample size to 0.01, and hit render (Fig.34).
You will see the scene build up and noise gradually decreasing; however, there are not enough subdivisions to make a smooth image, so to fix this just add more samples.
Set the Subdivs to 4000; this will multiply the render time by 4 (Fig.35).
|
|
|
|
|
www.3dtotal.com |
page12 |
Chapter01 |

INTRODUCTION TO V-RAY Chapter01-V-RayGlobalIllumination
Still noisy along with an increasingly high render time; if you want it smoother, keep adding samples. One way to do this is to set the samples to 20,000 – 100,000 and cancel the render whenever you wish. This will keep the image you see on the screen as the final render.
Note: you can save the Light Cache generated by Progressive Path Tracing and reuse it for standard IR Map + Light Cache renders.
MAKE GI PREVIEWS
With IR Maps
Set the IR Map to the medium preset, then set it to custom; set the Max rate to -7 and the Min rate to -4; set Light Cache as secondary engine and set the number of samples to 250 with a sample size of 0.08. Hit render.
Fig.36 = 6 seconds, and a decent approximation of your scene! You can increase accuracy of the GI by pushing the Light Cache samples a bit, and/or the Min rate.
With Light Cache
You can use Progressive Path Tracing, but this will be noisy, so just set Light Cache as primary and secondary engine, set the sample to 500-1000, and set the sample size to 0.02. Hit render.
See light cache example above (Fig.29).
LIGHTING A SCENE WITH
ONLY GI
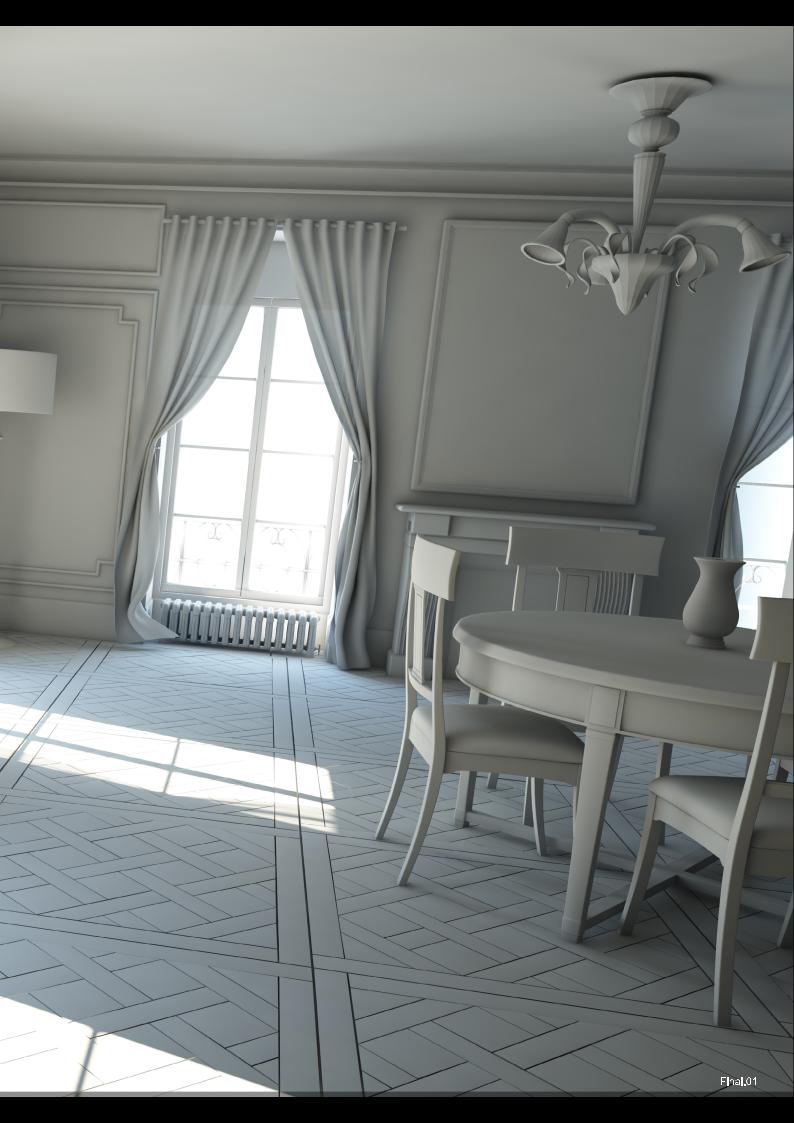
Now let’s tackle a more complicated scene with only sunlight and environment lighting the scene. Let’s see what the best way to preview,
light and render this scene is, without losing fine details or suffering (not too) long render times (Final.01).
The only light source in this scene is a VRaySun, with a V-Ray environmental lighting
linked to the sun. Since light will only come in through the windows, this will create a few
problems, as direct light will only hit on a small portion of the floor.
Fig.37: Direct light only
|
|
|
|
|
www.3dtotal.com |
page13 |
Chapter01 |
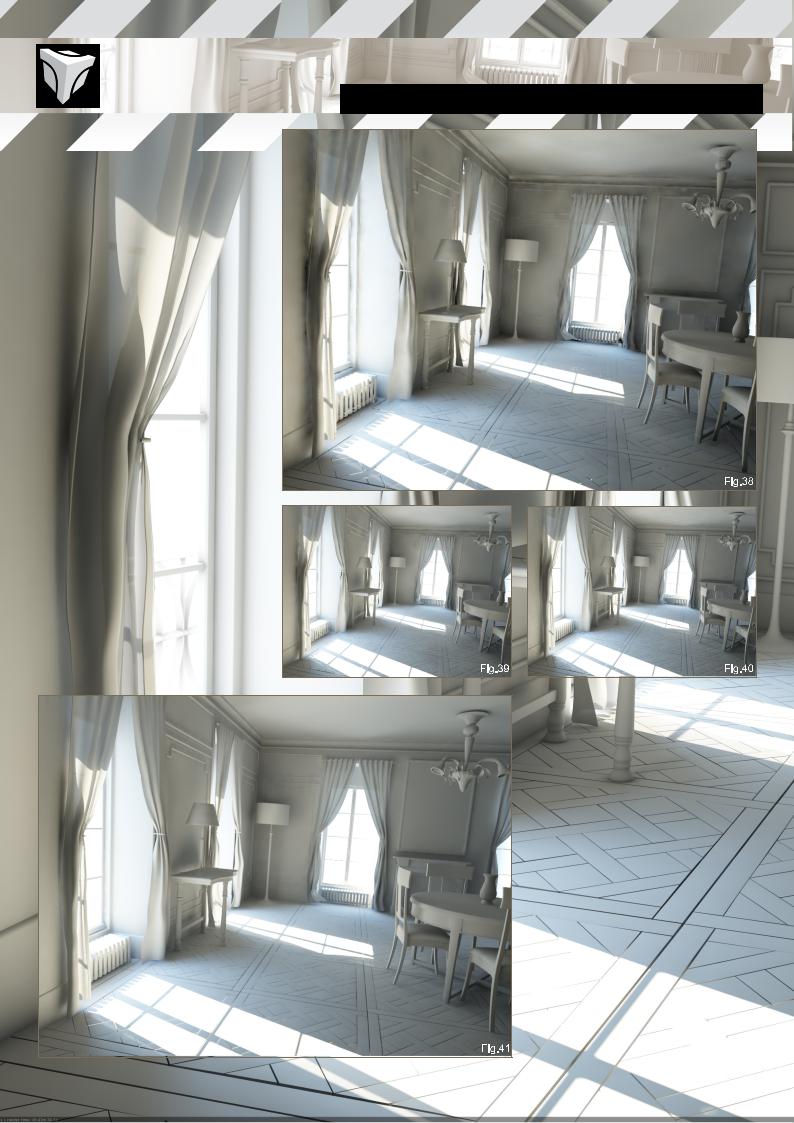
FIND THE RIGHT SOLUTION FOR YOUR SCENE
Fig.38: Irradiance Map + Brute Force GI, set as very low preset – already a four minute render! Let’s try this with Light Cache as secondary bounces…
Fig.39: Irradiance Map + Light Cache, same settings for the Irradiance Map, Light Cache at 1000 samples – rendered in 2:30. This is
better, but obviously not enough detail in the GI solution, so let’s push those settings up!
Fig.40: This time Light Cache Subdivisions are at 2000 and the Irradiance Map settings are on high. A 15-minute render and the render quality is far from perfect; you can see blotchy spots on the wall and ceiling, fine details and corners have a great deal of noise, and you can’t see all the floor tiles. The solution for this will again increase render times: we simply need more hemispherical samples; these will add more rays shooting from direct light bounces. Let’s set them to 100, increase the Interpolation Samples to 30, and reduce the Min and Max rate to -4
or -1. This time you can keep the Light Cache already computed, as only the Irradiance Map needs to be calculated again.
Chapter01-V-RayGlobalIllumination INTRODUCTION TO V-RAY
Fig.41: Now that’s much better – you can see a big difference on the left wall and curtain! However, further away from the camera, blotchiness is still ruining the render – same problems on the floor. This time, let’s rework on the Light Cache: go back to single frame on Light Cache with 0.003 sample size and 3000 samples; in Irradiance Map set the Interpolation Samples to 50, and the Calc. Pass Interpolation to 15. For better details increase the Color
Threshold to 0.4, and finally the Normal
Threshold to 0.2.
Fig.42: Completed in 20 minutes and at a decent quality, but not yet production. At this point, several options are viable: you can simply just increase the Max rate to keep tweaking
the Hemispherical Subdivision; increase the Interpolation Samples … Lots of tweaking is
|
|
|
|
|
www.3dtotal.com |
page14 |
Chapter01 |

INTRODUCTION TO V-RAY Chapter01-V-RayGlobalIllumination
possible! On the other hand, you could rely on an Ambient Occlusion pass to sharpen the fine shadows.
If you have a need for a very high resolution render, a good solution is to compute the GI at half of the final resolution, save it, and then render at full resolution. This will drastically speed up the render! The image improvement from computing GI at 5000 pixels wide compared to 2500 pixels is almost invisible. If you absolutely need more details, the wise
choice would be to make an Ambient Occlusion pass at full resolution and merge it with the final image (Final.01).
CONCLUSION
There, we have tackled most of V-Ray’s Indirect
Illumination settings and finer workings; you now have the tools to light your creations in many different ways, depending on what you need most – accuracy, speed, stills, animation, SD images, and high-res images. The only advice
I can make at this point is to take some time experimenting with V-Ray: play around with the
settings, see how they affect the render itself, the memory usage, and the render time – this can really help once you use V-Ray to render that multimillion poly scene, with a multi-layer, glossy Fresnel refraction and SSS material all over the place!
I personally usually stick with Irradiance Map + Light Cache and add Ambient Occlusion for a basic render. The interpolation types’ sample sizes, as well as most other settings, always need more or less tweaking depending on the complexity of the scene. For previews I use a low sample Light Cache.
If you’re used to overnight renders you can take advantage of Progressive Path Tracing – let it run while you are away at the weekends!
Don’t forget that Irradiance Map and light cache are dependent on the image resolution: a GI solution for 640*480 will not be suitable once you render it at 1920*1200; to speed up tweaking find the tricky parts and use render region.
Be sure to catch the next chapter in this series where we’ll be looking at Vray Materials!
ERIC ENNIS
For more from this artist visit http://www.Eric-Ennis.com
or contact contact@eric-ennis.com
|
|
|
|
|
www.3dtotal.com |
page15 |
Chapter01 |


CHAPTER 02
V-RAY MATERIALS + TEXTURES

INTRODUCTION TO V-RAY Chapter02-V-RayMaterials+Textures
INTRODUCTION TO V-RAY
CHAPTER 02 - V-RAY MATERIALS + TEXTURES
Software Used: V-Ray, 3ds Max
Now that we have had a good look at global illumination in last month’s issue, let’s dive into the material side of Vray. We will not spend much time delving into the creative side of shader building as this is something completely different, we will rather focus on the technical aspects of Vray materials, figuring out what these buttons do. If you are used to another render engine or just leaving Scanline rendering, this will help.
Most settings are common to any render engine and there won’t be any example for the usual setting.
A: VRAY MTL
(See VrayMtlGUUI) Vray’s Bread and butter material is quicker to render than Standard max materials and highly configurable so let’s take a look at it.
Roughness: this is used to fake dust on surfaces, not a replacement for an actual texture map.
Highlight glossiness: this controls the amount of specular reflected from the object, usually locked to reflection glossiness. Unlink them if you don’t need blurry reflections.
Reflection glossiness: allows blurry reflections, any value under 1.0 will result in blurry reflections which slow down render time considerably. Lower the subdivisions to improve render times, or increase it if you get too blurry or inaccurate results.
You can use Vray’s light cache option: Use
light cache for glossy rays to speed up render but remember however that a low light cache setting will result in incorrect reflections.
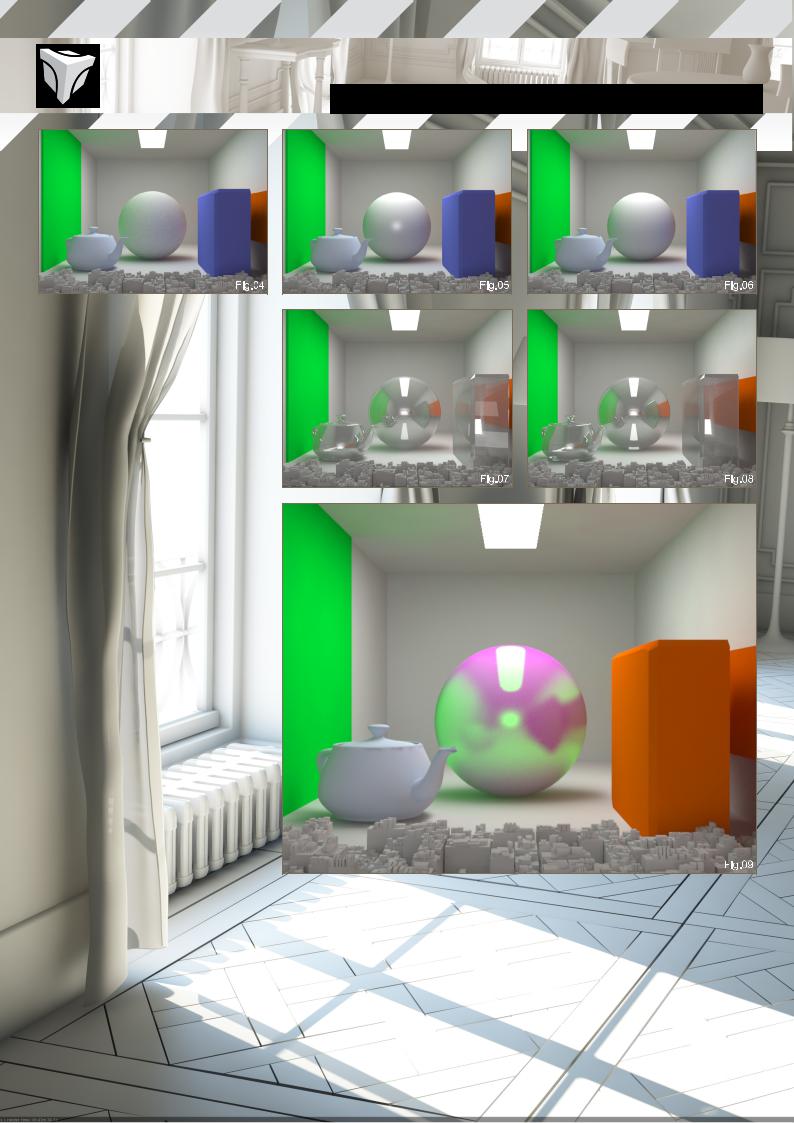
Fig.01: 127.127.127 reflection value, 1.0 highlight and reflection glossiness
Fig.02: 127.127.127 reflection value, .75 highlight and reflection glossiness
Fig.03: 127.127.127 reflection value, 0.1
|
|
|
|
|
www.3dtotal.com |
page19 |
Chapter02 |
Chapter02-V-RayMaterials+Textures INTRODUCTION TO V-RAY
highlight and reflection glossiness subdiv at 8 Fig.04: 127.127.127 reflection value, 0.1 highlight and reflection glossiness subdiv at 2
Fig.05: 127.127.127 reflection value, 0.75 highlight and 1.0 reflection glossiness, no reflections
Fig.06: 127.127.127 reflection value, 0.25 highlight and 1.0 reflection glossiness, no reflections
Max depth: used in reflections and refractions this will set a limit in Vray for how many times a reflection or refraction will bounce inside an object. It can be overridden in Vray’s render dialog with more depth resulting in longer calculations.
Fig.07: max depth at 5
Fig.08: max depth at 2
Affect shadows: creates transparent shadows through refractive objects, only works with VRay lights
Fog: simulates colored refractive objects, such as dirty water, tinted glass etc… this will change the color of the object as well as the shadows cast from it.
Translucency: basically this is SSS, you need to have a glossy refractive material in order to use this, hybrid model is the most accurate; use back side color to tint the SSS shader. The scatter coefficient determines the ray’s angle travelling through the object. 0.0 means light
goes in all directions, 1.0 means light can only follow its initial direction.
OPTIONS:
•Cutoff: threshold to control when to compute or not reflections or refractions, do not set this at 0.0 as it will greatly increase render time (I personally have never changed this setting).
•Environment priority: used to prioritize environmental reflection or refraction previously set over reflecting and refracting the actual scene, useful with HDRI environments.
•Energy preservation mode:
•RGB: blends the reflection color with the diffuse color in the render Fig.09
|
|
|
|
|
www.3dtotal.com |
page20 |
Chapter02 |