
Introduction to V-Ray
.pdf
CHAPTER 01
PAGE 04 | V-RAY GLOBAL ILLUMINATION
CHAPTER 02
PAGE 18 | V-RAY MATERIALS + TEXTURES
CHAPTER 03
PAGE 26 | V-RAY SETTINGS
CHAPTER 04
PAGE 30 | V-RAY LIGHTS
CHAPTER 05
PAGE 36 | V-RAY PLUGINS

CHAPTER 01
V-RAY GLOBAL ILLUMINATION
INTRODUCTION TO V-RAY Chapter01-V-RayGlobalIllumination
INTRODUCTION TO V-RAY
CHAPTER 01 - V-RAY GLOBAL ILLUMINATION
Software Used: V-Ray, 3ds Max
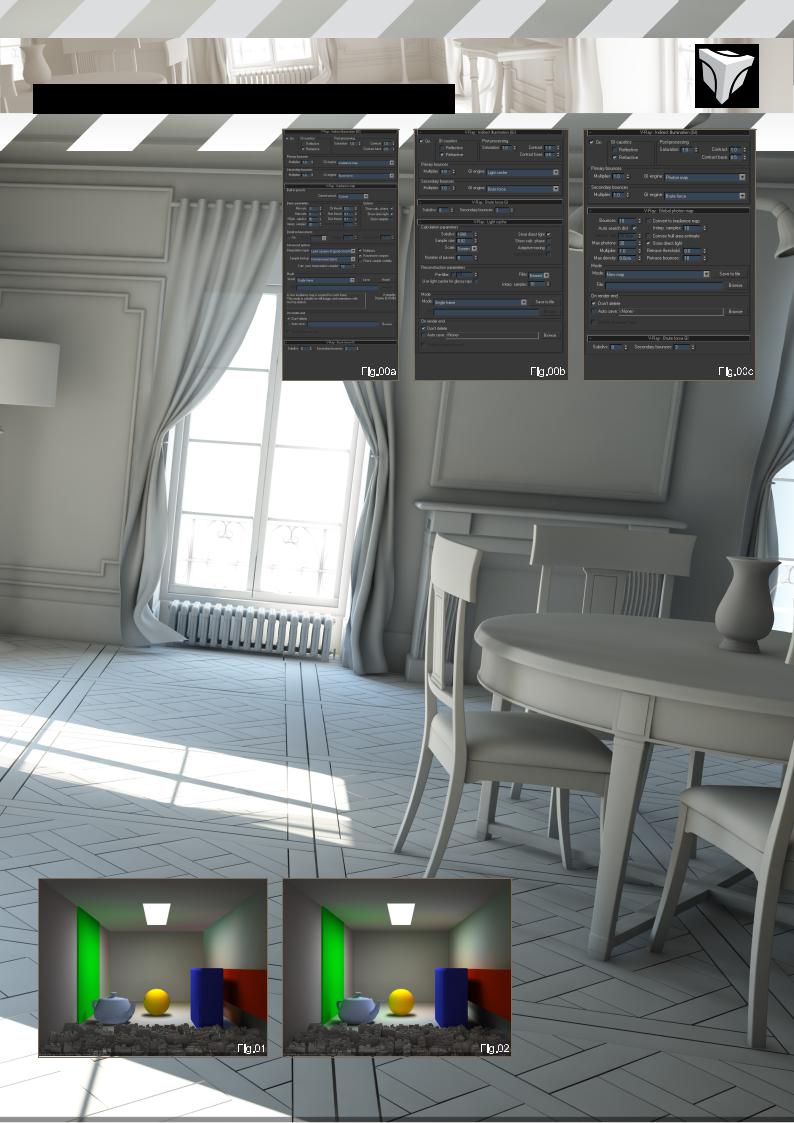
This series of tutorials is dedicated to the V-Ray renderer for 3ds Max, and will guide you through V-Ray’s most important features. Here is a quick look at V-Ray’s GUI before we get started:
Irradiance Map GUI (Fig.00a)
Light Cache GUI (Fig.00b)
Photon Map GUI (Fig.00c)
GLOBAL ILLUMINATION
This first chapter of this V-Ray for 3ds Max tutorial series will cover Global Illumination in V-Ray, looking at the following topics:
GI MODES
Irradiance Map
Brute Force
Light Cache
Photon Map
HOW TO
Create ambient occlusion
Use Progressive path tracing
Make GI previews
LIGHTING A SCENE WITH ONLY GI
Find the right Solution for your scene Conclusion
Before you begin anything, it is always recommended to work in scale, whether it is inches or centimeters, just to have a physically
viable scene. We are going to begin the series with V-Ray’s impressive Global Illumination, talking in detail about all the various settings and modes it has to offer.
GI MODES
V-Ray has four ways of interpreting GI, which can be assigned to primary or secondary light bounces. We will look into V-Ray’s technical aspects for now, explaining all the settings to help you understand its finer workings.
IRRADIANCE MAP
Irradiance Map (IR Map) is the base of V-Ray’s GI engine, and in most cases you will use this solution; it is versatile and easily configurable for high detail or previews, adapted to animation and stills. To put it simply, the Irradiance Map will compute GI more accurately where there are fine details, and coarsely where you have flat surfaces.
Basic Parameters
This is a multi-pass GI solution; the difference
between the minimum and maximum rates will give you the number of passes computed by
V-Ray at render time.
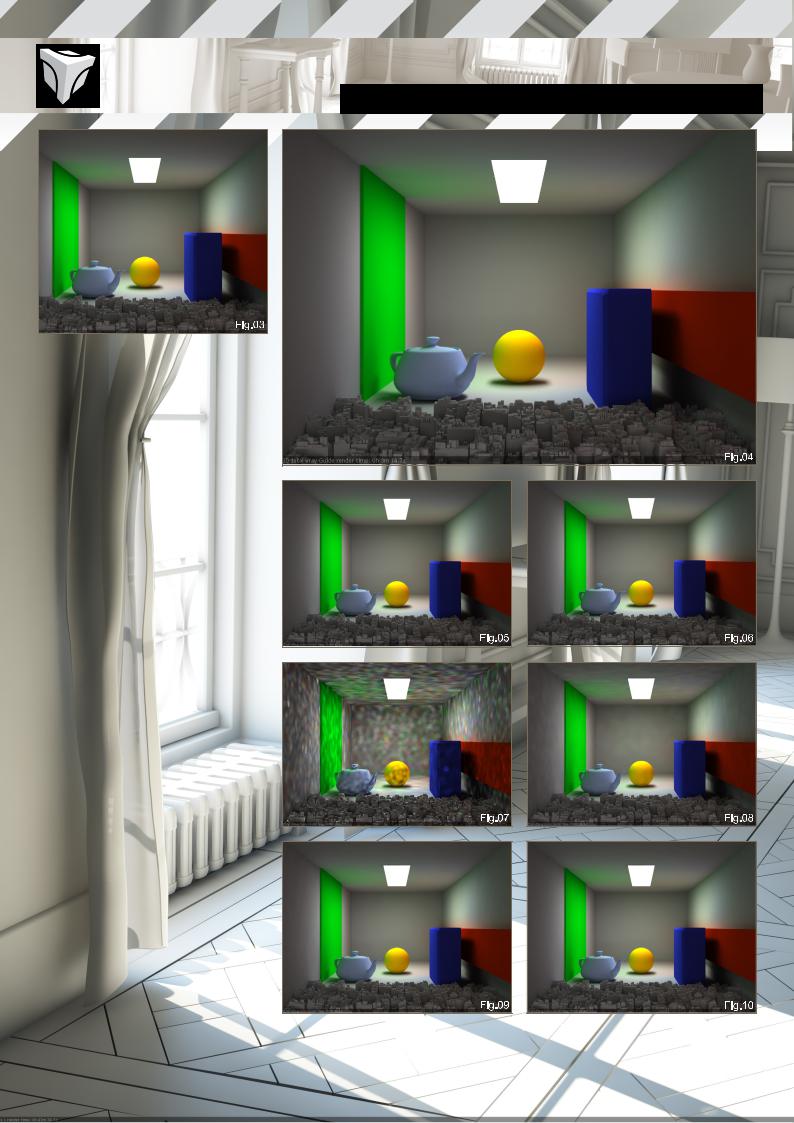
Min/Max Rate: These are the most important settings of V-Ray’s Irradiance Map solution: the Min rate determines the resolution of the coarse GI pass; the Max rate determines the resolution of the finest GI pass computed (a value of -1 will compute an image half the size of the final image; a value of +2 will compute an image four times more detailed than the final image).
The Min rate should always be negative in order to speed up the rendering of flat surfaces; you can go as low as -6 with some gain in render times, however, lower settings might actually slow down the render!
The Max rate, on the other hand, defines the amount of fine details you will see in the GI solution. It will also dramatically slow down render times as you increase it: a value of -2 or
-3 is good for visualization; however, for final renders you will want to push this to, or above,
-1.
Fig.01 Max rate:-6
Fig.02 Max rate: -4
Fig.03 Max rate: -2
Fig.04 Max rate: 0
Note: these values are for a screen resolution of 800*600, for high resolution renders you can
|
|
|
|
|
www.3dtotal.com |
page5 |
Chapter01 |
Chapter01-V-RayGlobalIllumination INTRODUCTION TO V-RAY
decrease the min and max rates and still get good results.
Fig.05 Resolution 1024*768 – Max rate: -2 Fig.06 Resolution 2048*1536 – Max rate: -4
Color Threshold: Advanced setting: reduce to increase image quality; keep this on default in most situations (0.2).
Normal Threshold: Advanced setting: reduce to improve V-Ray’s perception of curved surfaces and fine details. Keep this on default in most situations (0.1).
Distance Threshold: Advanced setting: determines V-Ray’s sensitivity to distance between objects. Keep this on default in most situations (0.1).
Hemispherical Subdivision: This controls the quantity of GI samples emitted from a light source: increase this number to get a smoother result; you can reduce it to gain speed but
it might get incorrect results and noise. This setting has a direct effect on render times.
This setting can be very useful if you are only using one light source for an entire scene (e.g. Sunlight through a window, bouncing of the walls and floor etc.): a smaller setting will make the GI calculation go faster but will give blotchy results; a higher setting will smooth the GI and accentuate the details but will increase render time. 50 is the basic value, but some scenes might need 100 or more.
Fig.07 HSph Subdivs: 1
Fig.08 HSph Subdivs: 5
Fig.09 HSph Subdivs: 25
Fig.10 HSph Subdivs: 50
|
|
|
|
|
www.3dtotal.com |
page6 |
Chapter01 |
INTRODUCTION TO V-RAY Chapter01-V-RayGlobalIllumination
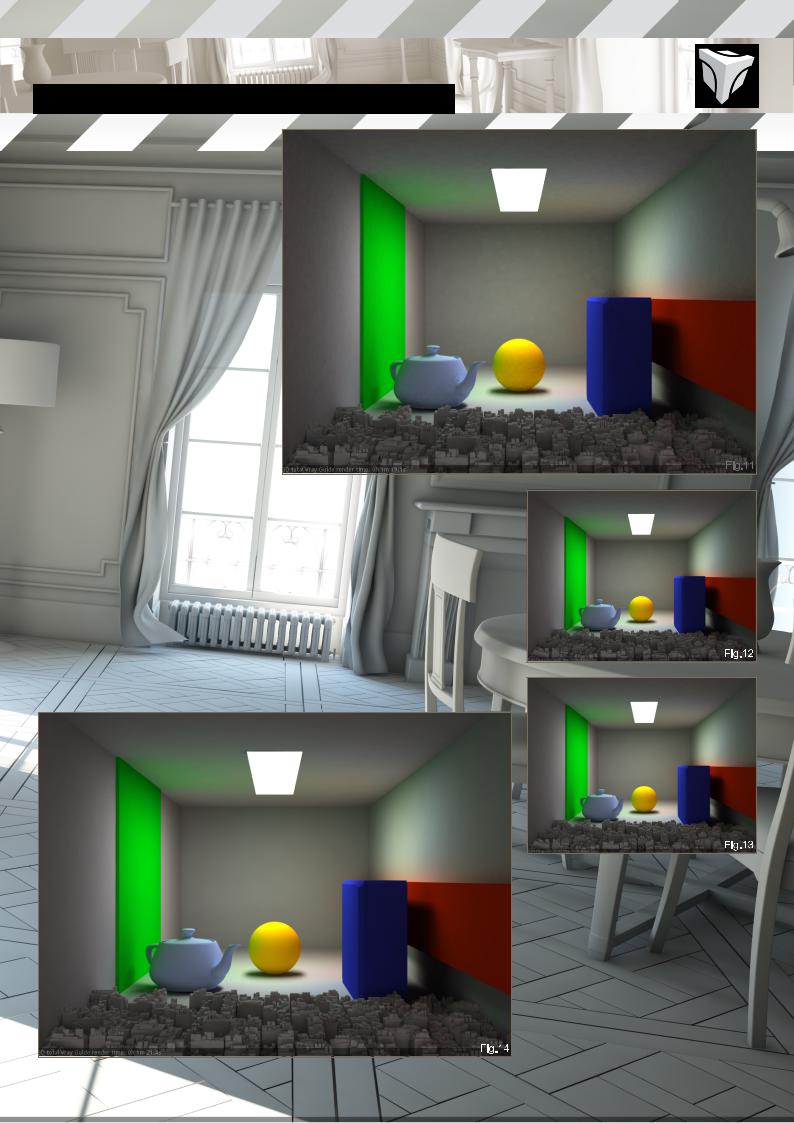
Interpolation Samples: Sets the amount of samples to be used to compute the final GI solution: small values will sharpen the GI while adding blotchiness; larger values will smooth the GI as more samples will be used to make an average – usually keep around 5-15.
To increase with Hemispherical Subdivisions – for example, if you set Hemispherical Subdiv. to 150 – you can set Interpolation Samples to 30-40.
Fig.11 Inter samples: 2
Fig.12 Inter samples: 4
Fig.13 Inter samples: 8
Fig.14 Inter samples: 15
Interpolation Frames: Only used in animation, this will compute additional GI passes to prevent flickering in the final animation.
Note: this is connected to Interpolation Samples and will multiply the number of passes: [2*(interpolation frames)+1]*interpolation samples
For example:
Inter sample = 20 Inter frames = 2
Number of passes = (2*2+1)*20 = 5*20 = 100
You can reduce the number of Interpolation Samples when Interpolation Frames are used to speed up rendering.
Show Calc. Phase: Will show the GI’s progress in the frame buffer during rendering.
Show Direct Light: will also show direct lighting in addition to the GI solution in the frame buffer during rendering, only work with show calc phase.
Show Samples: Will represent the density of
V-Ray’s Irradiance Map samples in the final render, displayed as dots.
Detail Enhancement: This increases the GI accuracy for small details, just as Ambient Occlusion would, but without the use of a separate pass. In a way, it works as Ambient
Occlusion: increasing light variations around fine details.
|
|
|
|
|
www.3dtotal.com |
page7 |
Chapter01 |
Chapter01-V-RayGlobalIllumination INTRODUCTION TO V-RAY
Radius works the same way as it would with Ambient Occlusion.
Subdivision multiplier is similar to brute force’s subdivision setting.
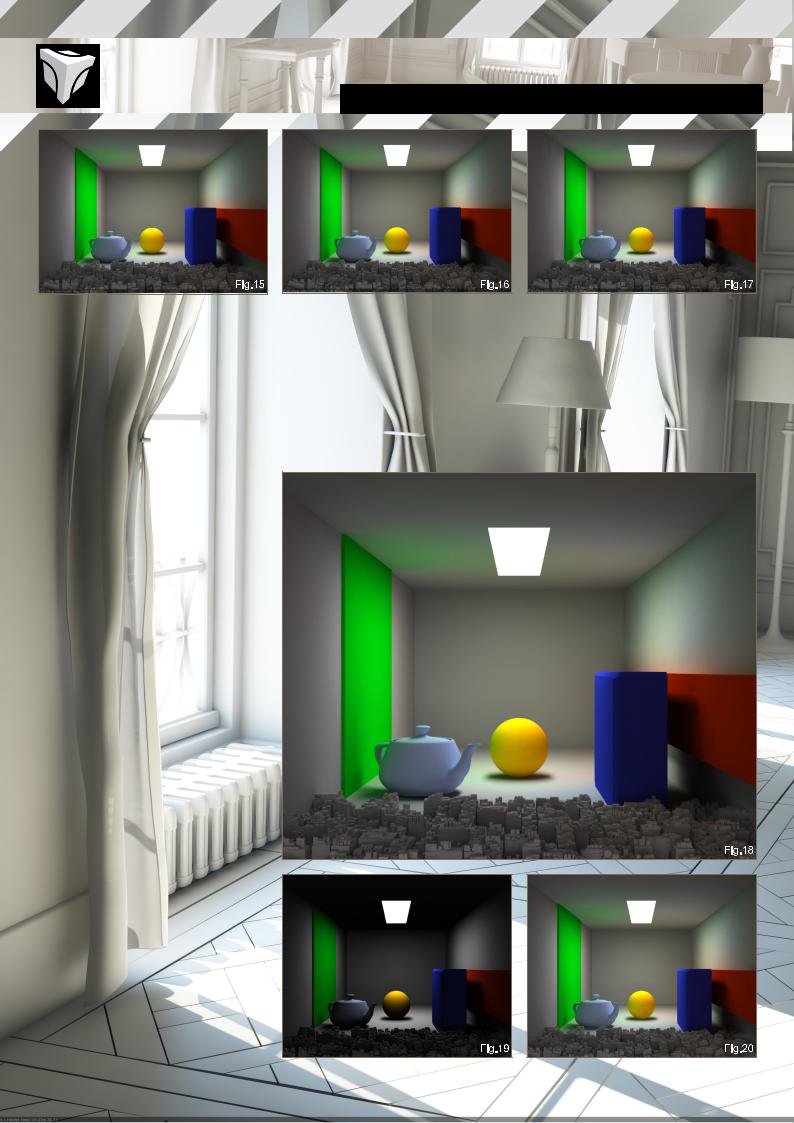
Interpolation Types:
Weighted Average: Smoothes the GI samples; produces blotchy results – perfect for speed.
Least Square Fit: IR Map’s bread and butter; however, it is also a smoothing method that will lose some fine details – increase the Min and Max rates, or you can use Ambient Occlusion to get those details back.
Delone Triangulation: Produces sharp results: this method produces high quality images with good attention to details; however, it will render slower, and will need an increase in the Max rate and hemispherical subdivisions to remove the noise.
Least Square with Voronoi Weights: A modification of Least Square fit, but slower – one to avoid!
Fig.15 Weighted Average
Fig.16 Least Square Fit Fig.17 Delone Triangulation
Fig.18 Least Square with Voronoi Weights
Sample Lookup: Use nearest only for previews: quad balanced is good for general use, as well
as overlapping; density based is by far the best of the series and should be exclusively used for final renders!
Calc. Pass Interpolation Samples: Should be kept between 10 and 25, this determines the number of iterations it will need in order to find to correct result.
Fig.19 Calc. Pass Interpolation Samples: 1 Fig.20 Calc. Pass Interpolation Samples: 2 Fig.21 Calc. Pass Interpolation Samples: 5 Fig.22 Calc. Pass Interpolation Samples: 10
Check Sample Visibility: Check this if you have problems with light going through thin objects.
|
|
|
|
|
www.3dtotal.com |
page8 |
Chapter01 |
INTRODUCTION TO V-RAY Chapter01-V-RayGlobalIllumination
BRUTE FORCE
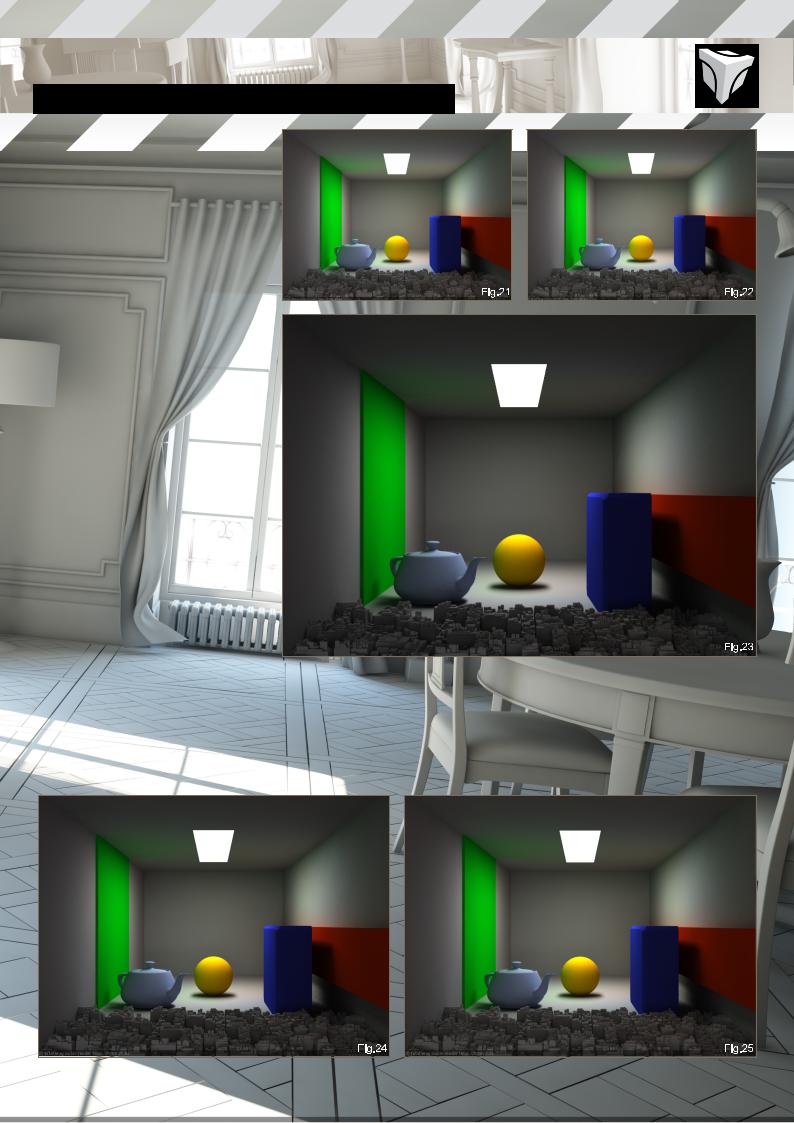
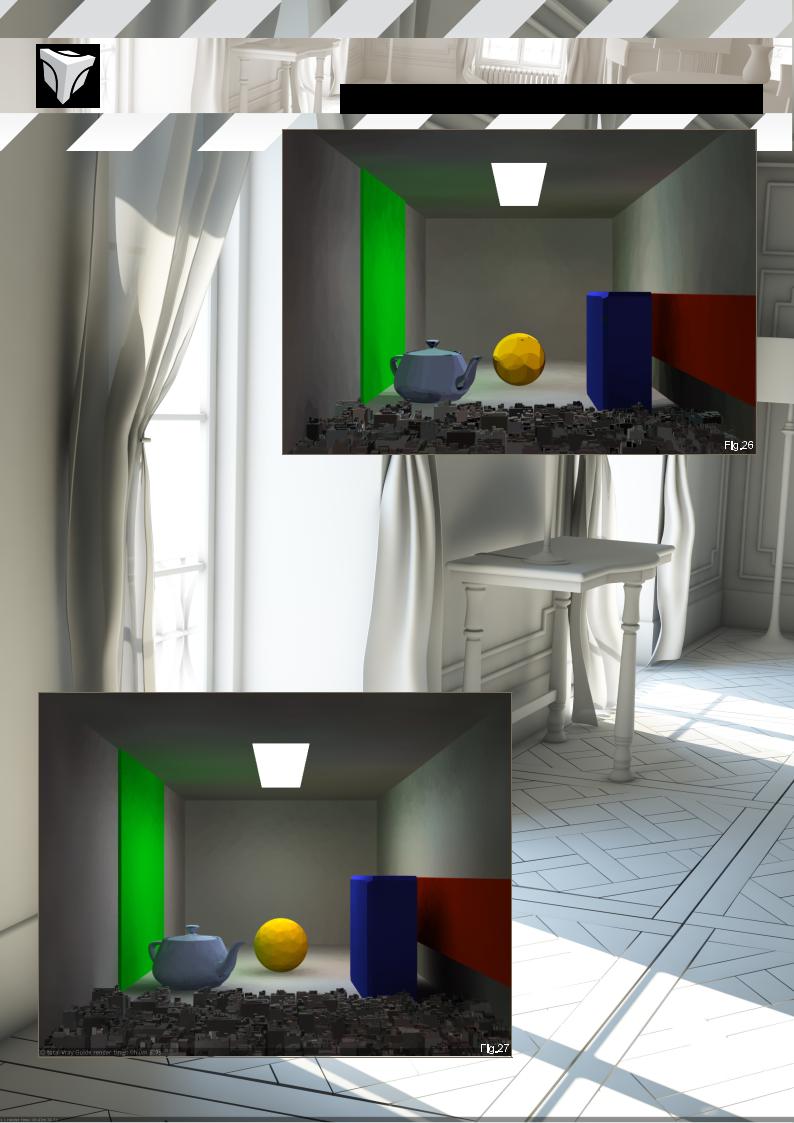
Self explanatory, this GI method will simply compute every light ray as soon as it hits an opaque surface at every possible angle, and restart again computing the resulting rays until it reaches the set number of bounces, resulting in very long render times. It is mainly used for the secondary bounces together with
Irradiance Map as primary, but can also be used for primary bounces; if used as the primary GI solution, increase the Subdivisions to remove the noise. This method will usually be darker than IR Map + Light Cache.
Fig.23 IR Map + Brute Force for secondary GI – notice the overall darkness due to the 1 secondary bounce
Fig.24 IR Map + Brute Force – 3 secondary bounces
Fig.25 IR Map + Brute Force – 8 secondary bounces notice the high render time
You can also use Light Cache as your secondary engine to speed up the renders.
LIGHT CACHE
Light Cache can be used in addition to any GI solution as secondary bounces; it can also be used as a primary GI solution; it can make
very fast previews; it works with animation and flythrough; and it can even make a final render by itself using the progressive path tracing – plus it’s easy to use!
The main settings for Light Cache would be the subdivisions and sample size. You should keep in mind also that Light Cache is dependent on the final image resolution; if you multiply the final output resolution by two, you should do the same with the Light Cache samples.
This is a very good solution, in most situations. Its only drawback is that it doesn’t work well with bump maps (go with displacement!).
Note: avoid full white materials (RGB 255,
255, 255) with Light Cache; as individual rays
|
|
|
|
|
www.3dtotal.com |
page9 |
Chapter01 |
will take longer to dissipate, these will cause excessive render times.
Sample size: Increase to get better results.
Scale: This one can be tricky to get right at first as it is scene dependant; it determines the size of each individual sample that will be computed – a very low sample size will give a more accurate light cache while adding noise, but push it too high and you will lose detail. In screen mode, a value of 1.0 will mean
the sample size will be the size of the final resolution; this mode is best for stills and most animations. In world mode, the sample size will be fixed to Max’s unit system; that mode will put more details to objects close to the camera. This mode is suited for fly-throughs.
Number of Passes: If you have a Dual Core, set it to 2; 4 for Quad Core; 8 for Xeon owners, and so on.
Store Direct Light: Check this to let the Light Cache calculate direct lighting (this will blur the lights); uncheck if you want sharp lights – this can be useful if you have too many lights in your scene.
Chapter01-V-RayGlobalIllumination INTRODUCTION TO V-RAY
Adaptive Tracing: Reduces noise; useful with caustics.
Use Directions Only: Only available with Adaptive Tracing; gives a more accurate result. Strangely enough, this will add noise since
it sharpens the Light Cache by adding more samples around fine details.
Pre filter: Increase value if too noisy, or too many artifacts.
Filter:
None: Good for previews. Nearest: Good results.
Fixed: Best results; keep the filter size at least twice the size of the light cache samples.
Use Light Cache for glossy rays; this option will allow the Light Cache solution to compute glossy reflection and refraction, which can drastically speed up render times in certain cases.
Mode:
Progressive Path Tracing: This mode will let Light Cache render the final image; in order to get a smooth result you will need to increase the subdivision considerably.
Fly through: Very useful for flythrough animation for architectural scenes etc.; this will compute the Light Cache for the entire camera animation at the first frame, and will skip it for the rest of the render.
Single Frame: Basic rendering mode, to be used in most situations.
From File: Load a previously saved Light Cache to skip the calculation.
|
|
|
|
|
www.3dtotal.com |
page10 |
Chapter01 |
