

Gauld A.Learning to program (Python)
.pdfClasses |
08/11/2004 |
function returnValue(){
return this.parent.getAttribute();
};
function newMethod(){
document.write("This is unique to the sub class<BR>");
};
function SubClass(){
this.parent = new MyClass(27); this.aMethodWithNoReturnValue = noReturn; this.aMethodWithReturnValue = returnValue; this.aNewMethod = newMethod;
};
var inst, aValue;
inst = new SubClass(); // define superclass document.write("The sub class value is:<BR>"); inst.aMethodWithNoReturnValue();
aValue = inst.aMethodWithReturnValue(); inst.aNewMethod(); document.write("aValue = " + aValue); </script>
We will see classes and objects being used in the following topics and case studies. It is not always obvious to a beginner how this, apparently complex, construct can make programs easier to write and understand but hopefully as you see classes being used in real programs it will become clearer. One thing I would like to say is that, for very small programs they do not really help and almost certainly will make the program longer. However as your programs start to get bigger - over about 100 lines say - then you will find that classes and objects can help to keep things organised and even reduce the amount of code you write.
If you are one of those who finds the whole OOP concept confusing don't panic, many people have programmed for their whole lives without ever creating a single class! On the other hand, if you can get to grips with objects it does open up some powerful new techniques.
Things to Remember
Classes encapuslate data and function into a single entity.
Classes are like cookie cutters, used to create instances, or objects. Objects communicate by sending each other messages.
When an object receives a message it executes a corresponding method. Methods are functions stored as attributes of the class.
Classes can inherit methods and data from other classes. This makes it easy to extend the capabilities of a class without changing the original.
Polymorphism is the ability to send the same message to several different types of object and each behaves in its own particular way in response.
Encapsulation, Polymorphism and Inheritance are all properties of Object Oriented programming languages.
VBScript and JavaScript are called Object Based languages because while they support encapsulation, they do not fully support inheritance and polymorphism.
Previous Next Contents
If you have any questions or feedback on this page send me mail at: alan.gauld@btinternet.com
D:\DOC\HomePage\tutor\tutclass.htm |
Page 150 of 202 |

Event Driven Programs |
08/11/2004 |
Event Driven Programming
What will we cover?
How does an event driven program differ from a batch programme?
How to write an event loop
How to use an event framework such as Tkinter
So far we have been looking at batch oriented programs. Recall that programs can be batch oriented, whereby they start, do something then stop, or event driven where they start, wait for events and only stop when told to do so - by an event. How do we create an event driven program? We'll look at this in two ways - first we will simulate an event environment then we'll create a very simple GUI program that uses the operating system and environment to generate events.
Simulating an Event Loop
Every event driven program has a loop somewhere that catches received events and processes them. The events may be generated by the operating environment, as happens with virtually all GUI programs or the program itself may go looking for events as is often the case in embedded control systems such as used in cameras etc.
We will create a program that looks for precisely one type of event - keyboard input - and processes the results until some quit event is received. In our case the quit event will be the space key. We will process the incoming events in a very simple manner - we will simply print the ASCII code for that key. We'll use Python for this because it has a nice, easy to use function for reading keys one at a time - getch(). This function comes in two varieties depending on the operating system you use. If
you are using Linux it's found in the curses module, if you use Windows it's in the msvcrt module. I'll use the Windows version but if you are on Linux just substitute curses.stdscr for msvcrt and it should work just fine.
First we implement the event handler function that will be called when a keypress is detected then the main program body which simply starts up the event gathering loop and calls the event handling function when a valid event is detected.
import msvcrt
def doKeyEvent(key):
if key == '\x00' or key == '\xe0': # non ASCII key = msvcrt.getch() # fetch second character
print ord(key)
def doQuitEvent(key): raise SystemExit
#First, clear the screen of clutter then warn the user
#of what to do to quit
lines = 25 # set to number of lines in console for line in range(lines): print
print "Hit space to end..." print
# Now mainloop runs "forever"
D:\DOC\HomePage\tutor\tutevent.htm |
Page 151 of 202 |
Event Driven Programs |
08/11/2004 |
||
while |
True: |
|
|
ky |
= msvcrt.getch() |
||
length = |
len(ky) |
|
|
if |
length != 0: |
|
|
|
# send events |
to event handling functions |
|
|
if ky |
== " ": |
# check for quit event |
doQuitEvent(ky)
else:
doKeyEvent(ky)
Notice that what we do with the events is of no interest to the main body, it simply collects the events and passes them to the event handlers. This independance of event capture and processing is a key feature of event driven programming.
Note: Where the key was non ASCII - a Function key for example - we needed to fetch a second character from the keyboard, this is because these special keys actually generate pairs of bytes and getch only retrieves one at a time. The actual value of interest is the second byte.
If we were creating this as a framework for use in lots of projects we would probably include a call to an initialisation function at the start and a cleanup function at the end. The programmer could then use the loop part and provide his own initialisation, processing and cleanup functions.
That's exactly what most GUI type environments do, in that the loop part is embedded in the operating environment or framework and applications are contractually required to provide the event handling functions and hook these into the event loop in some way.
Let's see that in action as we explore Python's Tkinter GUI library.
A GUI program
For this exercise we'll use the Python Tkinter toolkit. This is a Python wrapper around the Tk toolkit originally written as an extension to Tcl and also available for Perl. The Python version is an object oriented framework which is, in my opinion, considerably easier to work with than the original procedural Tk version. We will look much more closely at the principles of GUI programming in the GUI topic.
I am not going to dwell much on the GUI aspects in this topic, rather I want to focus on the style of programming - using Tkinter to handle the event loop and leaving the programmer to create the initial GUI and then process the events as they arrive.
In the example we create an application class KeysApp which creates the GUI in the
__init__ method and binds the space key to the doQuitEvent method. The class also defines the required doQuitEvent method.
The GUI itself simply consists of a text entry widget whose default behaviour is to echo characters typed onto the display.
Creating an application class is quite common in OO event driven environments because there is a lot of synergy between the concepts of events being sent to a program and messages being sent to an object. The two concepts map on to each other very easily. An event handling function thus becomes a method of the application class.
Having defined the class we simply create an instance of it and then send it the mainloop message.
The code looks like this:
D:\DOC\HomePage\tutor\tutevent.htm |
Page 152 of 202 |
Event Driven Programs |
08/11/2004 |
#Use from X import * to save having to preface everything
#as tkinter.xxx
from Tkinter import *
#Create the application class which defines the GUI
#and the event handling methods
class KeysApp(Frame):
def __init__(self): # use constructor to build GUI Frame.__init__(self)
self.txtBox = Text(self) self.txtBox.bind("<space>", self.doQuitEvent) self.txtBox.pack()
self.pack()
def doQuitEvent(self,event): import sys
sys.exit()
# Now create an instance and start the event loop running myApp = KeysApp()
myApp.mainloop()
Notice that we don't even implement a key event handler! That's because the default behaviour of the Text widget is to print out the keys pressed. However that does mean our programs are not really functionally equivalent. In the console version we printed the ASCII codes of all keys rather than only printing the alphanumeric versions of printable keys as we do here. There's nothing to prevent us capturing all of the keypresses and doing the same thing. To do so we would add the following line to the __init__ method:
self.txtBox.bind("<Key>", self.doKeyEvent)
And the following method to process the event:
def doKeyEvent(self,event):
str = "%d\n" % event.keycode self.txtBox.insert(END, str) return "break"
Note 1: the key value is stored in the keycode field of the event. I had to look at the source code of Tkinter.py to find that out... Recall that curiosity is a key attribute of a programmer?!
Note 2: return "break" is a magic signal to tell Tkinter not to invoke the default event processing for that widget. Without that line, the text box displays the ASCII code followed by the actual character typed, which is not what we want here.
That's enough on Tkinter for now. This isn't meant to be a Tkinter tutorial, that's the subject of the next topic. There are also several books on using Tk and Tkinter.
Event Driven Programming in VBScript and JavaScript
Both VBScript and JavaScript can be used in an event driven manner when programming a web browser. Normally when a web page containing script code is loaded the script is executed in a batch fashion as the page loads. However if the script contains nothing but function definitions the execution will do nothing but define the functions ready for use, but the functions will not be called
D:\DOC\HomePage\tutor\tutevent.htm |
Page 153 of 202 |
Event Driven Programs |
08/11/2004 |
initially. Instead, in the HTML part of the page the functions will be bound to HTML elements - usually within a Form element - such that when events occur the functions are called. We have already seen this in the JavaScript example of getting user input, when we read the input from an HTML form. Let's look at that example again more closely and see how it really is an example of event driven programming within a web page:
<script language="JavaScript"> function myProgram(){
alert("We got a value of " + document.entry.data.value);
}
</script>
<form name='entry'>
<P>Type value then click outside the field with your mouse</P> <Input Type='text' Name='data' onChange='myProgram()'>
</form>
The script part simply defines a JavaScript function, and the definition is executed when the page loads. The HTML code then creates a Form with an Input element. As part of the Input definition we bind the onChange event to a short block of JavaScript which simply executes our
myProgram() event handler. Now when the user changes the content of the Input box the browser executes our event handler. The event loop is embedded inside the browser.
VBScript can be uised in exactly the same way except that the function definitions are all in VBScript instead of JavaScript, like this:
<script language="VBScript"> Sub myProgram()
MsgBox "We got a value of " & Document.entry2.data.value End Sub
</script>
<form name='entry2'>
<P>Type value then click outside the field with your mouse</P> <Input Type='text' Name='data' onChange='myProgram()'>
</form>
Thus we can see that web browsr code can be written in batch form or event driven form or a combination of styles to suit our needs.
Things to remember
Event loops do not care about the events they detect Event handlers handle one single event at a time
Frameworks such as Tkinter provide an event loop and often some default event handlers too.
Web browsers provide for both batch and event driven coding styles, or even a mixture of both.
Previous Next Contents
If you have any questions or feedback on this page send me mail at: alan.gauld@btinternet.com
D:\DOC\HomePage\tutor\tutevent.htm |
Page 154 of 202 |

Intoduction to GUI Programming |
08/11/2004 |
GUI Programming with Tkinter
What will we cover?
Basic GUI building principles Basic widgets
Simple Tkinter program structure GUI and OOP, a perfect match wxPython as an alternative to Tkinter
In this topic we look at how a GUI program is assembled in a general sense, then how this is done using Python's native GUI toolkit, Tkinter. This will not be a full blown Tkinter refence nor even a complete tutorial. There is already a very good and detailed tutor linked from the Python web site. This tutorial will instead try to lead you through the basics of GUI programming, introducing some of the basic GUI components and how to use them. We will also look at how Object Oriented programming can help organise a GUI application.
GUI principles
The first thing I want to say is that you won't learn anything new about programming here. Programming a GUI is exactly like any other kind of programming, you can use sequences, loops, branches and modules just as before. What is different is that in programming a GUI you usually use a Toolkit and must follow the pattern of program design laid down by the toolkit vendor. Each new toolkit will have its own API and set of design rules and you as a programmer need to learn these. This is why most programmers try to standardise on only a few toolkits which are available across multiple languages - learning a new toolkit tends to be much harder than learning a new programming language!
Most windows programming languages come with a toolkit included (usually a thin veneer over the very primitive toolkit built into the windowing system itself). Visual Basic, Delphi(Kylix) and Visual C++/.NET are examples of this.
Java is different in that the language includes its own graphics toolkit (called Swing) which runs on any platform that Java runs on - which is almost any platform!
There are other toolkits that you can get separately which can be used on any OS (Unix, Mac, Windows...). These generally have adaptors to allow them to be used from many different languages. Some of these are commercial but many are freeware. Examples are: GT/K, Qt, Tk
They all have web sites. For some examples try:
wxPython, a Python version of the wxWidgets toolkit which is actually written in C++ PyQt, the Qt toolkit which has "bindings" to most languages.
pyGTK, the Gimp Toolkit, or GTK+ which is a freeware project used heavily in the Linux community.
Qt and GT/k are what most Linux applications are written in and are both free for non commercial use (ie you don't sell your programs for profit) Qt can provide a commercial license too if you want.
The standard Python graphics kit (comes with the language) is Tkinter which is based on Tk, a very old multi OS toolkit. This is the tookit we will look at most closely, versions of it are available for Tcl, Haskell and Perl as well as Python.
D:\DOC\HomePage\tutor\tutgui.htm |
Page 155 of 202 |
Intoduction to GUI Programming |
08/11/2004 |
The principles in Tk are slightly different to other toolkits so I will conclude with a very brief look at another popular GUI toolkit for Python(and C/C++) which is more conventional in its approach. But first some general principles:
As we have already stated several times GUI applications are nearly always event driven by nature. If you don't remember what that means go back and look at the event driven programming topic.
I will assume that you are already familiar with GUIs as a user and will focus on how GUI programs work from a programmers perspective. I will not be going into details of how to write large complex GUIs with multiple windows, MDI interfaces etc. I will stick to the basics of creating a single window application with some labels, buttons, text boxes and message boxes.
First things first, we need to check our vocabulary. GUI programming has its own set of programming terms. The most common terms are described in the table below:
Term
Window
Control
Description
An area of the screen controlled by an application. Windows are usually rectangular but some GUI environments permit other shapes. Windows can contain other windows and frequently every single GUI control is treated as a window in its own right.
A control is a GUI object used for controlling the application. Controls have properties and usually generate events. Normally controls correspond to application level objects and the events are coupled to methods of the corresponding object such that when an event occurs the object executes one of its methods. The GUI environment usually provides a mechanism for binding events to methods.
Widget
Frame
A control, sometimes restricted to visible controls. Some controls(such as timers) can be associated with a given window but are not visible. Widgets are that subset of controls which are visible and can be maniplulated by the user or programmer. The widgets that we shall cover are:
Frame
Label
Button
Text Entry
Message boxes
The ones we won't discuss in this topic but are used elsewhere in the tutor are:
Text box
Radio Button
Finally, the ones not discussed at all are:
Canvas - for drawing
Check button - for multiple selections
Image - for displaying BMP, GIF, JPEG and PNG images
Listbox - for lists!
Menu/MenuButton - for building menus
Scale/Scrollbar - indicating position
A type of widget used to group other widgets together. Often a Frame is used to represent the complete window and further frames are embedded within it.
D:\DOC\HomePage\tutor\tutgui.htm |
Page 156 of 202 |
Intoduction to GUI Programming |
08/11/2004 |
Layout
Child
Controls are laid out within a Frame according to a particular form of Layout. The Layout may be specified in a number of ways, either using on-screen coordinates specified in pixels, using relative position to other components(left, top etc) or using a grid or table arrangement. A coordinate system is easy to understand but difficult to manage when a window is resized etc. Beginners are advised to use non-resizable windows if working with coordinate based layouts.
GUI applications tend to consist of a heirarchy of widgets/controls. The top level Frame comprising the application window will contain sub frames which in turn contain still more frames or controls. These controls can be visualised as a tree structure with each control having a single parent and a number of children. In fact it is normal for this structure to be stored explicitly by the widgets so that the programmer, or more commonly the GUI environment itself, can often perform some common action to a control and all its children.
The Containment tree
One very important principle to grasp in GUI programming is the idea of a containment heirarchy. That is the widgets are contained in a tree like structure with a top level widget controlling the entire interface. It has various child widgets which in turn may have children of their own. Events arrive at a child widget and if it is unable to handle it it will pass the event to its parent and so on up tonthe top level. Similarly if a command is given to draw a widget it will send the command on down to its children, thus a draw command to the top level widget will redraw the entire application whereas onre sent to a button will likely only redraw the button itself.
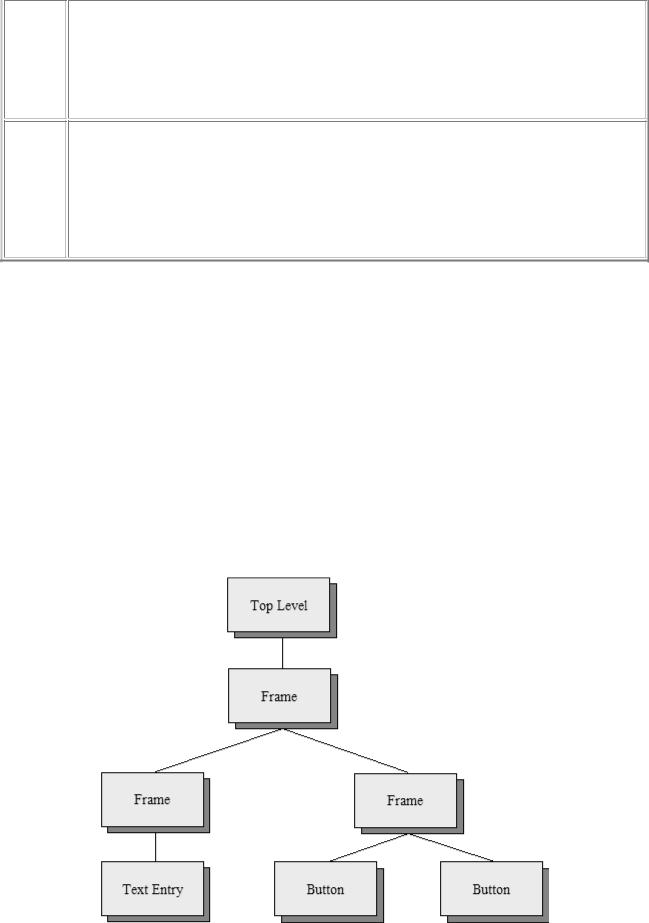
This concept of events percolating up the tree and commands being pushed down is fundamental to understanding how GUIs operate at the programmer level, and why you always need to specify a widgets parent whjen creating it, so that it knows where is sits in the containment tree. We can illustrate a containment tree for the simple application we will create in this topic like this:
,
D:\DOC\HomePage\tutor\tutgui.htm |
Page 157 of 202 |
Intoduction to GUI Programming |
08/11/2004 |
This illustrates the top level widget containing a single Frame which represents the outermost window border. This in turn contains two more Frames, the first of which contains a Text
Entry widget and the second contains the two Buttons used to control the application. We will refer back to this diagram later in the topic when we come to build the GUI.
A Tour of Some Common Widgets
In this section we will use the Python interactive prompt to create some simple windows and widgets. Note that because IDLE is itself a Tkinter application you cannot reliably run Tkinter applications within IDLE. You can of course create the files using IDLE as an editor but you must run them from a OS command prompt. Pythonwin users can run Tkinter applications since Pythonwin is built using windows own GUI toolkit, MFC. However even within Pythonwin there are certain unexpected behaviours with Tkinter application. As a result I will use the raw Python prompt from the Operating System.
>>> from Tkinter import *
This is the first requirement of any Tkinter program - import the names of the widgets. You could of course just import the module but it quickly gets tiring typing Tkinter in front of every component name.
>>> top = Tk()
This creates the top level widget in our widget heirarchy. All other widgets will be created as children of this. Notice that a new blank window has appeared complete with an empty title bar save for a Tk logo as icon and the usual set of control buttons (iconify, maximise etc). We will now add components to this window as we build an application.
>>> dir(top)
['_tclCommands', 'children', 'master', 'tk']
The dir function shows us what names are known to the argument. You can use it on modules but in this case we are looking at the internals of the top object, an instance of the Tk class. These are the attributes of top, note, in particular, the children and master attributes which are the links to the widget containment tree. Note also the attribute _tclCommands, this is because, as you might recall, Tkinter is built on a Tcl toolkit called Tk.
>>> F = Frame(top)
Create a Frame widget which will in turn contain the child controls/widgets that we use.
Frame specifies top as its first (and in this case only) parameter thus signifying that F will be a child widget of top.
>>> F.pack()
Notice that the Tk window has now shrunk to the size of the added Frame widget - which is currently empty so the window is now very small! The pack() method invokes a Layout Manager known as the packer which is very easy to use for simple layouts but becomes a little clumsy as the layouts get more complex. We will stick with it for now because it is easy to use. Note that widgets will not be visible in our application until we pack them (or use another Layout manager method).
D:\DOC\HomePage\tutor\tutgui.htm |
Page 158 of 202 |
Intoduction to GUI Programming |
08/11/2004 |
>>> lHello = Label(F, text="Hello world")
Here we create a new object, lHello, an instance of the Label class, with a parent widget F and a text attribute of "Hello world". Notice that because Tkinter object constructors tend to have many parameters (each with default values) it is usual to use the named parameter technique of passing
arguments to Tkinter objects. Also notice that the object is not yet visible because we haven't packed it yet.
One final point to note is the use of a naming convention: I put a lowercasel, for Label, in front of a name, Hello, which reminds me of its purpose. Like most naming conventions this is a matter of personal choice, but I find it helps.
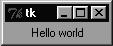
>>> lHello.pack()
Now we can see it. Hopefully yours looks quite a lot like this:
We can specify other properties of the Label such as the font and color using parameters to the object constructor too. We can also access the corresponding properties using the configure method of Tkinter widgets, like so:
>>> lHello.configure(text="Goodbye")
The message changed. That was easy, wasn't it? configure is an especially good technique if you need to change multiple properties at once because they can all be passed as arguments. However if you only want to change a single property at a time, as we did above you can treat the object like a dictionary, thus:
>>> lHello['text'] = "Hello again"
which is shorter and arguably easier to understand.
Labels are pretty boring widgets, they can only display read-only text, albeit in various colors, fonts and sizes. (In fact they can be used to display simple graphics too but we won't bother with that here).
Before we look at another object type there is one more thing to do and that's to set the title of the window. We do that by using a method of the top level widget top:
>>> F.master.title("Hello")
We could have used top directly but, as we'll see later, access through the Frame's master property is a useful technique.
>>> bQuit = Button(F, text="Quit", command=F.quit)
Here we create a new widget a button. The button has a label "Quit" and is associated with the command F.quit. Note that we pass the method name, we do not call the method by adding parentheses after it. This means we must pass a function object in Python terms, it can be a built in
D:\DOC\HomePage\tutor\tutgui.htm |
Page 159 of 202 |