

AutoCAD 2005 For Dummies (2004)
.pdf320 Part IV: Share and Share Alike

Chapter 14
Sheet Sets without Regrets
In This Chapter
Understanding resource drawings, views, and sheets
Creating and using sheet sets
Adding drawings and assembling views
Adding a sheet list table
Atypical AutoCAD project can include dozens of drawings, scores of sheets, lots of layouts, copious cross-drawing references, and more than
a few people working on those components at once. How do you create, manage, update, plot, and generally keep a handle on all that stuff without going crazy? The new sheets sets feature in AutoCAD 2005 is Autodesk’s response to this challenge.
Without sheet sets, you must manage project drawings “manually” — that is, you have to make sure that all the project’s drawings get created, get numbered and named correctly, and have up-to-date title block information. You also have to ensure that cross-sheet references are accurate (for example, when a plan includes references to details on other sheets). When the time comes to send drawings to clients or consultants, you must ensure that you include all the sheets and that all of them are up-to- date. For a large project with many drawings, these can be daunting tasks. It’s easy to end up with missing sheets or sheets that contain obsolete title block or cross-reference information, especially when you add or renumber sheets later in a project.
Sheet sets comprise a new palette, a group of completely new commands, and a few updated existing features. Together these things make possible a new approach to managing all the drawings for a project. Sheet sets provide a single interface that lists all your sheets, their numbers, and their names. (AutoCAD stores this information, along with the relationships among the sheets, in a DST file.) You can add and renumber sheets easily. You can create cross-sheet references that update automatically after you renumber sheets, and you can create a sheet list on your title sheet that updates automatically after you change sheet numbers or titles. When you’re ready to send or plot drawings, a sheet set enables AutoCAD to locate and gather all the required files.

322 Part IV: Share and Share Alike
Because the sheet sets approach is brand new, it remains to be seen how quickly (or whether) AutoCAD users adopt it. My prediction is that companies with well-managed CAD production staffs that work on larger projects requiring lots of sheets will find sheet sets compelling and move to adopt them quickly. Companies whose projects require only a few drawing sheets or whose AutoCAD users tend to do their own thing with little central organization probably will continue to deal with sheets as discreet, unconnected DWG files.
Sheet sets rely on other relatively sophisticated AutoCAD features, so make sure that you’re familiar with the following before you delve into this chapter:
Paper space layouts (Chapter 3)
Named views (Chapter 7)
Tables and text fields (Chapter 9)
Blocks and attributes (Chapter 13)
External references (Chapter 13)
Understanding external references and layouts is especially important because these features are central to the way that the Sheet Set Manager creates and organizes sheets.
Taming Sheet Sets
Your passport to the brave new world of sheet sets comes in the form of the Sheet Set Manager palette, shown in Figure 14-1. You use this palette for most sheet set operations. To toggle the palette on or off, click the Sheet Set Manager button (which looks like a roll of drawings) on the Standard toolbar or press Ctrl+4. If you choose to leave the palette on most of the time, you may want to turn on its auto-hide setting so that it gets out of the way automatically when you’re not using it — refer to Chapter 2 for instructions.
The Sheet Set Manager palette’s three tabs indicate the three major types of objects you use to create and manage sheet sets:
Resource Drawings contain subcomponents such as individual plans, details, and elevations that you use to build your sheets. Resource drawings usually contain geometry and annotations in model space only. Resource drawings usually don’t include title blocks or paper space layouts. You must add DWG files to the Resource Drawings tab before you can create Views and add them to Sheets.
Views are areas of resource drawings that you place on a sheet. A sheet set view can be the entire resource drawing or just a portion of it that you’ve defined, using the AutoCAD named views feature. (Chapter 7 explains named views and shows how to create them.)

Chapter 14: Sheet Sets without Regrets 323
Figure 14-1:
The Sheet
Set
Manager
palette.
You don’t have to use named views in order to take advantage of sheet sets, but you may use them to assemble different areas of a resource drawing onto one or more sheets. For example, if you draw a large plan that needs to be broken up onto several sheets in order to plot at a legible scale, you define a named view for each area of the plan and place each view on a separate sheet.
Sheets are paper space layouts within drawing files. (Chapter 3 describes layouts and shows how to create them.) Each sheet corresponds to one sheet in the sheet set. With the sheet set methodology, AutoCAD attaches resource drawings as xrefs into sheet drawings and creates paper space viewports on a layout in order to show the desired area of the resource drawing — either a named view or the entire drawing. You use the Sheet Set Manager to tell AutoCAD which resource drawings and views to put on which sheets. AutoCAD then does the attach-xref-and-make-viewport procedure automatically.
AutoCAD stores the settings for all this stuff — the names of files and configuration data that control how the sheet set features work with those files — in a DST file. Each project has its own DST file, and multiple AutoCAD users can use one project’s DST file at the same time.
Using an Existing Sheet Set
The quickest way to get started with sheet sets is to use one that someone else — such as a CAD manager in your office — has set up. You also can

324 Part IV: Share and Share Alike
experiment with Autodesk’s sheet set samples, located under C:\Program Files\AutoCAD Neo\Sample\Sheet Sets.
To open an existing sheet set configuration, do one of the following:
Click the menu at the top of the Sheet Set Manager palette and choose Open. AutoCAD displays a file dialog box, in which you can navigate to the appropriate folder, select the sheet set data file, and click the Open button.
In Windows Explorer, double-click on a DST file.
In either case, AutoCAD displays the sheet set information in the Sheet Set Manager palette, as shown in Figure 14-1. Click each of the three tabs to get an idea of how the particular sheet set that you opened is configured.
With a sheet set open, you’re ready to perform tasks such as these:
Double-click a name on any of the tabs to open the corresponding DWG file in AutoCAD. Double-clicking a sheet name on the Sheet List tab or a drawing name on the Resource Drawings tab opens that DWG file, while double-clicking a view name on the View List tab opens the DWG file and zooms to the view. Thus, you can use the Sheet Set Manager to navigate quickly among all the drawings for a project.
Right-click the sheet set name or a sheet subset name on the Sheet List tab to create a new sheet, using the template drawing (DWT file) configured for the project or sheet subset. (The “Getting Your Sheets Together” section, later in this chapter, describes how to specify the DWT file for a sheet set or subset.)
Right-click a resource drawing to place it — either the entire drawing or a named view within it — on a sheet drawing.
Right-click a sheet or view to rename and renumber it. Names and numbers can be linked to labels on the sheets, so that when you change the names or numbers in the Sheet Set Manager, AutoCAD automatically updates them in all drawings where they appear. (See the next two paragraphs for more information.)
Right-click the sheet set name to add a sheet list table (that is, an index of the drawings for the project) to the current drawing. AutoCAD uses the name and number data described in the preceding paragraph to create the sheet table list and keep it current.
On the View List tab, right-click the sheet set name and choose Properties to specify label blocks and callout blocks. Then you can right-click view names to place these automatically updating blocks in drawings. Label blocks show the number and name of a part of a drawing (for example, a single detail or a plan). Callout blocks reference another part of the drawing set — usually on another sheet (for example, a pointer on a plan to an elevation or detail on a different sheet).
Chapter 14: Sheet Sets without Regrets 325
Right-click sheets or subsets to publish (that is, plot) them, package them for electronic transmittal, or archive them for yourself. (Chapter 16 includes instructions for these tasks.)
The rest of this chapter provides details and procedures for many of these operations.
You don’t have to use all the features described earlier in order to benefit from sheet sets. For example, you might use the Sheet Set Manager just to create a navigational list of your drawings, add a sheet index to the cover sheet of the drawing set, and batch plot all the sheets.
The Sheet Set Setup
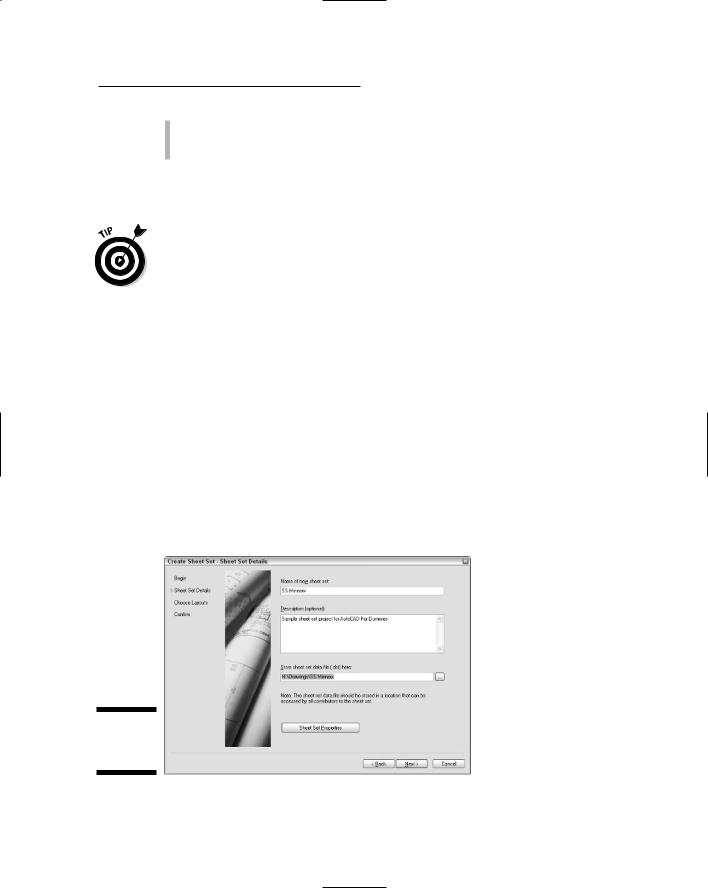
If you don’t have an obliging CAD manager to configure sheets sets for you, then you’ll have to do it yourself. You use the Create Sheet Set wizard for this task. Follow these steps to create a new sheet set:
1.Open the menu at the top of the Sheet Set Manager palette and choose New Sheet Set.
The Create Sheet Set wizard appears.
2.Choose Create a Sheet Set Using Existing Drawings, and then click Next.
The Sheet Set Details page appears, as shown in Figure 14-2.
Figure 14-2:
Sheet Set
Details.

326 Part IV: Share and Share Alike
3.Type a name and description for the sheet set, and choose a directory for the DST (sheet set configuration data) file.
By default, AutoCAD stores DST files that you create in your local My Documents\AutoCAD Sheet Sets folder. Unless you’re the only person working on a project, you should instead put DST files in a commonly accessible place on your local network. You can store the DST files for all projects in a single network folder or simply keep each project’s DST file in the same folder that holds the project’s DWG files.
4.Click the Sheet Set Properties button, review the other settings, and click OK.
You can change all this stuff later in the Sheet Set Manager palette, so don’t worry too much about it now. Use the dialog box help (click the question mark and then click on a setting) to find out more about any of the settings.
5.Click Next.
The Choose Layouts page appears. You can click the Browse button to add any drawing(s) that you’ve already created for the project to the sheet set, but it’s just as easy to add them later in the Sheet Set Manager palette. (I show you how in the next section.)
6.Click Next.
The wizard displays a summary of the settings that it saved to the new DST file.
7.Click Finish.
AutoCAD closes the Create Sheet Set wizard and opens your new sheet set in the Sheet Set Manager palette.
The other way to create a new sheet set is to copy one from an existing DST file. If you choose Create a Sheet Set Using An Example Sheet Set in Step 2, then you can choose from half a dozen Autodesk samples or open a file dialog box and browse to other DST files. The Autodesk examples are fine for experimenting, but you will need to modify them in order to make them usable on real projects.
To change any of the sheet set properties (which you reviewed in Step 5 above), right-click the sheet set name on the Sheet List tab of the Sheet Set Manager palette and choose Properties.
Getting Your Sheets Together
A new sheet set without any sheets is a lonely thing indeed, so after you create a new sheet set, you’ll need to populate the set with drawings. A common way to get started is to create a drawing with a suitable layout and title block in

Chapter 14: Sheet Sets without Regrets 327
paper space and then add it to the set. The other method is to direct the Sheet Set Manager to create a new drawing, using the template and folder that’s configured in the sheet set properties. I cover both methods here.
Adding existing sheets to a set
Use these steps to add an existing drawing to the sheet set for a project:
1.Create and save at least one properly set up drawing, including a paper space layout. (See Chapter 3 for details.)
If you delete any unused layout tabs (right-click the tab and choose Delete), the sheet list will turn out cleaner and less confusing. When you’re using sheet sets, it’s usually best to set up and use just one layout per drawing file.
2.Open the Sheet Set Manager palette.
3.(Optional) On the Sheet List tab of the Sheet Set Manager palette, right-click the sheet set name and choose New Subset. Type a subset name and click OK.
You can use sheets subsets to group your sheets into categories. See the “Sheet subsets” section after these steps for an explanation and examples.
This isn’t your only chance to assign a sheet to a subset. You can create the subset later and then drag the sheet into it.
4.Right-click the sheet set name (or the subset name that you created in the previous step) and choose Import Layout as Sheet.
The Import Layouts as Sheets dialog box appears.
5.Click the browse button (the one with an ellipsis on it).
6.Navigate to and select the drawing that you created in Step 1, and then click Open.
AutoCAD will report an error if you try to import a drawing that doesn’t contain any configured layouts.
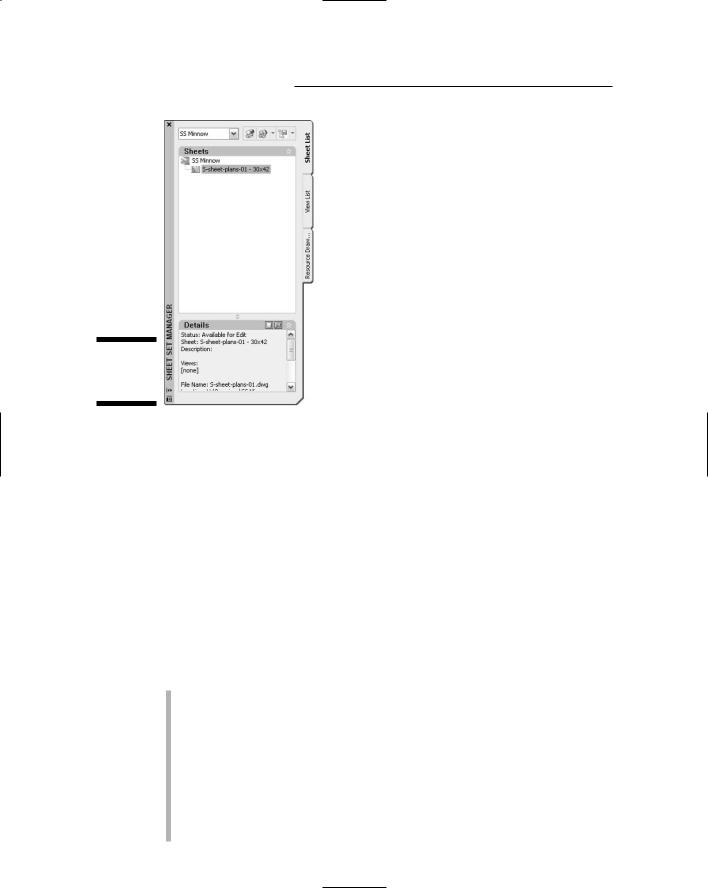
7.Select one or more layouts to import into the Sheet List and click OK.
AutoCAD adds the layout(s) to the Sheet List, as shown in Figure 14-3. The sheet name is a combination of the DWG file name (S-sheet-plans-01 in this figure) and layout name (30x42).
8.Right-click the newly imported sheet and choose Rename and Renumber.
The Rename and Renumber Sheet dialog box appears.
328 Part IV: Share and Share Alike
Figure 14-3:
An imported sheet.
9.Type a Sheet Number and Sheet Title in the text boxes, and then click OK.
If you later create a sheet list table — that is, a drawing sheet index — for your cover sheet, then AutoCAD will use what you type here to describe the sheet. (I demonstrate this procedure at the end of this chapter.) You usually should type the sheet number and title as they will appear in the title block. This information also helps you and others identify the sheet unambiguously in the Sheet List.
Sheet subsets
On the Sheet List tab, you can create sheet subsets to organize your sheets into types — for example, plan sheets, elevation sheets, and detail sheets. The advantages of using subsets are:
On a project with lots of drawings, you can find drawings and understand what kinds of drawings make up the set more easily. This kind of organization also makes it easy to select a group of related files for plotting or transmitting to someone else.
You can configure each subset to use a unique template drawing (for example, DWT file). Thus when you create new drawings with the Sheet Set Manager, as described in the next section, different kinds of drawings can start from different templates. For example, you might use one template to start plans and a different one to start details, based on different scales or other considerations.

Chapter 14: Sheet Sets without Regrets 329
You can configure each subset to create new sheet drawings in different folders. For example, you might keep your plan sheets and detail sheets in two different folders.
To configure both of the second two options, right-click the subset name and choose Properties.
Don’t confuse sheet subsets with sheet selections. You create the latter with the Sheet Selections button at the top of the Sheet List tab. A sheet selection is simply a grouping of sheets with a name attached to it. You can use sheet selections to grab a group of sheets quickly for transmitting, archiving, or publishing. (Chapter 16 describes these activities.) Sheet selections don’t store any configuration information and don’t affect the organization of the Sheet List. Sheet subsets do both of those things.
Creating new sheets for a set
Use the following steps to create a new sheet drawing, using the configuration settings for the sheet set:
1.(Optional) On the Sheet List tab of the Sheet Set Manager palette, right-click the sheet set name and choose New Subset. Type a subset name and click OK.
2.Right-click the sheet set name or subset name and choose Properties.
The Sheet Set Properties dialog box appears.
3.Verify or change the Sheet Creation properties, and then click OK.
Sheet Storage Location determines where the new sheet DWG file will get created, and Sheet Creation Template specifies the DWT file that it gets created from.
4.Right-click the sheet set name or subset name and choose New Sheet.
The New Sheet dialog box appears, as shown in Figure 14-4.
Figure 14-4:
Creating a new sheet.