

3D Game Programming All In One (2004)
.pdf298Chapter 8 ■ Introduction to Textures
Cloning
To use the Clone Brush, follow this procedure:
1.Position the cursor over the part of the image that you want to copy. Set the source area by right-clicking the source area once. Your computer beeps to indicate that you have selected the source area.
2.To place the cloned image on a specific layer or in a selection, select that layer or area now. Paint Shop Pro only clones within the selection.
3.Move the cursor to the area to which you want to start copying the image. This can be within the same image or in another image of the same color depth.
4.Press and hold the left mouse button to make the crosshairs appear over the source area to indicate which pixel you are copying.
5.Drag the mouse to clone from the source area to the destination area.
6.Release the mouse button to end the brush stroke.
7.To resume cloning, start over at step 5. Remember that the location of the source area depends on the clone mode.
Eraser
Use the Eraser to replace colors in an image with the background color or with a transparency. When you drag the Eraser across a bitmap layer, all the pixels in its path become transparent. When used on a background, the Eraser produces a different effect. It acts like a paintbrush, replacing the existing color with the current foreground or background color.
The Eraser retains the information it has removed from a layer. To restore the erased image, you can right-click and drag the Eraser over the transparent areas.
To use the Eraser:
1.Activate the Eraser by clicking its button in the Tool palette. (The Eraser is in the seventh slot from the bottom. Refer back to Figure 8.27.)
2.Use the Tool Options palette to configure the Eraser tip for your needs.
3.Drag the cursor across a layer to erase the color.
Selecting
There are several ways to select things in Paint Shop Pro. When working with bitmap images on raster layers, you select pixels with one of two tools, Selection or Freehand. When working with vector layers, you select objects with the Vector Object Selection tool.
Team LRN

Paint Shop Pro |
299 |
Selection Tool
Use the Selection tool to create a selection in a specific preset shape. The Selection tool is located in the fifth slot from the top of the Tool palette (refer back to Figure 8.27). As with other tools, you have a range of tool options to use (see Table 8.4).
Table 8.4 Selection Tool Options
Option |
Description |
Selection Type |
Choose one of the selection shapes from this drop-down box. Your choices are |
|
rectangle, square, rectangle or square with rounded corners, ellipse, circle, triangle, |
|
pentagon, hexagon, octagon, one of two star shapes, and one of three arrow shapes. |
Mode |
Normally you would use the Selection tool in Replace mode, where each time you use |
|
the tool, you create a new and different selection. You can use Add mode if you want |
|
each selection you make to be added to the previous selection. Remove mode |
|
removes the area of each selection from a previous selection. You will find, however, |
|
that it is probably best to just use Replace mode and press the Shift key to |
temporarily |
invoke Add mode or the Control key to temporarily invoke Remove mode. |
Feathering |
Feathering controls the sharpness of a selection's edges. By fading a set width (in |
|
pixels) along the edges, it produces a smooth transition between a selection and |
|
the surrounding area. The feathering value is the width of the transition area in |
|
pixels. A higher feathering value creates softer edges by feathering more pixels. |
|
Feathering is useful when pasting a selection. The fading helps the selection blend |
|
into the background. |
Anti-alias |
Anti-aliasing is similar to feathering, but more precise. It produces a smooth-edged |
|
selection by partially filling in pixels along the edge, making them semitransparent. If |
|
anti-aliasing is not applied, the edges of a selection can appear jagged. Anti-aliasing |
|
is useful when combining images and when working with text. |
To make a selection:
1.Click the Selection button on the Tool palette.
2.Place the cursor on the image.
t i p
To create a rectangular, square, or rounded rectangular or square selection, place the cursor at a corner of the area you want to select.
To create a circular or elliptical selection, place the cursor at the center of the area you want to select.
To create a selection using the other shapes, place the cursor at a point that would form the corner of an imaginary rectangle enclosing the shape.
Team LRN

300 |
Chapter 8 ■ Introduction to Textures |
|
|
3. |
Click and drag the mouse until the selection is the size you want. As the cursor |
|
|
moves, a line appears to indicate the border of the selection. |
|
4. |
Release the mouse button. The selection border becomes a marquee. |
|
Freehand Selection Tool |
|
|
The Freehand Selection tool shares the same slot in the Tool palette as the Selection tool. |
|
|
It makes selections with three types of borders: |
|
|
■ |
Irregularly shaped borders |
|
■ |
Point-to-point straight borders |
|
■ |
Borders between areas of contrasting colors or amount of light |
You can change the Freehand Selection tool's selection shape from its Tool Options dialog box by choosing one of the three selection shapes from this drop-down box. This works exactly the same as with the Selection tool.
The Freehand Selection tool has the same options as the Selection tool, with one addition: Smoothing. This option smoothes sharp corners and jagged lines. The higher the value, the more smoothing is done.
Use the Freehand Selection tool to draw the outline of the selection as follows:
1.Click the Freehand Selection icon on the Tool palette.
2.On the Tool Options palette, set the needed options.
3.Move the cursor over the image.
4.Click the image at a point that you want to become the border of the selection.
5.Drag the cursor to create an outline of the area you want to select. Be careful here—don't release the mouse button while creating your selection, or you may end up selecting stuff you don't want.
6.If you release the mouse button, start again, add to the selection using the Shift key, or remove part of the selection using the Ctrl key.
7.When the line encloses the selection, release the mouse button. The line becomes a marquee indicating the border of the selection.
Masks
A mask is a grayscale image that you apply to a layer. You can use it to hide and display parts of the layer, to fade between layers, and to create special effects with precision. Masks can be created from selections, alpha channels, and images.
A mask can cover a layer completely or with varying levels of opacity. The gray value of the mask determines how much it covers. Where it is black, it completely masks the layer; where it is white, it leaves the layer unmasked; where it is gray, it produces a translucent effect.
Team LRN
Paint Shop Pro |
301 |
All masks are created and edited in a grayscale bitmap mode. Therefore, all tools and image processing features that work on grayscale images work on masks. The tools that can be used in either vector or bitmap mode (Drawing, Preset Shapes, and Text) work only in their bitmap modes when editing masks.
A mask works the same way with a vector layer as it does with a bitmap layer. It can be linked to a layer, which moves it with the layer. If a mask is not linked to the layer, moving the layer's content will not affect the position of the mask.
Because a mask is grayscale, you can save it with the image in an alpha channel or as a separate image on a hard disk. The texture for the helicopter canopy in Figure 8.7 was created as a grayscale mask saved in an alpha channel! Also, you can load a selection as a mask and a mask as a selection from an alpha channel.
Remember that you must choose the mask layer you are editing by selecting it on the Layer palette before painting so that you edit the mask, not the image. When you are editing the mask, the colors available to you become those of a grayscale image. When you click a foreground or background color box, the grayscale palette appears. When you switch to a nonmask layer, the active color boxes return to their previous colors.
t i p
Any painting tool or effect that can be applied to a grayscale image can be applied to a mask.
When you edit a mask, you change either the areas or the level of masking. For example, painting over an object to mask it changes the area, while making a gradient fill edits the degree of masking. A gradient fill is where we fill a shape with colors that gradually fade from one color to another. Usually we use a grayscale gradient when making masks. For example, we might use a gradient that transitions from dark gray to white. The dark gray masks more than the lighter grays. As the gradient approaches white, there is less masking effect.
Creating a New Mask Layer
To create a new Mask Layer:
1.On the Layer palette, click the layer for which you want to create a mask.
2.Choose Layers, New Mask Layer and then choose the type of mask:
■Show All. This type shows all underlying pixels. All pixels of the mask are white. Paint the mask with grays or black to hide portions of the underlying layers.
■Hide All. This type hides all underlying pixels. All pixels of the mask are black. Paint the mask with white or grays to show portions of the underlying layers.
Team LRN
302 Chapter 8 ■ Introduction to Textures
The mask layer and the selected layer are added to a new layer group. The mask layer applies to the selected layer only.
3.Use the painting tools to alter the masked area.
4.To view the mask on the image, click the Mask Overlay toggle on the Layer palette, at the far right of the layer properties palette for the mask layer you created.
t i p
To apply a mask to all underlying layers, drag it from the layer group to the main level of the Layer palette.
Creating a Mask from a Selection
To create a mask from a selection:
1.Use the Selection, Freehand Selection, or Magic Wand tool to make a selection on a raster or vector layer in the image.
2.Do one of the following:
■Mask the selected area. To do so, choose Layers, New Mask Layer, Hide Selection.
■Mask the unselected area. To do so, choose Layers, New Mask Layer, Show Selection.
The mask layer and the selected layer are added to a new layer group. The mask layer applies to the selected layer only.
3.Use the painting tools to alter the masked area if needed.
4.To view the mask on the image, click the Mask Overlay toggle on the Layer palette.
Creating a Mask from an Image
To create a mask from an image:
1.Open the image that you want to use for the mask.
2.Select the image in which you want to create the mask layer.
3.On the Layer palette, click the layer you want to mask.
4.Choose Layers, New Mask Layer, From Image to open the Add Mask From Image dialog box.
5.In the Source window drop-down list, select the image to use for the mask.
6.In the Create Mask From Group box, select one of the following:
■Source luminance. The luminance value of the pixel color determines the degree of masking. Lighter colors produce less masking, darker colors produce more masking, and transparent areas completely mask the layer.
Team LRN

Paint Shop Pro |
303 |
■Any nonzero value. Transparent areas completely mask the layer. There is no gradation to the masking. Pixels with data (opacity of 1 to 255) become white pixels in the mask, and transparent pixels become black in the mask.
■Source opacity. The opacity of the image determines the degree of masking. Fully opaque pixels produce no masking, partially transparent pixels create more masking, and transparent pixels produce full masking.
7.To reverse the transparency of the mask data, select the Invert Mask Data check box. Black pixels become white, white pixels become black, and grays are assigned their mirror value.
8.Click OK.
The mask layer and the selected layer are added to a new layer group. The mask layer applies to the selected layer only.
9.To view the mask on the image, click the Mask Overlay toggle on the Layer palette.
Scaling Images
You may need to scale your image, making it larger or smaller. To do this, use the Resize feature, as follows:
1.Choose Image, Resize.
2.Select a method for resizing the image. The Resize dialog box presents you with two sizing method options:
■Pixel Dimensions. Select a new size by choosing a new measurement in pixels or one based on a percentage increase or decrease from the original.
■Actual/Print Size. Select a new size by changing the resolution or the page dimensions. Note that the two are linked.
3.Enter the new measurements in the Width and Height boxes of the Pixel Dimension panel. In the Actual/Print Size panel, you can also change the resolution.
4.In the Resample Using box, select the type of resizing for Paint Shop Pro to apply. There are five choices:
■Smart Size. Paint Shop Pro chooses the best algorithm based on the current image characteristics.
■Bicubic Resample. Paint Shop Pro uses a process called interpolation to minimize the raggedness normally associated with expanding an image. As applied here, interpolation smoothes out rough spots by estimating how the "missing" pixels should appear and then filling them with the appropriate color. It produces better results than the Pixel Resize method with photorealistic images and with images that are irregular or complex. Use Bicubic Resample when enlarging an image.
Team LRN
304 Chapter 8 ■ Introduction to Textures
■Bilinear Resample. Paint Shop Pro reduces the size of an image by applying a method similar to the Bicubic Resample. Use it when reducing photorealistic images and images that are irregular or complex.
■Pixel Resize. Paint Shop Pro duplicates or removes pixels as necessary to achieve the selected width and height of an image. It produces better results than the resampling methods when used with hard-edged images.
■Weighted Average. Paint Shop Pro uses a weighted-average color value of neighboring pixels to determine how newly created pixels will appear. Use this type when reducing photorealistic, irregular, or complex images.
5.In an image with more than one layer, select the Resize All Layers check box to resize the entire image. Leave the box unchecked to resize only the active layer.
6.To change the proportions of the image, select the Maintain Aspect Ratio of check box and type a new ratio for the image width. Aspect ratio is the relationship of the image's width to height. By default, the Aspect Ratio box displays the image's current aspect ratio.
7.Click OK to close the dialog box and apply the changes.
t i p
After resizing, many images can be improved by using the Sharpen or Soften filters.
Bilinear and Bicubic resampling are available only for grayscale images and 24-bit images. To resample an image with a lower color depth, do the following:
1.Increase the image's color depth.
2.Resize the image.
3.Reduce the image's color depth to the original depth.
Rotating
Use this feature to rotate a selection, a layer, or an image of any color depth.
To rotate an image, a layer, or a selection:
1.Choose Image, Rotate, Free Rotate.
2.Select the direction of rotation by clicking the Direction's option button or its text. Right is clockwise, and left is counterclockwise.
3.Set the degrees of rotation in quarter-circle increments (90-, 180-, or 270-degree option) or rotate by any other amount by typing the value in the Free box.
4.To rotate every layer in a multilayer image, select the All Layers check box. Clear the check box to rotate only the current layer. When this check box is selected or
Team LRN

Paint Shop Pro |
305 |
when the image consists of a single background layer, the canvas size changes to accommodate the rotated image.
5. Click OK to close the dialog box and rotate the image.
Image Sizes
Use the Change Canvas Size dialog box to change the dimensions of the image. Because the current background color is used for pixels added to the background layer of an image, select a background color before opening the dialog box.
Changing the canvas size changes the size of the background, without changing the size of the image or any layers that may be in the image.
To change the image resolution, use the Resize dialog box, not the Canvas Size dialog box.
To change the size of the image canvas:
1.Choose Image, Canvas Size.
2.In the Dimensions panel, enter a new size (in pixels) for the image in the New Width and New Height boxes. You can type a number or use the spin controls. The current width and height are displayed for your reference.
3.Use the Arrow buttons in the dialog box to indicate how you want the image to be placed in the newly dimensioned canvas.
4.Use the edit boxes to enter precision placement information that will supersede the Arrow buttons, if needed.
5.After positioning the image, click OK to close the dialog box and apply the changes.
Text
There will be times when we want our game textures and images to contain text. Now we could use the paintbrush and try to write out our text in a freehand fashion. However, there just so happens to be a very handy Text tool available with lots of capabilities.
Looking back to Figure 8.27, you'll find that the Text tool is the fourth one from the bottom of the Tool palette.
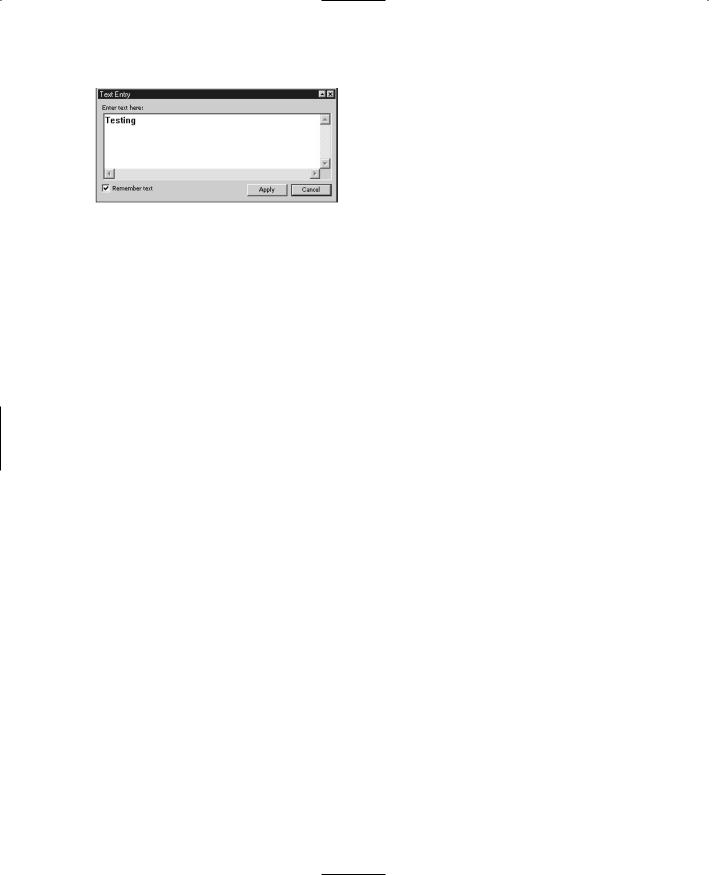
Go ahead and create a new blank image, then select the Text tool, and click in the center of your image. You'll get the Text Entry dialog box.
Using Figure 8.33 as your guide, you'll note that the first and most obvious feature is the Text Edit box. You can type many lines of text in here; there is a limit, but it is high. I have been able to enter 32 lines of 128 characters each with no penalty other than a little slowdown in response time.
Team LRN
306 |
Chapter 8 |
■ Introduction to Textures |
|
|
|
|
|
|
Let's create some text so that we can look |
|
|
|
|
|
|
|
|
|
more closely at the available options. |
|
|
|
|
1. In the Font section of the Tool Options |
|
|
|
|
palette, you can scroll through the Name, |
|
|
|
|
Stroke Width, and Size lists and click to |
|
|
|
|
make your selection. |
|
Figure 8.33 |
The Text Entry dialog box. |
2. The Create As section is where you |
|
|
|
|
|
choose the creation mode for the text. |
|
|
|
|
You can select one of three modes: |
■Vector. A vector object on a vector layer.
■Selection. An empty selection on the current layer.
■Floating. A selection floating above the current layer.
You should usually create your text as vector type. This allows you to easily edit and manipulate the text at any time. You can collapse the vector text into your bitmap image when you are happy with using the Layers, Merge, Merge All (Flatten) menu item.
3.By selecting the Anti-alias check box, you can soften the jagged edges that can appear on bitmap text; this feature partially fills in pixels in the jaggy spots. You can only do this with grayscale and 24-bit color images, however. (You should create your textures as 24-bit color images unless you have a specific reason to do otherwise, anyway.)
4.To select a color for the text, use the Materials palette.
5.Add emphasis effects to the text by using the Font Style options. When you choose an effect, it is applied to the next character you type. Change the effects of specific characters by highlighting them and then clicking the effects buttons. You can select from four style effects: Bold, Italic, Underline, and Strikeout.
6.The Alignment buttons are to the left of the Font Style buttons. These buttons set how the ends of multiple lines of text line up with each other: left, center, or right paragraph alignment. These settings affect the entire text in a paragraph and can't be changed for individual lines. Different paragraphs can have different alignments.
7.In the Text Settings section at the far right end of the Tool Options palette, set specific leading (space between lines) and kerning (space between letters) by clearing the Auto Kern check box and typing values in the Leading and Kerning edit boxes.
If you cannot see the Text Settings section, you will see a small black triangle at the right end. Click on this triangle to make the Tool Options palette shift over, revealing the tools that couldn't fit in your window on the right-hand side.
Team LRN

Moving Right Along |
307 |
8.In the text box, type the text you want to add to the image. Click the background (away from the text) to remove the highlighting and view the text. Note that the text does not display kerning and leading changes you have made.
9.Click OK to close the dialog box; this places the text in the image at the location where you had clicked with the Text tool.
There you go. You should now have your text sitting in your image, centered on the spot where you clicked the Text tool, highlighted with a dashed-line box with the sizing handles on the corners.
Moving Right Along
In this chapter we had our first peek at the world of textures. As the book unfolds, we will examine the uses for textures in more detail.
Then we took a detailed look at a powerful imaging tool that we can use to create and edit textures—Paint Shop Pro. As you have seen, Paint Shop Pro has a very complete feature set.
In the following chapter, we will expand our understanding of using textures in game development by learning how to skin objects, such as player models and vehicles.
Team LRN