3D Game Programming All In One (2004)
.pdf278 Chapter 8 ■ Introduction to Textures
Figure 8.7 Vehicle detail and structure.
Figure 8.8 Player clothing, skin, and other details.
Figure 8.9 Distant objects.
still make out the sense of a solid glasslike surface.
Of course, technological features are not the only things that can be enhanced through textures. In Figure 8.8 the brawler about to enter the tavern is attired in the latest stylish leather brawling jacket. He is obviously somewhere around 40 years of age, judging by his classic male-pat- tern baldness, and the bat is a Tubettiville slugger. Okay, okay, the bat is a stretch, but if it were turned over 180 degrees, you would be able to see the Tubettiville logo, and then you could tell! Also note the use of the texture specifying the tavern name, named in honor of a famous Delta Force 2 player, Insomniac.
Look at the moon in Figure 8.9. Look again, closer. Does it look familiar? It should, because the moon texture in that picture is an actual photograph of the full moon, taken outside my house with a digital camera and then used to generate the moon texture. The rest of the scene is generated using the Torque Engine with appropriate nighttime lighting parameters set.
I think by now you have a pretty good idea why I say that textures are the unsung heroes of 3D gaming. They really make a huge difference by conveying not only the obvious visual information, but also the subtle clues and feelings that can turn a good game into a great experience.
Team LRN

Paint Shop Pro |
279 |
Paint Shop Pro
You are going to be creating your own textures as you travel through this book, and to do that you'll need a good tool for texture and image manipulation. Well, the good folks at JASC Software have graciously allowed us to include their great image processing tool, Paint Shop Pro, on the companion CD for you to use.
I've been using Paint Shop Pro for about 10 years, I think. In the early days, I only used it for converting file types, because that was about all it could do. Nowadays, though, it is a fully featured image processing and image generation tool, with scanner support, special effects and filters, image analysis statistics, and the whole nine yards.
First, you'll need to install Paint Shop Pro, if you haven't already run the Full Install from the CD.
Installing Paint Shop Pro
If you want to install only Paint Shop Pro, do the following:
1.Browse to your CD in the \PSP folder.
2.Locate the Setup.exe file and double-click it to run it.
3.Click the Next button for the Welcome screen.
4.Follow the various screens, and take the default options for each one, unless you know you have a specific reason to do otherwise.
Getting Started
To get this party rolling, we're going to just blast through and create a couple of textures that you can use later for whatever grabs your fancy. We'll cover just the tools and steps we need to get the job done. In a later section we'll cover the most common tools in more detail.
Creating a Texture
So, let's get down to brass tacks and create a texture from scratch. We'll create a wood texture using the built-in capabilities of Paint Shop Pro.
1.Launch Paint Shop Pro and select File, New.
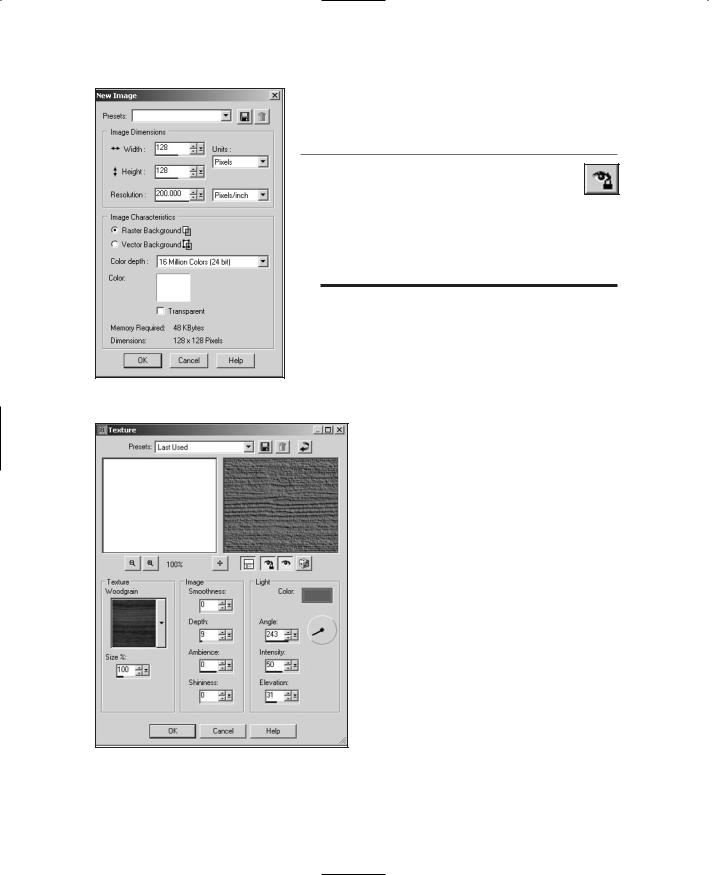
2.A New Image dialog box opens up. Set the width and height dimensions to 128 pixels (see Figure 8.10) and click OK.
3.We now have a blank image to work with. Choose the menu item Effects, Texture Effects, Texture, and the Texture dialog box will appear, as in Figure 8.11.
4.In the visual list at the lower part of the Texture dialog box, select Woodgrain. You'll have to scroll down through the list to the bottom.
Team LRN
280 Chapter 8 ■ Introduction to Textures
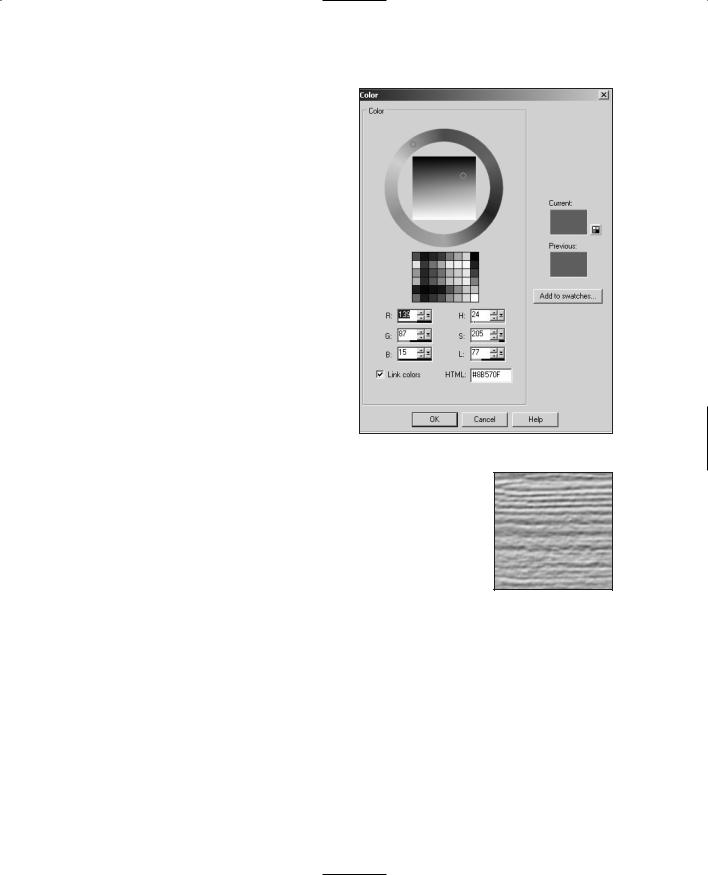
5.Click on the color box at center-right. You will get a Color dialog box, as shown in Figure 8.12.
t i p
Most of the image processing tools in Paint Shop
Pro have an Auto Proof button that looks like this:
If you are using something newer than an old Pentium 100 computer, you should probably have this button pressed. It allows you to see the changes in your image as soon as you make them, rather than waiting until you click the OK button to close whichever dialog box you are using.
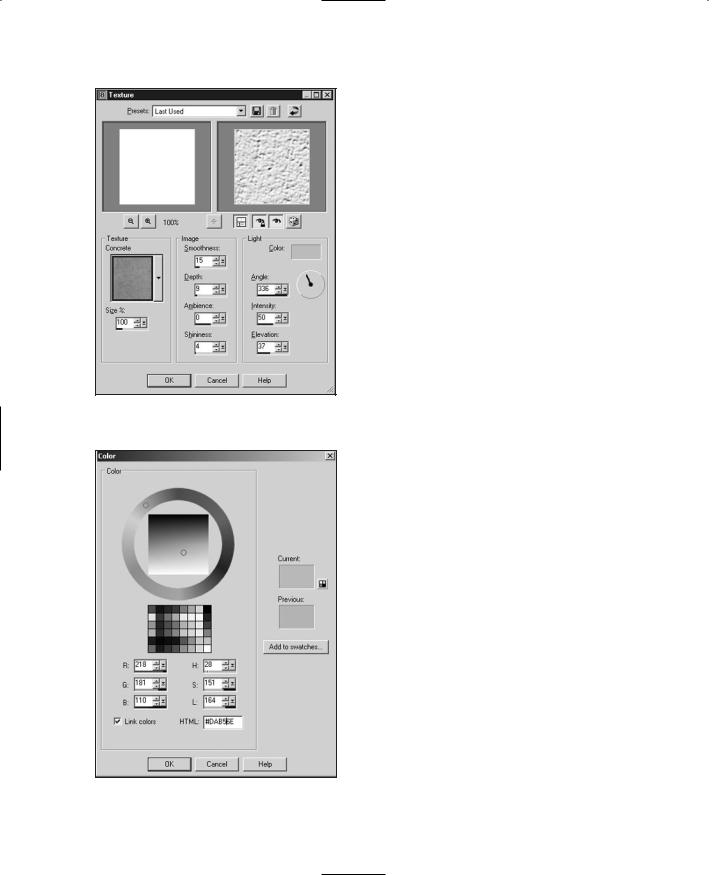
6.Change the value in the R (for red) box to 139, in the G (for green) box to 87, and in the B (for blue) box to 15. The H (hue), S (saturation), and L (light) boxes will automatically change to match.
Figure 8.10 Creating a new blank 7. Click OK to close the Color dialog box.
image.
8. Change the other settings in the Texture dialog box to match those in Table 8.1.
|
Table 8.1 |
Texture Dialog Box |
|
|
Settings |
|
|
|
Attribute |
Value |
|
|
Size |
100 |
|
|
Smoothness |
15 |
|
|
Depth |
9 |
|
|
Ambience |
0 |
|
|
Shininess |
4 |
|
|
Angle |
336 |
|
|
Intensity |
50 |
|
|
Elevation |
37 |
|
|
|
|
|
Figure 8.11 Texture dialog box with woodgrain texture.
9.Click OK to close the Texture dialog box.
10.Now you should have a bona fide woodgrain texture, like the one shown in Figure 8.13, that you can use for things like walls, planks, ladders, the wooden stock on a weapon, barrels, and whatever else you can come up with.
Team LRN
Paint Shop Pro |
281 |
11.With this texture, you can experiment with different image processing effects and touchup tools in Paint Shop Pro. Go ahead and give it a try.
Okay, that was so much fun, let's do another. This time we are going to tweak an image a bit searching for a specific look. The next texture will be a sort of roughwall look that you might find on a painted cement block, or maybe a freshly poured sidewalk, or something like that. We'll call it the sidewalk texture, for convenience.
1.If it isn't still open, launch Paint Shop Pro.
2.Select File, New.
3.Set the width and height dimensions to 128 pixels and click OK. (Take another look at Figure 8.10 if you
need to refresh your memory.) |
Figure 8.12 Color dialog box for woodgrain. |
4.Select the menu item Effects, Texture
Effects, Texture, and the Texture dialog box will appear again, just like before, as depicted in Figure 8.11.
5.This time we'll do something a bit different from the previous image. Locate the Texture frame at center-left. Click on it to open a visual menu of textures, and choose Concrete.
You should get a texture like the one shown in the boxes in the dialog box in Figure 8.14.
6.Click on the color box at center-right to get the Color dialog box again.
Figure 8.13
Woodgrain texture.
7.Using Figure 8.15 as a guide, change the value in the R box to 218, in the G box to 181, and in the B box to 110.
8.Click OK to close the Color dialog box.
9.Change the other settings in the Texture dialog box to match those in Table 8.1.
10.Click OK to close the Texture dialog box. You should get a new texture like the one shown in Figure 8.16.
Now this texture is quite a bit darker than I want it to be. I'm looking for a gray with a hint of beige or tan color, so what we'll have to do is touch it up a bit. First, we want to brighten the highlights and, at the same time, darken the shadows a bit.
Team LRN
282 Chapter 8 ■ Introduction to Textures
Figure 8.14 Texture dialog box with default preset.
Figure 8.15 Color dialog box for sidewalk texture.
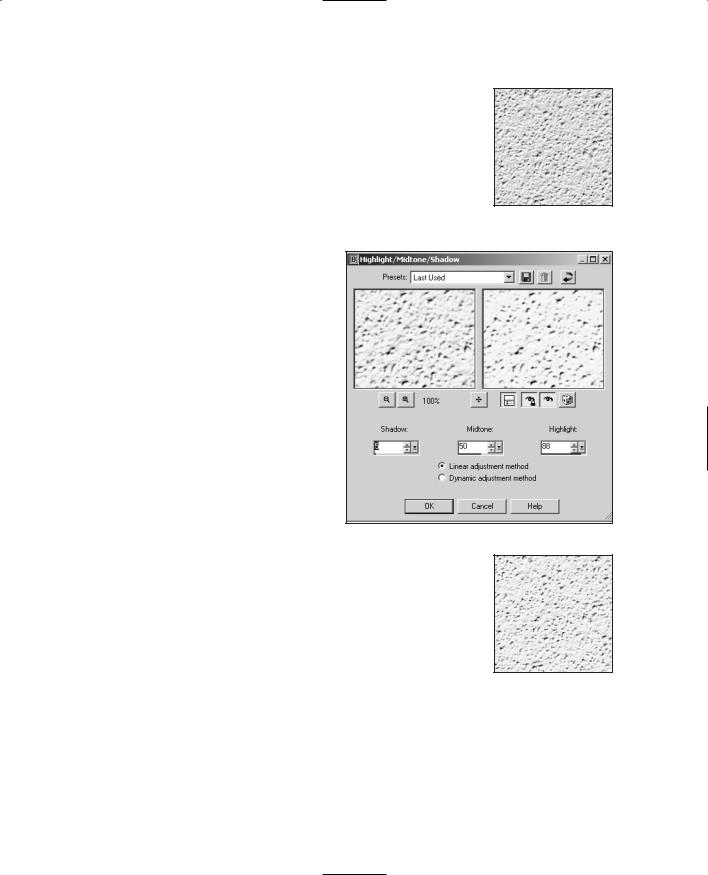
To do this, we'll use the Highlight/ Midtone/Shadow tool.
11.Select Adjust, Brightness and Contrast, Highlight/Midtone/Shadow. You'll get the Highlight/Midtone/Shadow dialog box shown in Figure 8.17. Change your settings to match those in the figure.
As you can see with Figure 8.18, the texture details now stand out in relief quite a bit more. This is goodness. However, the color is way too rich, or vibrant, for use as a sidewalk or wall texture, in my humble opinion.
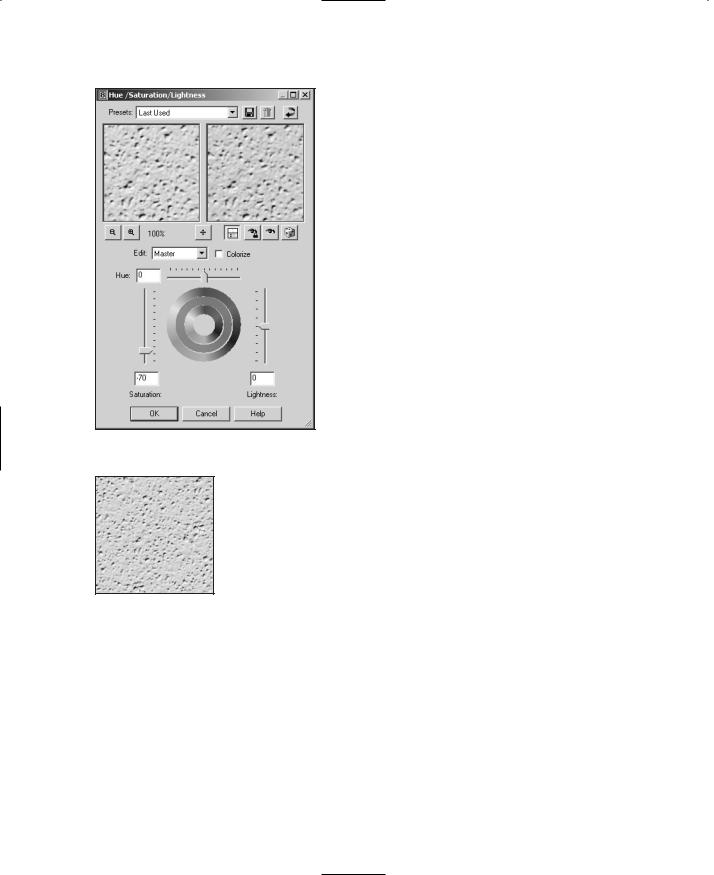
What we want to do now is tone down the richness of the color. We can do that by using the Hue/Saturation/Lightness tool. Now, we could have done this part using the Color tool when we created the color. And I tried! But it wasn't close enough, so using the Hue/Saturation/ Lightness tool allows us to tweak the color in the direction we want.
12.Choose Adjust, Hue and Saturation, Hue/Saturation/Lightness to get the Hue/Saturation/Lightness dialog box, as shown in Figure 8.19.
13.Set the Hue to 0, the Saturation to 70, and the Lightness to 0, and then click OK.
This will take the edge off the richness of the color quite a bit. If you look at Figure 8.20 and compare it with Figure 8.18, you can see the difference. You can use the Undo/Redo feature of Paint Shop Pro to compare your own versions of these images. Select the Edit, Undo and the Edit, Redo menu items to switch back and forth between the before and after versions of your own creation.
Team LRN
Paint Shop Pro |
283 |
Now that the color is where we want it, let's roughen it up a bit. The texture is a bit too smooth, sort of like taffy. A sidewalk usually looks grainier. To do this, we'll add noise.
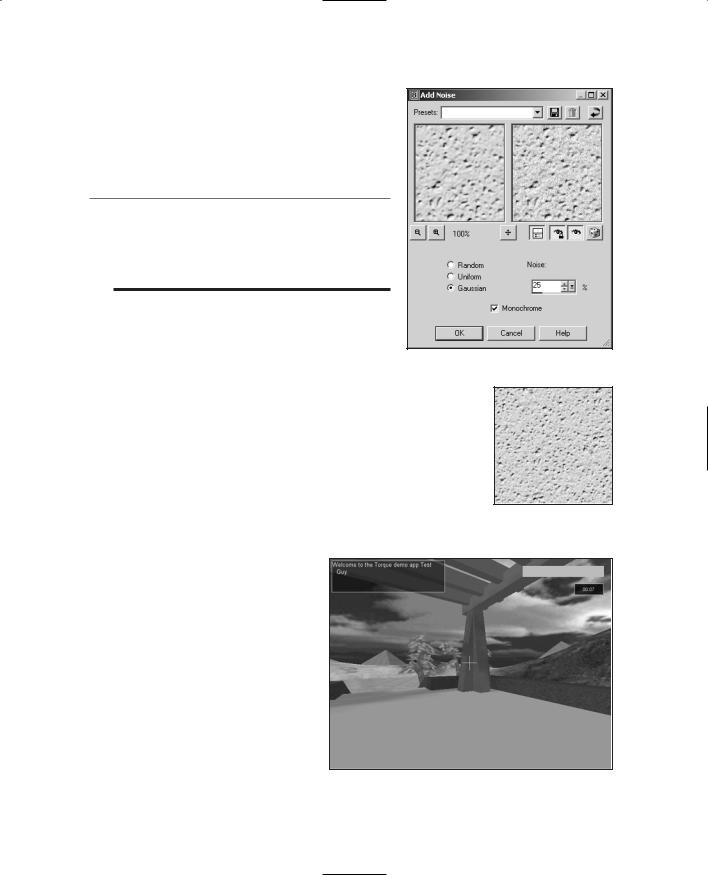
14.Choose Adjust, Add/Remove Noise, Add Noise. You'll get the Add Noise dialog box, as shown in Figure 8.21.
15.Set the Noise value to 19 percent.
16.Select the Gaussian button.
17.Check the Monochrome box. Compare Figure 8.22 with Figure 8.20, and you'll see the differ- ence—the newly added roughness to the surface.
You should now have two images open in your Paint Shop Pro window: the first one being the woodgrain texture, and the other being the sidewalk texture. In the next section you'll learn how to save those images for later use.
Working with Files
Figure 8.16 Initial sidewalk texture.
We want to get those images saved without any further ado, but first I want to show you something. You're going to
launch the fps demo game that comes Figure 8.17 Highlight/Midtone/Shadow dialog box. with the Torque Engine.
Launching the fps Demo Game
1.Leave Paint Shop Pro running and task switch (Alt+Tab) to the Windows desktop.
2.Using the Windows Explorer, browse into the C:\3DGPAi1 folder and then double-click on the fps demo shortcut.
3.When the GarageGames/Torque splash screen appears, click on the Start Mission button.
4.When the Mission dialog box appears, clear the Multiplayer check box.
5.Click on Scorched Planet to highlight that line.
6.Click on Launch Mission.
Figure 8.18
Enhanced highlight sidewalk texture.
Team LRN
284 Chapter 8 ■ Introduction to Textures
When the game finishes loading you should get a view pretty well identical to the one in Figure 8.23, except it will be in color, of course. The floor will be bright orange, and the beams above you will be magenta. This odd coloring is deliberate—you are going to save your own textures in place of these two textures; this will make it easy for you to see if your changes have taken effect.
7. Resist the natural impulse to run around and blow things up. Instead, press the Escape key to exit the game (well, try to resist the natural impulse to run around and blow things up, anyway).
8. Click Quit.
Saving Texture Files
Okay, now that you have the "before" view recorded in your mind, we'll finally get to saving
Figure 8.19 Hue/Saturation/Lightness those images. Switch back to Paint Shop Pro now, dialog box.
and follow this procedure to save your files:
Figure 8.20
Desaturated sidewalk texture.
1.Click on the woodgrain image to bring it to the front (making it active).
2.Select File, Save As, and the Save As dialog box will appear.
3.In the Save As dialog box, make the type be JPG by scrolling through the Save As Type list and selecting JPG – JIFF Compliant.
4.Browse your way to C:\3DGPAi1\fps\data\interiors\evil1.
5.Name your file wood.jpg—the name must be exact.
6.Click OK.
7.You will get a dialog box that says "C:\3DGPAi1\fps\data\interiors\evil1\wood.jpg already exists. Do you want to replace it?" Click Yes.
Repeat steps 1 to 7 for the sidewalk image, using the name drk_cem.jpg.
Now, task switch back to the desktop and run the fps demo game again, just as you did before. When you spawn in the game you will now see the floor rendered with your new texture and the overhead beams rendered with the woodgrain texture you created. If either the floor or the beams look like they did in your "before" view, then you've
Team LRN
Paint Shop Pro |
285 |
probably made an error in the file name or perhaps saved them in the wrong folder. Double-check your work, and everything should turn out fine.
Congratulations! Now you are an artist.
t i p
The actual textures used for this platform object are saved in the evil1 folder as Original wood.jpg for the overhead beams and Original drk_cem.jpg for the floor. You can use the originals to replace your own textures if you want to see what they looked like.
PNG versus JPG
Paint Shop Pro supports many, many file types. If
Figure 8.21
you select File, Save As, you'll get the Save As dialog
box. If you click on the Save As Type combo box, you'll get a whopping great hockey sock full of available file types. There are two of particular interest to us: JPEG (Joint Photographic Experts Group) and PNG (Portable Network Graphics). In Windows, the JPEG format file extension is "JPG"; this has more common usage than "JPEG", so that's the term I will use.
When you save files in the JPG format, the images are compressed. The type of compression used is called a lossy compression. This means that the technique used to
squeeze the image information into less space throws away some of the information. This is not necessarily a Bad Thing. The people who devised the JPG format were pretty clever and were able to specify rules that guide the software in what to keep, what to throw away, and how to modify the information. So although there is loss of information, the effect on the image is pretty negligible in most cases.
Add Noise dialog box.
Figure 8.22 Final sidewalk texture.
But there is an effect. Try this little
experiment to see for yourself: Figure 8.23 Spawn view in the fps demo game.
Team LRN