

3D Game Programming All In One (2004)
.pdf288Chapter 8 ■ Introduction to Textures
course. The PNG format supports a concept called alpha channels, and we will need to use alpha channels for some of our game images. Not all of them, but a few. So the rule of thumb will be to use JPG for all images except when we need to specify an alpha chan- nel—then we use PNG.
Finally, here is an important workflow tip. Save all of your original image creations in the Paint Shop Pro native format: PSPIMAGE. When you create and save your images in PSPIMAGE format, it's a lot like having the original source code for a program. In PSPIMAGE format you can edit any text you've created in vector mode, modify objects and curves that are in vector format, move them around, and so on. You can then save them in the game format you need, PNG or JPG, when you need to.
Bitmap versus Vector Images
Paint Shop Pro uses image graphics in two different and complementary ways: bitmap graphics and vector graphics formats.
Bitmap images are also called raster images. Raster, the older term, is the pattern of lines traced by rectilinear scanning in display systems. Although it is not exactly the same as a bitmap image, it's the term that Paint Shop Pro uses to describe such images. In this book I will use the term bitmap for such images, except when quoting Paint Shop Pro tools or commands that use the word raster. Just remember that they essentially mean the same thing in this context.
A bitmap image is composed of pixels laid out on a grid. Each pixel represents a color value, one each for red, green, and blue. The weighting of each of these values determines the color of each pixel. In most image processing tools, if you increase the magnification of a bitmap image, you can see these pixels. They look like squares on the screen. A bitmap object is a collection of these pixels. An object is stored as a group of pixels with the color information about each pixel color. Pixels can be blended to create soft edges and smooth transitions between objects. Photographic images are usually rendered as bitmap images because the pixel format matches well to the way that photographs are made.
You should note that an image in bitmap format is resolution-dependent. You specify the resolution and pixel dimensions when you create the image. If you later decide to increase its size, you enlarge each pixel, which lowers the image quality.
A vector image is composed of procedural and mathematical instructions for drawing the image. As you encountered in Chapter 3, a vector is basically a line that has definite magnitude and direction. Vector objects in Paint Shop Pro are defined in a similar fashion. Each object in a vector image is stored as a separate item with information about its relative position in the image, its starting and ending points, and width, color, and curve information. This makes the vector format useful for things like logos, text fonts, and line drawings.
Team LRN

Paint Shop Pro |
289 |
An image in vector format does not depend on the resolution. It can be resized without losing detail because it is stored as a set of instructions, not as a collection of pixels. Each time you display an image, you re-create it.
Now a computer monitor uses pixels to display an image, and most printers convert pixels to ink dots. Because of this, vector images are converted into pixel format when displayed on the screen or printed. However, when you close the image files and save them, they are saved in the vector format.
We will be doing most of our work with bitmap images. However, you may find that certain vector techniques can be used to create some image components, like curves and text. We'll create them as vectors and then convert them when required. Some of the tools we'll use allow you to create in either format. Most of the time we'll do it in the bitmap format when we are using fancy effects tools.
Creating Alpha Channels
Okay, so you are now able to perform the most important texture imaging operations, creating one and saving it. The next most important operation is the creation of alpha channel transparent sections of an image. Remember the helicopter tail boom?
There are other uses for alpha transparency, of course. Bitmapped GUI buttons are candidates: You may want a button that does not have straight sides and square corners. You can create irregular button shapes using transparent sections of your button image.
Another use for a bitmap with alpha transparency would be overlays on the GUI, such as health bars, status displays, and weapons crosshairs.
Let's take a look at an example of a bitmap with transparency.
Launch the fps demo game the same way you did when testing your textures earlier, but this time click the About button instead. You'll see the credits for the creation of the Torque Engine, with the nice round GarageGames logo. Let's change it!
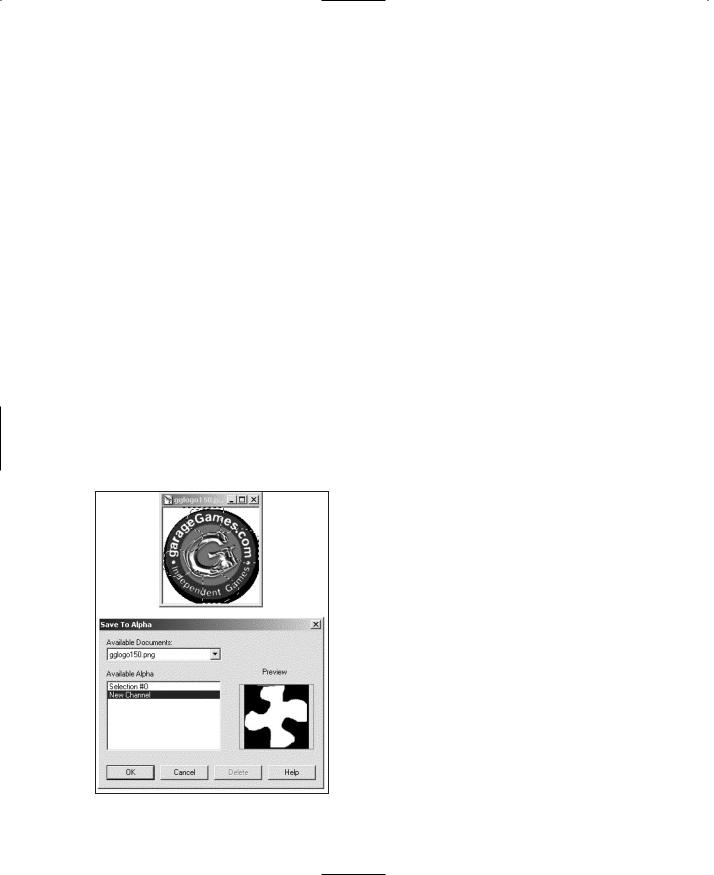
1.In Paint Shop Pro select File, Open. Browse your way to C:\3DGPAi1\fps\client\ui and then find the file gglogo150.png and open it. We're going to work with this file. The original version has already been backed up as Original gglogo150.png for you, so don't worry about messing up the logo.
Notice that there is no background color for this image; the areas outside the logo circle are filled with a gray-and-white checkerboard pattern. This pattern is the default Paint Shop Pro transparency pattern. The appearance of this pattern means that the alpha channel for the file has a value of 0 for each pixel of the image that coincides with the transparency pattern.
Team LRN
290 Chapter 8 ■ Introduction to Textures
2.Now choose the Freehand Selection tool. (Refer back to Figure 8.27—you want the fifth tool icon from the top.) Click on the little black triangle to the right, and choose the Freehand Selection tool from the icon menu.
3.Use the Freehand Selection tool to select an irregular shape in the gglogo150 image, such as shown in part A of Figure 8.29.
4.Delete the selected portion, leaving a cutout in the logo, as shown in part B of Figure 8.29.
5.Now choose File, Save As to save your changes.
6.Launch the fps demo game and click on the About button.
You should now see that the nice round GG logo has a "hole" in it shaped like the selection you made, with the dialog box's gray background color showing through. Part C of Figure 8.29 shows what it looks like. If the dialog box's background color had been blue, that's the color you would see. Or if it had been some bitmap image, then parts of the image would show through the logo. The areas in the logo that were covered by the transparency pattern (as dictated by the alpha channel) are not drawn at all. Of course, your shape is probably not identical to the cutout shape I made.
This process, when carried out with most programs other than Paint Shop Pro, or even with some older versions of PSP, is a fairly complex activity. With PSP 8 it's pretty well a nonevent!
Figure 8.29 Creating an alpha channel selection.
Paint Shop Pro Features
I won't cover all of the features that Paint Shop Pro offers—and there are just a ton of them. What I'll do is cover those that I use the most when creating textures for games and present some of the most useful options and capabilities for those features.
Materials Palette
In Paint Shop Pro a material is a combination of color, gradient, pattern, and texture. The Materials palette provides a way to edit those attributes of either a foreground or background material.
The Materials palette is normally found docked on the right side, just below the toolbars.
On the Materials palette (see Figure 8.30), you will find the Colors tab and the Swatches tab.
Team LRN
Paint Shop Pro |
291 |
The Colors tab is used to select either the foreground or the background color for the material. Simply move your cursor over the Colors tab body, and the cursor will change to the eyedropper icon. Set the foreground color by left-clicking on a color, and set the background by right-clicking on a color.
Swatches are custom materials you have created and saved for later use.
To the right of the tabs are the Foreground Properties and Background Properties boxes. When you choose a color from the Colors tab, the chosen color appears in the appropriate properties box. The upper-left properties box is for the foreground and stroke properties, and the lower-right one is for the background and fill.
Below each properties box are three buttons. From left to right these are the Style button, the Texture button, and the Transparent button.
■Style button. Indicates whether the color box is showing a color, gradient, or pattern.
■Texture button. Indicates whether a texture will be applied to the color.
■Transparent button. Indicates whether this color type (foreground or background) will be transparent.
To the right of the Foreground Properties and Background Properties boxes are the much smaller Foreground Color and Background Color boxes. Like the properties boxes, these reflect the current active colors. However, when you click in these boxes, you get a simple Color Selection dialog box and not the more complex Materials dialog box.
The All Tools check box allows you to indicate that the materials properties you have set apply globally to every drawing tool. When this
option is not chosen, you will have to change the settings for each drawing tool you use.
If the Materials palette is not visible, choose View,
Palettes, Materials to make it visible.
Layers
You can create four types of layers in Paint Shop Pro: raster layers, vector layers, mask layers, and adjustment layers. Raster layers are Paint Shop Pro's name for layers that contain pixel information (bitmaps). You can probably guess that vector layers contain instructions for drawing vector lines, shapes, and text. Vector layers can be added to images of any color depth, but not so with raster
layers. Mask layers contain mask information, such Figure 8.30 The Materials palette.
Team LRN

292 Chapter 8 ■ Introduction to Textures
as the alpha channel stuff that we did earlier in this chapter. Adjustment layers contain color correction information. You use them to change the appearance of the underlying layers.
A newly created Paint Shop Pro image consists of one raster layer, always called the background layer. This is like the canvas of a painting; every image must have at least one layer. Paint Shop Pro permits up to 100 layers per image, providing your computer has sufficient memory.
A Layer palette, the Layer Properties dialog box, and various commands in the Layers menu are available for working with layers. For each layer, the Layer palette displays its order in the layer stack and current properties. For a vector layer, a button for each vector object you draw is also displayed. The Layer Properties dialog box shows the settings for any individual layer. The Layers menu contains the general options for creating, managing, and merging layers. It also lists the layers in the image.
t i p
An image must be a grayscale image or a 24-bit color image to contain more than one bitmap layer or any adjustment layers. You might need to increase an image's color depth if you want to add these layers.
Creating Layers
To create a new layer, choose the Layers menu. You will see one menu item for each of the available layer types that can be created. If some aren't available, you need to increase the color palette for your image by choosing Colors, Increase Color depth. 16 million colors, if available to you, will give you access to all layer types.
The Layer Palette
The Layer palette provides quick access to many of the commands and options in the Layers menu and Layer Properties dialog box.
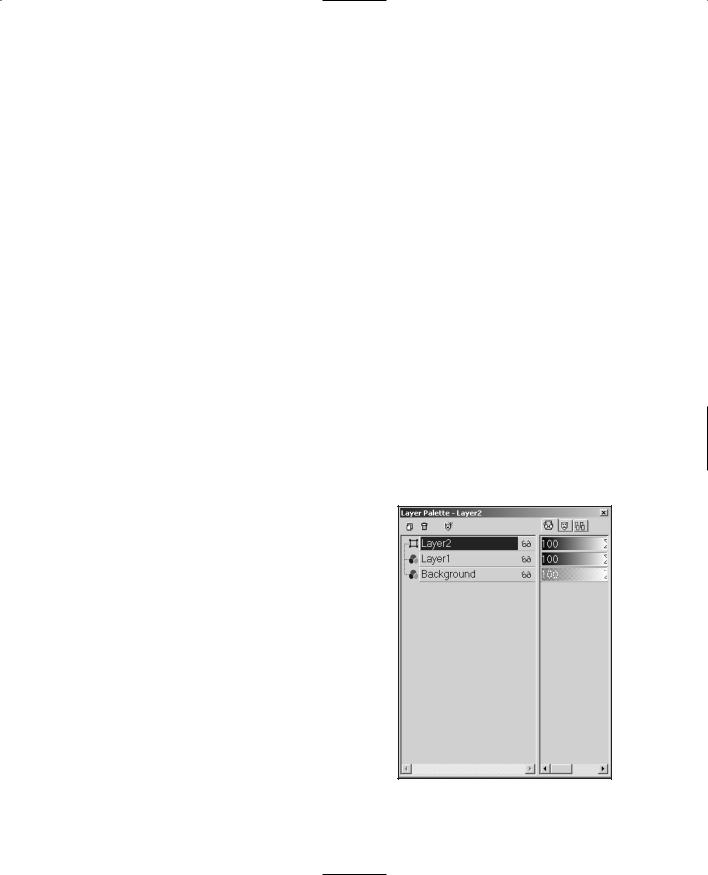
The Layer palette contains two panes (see Figure 8.31). Drag the vertical divider to change the size of each pane. The left pane of the Layer palette displays the names of layers and layer groups. The icon to the left of each name indicates the type of layer (background, raster, vector, mask, adjustment, group, or floating selection). When there are more layers than the palette can display, you can use the scroll bars on the right side to move the list of layers up or down.
The right pane of the Layer palette displays options for the layer, including visibility, opacity, blend mode, link set, and lock transparency. All settings on this pane apply to raster, mask, vector, and adjustment layers, but only the Visibility toggle applies to vector objects.
The Layer palette toolbar includes buttons for command tasks, such as adding a new raster or vector layer.
Team LRN
Paint Shop Pro |
293 |
If the palette is not visible, choose
View, Palettes, Layers to make the
Layer palette visible.
Layer Palette Buttons
Each layer in an image has a Layer button on the Layer palette where its name is displayed. To the left, an icon shows the layer type: raster, vector, mask, or adjustment. If you add an object to a vector layer, a plus sign ("+") appears next to its button and a Vector Object button appears underneath it. A Text Object button displays
the text you typed. Line Object and Figure 8.31 The Layer palette. Shape Object buttons display the types
of lines and shapes, respectively. A Vector Object button is indicated by the "square and circle" icon to its left.
■Click a Layer button to make its layer active, or current. The button is highlighted to indicate that it is active. When you click a Vector Object button, its text appears in bold.
■A Layer button corresponding to a new layer appears on the palette and in the Layers menu list when you add a new layer. When you delete or merge a layer, its Layer button disappears.
■Right-click on a Layer button to get a pop-up menu of operations that can be performed on the layer. This menu is similar to the Layers menu.
■Right-click on a Vector Object button to get a pop-up menu of the editing operations available for the layer.
■Hover the cursor over a Layer button to see a thumbnail image of that layer, or over a Vector Object button to see a thumbnail of the object.
■Click the plus ("+") sign to the left of a Vector Layer button to expand the object list for a vector layer.
Layer Palette Controls
Several optional controls are available on the right side of the Layer palette. You will probably only need to use two of these controls: the Visibility toggle and the Opacity slider. The Visibility toggle merely indicates whether the selected layer or object should appear in the image. The Opacity slider indicates how much of the object or layer is visible. Opacity is the measure of how opaque an object is, so it is the opposite of transparency. A 100
Team LRN
294Chapter 8 ■ Introduction to Textures
percent opaque object or layer completely obscures any objects or layers that are behind it. A 50 percent opaque object would be like a ghost of an object, allowing a certain amount of the obscured objects or layers to show through.
Saving Layers
You can save images that contain raster, mask, and adjustment layers in either the PSPIMAGE format or Photoshop's PSD format. Both formats retain all the layer information for these two types of layers. However, images containing vector layers must be saved in the PSPIMAGE format to retain the vector information. When you save an image with vector layers in the PSD format, the vector layers are converted to bitmap layers.
Tool Options Palette
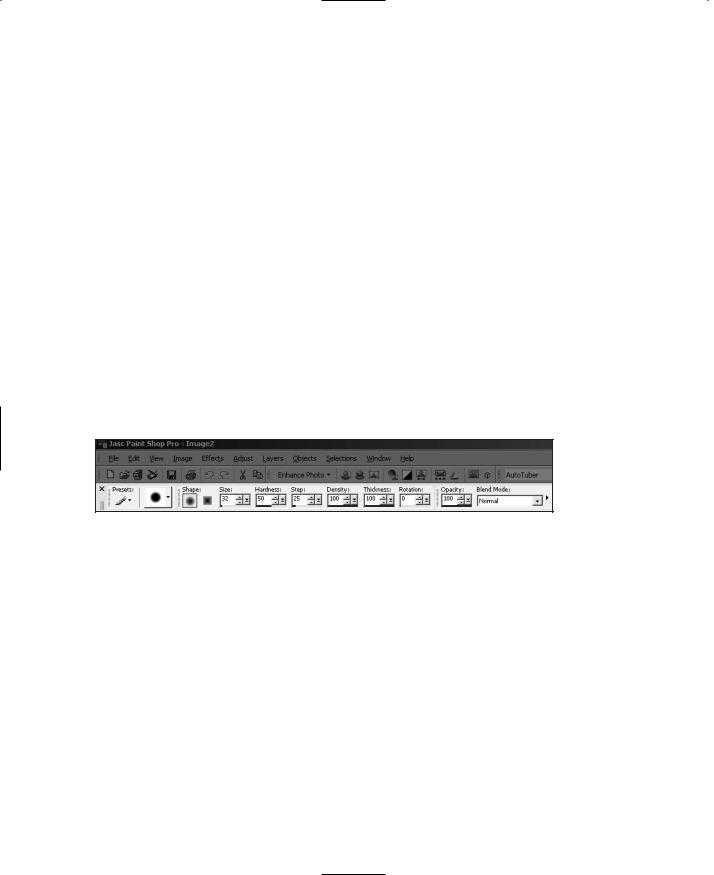
Every drawing tool has different adjustable settings that can be accessed via the Tool Options palette. The contents of this palette change according to which tool is being used.
Figure 8.32 shows the Tool Options palette in its default location, just below the toolbars. In the figure, the Paint Brush tool has been selected, so the Paint Brush options are being shown. The other parts of the window—the toolbars and menus—have been dimmed to make the Tool Options palette stand out.
Figure 8.32 The Tool Options palette for the Paint Brush.
Paint Brush
The Paint Brush is one of the primary image creation tools. It is one of the brush tools that is associated with the seventh icon from the top of the Tool palette (refer back to Figure 8.27).
Using the Paint Brush
To "paint" in a freehand style, use the Paint Brush tool as follows:
1.Click the image where you want the brush stroke to start.
2.Drag the cursor while pressing the mouse button. (Press the right mouse button if you want to use the background color.)
3.Release the mouse button to end the brush stroke.
If you want to create straight lines, do this:
Team LRN

Paint Shop Pro |
295 |
1.Click the image where you want the line to begin.
2.Press and hold the Shift key.
3.Click the image where you want to end the line (right-click to use the background color).
4.You can continue adding line segments of either color by clicking the mouse button.
5.Release the Shift key to end the line.
Paint Brush Tool Options
The Tool Options palette for the Paint Brush will appear in the upper toolbar when you select the Paint Brush. Figure 8.32 will help you locate the palette. The palette contains a number of optional attributes that you can alter; the most useful options are described in Table 8.2. These kinds of options are available for all tools on the Tool palette, although the specific options vary from tool to tool.
Table 8.2 Paint Brush Tool Options
Option |
Description |
Shape |
Shape controls the shape of the brush tip: round, square, vertical, horizontal, right |
|
slash, and left slash. When the brush touches the image, it applies color in the selected |
|
shape. For example, if you click your image once with a square brush, the brush will |
|
apply a square-shaped area of color. |
Size |
Size is the width of the brush tip in pixels, from 1 to 255 pixels wide. |
Opacity |
Opacity controls how completely the color covers the image surface. Lowering the |
|
opacity is like diluting paint. At 100 percent opacity, the color covers everything; at 1 |
|
percent, the color is almost transparent. |
Density |
Density controls the amount of color the brush applies with each stroke. The density |
|
can be compared to the number of bristles in a real paintbrush—increasing or |
|
decreasing density adds or removes bristles. At 100 percent, the color covers the |
|
surface completely. As the density decreases, the amount of color applied with each |
|
stroke decreases. At 1 percent, only a few pixels of color appear. |
Hardness |
Hardness controls the sharpness of the brush edges. The harder the brush, the more |
|
defined the edges of color will be. At 100 percent, the stroke has sharply defined edges. |
|
As the hardness decreases, the brush edge softens. |
Step |
Step controls the spacing of the discrete pixels of color, or how frequently the brush tip |
|
touches the image during a stroke. It is a percentage of the diameter of the brush tip. |
|
At 100 percent, a size 30 brush tip touches the surface once every 30 pixels, and the |
|
brush shape is clearly defined; at 50 percent, the tip touches in the middle of the |
|
previous tip. As the step decreases, the brush tip touches the surface more frequently. |
|
Its outline becomes less noticeable, and the strokes appear smoother and denser. |
Team LRN

296Chapter 8 ■ Introduction to Textures
Paint Shop Pro contains a selection of brushes with the preset tip shapes that approximate specific drawing tools: Paint Brush, Pen, Pencil, Marker, Crayon, Chalk, and Charcoal. If you use one of these brushes, all attributes except the size and step values are set automatically. You will find these presets at the left end of the Tool Options palette, under the label "Presets".
The numeric edit controls used in the palette provide a variety of ways to change the settings. You can type a number in the box, click the spinner controls, drag the meter bar, or press the pop-out button and drag the slider.
Table 8.3 describes options that are available only for the Paint Brush tool and not for the other brush tools.
Table 8.3 Paint Brush Special Brush Options
Option |
Description |
Continuous Stroke |
Normally, the Paint Brush tool simulates the effect of repeated brush strokes. |
|
Each time you move the brush over the same area of the image (or layer), |
|
you apply more paint. When the Continuous Stroke check box is selected, the |
|
brush applies paint once, and repainting an area has no effect. |
Wet Look |
With this option selected, the Paint Brush tool simulates wet paint, with soft |
|
color inside and a darker ring near the edge. To see the effect, lower the |
|
Hardness setting to some value less than 100 percent. |
Air Brush
The Air Brush is used to paint the same way you would with an airbrush or a spray can. It is one of the three brush tools that are associated with the seventh icon from the top of the Tool palette (refer back to Figure 8.27).
t i p
To confine the brush painting to a specific area, use the Selection tool or the Freehand Selection tool to make a selection before painting. Then the brushwork will only be applied within the selected area. This is a handy technique to avoid "overspray" with the Air Brush.
Freestyle Airbrush Painting
Freestyle airbrush painting is a technique where there are no restrictions on brush movement. To paint something in a freestyle manner:
1.Click the image where you want the brush stroke to start.
2.Drag the cursor while pressing one of the mouse buttons (press the right mouse button to use the background color).
3.Release the mouse button to end the brush stroke.
Team LRN

Paint Shop Pro |
297 |
Straight Airbrush Lines
We can restrict the movement of our airbrush in order to make consistent lines, by doing the following:
1.Click the image where you want the line to begin.
2.Press and hold the Shift key.
3.Click the image where you want to end the line (press the right mouse button to use the background color).
4.Keep adding line segments of either color by clicking with the left or right mouse button.
5.Release the Shift key to end the line.
Clone Brush
The Clone Brush is the eighth tool from the top of the Tool palette. Use the Clone Brush to copy part of an image to another location. You can clone within an image, between bitmap layers, or between two grayscale or 24-bit color images. For example, if a photograph has a flaw against a multitoned or multicolored background, such as skin or cloth, you can use the Clone Brush to copy the background over the flaw.
When you use the Clone Brush, you work with two image areas: the source area, which is the area you copy from; and the destination (or target) area, which is the area you copy to. The destination can be within the same image or in another image of equal color depth.
Clone Brush Options
The Clone Brush shares many options with the other brushes. However, one option is unique to the Clone Brush and has a big effect on how it operates: the Aligned Mode option.
With this option enabled, the source area moves with the brush each time you release the mouse button. When you release and then reclick the mouse button, the brush resumes cloning the image relative to the distance from the source area.
With this option disabled, the source area does not move when you release the mouse button. Each time you release and then reclick the mouse button, the starting point for cloning returns to the source area.
There is also the Sample Merged option. With this option enabled, the brush will clone all visible data rather than just the data from the current layer. If not enabled, only the data on the current layer when the source point was defined is cloned.
t i p
When you clone from one image to another, make sure that the two images have the same color depth before you begin.
Team LRN