

Chapter 1 - Ladder Diagram Fundamentals
TDR |
|
|
|
|
||
|
|
On |
|
|||
Coil |
|
|
|
|
|
|
|
|
|
|
Delay |
|
|
Power |
|
|
|
|
|
|
|
|
|
|
|
|
|
TDR
N/O
Contact
TDR
N/C
Contact
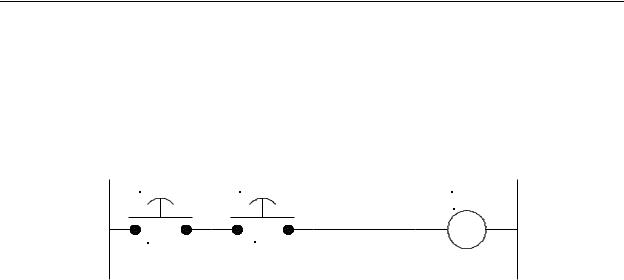
Figure 1-16 - Delay-On Timer Relay
Delay-on relays are useful for delaying turn-on events. For example, when the motor is started on a machine, a TON time delay relay can be used to disable all the other controls for a few seconds until the motor has had time to achieve running speed.
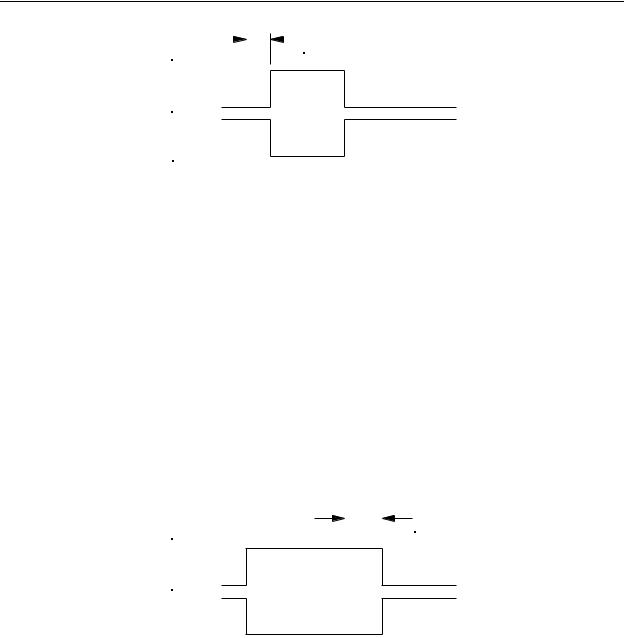
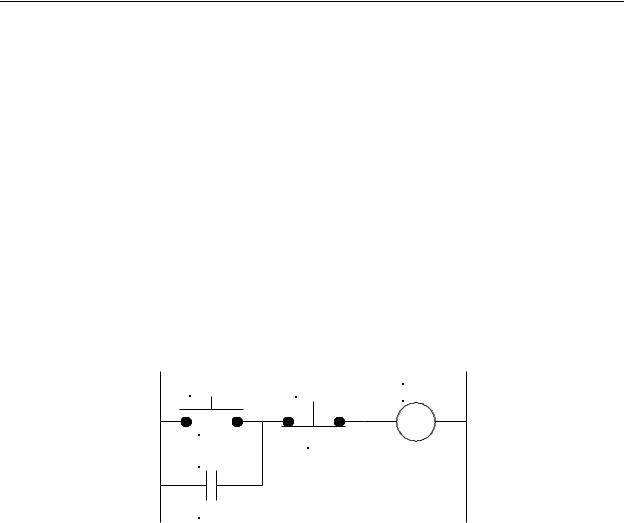
Delay-Off Timer (TOF) Relay
Figure 1-17 shows a timing diagram for a delay off timer. In this case, at the instant power is applied to the relay coil, the contacts activate - that is, the N/O contacts close, and the N/C contacts open. The time delay occurs when the relay is switched off. After power is removed from the relay coil, the contacts stay activated until the relay times-out. If the relay coil is re-energized before the relay times-out, the timer will reset, and the relay will remain energized until power is removed, at which time it will again begin the delay-off cycle.
TDR |
|
|
Off |
|
|
|
|||
Coil |
|
|
||
|
|
Delay |
||
Power |
|
|
|
|
|
|
|
||
|
|
|
|
|
TDR
N/O
Contact
TDR
N/C
Contact
Figure 1-17 - Delay-Off Timer Relay
Delay-off time delay relays are excellent for applications requiring time to be “stretched”. As an example, it can be used to operate a fan that continues to cool the machine even after the machine has been stopped.
1-4. Fundamentals of Ladder Diagrams
1-11
Chapter 1 - Ladder Diagram Fundamentals
Basic Diagram Framework
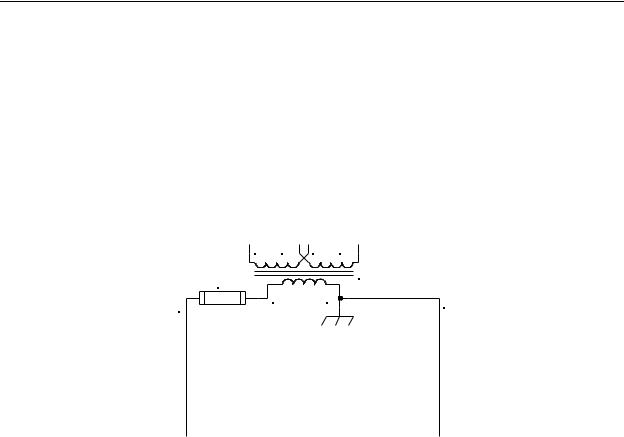
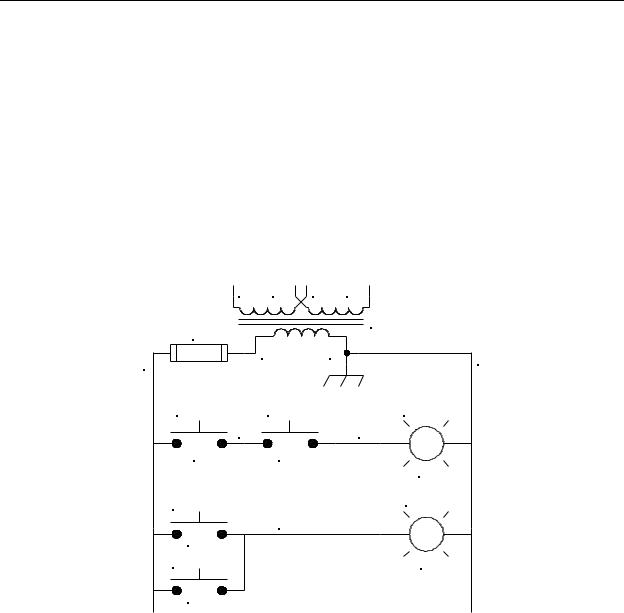
All electrical machine diagrams are drawn using a standard format. This format is called the ladder diagram. Beginning with the control transformer, we add a protective fuse on the left side. As mentioned earlier, in many cases the fuse is part of the transformer itself. From the transformer/fuse combination, horizontal lines are drawn to both sides and then drawn vertically down the page as shown in Figure 1-18. These vertical lines are called power rails or simply rails or uprights. The voltage difference between the two rails is equal to the transformer secondary voltage, so any component connected between the two rails will be powered.
H1 |
H3 |
H2 |
|
H4 |
F1 |
|
|
|
T1 |
|
|
|
|
|
2 |
X1 |
|
X2 |
1 |
|
|
|
||
|
|
|
|
Figure 1-18 - Basic Control Circuit
Notice that the right side of the control transformer secondary is grounded to the frame of the machine (earth ground). The reason for this is that, without this ground, should the transformer short internally from primary to secondary, it could apply potentially lethal line voltages to the controls. With the ground, an internal transformer short will cause a fuse to blow or circuit breaker to trip farther “upstream” on the line voltage side of the transformer which will shutdown power to the controls.
Wiring
The wires are numbered. In our diagram, the left rail is wire number 2 and the right rail is wire number 1. When the system is constructed, the actual wires used to connect the components will have a label on each end (called a wire marker), as shown in
Figure 1-19, indicating the same wire number. This makes it easier to build, troubleshoot, and modify the circuitry. In addition, by using wire markers, all the wires will be identified, making it unnecessary to use more than one color wire to wire the system, which reduces the cost to construct the machine. Generally, control circuits are wired with all black, red,
1-12

Chapter 1 - Ladder Diagram Fundamentals
or white wire (do not use green - it is reserved for safety ground wiring). Notice that in
Figure 1-18 the wire connecting T1 to F1 is not numbered. This is because in our design we will be using a transformer with the fuse block included. Therefore, this will be a permanent metal strap on the transformer and will not be a wire.
The wire generally used within the controls circuitry is AWG14 or AWG16 stranded copper, type MTW or THHN. MTW is an abbreviation for “machine tool wire” and THHN indicates thermoplastic heat-resistant nylon-coated. MTW has a single PVC insulation jacket and is used in applications where the wire will not be exposed to gas or oil.
It is less expensive, more flexible, and easier to route, bundle, and pull through conduits. THHN is used in areas where the wire may be exposed to gas or oil (such as hydraulically operated machines). It has a transparent, oil-
resistant nylon coating on the outside of the insulation. The drawback to THHN is that it is more expensive, is more difficult to route around corners, and because of its larger diameter, reduces the maximum number of conductors that can be pulled into tight places
(such as inside conduits). Since most control components use low currents, AWG14 or AWG16 wire is much larger than is needed. However, it is generally accepted for panel and controls wiring because the larger wire is tough, more flexible, easier to install, and can better withstand the constant vibration created by heavy machinery.
Reference Designators
For all electrical diagrams, every component is given a reference designator. This is a label assigned to the component so that it can be easily located. The reference designator for each component appears on the schematic diagram, the mechanical layout diagram, the parts list, and sometimes is even stamped on the actual component itself. The reference designator consists of an alphabetical prefix followed by a number. The prefix identifies what kind of part it is (control relay, transformer, limit switch, etc.), and the number indicates which particular part it is. Some of the most commonly used reference designator prefixes are as follows:
T |
transformer |
CR |
control relay |
R |
resistor |
C |
capacitor |
LS |
limit switch |
PB |
pushbutton |
S |
switch |
SS |
selector switch |
1-13

Chapter 1 - Ladder Diagram Fundamentals
TDR or TR |
time delay relay |
M |
motor, or motor relay |
L |
indicator lamp or line phase |
F |
fuse |
CB |
circuit breaker |
OL |
overload switch or overload contact |
The number of the reference designator is assigned by the designer beginning with the number 1. For example, control relays are numbered CR1, CR2, etc, fuses are F1, F2, etc. and so on. It is generally a courtesy of the designer to state on the electrical drawing the “Last Used Reference Designators”. This is done so that anyone who is assigned the job of later modifying the machine will know where to “pick up” in the numbering scheme for any added components. For example, if the drawing stated “Last Used Reference Designators: CR15, T2, F3", then in a modification which adds a control relay, the added relay would be assigned the next sequential reference designator, CR16. This eliminates the possibility of skipping a number or having duplicate numbers. Also, if components are deleted as part of a modification, it is a courtesy to add a line of text to the drawing stating “Unused Reference Designators:” This prevents someone who is reading the drawing from wasting time searching for a component that no longer exists.
Some automation equipment and machine tool manufacturers use a reversed component numbering scheme that starts with the number and ends with the alphabetical designator. For example, instead of CR15, T2, and F3, the reference designators 15CR, 2T, and 3F are used.
The components in our diagram example shown in Figure 1-18 are numbered with reference designators. The transformer is T1 and the fuse is F1. Other components will be assigned reference designators as they are added to the diagram.
Boolean Logic and Relay Logic
Since the relays in a machine perform some type of control operation, it can be said that they perform a logical function. As with all logical functions, these control circuits must consist of the fundamental AND, OR, and INVERT logical operations. Relay coils, N/C
contacts, and N/O contacts can be wired to perform |
LAMP1 |
|
these same fundamental logical functions. By properly SWITCH1 |
||
SWITCH2 |
||
wiring relay contacts and coils together, we can create |
|
|
any logical function desired. |
|
AND
Generally when introducing a class to logical
operations, an instructor uses the analogy of a series Figure 1-20 - AND Lamp Circuit
1-14
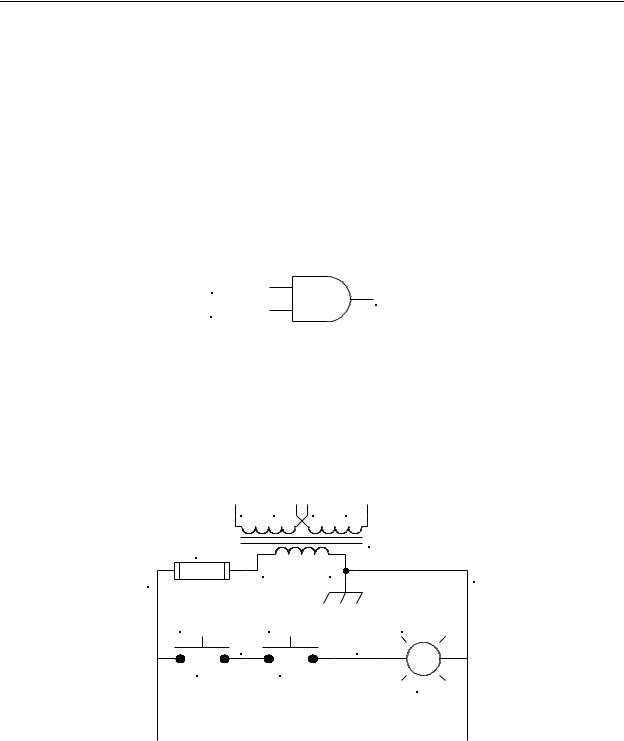
Chapter 1 - Ladder Diagram Fundamentals
connection of two switches, a lamp and a battery to illustrate the AND function. Relay logic allows this function to be represented this way. Figure 1-20 shows the actual wiring connection for two switches, a lamp and a battery in an AND configuration. The lamp,
LAMP1, will illuminate only when SWITCH1 AND SWITCH2 are ON. The Boolean expression for this is
Lamp1 = (Switch1) • (Switch2) |
(1-1) |
If we were to build this function using digital logic chips, the logic diagram for Equation 1-1 and Figure 1-20 would appears as shown in Figure 1-21. However, keep in mind that we will not be doing this for machine controls.
SWITCH1
LAMP1
SWITCH2
Figure 1-21 - AND Circuit
To represent the circuit of Figure 1-21 in ladder logic form in an electrical machine diagram, we would utilize the power from the rails and simply add the two switches (we have assumed these are to be pushbutton switches) and lamp in series between the rails as shown in Figure 1-22. This added circuit forms what is called a rung. The reason for the name “rung” is that as we add more circuitry to the diagram, it will begin to resemble a ladder with two uprights and many rungs.
H1 |
H3 |
H2 |
H4 |
|
F1 |
|
|
T1 |
|
|
|
|
|
|
2 |
X1 |
|
X2 |
1 |
|
|
|
||
|
|
|
|
|
SWITCH1 |
SWITCH2 |
LAMP1 |
|
|
3 |
|
|
4 |
|
PB1 |
PB2 |
|
L1 |
|
|
|
|
|
|
Figure 1-22 - Ladder Diagram |
|
|||
1-15
Chapter 1 - Ladder Diagram Fundamentals
There are a few important details that have been added along with the switches and lamp. Note that the added wires have been assigned the wire numbers 3 and 4 and the added components have been assigned the reference designators PB1, PB2, and L1. Also note that the switches are on the left and the lamp is on the right. This is a standard convention when designing and drawing machine circuits. The controlling devices (in this case the switches) are always positioned on the left side of the rung, and the controlled devices (in this case the lamp) are always positioned on the right side of the rung. This wiring scheme is also done for safety reasons. Assume for example that we put the lamp on the left side and the switches on the right. Should there develop a short to ground in the wire from the lamp to the switches, the lamp would light without either of the switches being pressed. For a lamp to inadvertently light is not a serious problem, but assume that instead of a lamp, we had the coil of a relay that started the machine. This would mean that a short circuit would start the machine without any warning. By properly wiring the controlled device (called the load) on the right side, a short in the circuit will cause the fuse to blow when the rung is activated, thus de-energizing the machine controls and shutting down the machine.
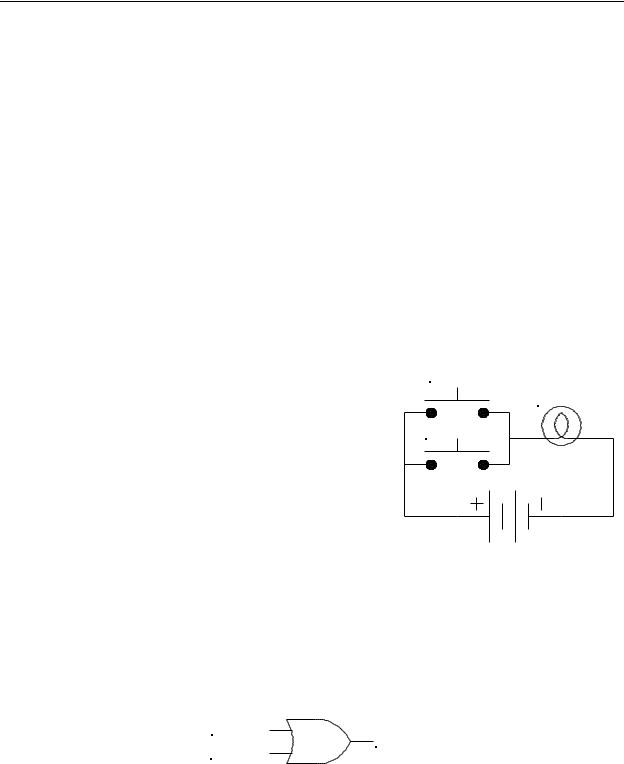
OR |
SWITCH1 |
The same approach may be taken for the OR |
LAMP2 |
|
|
function. The circuit shown in Figure 1-23 illustrates two |
SWITCH2 |
switches wired as an OR function controlling a lamp, |
|
LAMP2. As can be seen from the circuit, the lamp will |
|
illuminate if SWITCH 1 OR SWITCH 2 is closed; that is, |
|
depressing either of the switches will cause the lamp |
|
LAMP2 to illuminate. The Boolean expression for this |
|
circuit is |
|
Figure 1-23 - OR Lamp Circuit |
|
Lamp2 = (Switch1) + (Switch2) |
(1-2) |
For those more familiar with logic diagramming, the OR gate representation of the OR circuit in Figure 1-23 and Equation 1-2 is shown in Figure 1-24. Again, when drawing machine controls diagrams, we do not use this schematic representation.
SWITCH1
LAMP2
SWITCH2
Figure 1-24 - OR Circuit
1-16
Chapter 1 - Ladder Diagram Fundamentals
We can now add this circuit to our ladder diagram as another rung as shown in
Figure 1-25. Note that since the switches SWITCH1 and SWITCH2 are the same ones used in the top rung, they will have the same names and the same reference designators when drawn in rung 2. This means that each of these two switches have two N/O contacts on the switch assembly. Some designers prefer to place dashed lines between the two PB1 switches and another between the two PB2 switches to clarify that they are operated by the same switch actuator (in this case the actuator is a pushbutton)
When we have two or more components in parallel in a rung, each parallel path is called a branch. In our diagram in Figure 1-25, rung two has two branches, one with PB1 and the other with PB2. It is possible to have branches on the load side of the rung also. For example, we could place another lamp in parallel with LAMP2 thereby creating a branch on the load side.
H1 |
H3 |
H2 |
H4 |
|
F1 |
|
|
T1 |
|
|
|
|
|
|
2 |
X1 |
|
X2 |
1 |
|
|
|
||
|
|
|
|
|
SWITCH1 |
SWITCH2 |
LAMP1 |
|
|
3 |
|
|
4 |
|
PB1 |
PB2 |
|
L1 |
|
|
|
|
|
|
SWITCH1 |
|
|
LAMP2 |
|
|
|
|
|
|
|
5 |
|
|
|
PB1 |
|
|
|
|
SWITCH2 |
|
|
L2 |
|
PB2 |
|
|
|
|
Figure 1-25 - Add Rung 2 |
|
|||
It is important to note that in our ladder diagram, it is possible to exchange rungs 1 and 2 without changing the way the lamps operate. This is one advantage of using ladder diagramming. The rungs can be arranged in any order without changing the way the machine operates. It allows the designer to compartmentalize and organize the control circuitry so that it is easier to understand and troubleshoot. However, keep in mind that, later in this text, when we begin PLC ladder programming, the rearranging of rungs is not
1-17
Chapter 1 - Ladder Diagram Fundamentals
recommended. In a PLC, the ordering of the rungs is critical and rearranging the order could change the way the PLC program executes.
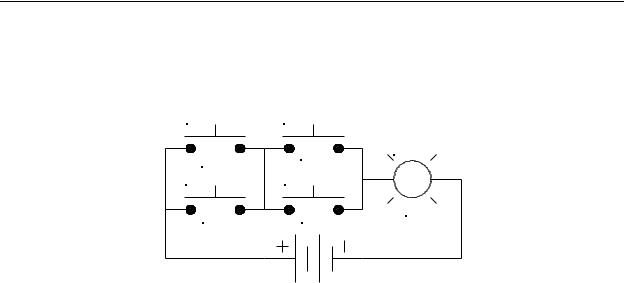
AND OR and OR AND
Let us now complicate the circuitry somewhat. Suppose that we add two more switches to the previous circuits and configure the original switch, battery and light circuit as in Figure 1-26.
SWITCH1 |
SWITCH2 |
|
PB1 |
PB2 |
LAMP3 |
|
||
|
|
|
SWITCH3 |
SWITCH4 |
|
PB3 |
PB4 |
L3 |
|
Figure 1-26 - AND-OR Lamp Circuit
Notice that two switches have been added, SWITCH 3 and SWITCH 4. For this system to operate properly, the LAMP needs to light if SWITCH 1 AND SWITCH 2 are both on, OR if SWITCH 3 AND SWITCH 4 are both on. This circuit is called an AND-OR circuit. The
Boolean expression for this is illustrated in Equation 1-3.
Lamp3 = (Switch1• Switch2) + (Switch3• Switch4) |
(1-3) |
The opposite of this circuit, called the OR-AND circuit is shown in Figure 1-27. For this circuit, LAMP4 will be on whenever SWITCH1 OR SWITCH2, AND SWITCH3 OR
SWITCH4 are on. For circuits that are logically complicated, it sometimes helps to list all the possible combinations of inputs (switches) that will energize a rung. For this OR-AND circuit, LAMP4 will be lit when the following combinations of switches are on:
SWITCH1 and SWITCH3
SWITCH1 and SWITCH4
SWITCH2 and SWITCH3
SWITCH2 and SWITCH4
1-18
Chapter 1 - Ladder Diagram Fundamentals
SWITCH1 and SWITCH2 and SWITCH3
SWITCH1 and SWITCH2 and SWITCH4
SWITCH1 and SWITCH3 and SWITCH4
SWITCH2 and SWITCH3 and SWITCH4
SWITCH1 and SWITCH2 and SWITCH3 and SWITCH4
SWITCH1 |
SWITCH3 |
|
PB1 |
PB3 |
LAMP4 |
|
||
|
|
|
SWITCH2 |
SWITCH4 |
|
PB2 |
PB4 |
L4 |
|
Figure 1-27 - OR-AND Lamp Circuit
The Boolean expression for the OR-AND circuit is shown in Equation 1-4
Lamp3 = (Switch1+ Switch2) • (Switch3 + Switch4) |
(1-4) |
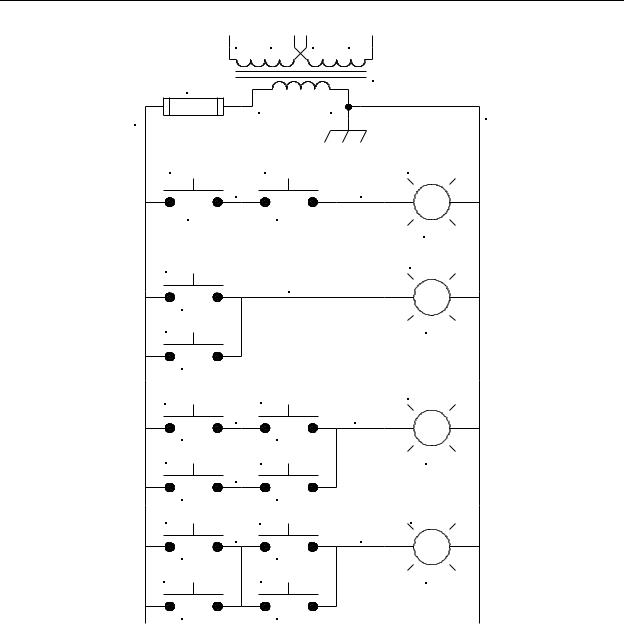
These two rungs will now be added to our ladder diagram and are shown in Figure 1-28. Look closely at the circuit and follow the possible power paths to energize LAMP3 and LAMP4. You should see two possible paths for LAMP3:
SWITCH1 AND SWITCH2
SWITCH3 AND SWITCH4
Either of these paths will allow LAMP3 to energize. For LAMP4, you should see four possible paths:
SWITCH1 AND SWITCH3
SWITCH1 AND SWITCH4
SWITCH2 AND SWITCH3
SWITCH2 AND SWITCH4.
Any one of these four paths will energize LAMP4.
1-19
Chapter 1 - Ladder Diagram Fundamentals
H1 |
H3 |
H2 |
H4 |
|
F1 |
|
|
T1 |
|
|
|
|
|
|
2 |
X1 |
|
X2 |
1 |
|
|
|
||
|
|
|
|
|
SWITCH1 |
SWITCH2 |
LAMP1 |
|
|
3 |
|
|
4 |
|
PB1 |
PB2 |
|
L1 |
|
|
|
|
|
|
SWITCH1 |
|
|
LAMP2 |
|
|
|
|
|
|
|
5 |
|
|
|
PB1 |
|
|
|
|
SWITCH2 |
|
|
L2 |
|
PB2 |
|
|
|
|
SWITCH1 |
SWITCH2 |
LAMP3 |
|
|
|
|
|||
6 |
|
|
8 |
|
PB1 |
PB2 |
|
|
|
SWITCH3 |
SWITCH4 |
L3 |
|
|
7 |
|
|
|
|
PB3 |
PB4 |
|
|
|
SWITCH1 |
SWITCH3 |
LAMP4 |
|
|
9 |
|
|
10 |
|
PB1 |
PB3 |
|
|
|
SWITCH2 |
SWITCH4 |
L4 |
|
|
PB2 |
PB4 |
|
|
|
Figure 1-28 - Add Rungs 3 & 4 |
|
|||
Now that we have completed a fundamental study of ladder diagram, we should begin investigating some standard ladder logic circuits that are commonly used on electric machinery. Keep in mind that these circuits are also used in programming programmable logic controllers.
1-20
Chapter 1 - Ladder Diagram Fundamentals
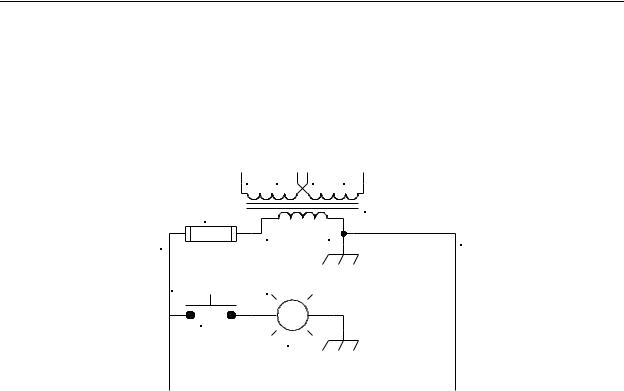
Ground Test
Earlier, we drew a ladder diagram of some switch circuits which included the control transformer. We connected the right side of the transformer to ground (the frame of the machine). For safety reasons, it is necessary to occasionally test this ground to be sure that is it still connected because loss of the ground circuit will not affect the performance of the machine and will therefore go unnoticed. This test is done using a ground test circuit, and is shown in Figure 1-29.
H1 |
H3 |
H2 |
|
H4 |
F1 |
|
|
|
T1 |
|
|
|
|
|
2 |
X1 |
|
X2 |
1 |
|
|
|
||
|
|
|
|
|
|
GROUND |
|
|
|
GROUND TEST |
TEST |
|
|
|
PASS |
|
|
|
|
S1 |
|
|
|
|
|
L1 |
|
|
|
Figure 1-29 - Ground Test Circuit
Notice that this rung is unusual in that it does not connect to the right rail. In this case, the right side fo the lamp L1 has a wire with a lug that is fastened to the frame of the machine under a screw. When the pushbutton S1 is pressed, the lamp L1 lights if there is a path for current to flow through the frame of the machine back to the X2 side of the control transformer. If the lamp fails to light, it is likely that the transformer is no longer grounded. The machine should not be operated until an electrician checks and repairs the problem. In some cases, the lamp L1 is located inside the pushbutton switch S1 (this is called an illuminated switch).
The Latch (with Sealing/Latching Contacts)
Occasionally, it is necessary to have a relay “latch” on so that if the device that activated the relay is switched off, the relay remains on. This is particularly useful for making a momentary pushbutton switch perform as if it were a maintained switch. Consider, for example, the pushbuttons that switch a machine on and off. This can be done with momentary pushbuttons if we include a relay in the circuit that is wired as a latch
1-21
Chapter 1 - Ladder Diagram Fundamentals
as shown in the ladder diagram segment Figure 1-30 (the transformer and fuse are not shown for clarity). Follow in the diagram as we discuss how this circuit operates.
First, when power is applied to the rails, CR1 is initially de-energized and the N/O
CR1 contact in parallel with switch S1 is open also. Since we are assuming S1 has not yet been pressed, there is no path for current to flow through the rung and it will be off. Next, we press the START switch S1. This provides a path for current flow through S1, S2 and the coil of CR1, which energizes CR1. As soon as CR1 energizes, the N/O CR1 contact in parallel with S1 closes (since the CR1 contact is operated by the CR1 coil). When the relay contact closes, we no longer need switch S1 to maintain a path for current flow through the rung. It is provided by the N/O CR1 contact and N/C pushbutton S2. At this point, we can release S1 and the relay CR1 will remain energized. The N/O CR1 contact “seals” or “latches” the circuit on, and the contact is therefore called a sealing contact or latching contact.
The circuit is de-energized by pressing the STOP switch S2. This breaks the flow of current through the rung, de-energizes the CR1 coil, and opens the CR1 contact in parallel with S1. When S2 is released, there will still be no current flow through the rung because both S1 and the CR1 N/O contact are open.
START |
STOP |
RUN |
CR1 |
||
S1 |
S2 |
|
|
|
|
RUN |
|
|
CR1
Figure 1-30 - Latch Circuit
The latch circuit has one other feature that cannot be obtained by using a maintained switch. Should power fail while the machine is on, the latch rung will, of course, deenergize. However, when power is restored, the machine will not automatically restart. It must be manually restarted by pressing S1. This is a safety feature that is required on all heavy machines.
2-Handed Anti-Tie Down, Anti-Repeat
Many machines used in manufacturing are designed to go through a repeated fixed cycle. An example of this is a metal cutter that slices sheets of metal when actuated by an operator. By code, all cyclic machines must have 2-handed RUN actuation, and antirepeat and anti-tie down features. Each of these is explained below.
1-22
Chapter 1 - Ladder Diagram Fundamentals
2-Handed RUN Actuation
This means that the machine can only be cycled by an operator pressing two switches simultaneously that are separated by a distance such that both switches cannot be pressed by one hand. This assures that both of the operator’s hands will be on the switches and not in the machine when it is cycling. This is simply two palm switches in series operating a RUN relay CR1, as shown in Figure 1-31.
LEFT |
RIGHT |
RUN |
START |
START |
|
|
|
CR1 |
S1 |
S2 |
|
Figure 1-31 - 2-Handed Operation
Anti-Tie Down and Anti-Repeat
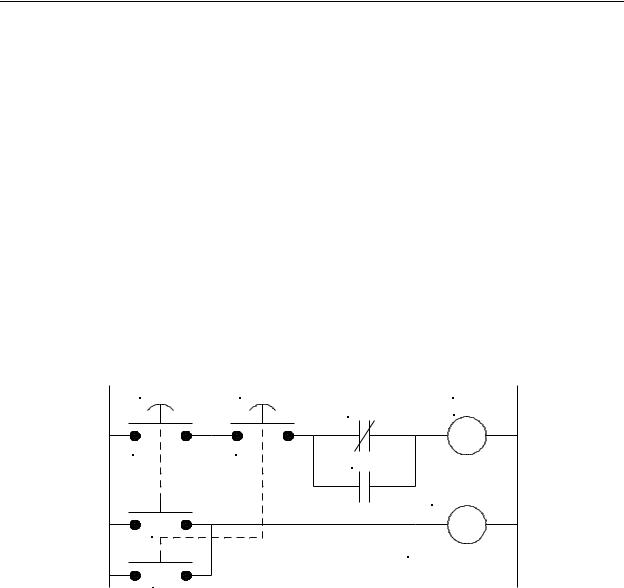
The machine must not have the capability to be cycled by tying or taping down one of the two RUN switches and using the second to operate the machine. In some cases, machine operators have done this so that they have one hand available to guide raw material into the machine while it is cycling, an extremely hazardous practice. Anti-tie down and anti-repeat go hand-in-hand by forcing both RUN switches to be cycled off and then on each time to make the machine perform one cycle. This means that both RUN switches must be pressed at the same time within a small time window, usually ½ second. If one switch is pressed and then the other is pressed after the time window has expired, the machine will not cycle.
Since both switches must be pressed within a time window, we will need a time delay relay for this feature, specifically a delay-on, or TON, relay. Consider the circuit shown in Figure 1-32. Notice that we have taken the 2-handed circuit that we constructed in Figure 1-31 and added additional circuitry to perform the anti-tie down. Follow along in the circuit as we analyze how it operates.
The two palm switches S1 and S2 now each have two N/O contacts. In the first rung they are connected in series and in the second rung, they are connected in parallel. This means that in order to energize CR1, both S1 and S2 must be pressed, and in order to energize TDR1, either S1 or S2 must be pressed. When power is applied to the rails, assuming neither S1 nor S2 are pressed, both relays CR1 and TDR1 will be de-energized.
Now we press either of the two palm switches. Since we did not yet press both switches, relay CR1 will not energize. However, in the second rung, since one of the two switches
1-23
Chapter 1 - Ladder Diagram Fundamentals
is pressed, we have a current path through the pressed switch to the coil of TDR1. The time delay relay TDR1 begins to count time. As long as we hold either switch depressed,
TDR1 will time out in ½ second. When this happens, the N/C TDR1 contact in the first rung will open, and the rung will be disabled from energizing, which, in turn, prevents the machine from running. At this point, the only way the first rung can be enabled is to first reset the time delay relay by releasing both S1 and S2.
If S1 and S2 are both pressed within ½ second of each other, the TDR1 N/C contact in the first rung will have not yet opened and CR1 will be energized. When this happens, the N/O CR1 contact in the first rung seals across the TDR1 contact so that when the time delay relay TDR1 times out, the first rung will not be disabled. As long as we hold both palm switches on, CR1 will remain on and TDR1 will remain timed out.
If we momentarily release either of the palm switches, CR1 de-energizes. When this happens, we loose the sealing contact across the N/C TDR1 contact in the first rung. If we re-press the palm switch, CR1 will not re-energize because TDR1 is still timed out and is holding its N/C contact open in the first rung. The only way to get CR1 re-energized is to reset TDR1 by releasing both S1 and S2 and then pressing both again.
LEFT |
RIGHT |
RUN |
START |
START |
|
|
TDR1 |
CR1 |
S1 |
S2 |
|
|
CR1 |
|
|
|
TDR1, 0.5s |
S1 |
|
|
|
|
ANTI-TIE DOWN |
S2
Figure 1-32 - 2-Handed Operation with Anti-Tie Down and
Anti-Repeat
Single Cycle
When actuated, the machine must perform only one cycle and then stop, even if the operator is still depressing the RUN switches. This prevents surprises and possible injury for the operator if the machine should inadvertently go through a second cycle. Therefore,
1-24
Chapter 1 - Ladder Diagram Fundamentals
circuitry is usually needed to assure that once the machine has completed one cycle of operation, it stops and waits for the RUN switch(es) to be released and then pressed again.
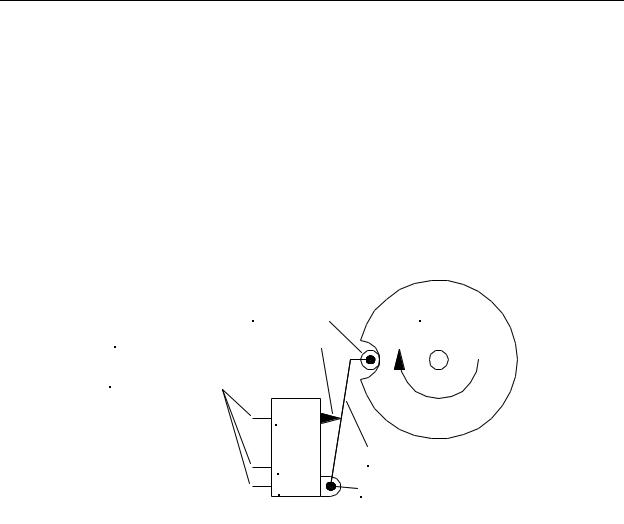
In order for the circuitry to be able to determine where the machine is in its cycle, a cam-operated limit switch (like the one previously illustrated in Figure 1-11) must be installed on the machine as shown in Figure 1-33. The cam is mounted on the mechanical shaft of the machine which rotates one revolution for each cycle of the machine. There is a spring inside the switch that pushes the actuator button, lever arm, and roller to the right and keeps the roller constantly pressed against the cam surface. The mechanism is adjusted so that when the cam rotates, the roller of the switch assembly rolls out of the detent in the cam which causes the lever arm to press the switch’s actuator button. The actuator remains pressed until the cam makes one complete revolution and the detent aligns with the roller.
ROLLER CAM
ACTUATOR BUTTON
TERMINALS
C
N/O |
LEVER ARM |
|
PIVOT |
||
N/C |
||
SWITCH |
|
Figure 1-33 - Cam-operated Limit Switch
The cam is aligned on the shaft so that when the machine is at the stopping point in its cycle (i.e., between cycles), the switch roller is in the cam detent. The switch has three terminals, C (common, or wiper), N/O (normally open), and N/C (normally closed).
When the machine is between cycles, the N/O terminal is open and the N/C is connected to C. While the machine is cycling, the N/O is connected to C and the N/C is open.
The circuit to implement the single-cycle feature is shown in Figure 1-34. Note that we will be using both the N/O and N/C contacts of the cam-operated limit switch LS1. Also note that, for the time being, the START switch S1 is shown as a single pushbutton switch. Later we will add the 2-handed anti-tie down, and anti-repeat circuitry to make a complete cycle control system. Follow along on the ladder diagram as we analyze how this circuit works.
1-25
Chapter 1 - Ladder Diagram Fundamentals
START |
|
RUN |
|
CR1 |
|
|
|
|
S1 |
|
|
CR1 |
CR3 |
RUN LATCH |
CYCLE |
|
CR2 |
LS1A |
|
|
CYCLE |
CR1 |
CYCLE LOCK |
|
|
|
LS1B |
|
CR3 |
|
CR3 |
|
|
|
Figure 1-34 - Single-Cycle Circuit
When the rails are energized, we will assume that the machine is mechanically positioned so that the cam switch is sitting in the cam detent (i.e., the N/O contact LS1A is open and the N/C contact LS1B is closed). At this point, CR1 in the first rung will be off (because the START switch has not yet been pressed), CR2 in the second rung is off (because CR1 is off and LS1A is open), and CR3 in the third rung is on because LS1B is closed and the N/C CR1 contact is closed. As soon as CR3 energizes, the CR3 N/O contact in the third rung closes. At this point, the circuit is powered and the machine is stopped, but ready to cycle.
Now we press the START switch S1. This energizes CR1. In the second rung, the
N/O CR1 contact closes. Since the N/O CR3 contact is already closed (because CR3 is on), CR2 energizes. This applies power to the machine and causes the cycle to begin.
As soon as the cam switch rides out of the cam detent, LS1A closes and LS1B opens. When this happens, LS1A in the second rung seals CR2 on. In the third rung,
LS1B opens which de-energizes CR3. Since CR2 is still on, the machine continues in its cycle. The operator may or may not release the START switch during the cycle. However, in either case it will not affect the operation of the machine. We will analyze both cases:
1. If the operator does release the START switch before the machine finishes it’s cycle, CR1 will de-energize. However, in the second rung it has no immediate effect
1-26

Chapter 1 - Ladder Diagram Fundamentals
because the contacts CR1 and CR3 are sealed by LS1A. Also, in the third rung, it has no immediate affect because LS1B is open which disables the entire rung. Eventually, the machine finishes it’s cycle and the cam switch rides into the cam detent. This causes LS1A to open and LS1B to close. In the third rung, since the N/C CR1 contact is closed (CR1 is off because S1 is released), closing LS1B switches on CR3. In the second rung, when LS1A opens CR2 de-energizes (because the N/O CR1 contact is open). This stops the machine and prevents it from beginning another cycle. The circuit is now back in it’s original state and ready for another cycle.
2. If the operator does not release the START switch before the machine finishes it’s cycle, CR1 remains energized. Eventually, the machine finishes it’s cycle and the cam switch rides into the cam detent. This causes LS1A to open and LS1B to close. In the third rung, the closing of LS1B has no effect because N/C CR1 is open. In rung 2, the opening of LS1A causes CR2 to de-energize, stopping the machine. Then, when the operator releases S1, CR1 turns off, and CR3 turns on. The circuit is now back in it’s original state and ready for another cycle.
There are some speed limitations to this circuit. First, if the machine cycles so quickly that the cam switch “flies” over the detent in the cam, the machine will cycle endlessly. One possible fix for this problem is to increase the width of the detent in the cam. However, if this fails to solve the problem, a non-mechanical switch mechanism must be used. Normally, the mechanical switch is replaced by an optical interrupter switch and the cam is replaced with a slotted disk. This will be covered in a later chapter. Secondly, if the machine has high inertia, it is possible that it may “coast” through the stop position. In this case, some type of electrically actuated braking system must be added that will quickly stop the machine when the brakes are applied. For our circuit, the brakes could be actuated by a N/C contact on CR2.
Combined Circuit
Figure 1-35 shows a single cycle circuit with the START switch replaced by the two rungs that perform the 2-handed, anti-tie down, and anti-repeat functions. In this circuit, when both palm switches are pressed within 0.5 second of each other, the machine will cycle once and stop, even if both palm switches remain pressed. Afterward, both palm switches must be released and pressed again in order to make the machine cycle again.
1-27
Chapter 1 - Ladder Diagram Fundamentals
LEFT
START
S1
S1
S2
CR1
CYCLE
LS1A
CYCLE
LS1B
RIGHT
START RUN TDR1 CR1
S2
CR1
TDR1, 0.5s
ANTI-TIE DOWN
CR3 |
RUN LATCH |
CR2
CR1 |
CYCLE LOCK |
CR3 |
CR3 |
|
Figure 1-35 - 2-Handed, Anti-Tie Down, Anti-Repeat, Single-
Cycle Circuit
1-28