

Chapter 7: Microcontroller Interrupts and Timers
Speedometer
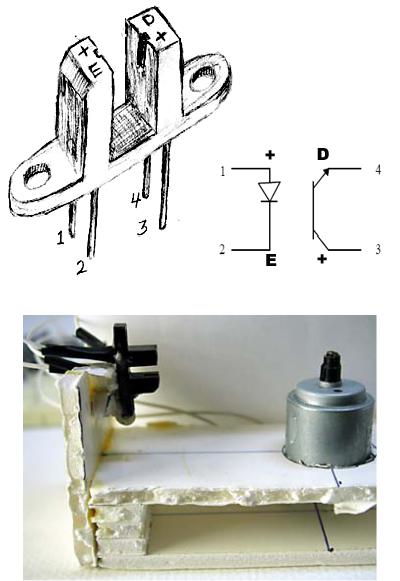
We used an optoisolator to separate the motor power circuits from the Butterfly to help lessen the likelihood of blowing something up. A device similar to an optoisolator is an optointerrupter, which has an air channel between the IR light emitting diode and the IR detector transistor, see Figure 23. An opaque object passed between the diode and the detector causes the transistor to turn off thus ‘interrupting’ the current. We can tie the transistor to a pin on the Butterfly and detect the interruption. Did you notice the opening cut in the wheel in Figure 22? (when you cut out the slot, glue it just under the inner side of the slot to help keep the wheel balanced) If you rig up the motor base so that the wheel spins thru the slot in the optointerrupter, each time the opening passes; the transistor turns on and back off when the slot has passed. If we write our software so that a voltage change on the pin attached to the optointerrupter causes an interrupt in the Butterfly, we can count those interrupts. If we count for exactly one second we have the number of times the wheel rotates per second, which is the rotational speed in Hz. Cool!
Solder long wires to the optoisolator, and then add electrical tape to prevent the legs from shorting. Next carefully glue it to the motor base in a position so that the wheel rotates thru it. Make sure the wheel is balanced and will turn cleanly (easier said than done) and fully block and unblock the optoisolator slot as the wheel turns, Figure 22.
144
Chapter 7: Microcontroller Interrupts and Timers
Figure 23: Opto Interrupt Switch - H21A1
Figure 24: Opto Interrupter Glued on Motor Base
Wiring:
•Optoisolator pin 1 to +3v
•Optoisolator pin 2 to a 200 Ohm resistor
145
Chapter 7: Microcontroller Interrupts and Timers
•200 Ohm resistor to Butterfly GND
•Optoisolator pin 3 to PORTB pin 4 (remember counting starts at 0)
•Optoisolator pin 4 to Butterfly GND
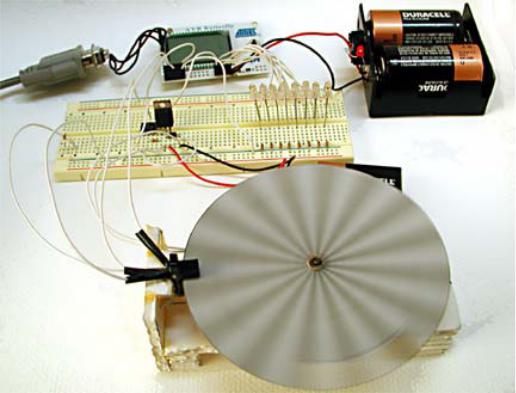
You will notice that you learned the mechanical engineering skills needed for this project in kindergarten. Though most kindergarteners could probably do a more attractive job than I did, it works.
Figure 25: Speedometer
Create a Speedometer directory and copy the motor control software to it. Make the following changes in Demonstrator.c:
// Demonstrator.c Speedometer version
#include "PC_Comm.h" #include "Demonstrator.h"
146
Chapter 7: Microcontroller Interrupts and Timers
unsigned char milliseconds = 0;
unsigned int second = 0;//count to 1000 and trigger one second event
unsigned int speed = 0; // IR detector count per second unsigned int lastspeed = 0; // IR detector count per second
void initializer()
{
//Calibrate the oscillator: OSCCAL_calibration();
//Initialize the USART USARTinit();
//Init port pins
DDRB |= 0x08;
PORTB |= ((1<<PINB4));//|(1<<PINB6)|(1<<PINB7));
// Enable pin change interrupt on PORTB
PCMSK1 = ((1<<PINB4));//|(1<<PINB6)|(1<<PINB7)); EIFR = (1<<6)|(1<<7);
EIMSK = (1<<6)|(1<<7);
DDRD = 0xFF; // set PORTD for output
PORTD = 0XFF; // set LEDs off
milliSecInit(127); // 50% duty cycle 1kHz signal
// say hello
sendString("\rPC_Comm.c ready to communicate.\r"); // identify yourself specifically
sendString("You are talking to the Speedometer demo.\r"); sendString("'setxxx' to set speed\r'Hz' to get speed in
Hertz\r");
}
void parseInput(char s[])
{
// parse first character switch (s[0])
{
case 's':
if( (s[1] == 'e') && (s[2] == 't')) parse_set(s);
147
Chapter 7: Microcontroller Interrupts and Timers
break; case 'H':
if( (s[1] == 'z')) sendSpeed(); break;
case 'd':
if( (s[1] == 'e') && (s[2] == 'm') && (s[3] == 'o') && (s[4] == '?') )
sendString("You are talking to the Speedometer demo.\r");
break;
default:
sendString("\rYou sent: '"); sendChar(s[0]);
sendString("' - I don't understand.\r"); break;
}
s[0] = '\0';
}
void sendSpeed()
{
char spd[11];
sendString("Speed = "); itoa(lastspeed,spd,10); sendString(spd); sendChar('\r');
}
int parse_set(char s[])
{
char set[11];
unsigned char i = 3, j = 0;
while( (s[i] != '\0') && (j <= 11) )
{
if( (s[i] >= '0') && (s[i] <= '9') )
{
set[j++] = s[i++];
}
else
{
148
Chapter 7: Microcontroller Interrupts and Timers
sendString("Error - Parse_set received a
non integer: ");
sendChar(s[i]);
sendChar('\r'); return 0;
}
}
set[j] = '\0';
if(j>4)// must be < 256
{
sendString("Error - Parse_set number too large\r"); return 0;
}
else
{
set_speed(atoi(set));
}
return 1;
}
void set_speed(int count)
{
char speed[11];
sendString("Setting the Compare Timer Count to: "); itoa(count,speed,10);
sendString(speed);
sendChar('\r');
milliSecInit(count);
}
/*
The USART init set the system oscillator to 2 mHz. We set the Timer0 prescaler to clk/8 which gives a 250 kHz input to the timer/counter. A compare of 250 throws an interrupt every millisecond.
*/
void milliSecInit(unsigned char count)
{
// Enable timer0 compare interrupt TIMSK0 = (1<<OCIE0A);
149
Chapter 7: Microcontroller Interrupts and Timers
//Sets the compare value setOCR0A(count);
//Set PWM Phase Correct mode, CLK/8 prescaler TCCR0A = (0<<FOC0A)|(0<<WGM01)|(1<<WGM00)|(1<<CS01);
}
void setOCR0A(unsigned char count)
{
// Sets the compare value OCR0A = count;
}
// Interrupt occurs twice per Millisec, timed for PWM SIGNAL(SIG_OUTPUT_COMPARE0)
{
//Toggle PORTD pin 0 if(PORTD &= 1) cbi(PORTD, 0); else sbi(PORTD, 0);
//get the speed count once per second if(second++ >= 1000)
{
second = 0;
lastspeed = speed; // store most recent speed in Hz
speed = 0;
}
}
SIGNAL(SIG_PIN_CHANGE1)
{
speed++;
}
We’ve made a couple of simple changes. We reused the pin interrupt code from the joystick software and in the interrupt routine we increment a speed counter variable. Once per second we copy the speed counter value to ‘lastspeed’ variable, which we report as the speed in Hz when requested.
Compile and load, remembering to reset the AVRStudio programming tool to use the correct PC_Comm.hex, which I forgot AGAIN! Open HyperTerminal, toggle
150
Chapter 7: Microcontroller Interrupts and Timers
the power to the Butterfly, move the joystick to the up position for a moment, and you should see something like the following:
Play with it for a while and you’ll see that this isn’t particularly accurate. But what do you expect for cardboard and glue?
151