- •Основы проектирования и конструирования
- •Санкт-Петербург
- •1. General guidelines
- •1.1. Objective and purposes of the coursework
- •1.2. Content and scope of the coursework
- •1.2.1. Explanatory note
- •1.2.2. Graphic portion of the course work
- •1.3. Selection of task for the course work
- •2. Guidelines of calculation portion of the course work
- •2.1. Electric-motor selection
- •2.2. Reduction unit kinematical and capacity calculations.
- •2.3. Toothed gear drive calculation
- •2.3.1. Assessment of permissible stresses
- •Permissible stresses for surface load durability
- •Permissible stresses for bending fatigue strength
- •Designedcalculationofhelicalgear
- •2.3.3.Testbendingfatiguestrengthcalculation
- •Designs of cylindrical gearings
- •2.3.4. Reduction unit wheels layout method
- •Calculation of forces acting in cylindrical toothed gears coupling
- •2.4. Design-basis calculation of the shafts
- •2.5. Selection of rolling bearings
- •Extension to reduction unit layout Slow speed (output) shaft.
- •Draw shaft diameter for the wheel of
- •(Fig.8)
- •2.6. General recommendations for the design of reduction unit housing elements
- •Inner walls of the housing mate the radius . (Fig.9)
- •2.7. Selection of tab
- •2.8 Test calculation of output shaft fatigue strength
- •Values и for the shafts with tab groove, made by end milling cutter
- •3. Guidelines to execution of graphic portion of the course work
- •4. Requirements to coursework completion
- •4.1. Requirements to explanatory note execution
- •4.2. Requirements to completion of coursework graphic section
- •5. Suggested reading
- •Example of title sheet execution for explanatory note to the coursework
- •Explanatory note to the coursework under the following topic:
- •Saint-Petersburg
2.3.3.Testbendingfatiguestrengthcalculation
To
avoid fatigue rapture of teeth it’s required to assign target local
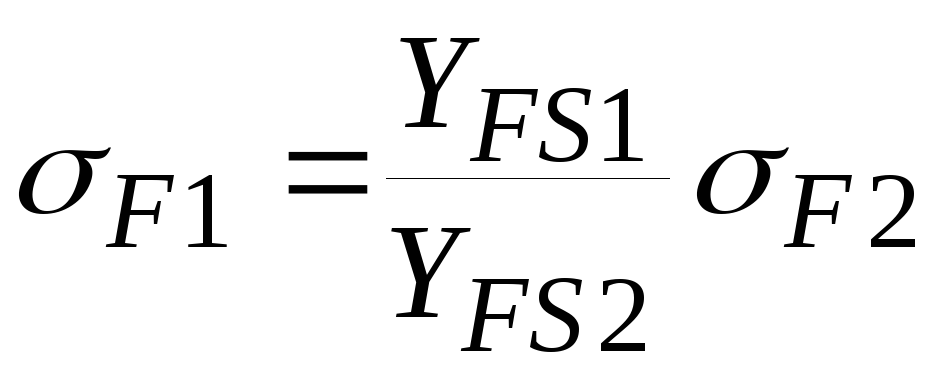
stress value ![]() on risky bending point of fillet surface to permissible stresses
on risky bending point of fillet surface to permissible stresses![]() :
:
![]() .
.
The above statement is calculated separately for pinion and wheel. Design-basis local bending fatigue strength is to be defined per the following formula:
for wheel
 ,
,for pinion
 ,
,
where![]() –bending
load ratio;
–bending
load ratio;
![]() –tooth
shape and stress concentration ratio;
–tooth
shape and stress concentration ratio;
![]() –equivalent
number of teeth;
–equivalent
number of teeth;
![]() –tooth
gradient ratio;
–tooth
gradient ratio; ![]() .
.
Designs of cylindrical gearings
The following guideline for the design of gearing should be assigned: pinions and wheels are to be made of thermo strengthened steel.

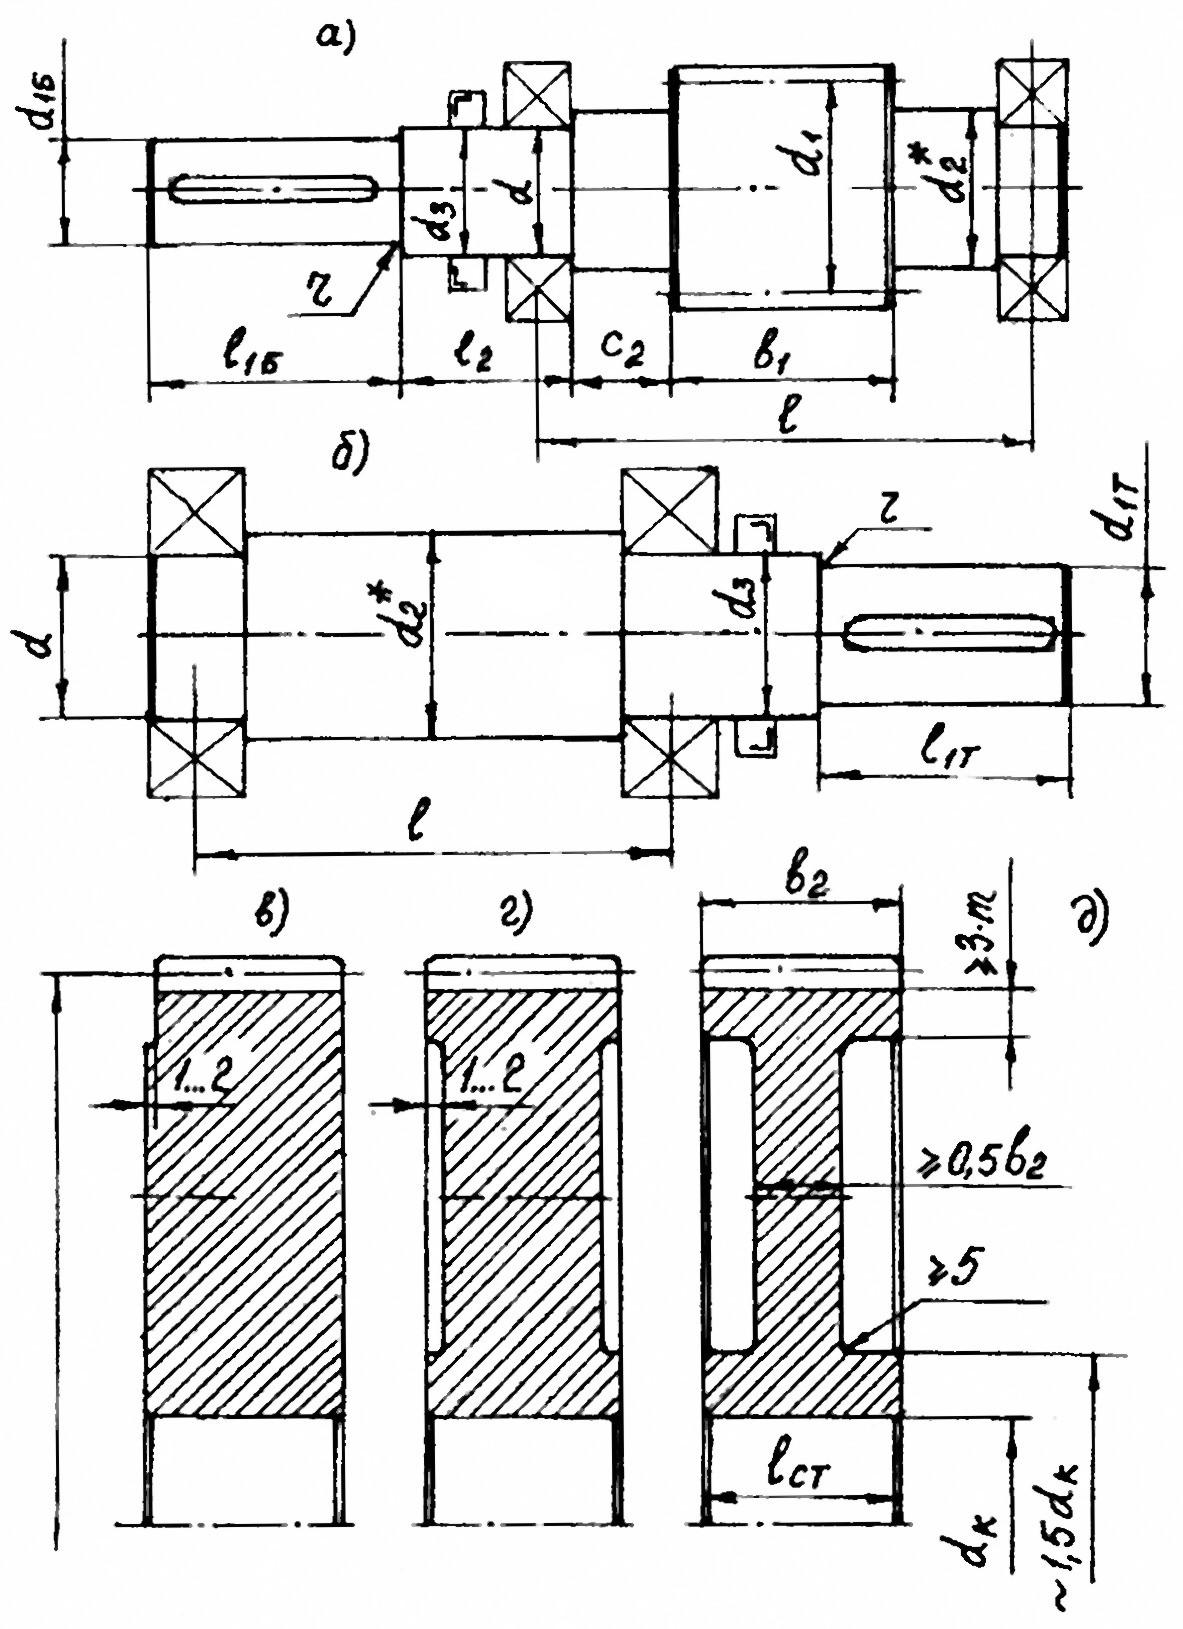
Figure 3. Design of reduction unit parts:
а) – Shaft-pinion with open tooth rim; b) – estimate design of reduction unit output shaft with plain section to be under the wheel and with further mounting of the latter to the shaft having large radial tension c), d) and e) – wheel design; f), g) – wheel design of small sizes up to 250 mm, with low step (в) and shallow pits (г); д) – single-disc wheel
Smaller
toothed wheel of the gear, pinion, can be made integral with the
shaft (shaft-pinion) or separately from the latter. The shaft-pinion
design is used for small (![]() mm)
and medium (
mm)
and medium (![]() mm)
range reduction units as well as for mass production applications as
being more reliable and cost effective. The forgings are used as part
blanks. Figure 3 displays the example of shaft-to-pinion design.
mm)
range reduction units as well as for mass production applications as
being more reliable and cost effective. The forgings are used as part
blanks. Figure 3 displays the example of shaft-to-pinion design.
The wheel comprises nave, rim and disc. Nave serves for wheel to shaft coupling and for transmitting the torque. Rim takes those forces which are applied on wheel teeth. The discconnectsrimwithnave.
The wheel configuration depends upon part blank fabrication method. It’s assumed that the blanks are produced by open die forging technique in the form of solid discs. In order to save labor consumption the wheels are made in the shape of massive discs having small pits alongside the flat end (Fig.3g) by reducing the volume of mechanical treatment, or with low step on the side of basic flat end (Fig.3 c). In particular, this is reasonable as far as small size wheels (up to 250mm) are concerned. Larger wheel sizes generally are made as of disc configuration (Fig.3e)
2.3.4. Reduction unit wheels layout method
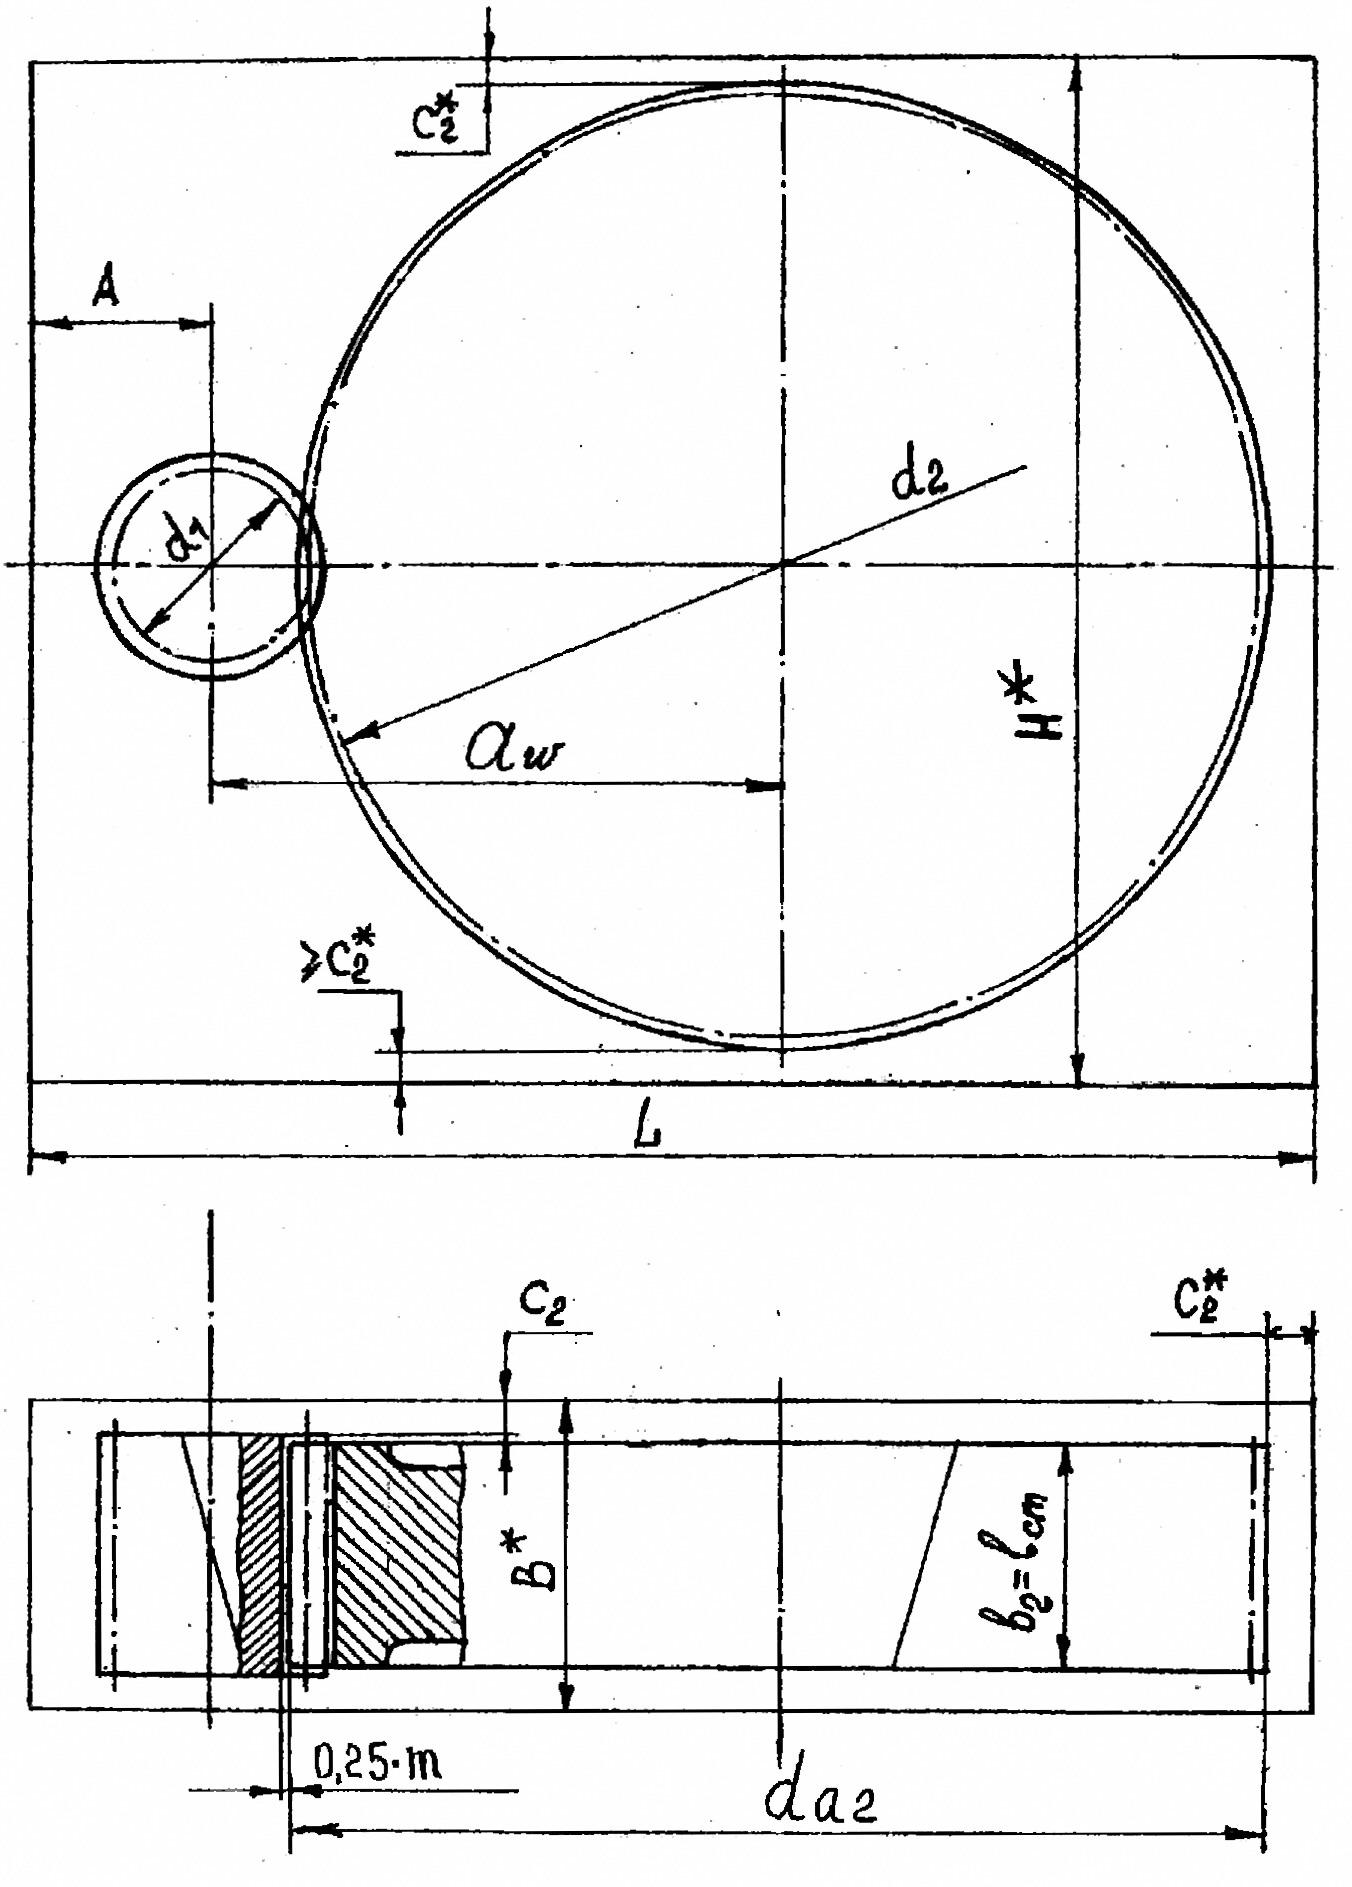
The main purpose to initiate layout on is to define overall dimensions of the part, allowing to assess possibilities to allocate reduction unit within given mounting space. Overall dimensions are measured as length L, width B and height H (Figure 4) in approximation.
The layout is performed in the following sequence:
1. Axle
to axle space ![]() is measured and axles of both input and output shafts are drawn. For
this reason it’s 1 mm paper should be used. Scaleofthedrawingtobe1:1.
is measured and axles of both input and output shafts are drawn. For
this reason it’s 1 mm paper should be used. Scaleofthedrawingtobe1:1.
2
. Then the profiles of the wheels are drawn. Dash-and-dot lines
are made corresponding to pitch surface of pinion diameter ![]() and wheel diameter
and wheel diameter ![]() .
.

Figure 4. Single step reduction unit Layout beginning.
Overall
dimensions of toothed gears are drawn: the flat end surfaces of the
wheels are displayed, the distances between them assumed equal to ![]() ,
then flat end surfaces of pinion are shown with spacing between them
as equal to
,
then flat end surfaces of pinion are shown with spacing between them
as equal to ![]() ;
then the surfaces of the wheel tips are drawn, which diameter to be
equal to
;
then the surfaces of the wheel tips are drawn, which diameter to be
equal to ![]() for the wheel and
for the wheel and ![]() for the pinion. In coupling one of tip
surface lines for instance of the pinion is drawn in dash-and-dot
lines; teeth pit surfaces are drawn, ensuring spacing between teeth
surfaces equal to
for the pinion. In coupling one of tip
surface lines for instance of the pinion is drawn in dash-and-dot
lines; teeth pit surfaces are drawn, ensuring spacing between teeth
surfaces equal to ![]() mm
in coupling.
mm
in coupling.
3. Upon
tooth rim width ratio being as ![]() and
and ![]() the length of the wheel nave can be taken as equal to wheel rim width
the length of the wheel nave can be taken as equal to wheel rim width
![]() .
.
4. The gaps between running wheels and inner surfaces of housing walls are set as being as follows for example:
the gap between the surface of the wheel tooth tips and inner housing wall of the reduction unit
![]() ;
;
the gap between flat end of the wheel and inner housing wall of the reduction unit
![]() ;
;
thegapbetweeninputshaftaxleandsidesurfaceofinnerhousingwallofthereductionunitcanbesetpreliminaryequalto
![]() ,
,
upon further development of the design the position of side walls can be defined more precisely.
5. The overall dimensions L,B* and H are then defined.
