- •Основы проектирования и конструирования
- •Санкт-Петербург
- •1. General guidelines
- •1.1. Objective and purposes of the coursework
- •1.2. Content and scope of the coursework
- •1.2.1. Explanatory note
- •1.2.2. Graphic portion of the course work
- •1.3. Selection of task for the course work
- •2. Guidelines of calculation portion of the course work
- •2.1. Electric-motor selection
- •2.2. Reduction unit kinematical and capacity calculations.
- •2.3. Toothed gear drive calculation
- •2.3.1. Assessment of permissible stresses
- •Permissible stresses for surface load durability
- •Permissible stresses for bending fatigue strength
- •Designedcalculationofhelicalgear
- •2.3.3.Testbendingfatiguestrengthcalculation
- •Designs of cylindrical gearings
- •2.3.4. Reduction unit wheels layout method
- •Calculation of forces acting in cylindrical toothed gears coupling
- •2.4. Design-basis calculation of the shafts
- •2.5. Selection of rolling bearings
- •Extension to reduction unit layout Slow speed (output) shaft.
- •Draw shaft diameter for the wheel of
- •(Fig.8)
- •2.6. General recommendations for the design of reduction unit housing elements
- •Inner walls of the housing mate the radius . (Fig.9)
- •2.7. Selection of tab
- •2.8 Test calculation of output shaft fatigue strength
- •Values и for the shafts with tab groove, made by end milling cutter
- •3. Guidelines to execution of graphic portion of the course work
- •4. Requirements to coursework completion
- •4.1. Requirements to explanatory note execution
- •4.2. Requirements to completion of coursework graphic section
- •5. Suggested reading
- •Example of title sheet execution for explanatory note to the coursework
- •Explanatory note to the coursework under the following topic:
- •Saint-Petersburg
Values и for the shafts with tab groove, made by end milling cutter
|
|
500 |
600 |
700 |
800 |
900 |
1000 |
|
|
1,8 |
1,9 |
2,0 |
2,15 |
2,25 |
2,4 |
|
|
1,4 |
1,6 |
1,75 |
1,9 |
2,0 |
2,2 |
Table 11.
Scale
factor
![]()
|
|
20 |
30 |
40 |
50 |
70 |
100 |
|
|
0,88 |
0,82 |
0,79 |
0,76 |
0,70 |
0,65 |
If ![]() ,
shaft strength has to be increased
,
shaft strength has to be increased
3. Guidelines to execution of graphic portion of the course work
The designed reduction mechanism is an assembly unit. Assembly unit is a product that comprises parts to be connected at the manufacturing facility by assembly operations. For any assembly unit the assembly layout is drawn during engineering phase.
The assembly drawing shall provide an idea about the arrangement and mutual relations between parts to be connected
Graphic part of the coursework includes completion of the assembly drawing of reduction unit output shaft. The drawing shall be made on A3 format sheet. The assembly unit shall contain reduction unit shaft, its’ supports and parts, mounted on the shaft.
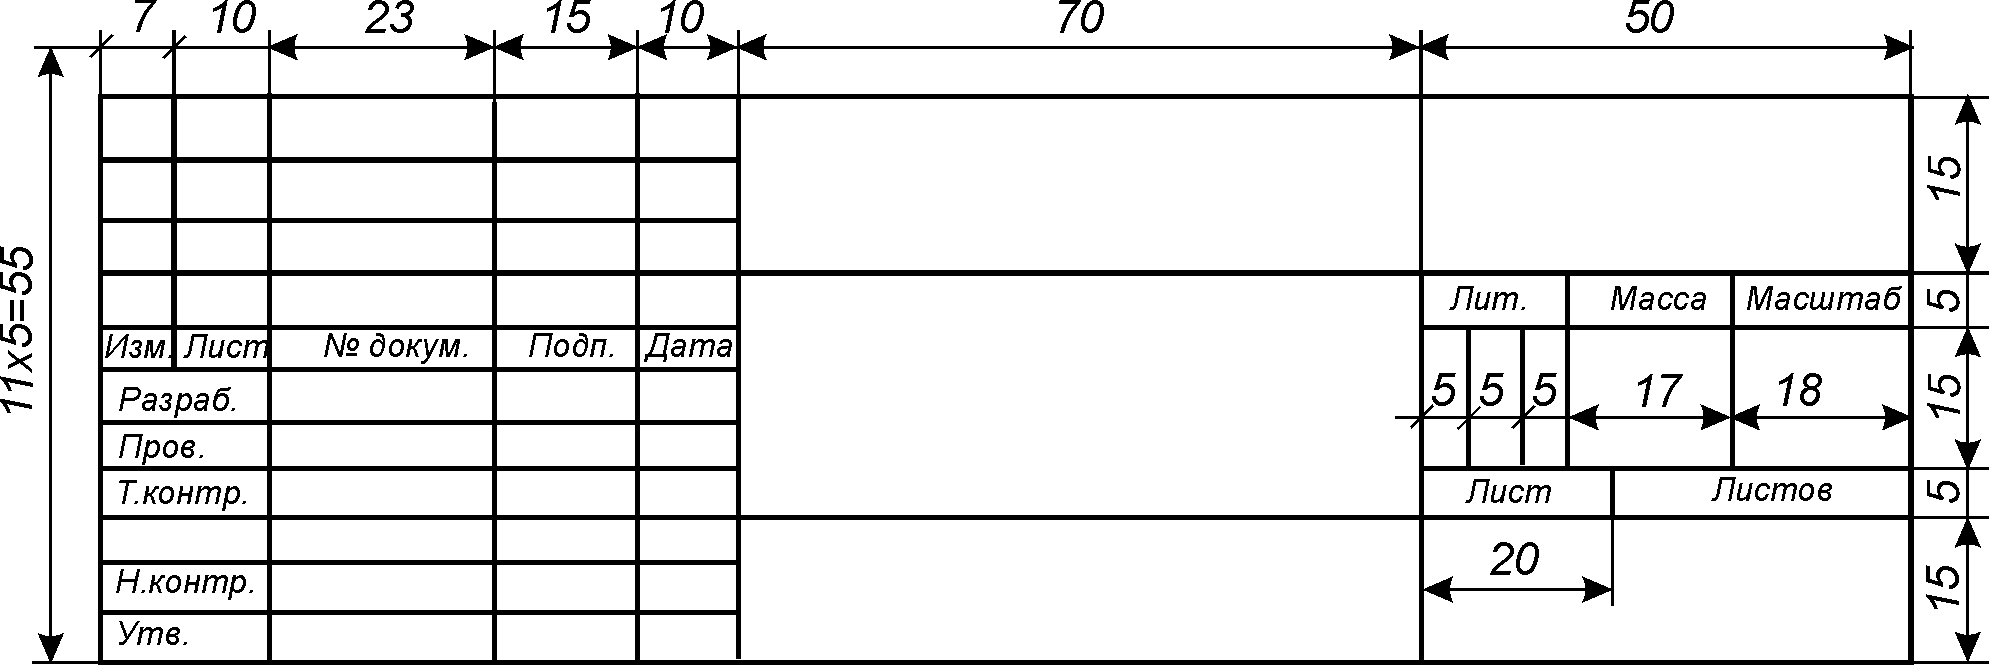
On the sheet the title block is placed in right low corner. The title block on drawings of projects under study shall be issued according to the format as shown on Figure 12.
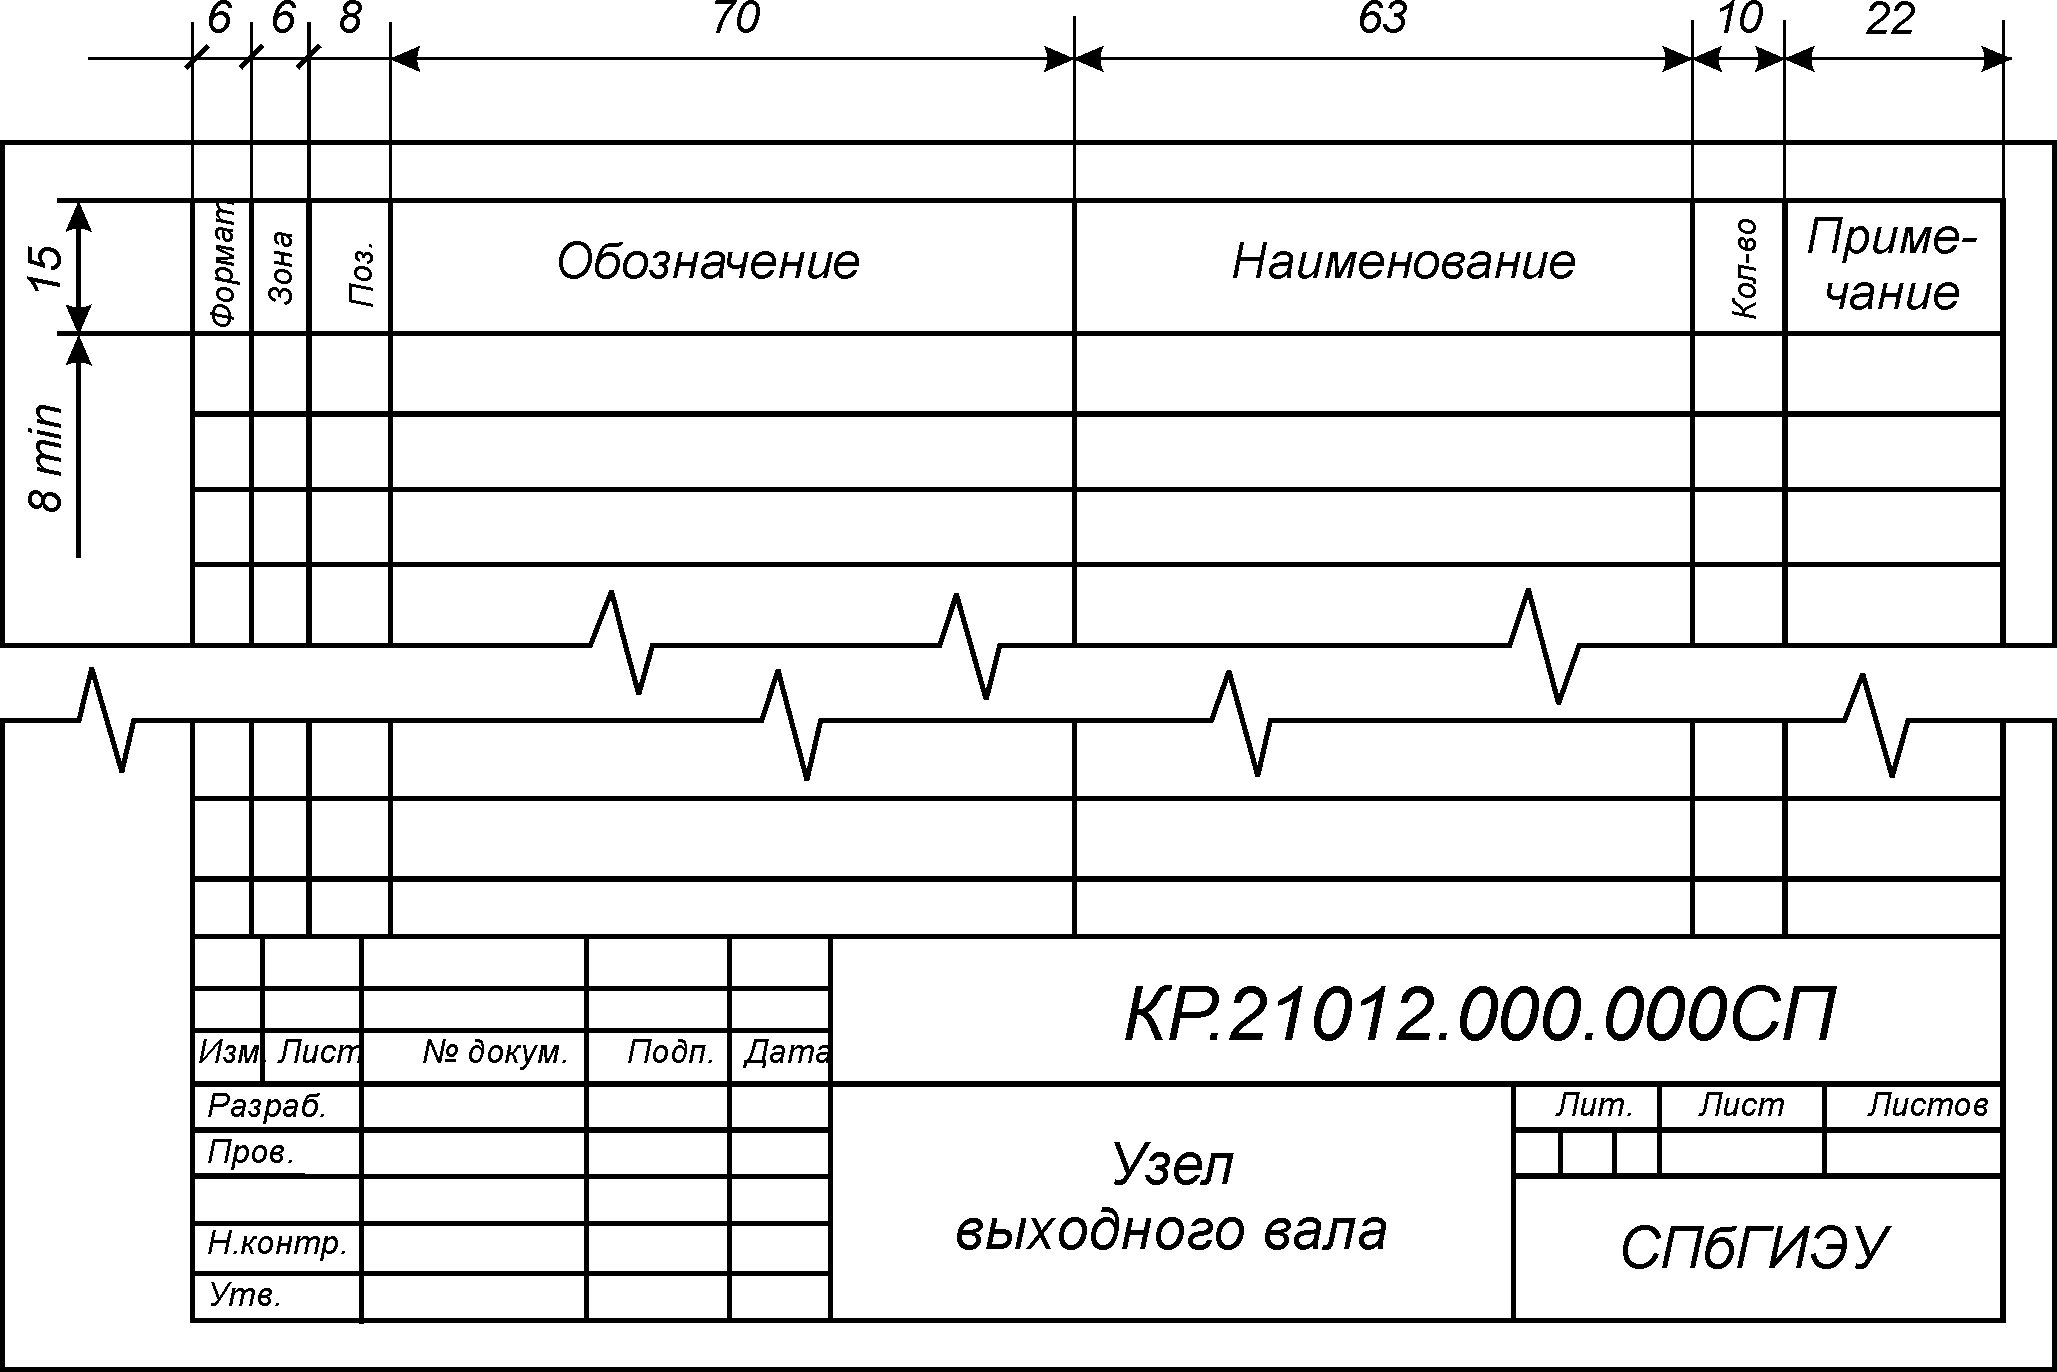
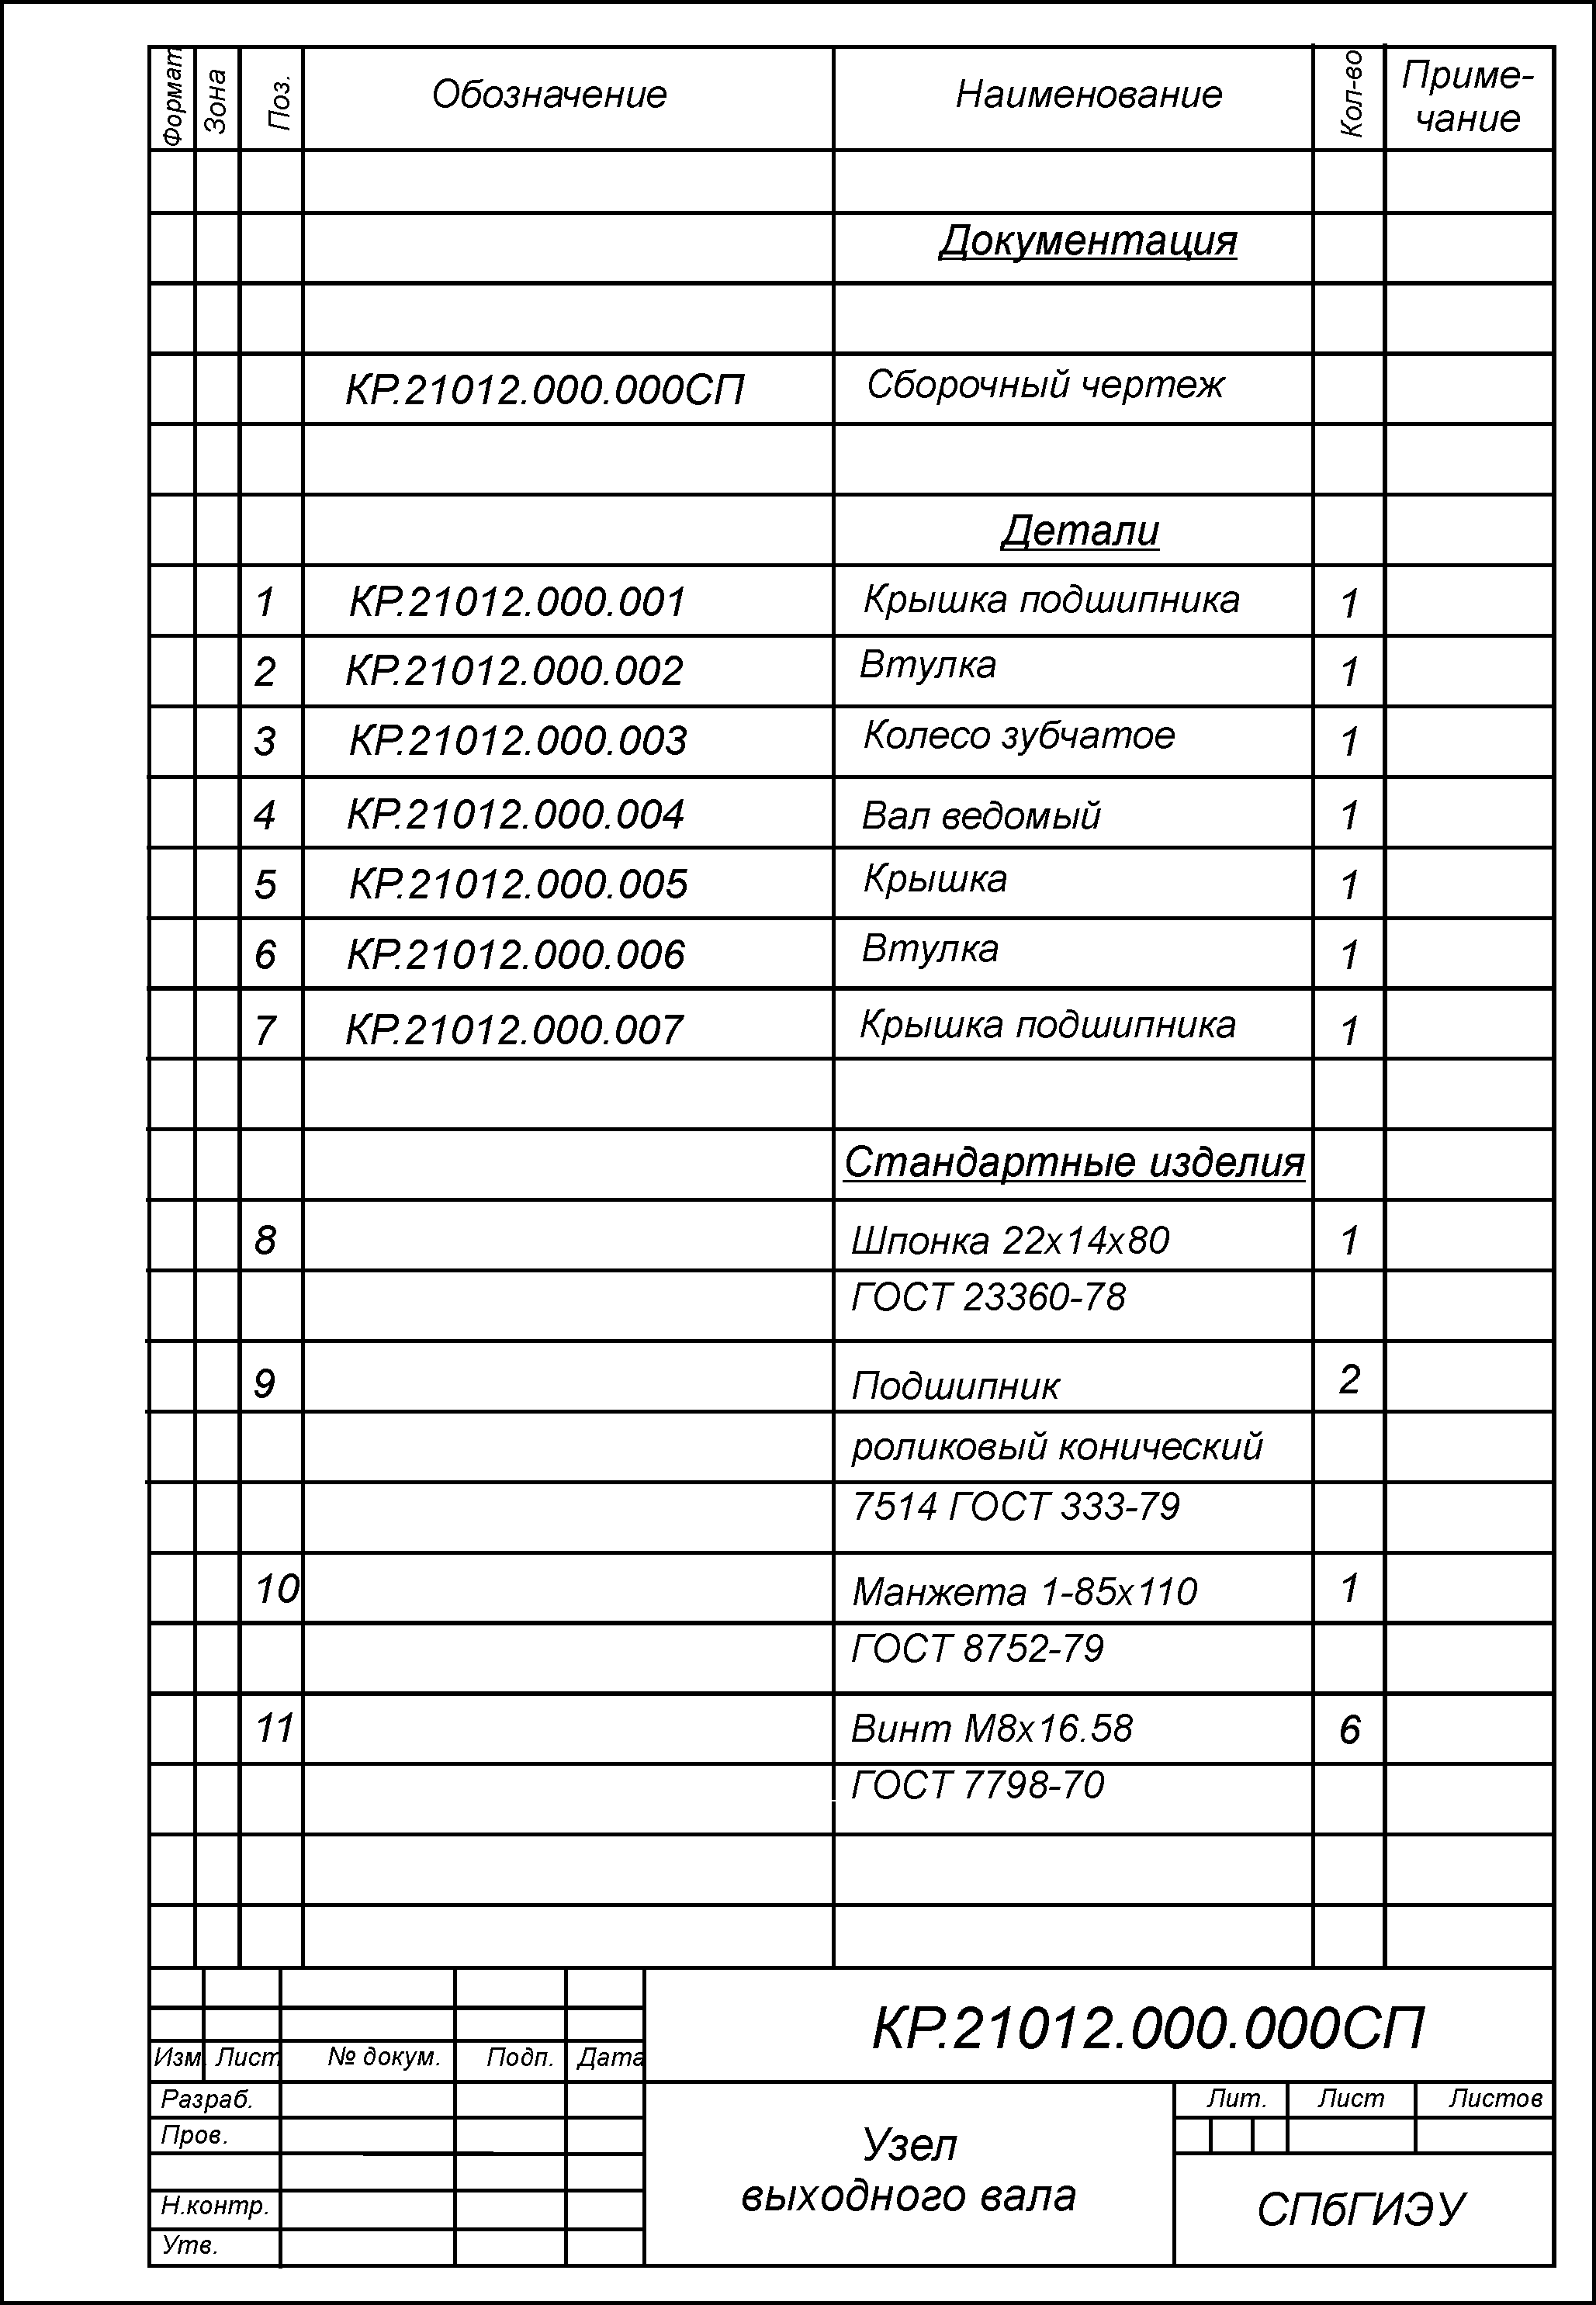
In order to define the content of assembly unit the specification is to be issued on separate format A4 sheets. Method and sequence of specification completion are stipulated by GOST 2.108-68 standard. Sizes of specification are indicated on figure 13. In general the specification consists of the following sections: documentation, assembly units (if available), parts, standard products.
Name of each section is indicated in the form of title in “Name”” column and highlighted by thin line. Below each title one free line is reserved, above the title not less than one line is left free. In the section “Documentation” the design documents for assembly unit are entered. Into this section in educational drawings the wording “Assembly drawing” is also to be written. Into the section “Parts” those parts shall be entered which are directly included into the assembly unit. Comprising parts shall be written as per their part name. Into “Standard products” section the products with their symbol and GOST number are entered.
In the column “Name” the component part name of the assembly unit is entered. All names are entered in subjective case and in singular form. Names of parts usually contain one word. If the name consists of two words, noun is written in the beginning of the name, for instance “Wheel toothed”, “Shaft driven”. The name of standard products has to fully comply with their symbols as set by the standard.
In the column “Quantity” the number of component parts to be entered into specification for one product is indicated
In the column “Part designation” entrance is performed according to the following example: CW.21012.000.000
CW – symbol of educational document (coursework)
21012 – design document symbol (number of test record book) 000 – positions for assembly units part numbers
000 – positions for part numbers (to be completed starting with the last position in compliance with part position number on assembly drawing).
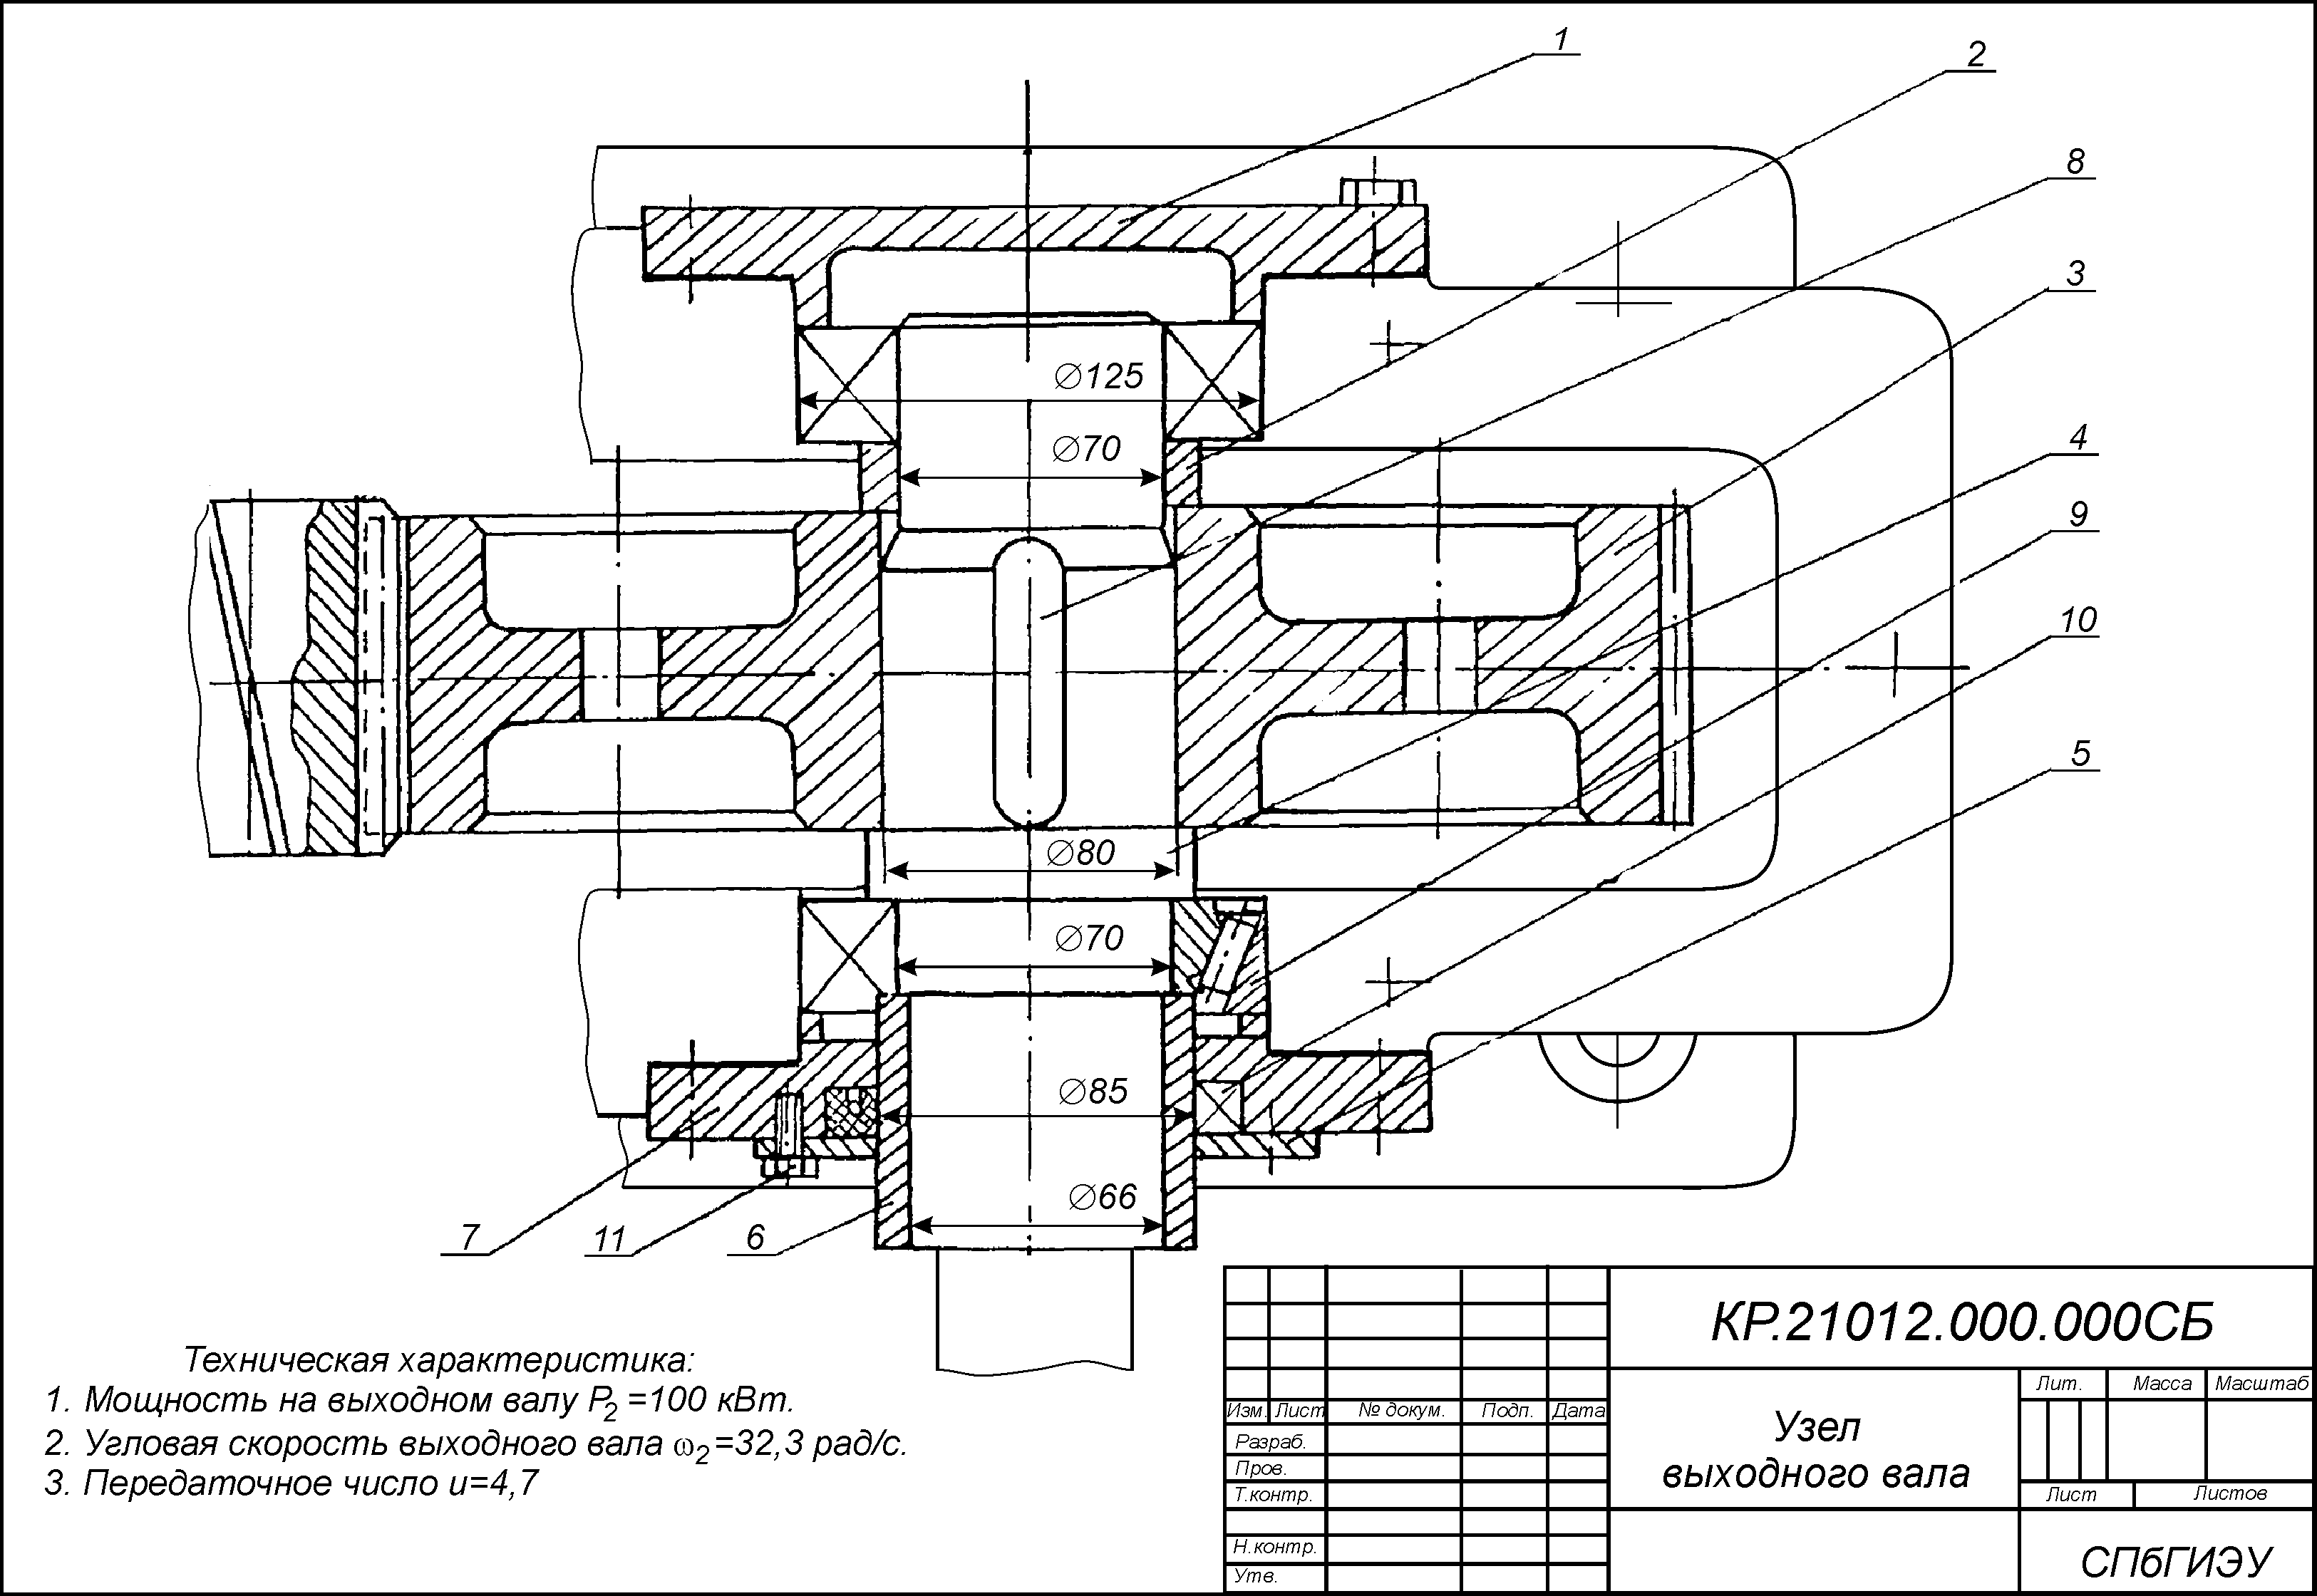
Figure 14 shows the example of assembly drawing completion for single-step cylindrical reduction unit assembly.
Some parts, for example rolling bearings, can be shown on assembly drawing in simplified form.
Some technical characteristic can be also displayed on assembly drawing. For instance, gearing ration, output shaft speed, torque on this shaft can be entered etc. The technical characteristic shall be placed in the free field of the drawing with individual numeration of items and shall be added with title “Technical characteristic”. Thetitleshouldnotbehighlighted.Figure 15 shows the example of specification execution.

Figure 12 Example of drawing title block

Figure 13. Dimensions of specification

Figure 14 Example of assembly drawing completion

Figure 15 Example of specification completion
