ИздательствоБашкирский государственный педагогический университет им.М. АкмуллыISBN5-87978-178-XГод2002Страниц28. Учебно-методическая разработка по английскому языку для студентов художественно-графического факультета
.pdfМИНИСТЕРСТВО ОБРАЗОВАНИЯ РОССИЙСКОЙ ФЕДЕРАЦИИ БАШКИРСКИЙ ГОСУДАРСТВЕННЫЙ ПЕДАГОГИЧЕСКИЙ УНИВЕРСИТЕТ
УЧЕБНО-МЕТОДИЧЕСКАЯ РАЗРАБОТКА ПО АНГЛИЙСКОМУ ЯЗЫКУ
для студентов художественно-графического факультета
УФА 2002
УДК 802.0 |
Печатается по решению |
ББК 81.43.21-923 |
редакционно-издательского совета |
У 91 |
Башгоспедуниверситета |
Учебно-методическая разработка по английскому языку для студентов художественно-графического факультета/ Сост. Ф.М.Гарипова, В.Д.Швайко.
– Уфа: Изд-во БГПУ, 2002, – 28с.
Данная учебно-методическая разработка по английскому языку предназначена для студентов художественно-графического факультета. Она представляет собой сборник текстов по специальности «изобразительное искусство», а также комплекс упражнений.
Представленные в работе тексты являются материалом, который позволит студентам приобрести знания как по специальности, так и усвоить английские слова и выражения, наиболее часто встречающиеся в специальной литературе. Текстовый материал сопровождается рисунками, что создает единство словесной и графической информации и позволяет студентам лучше семантизировать незнакомую лексику и в целом понимать смысл специального текста.
Авторы-составители: Ф.М.Гарипова, канд. пед. наук, доцент; В.Д.Швайко, канд. филол. наук, доцент.
Рецензенты: В.В.Кузиков, канд. филол. наук, доцент (БГУ); Кафедра ин. яз. БГПУ.
ISBN 5-87978-178-X
© Издательство БГПУ, 2002
2

TEXT I
DRAWING ANIMALS
What comes to mind when someone says “porcupine”? You probably think of prickly needles. Prickly needles sticking out in all directions – the special quality of porcupines.
Everything has a special quality, one which distinguishes its appearance or its actions. If you can learn to look for and recognize the special quality of the thing you are drawing, you will have gone a long way toward making a really successful picture.
The artists who drew animals all captured the special quality of their subjects. In the drawing of a bear, it is a rough, fuzzy coat. In a chicken, it is a fat, bulky look and wiggly feathers. Can you tell
what special thing an artist finds most interesting in drawing a lion?
HOW TO DRAW AN ANIMAL
Most live animals will not oblige by standing still while you draw them, so work at first from photos. The elephant’s pose is an easy one to draw. Let’s start with him.
MATERIALS: Get a pencil that will make a good dark line. You will also need some sort of pencil sharpener. It is hard to draw with a short, blunted point. Almost any kind of paper will do, but make sure it is a good size – no smaller than 9 by 12 inches. Find a sturdy and well-lighted table on which to work.
1. Before you start to draw, look carefully at the elephant. What is special about him? What makes him look different from a horse or a house or a giraffe? The special quality here is created by the large, heavy forms of the elephant’s body – the simple, massive shape.
2 Think of the elephant as a collection of parts; this will help you to get everything in the correct proportion. The body is a big oval (an egg shape); the legs are like tree trunks; the head and ears are smaller ovals. Draw in these shapes, keeping them very light. This preliminary drawing is a “map” that shows you where everything is eventually going to be.
3

3. Now you can start putting in your heavier final lines. A pencil can make a great variety of lines – quick and sketchy, jiggly, heavy, any kind of line you like. Use a type of line that suits your elephant best.
4.When you have drawn the main shapes, tackle some of the smaller parts, such as the tail and tusks and trunk. Pick out only the most important details. Too many details will confuse the picture.
5.One distinctive feature of elephants is their skin. It has a rough texture; it is a tangle of wrinkles. “Texture” means the kind of surface that an object has. For example, silk has a smooth texture, sandpaper is rough, a wool rug is fuzzy. You can’t make the paper itself smooth or rough or fuzzy. But you can suggest these qualities by the kind of pencil lines you make. See if you can get the texture of the elephant’s skin in your drawing.
6.Finally, when the elephant is finished, you may want to add some background – perhaps a few trees to suggest jungle. How about some grass in the foreground?
After you have completed this drawing of the elephant, try another one. See if you can find a better way of drawing him. You may want to work larger or smaller. Or you may want to change the pose – perhaps tilt the head or shift the feet. There is no reason whatever for sticking exactly to the photograph.
When you have drawn the elephant several times, try the lion. Work in the same way as when you were drawing the elephant. Look at the animal carefully. What impresses you as the lion’s special quality? Is it his wild, fierce look? Is it his mane? The lion’s mane is great fun to draw. Will you use little jagged lines, pretty
4

curls, scratches, blots, scrawls, small circles? Whatever you decide to do, do it consistently, and the mane will have a definite texture.
There is no one correct way to make a drawing. There are certain steps and methods of working, discussed in our book, that will help you to do what you want. But they are only techniques. It is your privilege and freedom to choose the sort of drawing you want to make. By all means draw a six-legged elephant with polka dots and feathers if the idea intrigues you.
EXERCISES
1.Guess about the meaning of the following international words. Translate them. Make word-combination with them.
A subject; a pose; forms; a proportion; oval; a detail; special.
2.Find out the synonyms among the following words.
To draw; a shape; an artist; dark, a painter; to paint; heavy; a form.
3.Put the following items of the plan in the right order according to the
text.
1)adding background
2)making heavier final lines
3)getting the texture of the animal’s skin in the drawing
4)finding the special quality of the animal
5)after having drawn the main shapes tackling smaller parts of the animal
6)preliminary drawing the animal in its main shapes
4.Answer the questions.
1)What is necessary for making a really successful picture?
2)How is the special quality of the elephant created?
3)Any animal you are going to draw is a collection of parts, isn’t it?
4)What is the variety of lines a pencil can make?
5)What does an artist do after having drawn the main shapes?
6)What does the word “texture” mean?
7)How can an artist suggest the animal’s texture?
8)What background can you add when drawing the animal is finished?
5.Speak on the main steps of drawing an animal.
5

TEXT II
DRAWING THE FIGURE
A thoughtful artist once said, “It is not enough to draw what a thing looks like. You have to draw what it is and what it is doing.” This is particularly true when you draw the human figure.
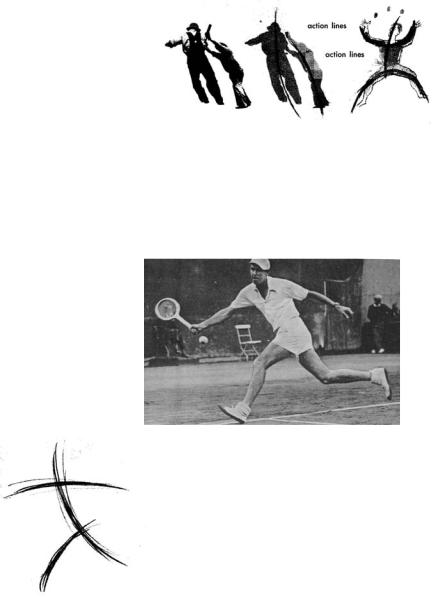
One way to get the feeling, movement and mood of a figure is to look for and recognize the action lines. Action lines reveal the position of the body and show what it is doing. Action lines don’t usually appear as such. They are imaginary lines. Sometimes just one or two lines can show the action, as in the figures below. Sometimes 3 or 4 action lines are needed, as for the juggler.
The fact that these lines are called action lines does not mean that they exist only in moving things. They exist in everything that has a shape or form. Sometimes it is hard to puzzle out what they are – especially if your subject is wearing a lot of bulky clothes or is all hunched up. But the action lines are always there.
Let’s imagine that we want to draw a tennis player.
1. Look at his photograph before you start to draw. Can you recognize the action lines? They are quite easy to pick out in this figure. Holding your pencil lightly, sketch them in quickly and roughly. These lines are intended to serve merely as a guide; don’t let them get too dark and heavy. This preliminary drawing, which shows just the action lines, is a sort of warm-up. It will help you to get started. It may look like a quick scribble or a tangle of lines. But if it has the feeling of running and reaching, you are off to a good beginning.
6

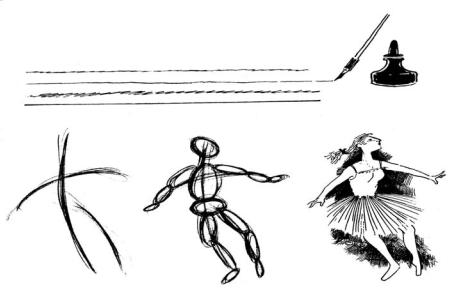
2.Now start to work on your main shapes. It is easiest to draw these shapes with the use of ovals, the way you drew the elephant. Each part of the body can be represented by an oval – a large oval for the chest, a smaller one for the hips, two long ones for each leg, and so on. The drawings below show how this works.
3.Action lines and ovals: when you have this much on paper, you have done the most important part of your drawing. Now you can begin to add your outlines. If the lines you put down at first are not exactly what you want, don’t erase them. Ignore them and draw in other lines. Too much erasing would give your drawing a fussed-over, sloppy look.
4.Skip from one part of the figure to another as your drawing progresses. This is the way to make all the different parts fit in with one another. With your action lines and ovals as a guide, you can be sure of getting everything in the right place. A common fault is to start at the top and work down. Often by the time you reach the feet, the top of the drawing looks like something started by someone else.
5.Once your outline is complete, you can give a little attention to detail. You may want to show some of the wrinkles in the shirt or pants. You may want to put in the socks and belt. But don’t include all the little details just because you see them. Include only what you think will look well.
7

6. The next step is a criticizing one. Put down your pencil. Look at what you have done. Do you see anything you can improve - a line that needs strengthening, a curve that needs changing? Don't struggle too hard with your first drawing, however; start another and see if you can do better.
After you have made 2 or 3 sketches of the tennis player, you will probably want to draw something else. To draw the figure well, you need much practice. You can learn a good deal by sketching from photographs, but it is hard to find clear and interesting ones. A real-life subject can be seen more clearly, and gives you a more vivid idea of feeling and pose. Try to get friends or relatives to pose for you in different positions. Get into the habit of sketching people around you, even if they don't hold still. You can make sketches at the beach, at ball games, looking out the window - wherever there are people.
Drawings can be made with pen and ink. This way of working gives you very crisp, sharp lines and dense blacks (and you can't erase). Try some pen-and- ink drawings. Use and old-fashioned penholder and a medium-sized point. If possible, use the special artists' black ink called India ink and a smooth white bond paper. Although your final drawing will be in ink, make your action lines and ovals in pencil first. If they are too conspicuous in your finished ink drawing, you can erase them.
8

TONES
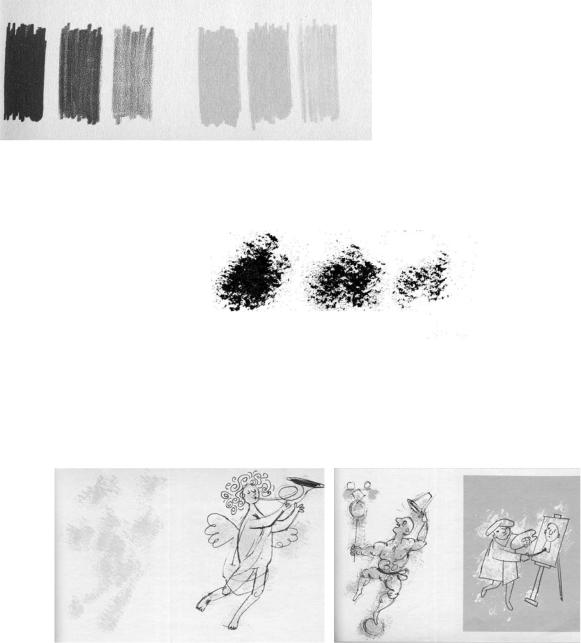
A tone is a shade of black or a shade of color. When you use a tone combined with simple line, your drawing will look more solid and more interesting. Here is a way to make a figure drawing, using tones. Get a small
sponge. Pour 2 or 3 drops of ink onto a plate and add about 2 tablespoons of water. Mix the ink and water. Dip your sponge lightly into the mixture. Then press the sponge down lightly on a piece of scrap paper and quickly lift it straight up again. You will see that the sponge leaves a large and pleasantly textured tone of gray.
Use the sponge to put the main masses of the figure on paper - a few big dabs for the body, some slimmer dabs (with the narrow part of the sponge) for the arms and legs. Then take your pencil, or pen and ink, and draw in the figure with lines. Try using colored ink, instead of black ink, for your tones. Or use water color, which is a transparent paint.
EXERCISES
1.Find in the text the equivalents of the following Russian words and wordcombinations.
Человеческая фигура; линии движений; положение тела; воображаемый; делать наброски; служить основой; стирать; переходить от к; деталь; линия, требующая усиления; изгиб, требующий изменения.
2.Put the following items of the plan in the right order according to the text.
1)Skipping from one part of the figure to another one.
2)Adding outlines.
3)A criticizing step - looking at what you have done.
9

4)Picking out the action lines in the figure.
5)Including details.
6)Drawing the figure's shapes with the use of ovals.
3.Answer the questions.
1)What does an artist pick out in the figure when he starts drawing?
2)What figures can represent parts of the body?
3)What does an artist do after having drawn action lines and ovals?
4)What is skipping?
5)What is a common fault in drawing a human figure?
6)Does an artist need to include all the details he can see?
7)The nest step is criticizing, isn't it?
4. Agree or disagree with the following statements. If you agree, say "That is right" and repeat the statement. If you disagree, say "That is wrong" and correct it.
1)Action lines are quite difficult to pick out in the figure.
2)Action lines are served as a guide.
3)It is easiest to draw main shapes with the use of rounds.
4)Action lines and ovals are the most important part of a drawing.
5)A common fault is to start drawing at the top and work down.
6)An artist should include all the little details he sees.
7)The next step is a criticizing one.
5. Speak on the main steps of drawing a human figure.
TEXT III
DRAWING HEADS
A person's face can tell you so much! It mirrors disappointment, surprise, pleasure. A face will tell you if a person is jolly or serious or sad. A face, then a head, is always interesting to draw.
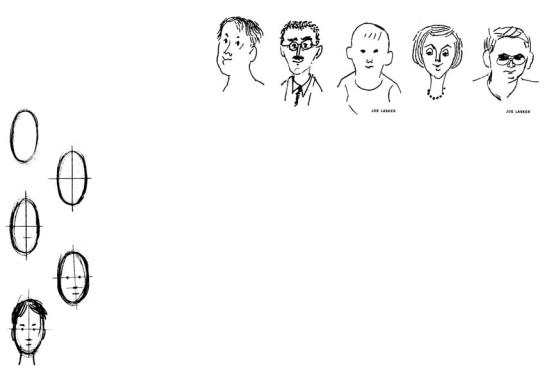
Artists often draw portraits that look very much like the subject. However, in the heads you are about to draw, don't bother about a likeness. You can try portraits a little later on, after you have had some practice.
You can make a similar "classic" head for yourself in the following way:
10
