

ИздательствоБашкирский государственный педагогический университет им.М. АкмуллыISBN5-87978-178-XГод2002Страниц28. Учебно-методическая разработка по английскому языку для студентов художественно-графического факультета
.pdf1.Draw an oval.
2.With light lines divide the oval in half both horizontally and vertically.
3.Divide the lower half of the oval in half again.
4.Add a few dots and dashes, as illustrated, and you have a head with all its features in the typical position.
5.Put in a few lines for hair, ears and neck, and you have finished your "classic" head.
That was easy. But for a drawing that has any feeling and character, you will have to do more than make an oval and a few dots and dashes.
Let's try to draw a head in the following way.
1.Look for the basic shape of the head you are going to draw. Suppose that it is a simple, broad oval. Pencil it in lightly.
2.Now you think about the features. The nose is a good starting pose. It is a sort of landmark. This fellow has a big, pudgy nose that could certainly be drawn as a simple U-shaped line.
3.Next come the eyes. An eye is often drawn as an oval with a circle inside. But it can be done in any number of other ways. You can make a black smudge, a simple dot, a dash, or a circle.
4.As you work, think about the entire head, not just the part you are drawing at the moment. This will help you to fit all the parts together. The mouth has a lot to do with expression. If the corners of the mouth are turned down, you get a frown. If they are turned up, you get a smile. If you draw a circle, the mouth is open. You can draw our model's mouth with 2 wide arcs.
5.You can suggest a hat with 3 broad ovals, and
the ears with simple loops. The chin and neck are round, fat curves. Most of the lines and shapes in this drawing are big and pudgy. This is the character of the man you are drawing, and this is the quality you want to get down on paper.
11

6. You can finish your drawing with the suggestion of shoulders and chest.
When your drawings begin to look as if they might resemble actual people, you might try drawing someone you know. Get a friend or relative to pose for you.
There is one model who is always available. That is you! All you need is a good-sized mirror. Prop it up on your worktable and you can draw yourself. Practically all artists have done self-portraits at one time or another. Rembrandt made dozens. He would paint his own picture whenever there was no one else available to pose for him.
EXERCISES
1.Find in the text the equivalents of the following Russian words and word-combinations
Портрет; автопортрет; черта; делить; точка; черточка; исходный пункт; модель; ухватить характер.
2.Put the following sentences in the right order according to the text.
1)As you work, think about the entire head, not just the part you are drawing at the moment.
2)Look for the basic shape of the head.
3)Next come the eyes.
4)The nose is a good starting point.
5)Add ears, a chin and a neck.
6)Finish your drawing with the suggestion of shoulders and chest.
3. Agree or disagree with the following statements. If you agree, say "That's right" and repeat the statement. If you disagree, say "That's wrong" and correct it.
1)A person's face mirrors emotions.
2)First an artist looks for the basic shape of the head.
3)Eyes are a good starting point.
4)Next comes the nose.
5)The mouth has nothing to do with expression.
6)If the corners of the mouth are turned down, you get a smile.
7)If the corners of the mouth are turned up, you get a frown.
8)An artist wants to get down the character of the person on paper.
4.Answer the following questions.
1)What emotions can a person"s face mirror?
2)What does an artist do first when he starts drawing a head?
12

3)The nose is a good starting point, isn't it?
4)What comes next?
5)What are the ways of drawing eyes?
6)How can an artist get a frown?
7)How can a smile be drawn?
8)How can a drawing be finished?
TEXT IV
DRAWING LANDSCAPES
If you tried to draw every leaf on a tree, or every grain of sand on a beach, your task would be impossible. You can't draw nature exactly as you see it. Nobody can.
Only a camera copies precisely what it sees.
The artist's job is to make a picture that shows how he thinks and feels about his subject.
He may try to tell in his drawing how it feels to be in a grassy meadow, or he may try to capture the wetness of a rainstorm, but he does not draw every single blade of grass or every drop of rain.
A drawing is a personal expression in which the subject may be changed, rearranged, simplified, or turned topsy-turvy to suit the artist.
13
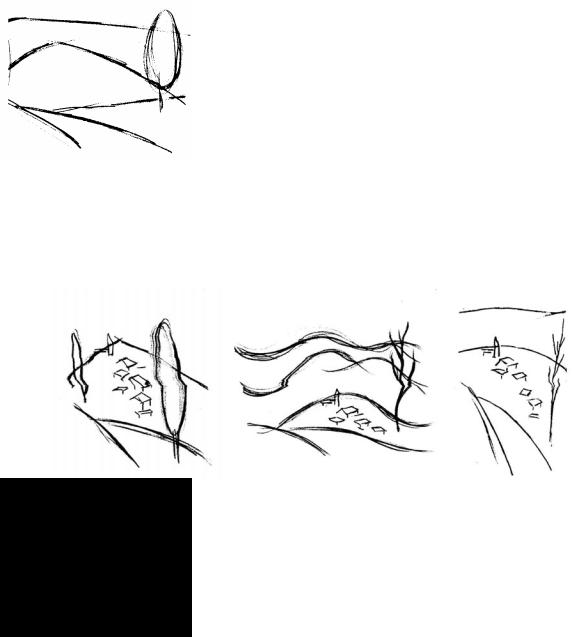
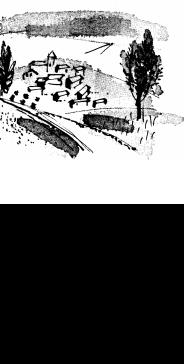
Imagine that you are sitting under a shady oak on a hilltop. Directly before you lies a peaceful valley with trees and neighboring mountains, and you also see a little hilltop town. If you work from this photograph, you will be able to follow, step by step, a systematic way of doing a landscape drawing with wash.
Wash is ink (or black water-color paint) mixed with water. The more water you add to the black, the lighter the tones. Wash is a way of getting a rich variety of soft grays. Its name comes from the manner in which the tone is applied. It is "washed" onto the paper with a large soft water-color brush. It is usually brushed on very freely and loosely.
MATERIALS: you will need pen and ink, pencil, a large soft water-color brush, 2 or 3 small dishes in which to mix your washes and paper. The paper should be quite heavy, so that it will not wrinkle when you put the wash on. Use a smooth water-color paper.
You approach a landscape in the same way as your other drawings. Look for the main shapes and forms. What interests you especially? Do you want to concentrate on the tree in the foreground, or on the little hilltop houses, or perhaps on the mountains in the background? Is there something you want to change or add or leave out?
1. First pencil in the main forms very lightly. One main form is the mountains, another the hill with the town, another the large tree on the right, still another the road in the foreground. When you pencil in the main shapes, you are composing your picture. The way you combine the lines and shapes of your picture, and the way you arrange them on paper, is called composition. There are 3 drawings above, all from the same photograph. Each is composed in a different way.
14

2.Now for the wash. Put 2 or 3 drops of ink on a plate. Or put some black water color on a plate. Then add 3 or 4 tablespoons of water and stir the mixture with your brush. If you want a lighter gray, use more water. Start with a light tone. You can always darken a light gray by adding more wash - later on in your drawing - but you can't make a dark tone any lighter once it has been brushed onto the paper.
3.When you have mixed the wash, brush in a tone wherever you feel you need it - perhaps in the sky, or the mountains in the background, or the road or tree in the foreground. The area covered with wash will immediately become separate from the rest of your drawing.
4.Give the wash a few minutes to dry. Then, if you think it should be darker, add some more wash. Don't draw lines with the wash. Do that later with your pen and ink.
5.Once all the tones are in, you can begin to draw with pen and ink. If you draw over a part of the paper that is wet, the ink will run. This can look pleasing; but when you don't want the ink to run, you must let the wash dry completely.
6.There are a great many small houses, trees and shrubs in this landscape. Don't feel that you have to include everything. You can eliminate whatever seems too cluttered or unclear or unimportant.
15
7.Pen and ink are good for suggesting texture. There are many different textures in this landscape; use them to give your drawing some variety. The foreground and the foliage of the tree, for instance, would be enriched by a little texture.
8.When you finish the pen-and-ink part of the drawing, you may want to go back and add some more wash - perhaps a deep shadow here and there, or an accent, or a slightly darker tone somewhere.
EXERCISES
1.Find pairs of antonyms among the following words.
Dark; to leave out; in the foreground; light; to add; to eliminate; dry; to combine; wet; in the background; to separate; to include.
2. Read and translate the following sentences. Define what parts of speech the underlined words refer to.
1)You can't draw nature exactly as you see it.
2)A drawing is a personal expression in which the subject may be changed.
3)Wash is ink mixed with water.
4)First pencil in the main forms very lightly.
5)You can always darken a light gray by adding more wash.
6)Give the wash a few minutes to dry.
7)You will need dishes in which to mix your washes.
8)Add some water and stir the mixture with your brush.
9)When you have mixed the wash, brush in a tone wherever you feel you
need it.
10)The Artist may try to capture the wetness of a rainstorm.
11)You can't make a dark tone any lighter once it has been brushed onto
the paper.
12)If you draw over a part of the paper that is wet, the ink will run.
13)You will need pen and ink, pencil, a brush, dishes and paper.
14)When you pencil in the main shapes, you are composing your picture.
15)The way you combine the lines and shapes of your picture, and the way you arrange them on paper, is called composition.
16

3.Put the following items of the plan in the right order according to the
text.
1)Suggesting texture.
2)Brushing in a tone you need.
3)Composing a picture.
4)Drawing with pen and ink.
4.Answer the following questions.
1)What is a drawing?
2)What is wash?
3)What does a tone depend on?
4)What materials do you need to make wash?
5)What is composition?
6)Is it necessary to include all details in your drawing?
7)What is good for suggesting texture?
5.Speak on the main steps of drawing a landscape.
TEXT V
SHOWING SPACE
How do you make a building look solid? When you draw the floor in a room, how do you make it look like a floor, and not a wall? How do you show that something is far away, or close? These questions are answered by the rules of perspective. Perspective is the technique of getting an object to look correctly in place when drawn on paper. There are 5 basic rules:
1.A basic principle of perspective is that things look large when close, and small when far away. For example, if you look at a row of telephone poles, you will see that they seem to get smaller as they get farther away.
2.Objects close to you usually appear darker and more vivid than objects in the distance. Have you ever stood on a hilltop (or looked out the window of a tall building) and noticed how houses or mountains far away seem hazy and vague, whereas a tree or roof close by is sharp and clear?
17

3.Objects close to you will overlap whatever happens to be behind them. For example, in the drawing the glass is farther away than the bottle. Therefore the bottle overlaps the glass.
4.Objects that are far away from you usually appear higher up than objects close to you. For example, a road gets higher and higher as it recedes into the distance. (It also gets smaller and smaller, as the first rule of perspective explains).
5.Parallel lines appear to come together far away, at the horizon. For example, the top and bottom lines of a building are actually parallel. This is apparent when you look at the building from directly in front. But when you see it from an angle, the lines seem to come closer together at the far end of the building. And if you extended these lines (or if the building were a hundred miles long), they would seem to come together at the horizon. Have you ever noticed how railroad tracks come closer together as they go toward the horizon? The same principle applies here.
Artists didn't know the principles of perspective until the time of the Italian Renaissance (about 1500). Drawings and paintings done before that time often tend to have a flat and somewhat strange, unreal look.
Today many artists intentionally ignore perspective. They feel they can best express feeling or mood and emotion by means of shapes and lines and colors. They would rather do this than make a realistic picture using the principles of perspective.
EXERCISES
1.Guess about the meaning of the following international words. Translate them. Make word-combinations with them.
Perspective; a technique; an object; a distance; parallel; a line; realistic; telephone; a principle; to ignore; emotion.
2.Find pairs of antonyms among the following words.
Large; unreal; in front; sharp; small; real; a bottom; in perspective; close; behind; far-away; flat; vague; from an angle; a top; hazy; directly; vivid.
18
3.Choose the words to finish up the sentences: parallel; perspective; behind; large; distance; small.
1) … is the technique of getting an object to look correctly in place when drawn on paper.
2) Things look … when close, and … when far away.
3) Objects close to you usually appear darker and more vivid than objects in the … .
4) Objects close to you will overlap whatever happens to be … them. 5) … lines appear to come together far away, at the horizon.
4.Answer the following questions.
1)What is perspective?
2)What is the basic principle of perspective?
3)Do objects close to you or objects in the distance appear darker and more
vivid?
4)Objects close to you will overlap those behind, won't they?
5)Which appears higher up: an object that is far away or close to you?
6)Where do parallel lines appear to come together?
7)How long have the principles of perspective been known to artists?
8)Today many artists ignore perspective, don't they?
5.Speak on the 5 basic rules of perspective.
TEXT VI
DRAWING SCENES
So far we have discussed one-at-a-time subjects, such as animals, figures, heads and landscapes. When a number of these subjects are combined, you have a scene. A scene usually contains one or more figures in some sort of setting, and there is usually some action. Sometimes scenes are called illustrations - they illustrate or describe an event.
How to draw a scene?
19
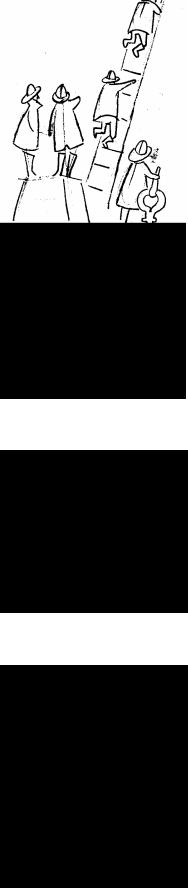
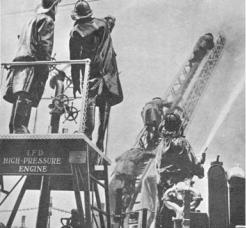
1.Here is a photograph of a scene that is filled with action and excitement. The firemen are extinguishing the fire. After you have studied it for a few moments, pencil in the main shapes very lightly. This is your "map".
2.Now draw the 2 figures on the left, and the platform on which they are standing. When you draw the figures, look for the action lines. Don't fuss with all the little folds and wrinkles in the raincoats.
3.Next, draw the fireman in the right foreground. In drawing this fellow shift him a bit to the right so that he won't block from view the figures climbing the ladder. Artists often make this type of change to simplify a drawing. Most things are too complicated to draw exactly as they appear.
4.Now draw the ladder with the men climbing it. These figures are small and bulky, but you will be able to draw them if you first puzzle out the action lines.
20