


Out-of-the-Box Site Configuration
When your Windchill solution is installed, the following are defined for the site:
•Context structure; for more information, see Installed Site Context Structure
on page 65 |
. |
•Context participation; for more information, see Installed Site Context
Participation on page 66 |
. |
•Context policies; for more information, see Installed Site Context Policies on
page 68 |
. |
•Context data; for more information, see Installed Site Context Data Types and
Attributes on page 74 |
. |
•Context templates; for more information, see Installed Site Templates on page
76 |
. |
•Context rules; for more information, see Installed Site Object Initialization
Rules on page 82 .
Site Administration Best Practices
This section includes best practices that are recommended for all Windchill solutions on page 133 and for Windchill solutions with products and libraries on page 137 .
For All Windchill Solutions
The following best practices are recommended for all Windchill solutions.
Managing User Licenses
In an out-of-the-box installation, the View and Print Only license group and profile is available. A policy access control rule limits the members of this group according to the license agreement with PTC. Users in this group are able to search for and view object information, download attachments, and view markups. The group is associated with the View-Print profile, which reduces visibility to actions unavailable to participants with the profile applied.
For more information, see the Windchill License Groups topic in the Windchill Help Center.
Establishing Site Administrators
When Windchill is installed, an administrator user is established (for example, wcadmin). This initial administrator is verified any time the method server is restarted. The initial administrator is also the first member of the Administrators group. In an out-of-the-box installation, the members of the Administrators group
Understanding the Site |
135 |

have full control over all Windchill objects and are commonly called the system or site administrators. While it is possible to use this initial administrator to create other contexts and establish teams, PTC recommends creating another site administrator to oversee context creation and management. Creating another administrator improves the performance of Windchill start-up. You can create another site administrator using the Participant Administration utility by assigning a user to the Administrators group.
Enabling Display of Quantity, Unit, and Reference Designator Attributes on Substitute Parts
You can choose to enable the display of the Quantity, Unit, and Reference Designator attributes on substitute parts on the Structure tab of the part information page. This functionality can be enabled at either the site or the organization level.
To enable this functionality:
1. In the Preference Management utility, set the Part Management Enable quantity and reference designators for substitute parts preference to Yes.
2.In the Type and Attribute Management utility, display the Part Master type.
3.On the Layouts tab for the Part Master, select the Part Structure Replacement
Attributes layout.
4.Add the Quantity, Unit, and Reference Designator attributes to the layout.
5.Save the layout.
The Quantity, Unit, and Reference Designator attributes will now display on the Attributes tab for substitute parts on the Structure tab of the part information page.
136 |
PTC Windchill® Basic Administration Guide |

Displaying Alias Attribute Information for a Workflow Primary Business Object on the My Tasks Table
Aworkflow process is typically launched in the context of a primary business object (PBO), such as a change notice, change request, change task, or promotion request. Site and organization administrators can choose to display attributes from the primary business object on a work item as columns in the My Tasks table for a user by:
1.Mapping an alias attribute on the Work Item type to the desired attribute on the primary business object. For more information, see the Creating a New Attribute and Alias Attribute Mapping help topics in the PTC Windchill Help Center.
2.Creating or editing a table view on the My Tasks table to include the alias attribute mapped in step 1. For more information, see the Creating and Editing New Table Views help topic in the PTC Windchill Help Center.
3.Share this table view with all users in your site or organization. For more information, see the Administering Table Views for the Site or Administering Table Views for the Organization topics in the PTC Windchill Help Center.
For example, to display the Need Date attribute of a change task on the assigned work item on a user’s table:
1.In the Type and Attribute Management utility, view the Work Item type.
2.Select Edit from the Actions menu to enter edit mode.
3.Click the new attribute icon  .
.
4.On the Define Attributes step, specify the Internal Name for the attribute as “needDate”, and select the Alias type for the attribute.
5.On the Choose Datatype step, select Date and Time.
6.On the Set Properties step, specify the following mapping syntax for the
Mapping property: primaryBusinessObject^wt.change2. VersionableChangeItem~needDate
Understanding the Site |
137 |
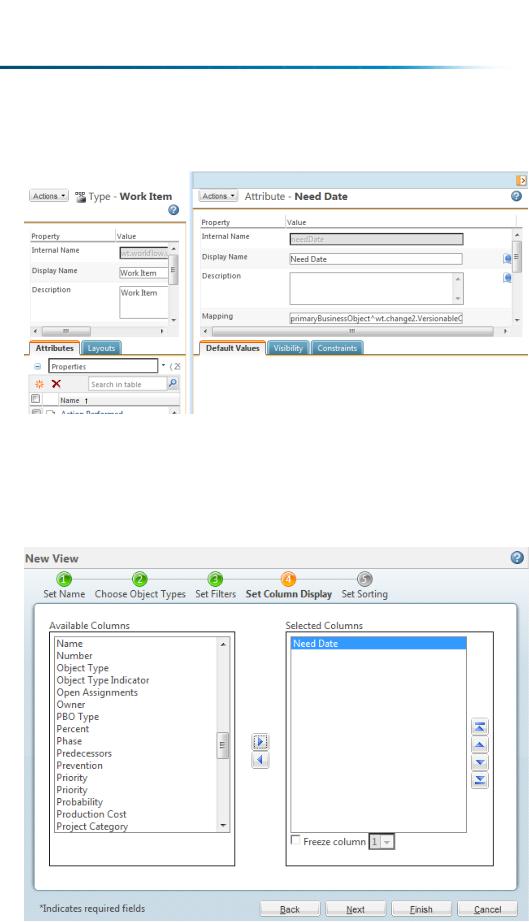
7. Click Save to finish creating the attribute.
8.From the My Tasks table on the Home page, select Customize from the view drop-down list, and create or edit a view.
9.(Optional) On the Set Name step of the New View or Edit View window, ensure that the Share with all users checkbox is selected, if you want to make this table view available to all users.
10.On the Set Column Display step, select the Need Date attribute.
11. Click OK.
138 |
PTC Windchill® Basic Administration Guide |