Create And Modify A Table Of Contents
We
are going to create, modify, and add Paragraph
Styles. We
will create
a Table
of Contents and
add hyperlinks.
Results Of This Tutorial
The
results of following this tutorial may be represented by
clicking Create_and_Modify_A_Table_of_Contents_Results.
It may be helpful to keep that page available as this lesson
is being done.
Why There Are Columns And Words In Bold
To
make the tutorial easier to read and to use the same tutorial
for both advanced and beginner students, the content in
parenthesis ( ) provides extra help for first-time users and
shows them what happens on their screen when they perform the
actions. Bold is
used so that certain words stand out; for example, words to
be clicked or to be typed are in bold. To understand the
lesson, advanced students may prefer to skim the content and
perform the actions specified in bold.
Basic Information
OpenOffice comes with
Paragraph Styles named “Heading 1”, Heading 2”, Heading
3“, etc. These numbered “Heading” Paragraph Styles are
used to create a Table Of Contents.
Apply The Paragraph Style: Heading 1 For
"My Classes"
Click File
> New
> Text
Document.
(The  document
appears.)
document
appears.)
Type
the words, My
Classes.
Click Format
> Styles
and Formatting.
(The “Styles and Formatting” window appears.) Click on
the Paragraph
Styles,  icon.
(Place your cursor on each icon, the small pictures, to find
'Paragraph Styles'.)
icon.
(Place your cursor on each icon, the small pictures, to find
'Paragraph Styles'.)
In
the Paragraph
Styles window,
double-click Heading
1. (A
heading or sub-title above a paragraph is considered part of
a paragraph. Double-clicking
"Heading 1" activates the “ Paragraph Style:
Heading 1” which is displayed
in the “Apply Styles” dialog box ,  ,
on the Formatting Toolbar (the third
line from the top of the screen. The words “My Classes”
become bigger and bold. The Paragraph Style “Heading 1”
automatically applies the font type Arial, font size 16, and
Bold. These settings can also be seen on the Formatting
Toolbar.)
,
on the Formatting Toolbar (the third
line from the top of the screen. The words “My Classes”
become bigger and bold. The Paragraph Style “Heading 1”
automatically applies the font type Arial, font size 16, and
Bold. These settings can also be seen on the Formatting
Toolbar.)
Modify
The Paragraph Style: Heading 1
The settings of a Paragraph
Style can be changed at any time.
In
the Paragraph Styles window, right-click on Heading
1, (Right-click
means to use the right
side mouse
button, not the usual left side button. You
will see the small menu  .)
.)
Click
the Modify button, (The
“Paragraph Style: Heading 1” window appears.)
Click
the Font tab.
If it is not already selected/highlighted,
click Arial (Font) >
Bold (Typeface) >
16 pt. (Size).
(The “Size” may be specified in percent or in points. To
change from percent to points, delete the number in the
upper “Size” box and type a number followed by the
letters, pt., such as 25pt. To change from points to
percent, delete the “Size” number and type a number
followed by the percent symbol such as 25%. These
settings can also be seen on the "Formatting Toolbar"
which is the third line from the top of the screen.)
Click
the Alignment tab.
In the Options section,
select (click on)
the word Center. (A
dot appears before the word “Center”
indicating that “Center”
has been selected.) ClickOK.
(The words, “My Classes”, move
to the center of the line, appear in bold, and are 16 pt.)
Add Paragraphs After "My Classes"
Press
the Enter key.
The Paragraph
Style: Text
body is
activated. (The words “Text body” appear in the “Apply
Styles” dialog box. The cursor moves down two lines. The
“Text body” font type is Arial, the font size is 12 and
Bold is not in use.)
Type
the words, I
go to many classes.
Press Enter.
(The cursor moves down two lines. When the "Enter"
key is pressed in the text body Style, a new paragraph is
started.)
Type the
words, These
are my classes.
Modify And Apply the Paragraph
Style: Heading
2 For
"English"
Press Enter.
Type
the word, English.
In
the Paragraph Styles window, right-click on Heading
2, (You
will see the small menu
.)
Click
the Modify
button, (The
“Paragraph Style: Heading 2” window appears.)
Click
the Font tab.
If it is not already selected/highlighted,
click Arial ("ont) >
Bold (Typeface) >
14 pt. (Size). (The
“Size” may be specified in percent or in points. To
change from percent to points, delete the number in the
upper “Size” box and type a number followed by the
letters, pt., such as 25pt. To change from points to
percent, delete the “Size” number and type a number
followed by the percent symbol such as 25%.)
Click
the Alignment tab.
In the Options section,
click on the word, Left.
(A dot appears before the word, “Left”,
indicating that “Left”
has been selected.) Click OK.
Click
the Indent
& Spacing tab.
In the Indent section,
in the “Before
text” dialog box, type .50.
( (To
change the numbers in the dialog box, click repeatedly on
the  until
".50” appears in the “Left”
dialog or you can highlight the numbers and type ".50"
or press Delete enough times to delete the number and type
the number. When
the “Paragraph Style : Heading 2” is activated, the
words will be indented of an inch.)
until
".50” appears in the “Left”
dialog or you can highlight the numbers and type ".50"
or press Delete enough times to delete the number and type
the number. When
the “Paragraph Style : Heading 2” is activated, the
words will be indented of an inch.)
Double-click Heading
2.
(This activates the “Paragraph Style: Heading 2”.
“Heading 2”
appears in the “Apply Styles” dialog box.)
Modify And Apply the Paragraph
Style: Heading
3 For
"Verbs"
Press Enter.
Type
the word, Verbs.
In
the Paragraph Styles window, right-click on Heading
3, (You
will see the small menu
.)
Click
the Modify
button, (The
“Paragraph Style: Heading 3” window appears.)
Click
the Indent
& Spacing tab.
In the Indent section,
in the Before
text dialog
box, type 1.0. (To
change the numbers in the dialog box, click repeatedly on
the
until
1.0” appears in the “Left”
dialog or you can highlight the numbers and type 1.0"
or press Delete enough times to delete the number and type
the number. When
the “Paragraph Style: Heading 3” is activated, the words
will be indented an inch.)
Click
the Alignment tab,
if it is not already selected, click Left.
Click the Font tab.
If it is not already selected/highlighted,
click Arial (Font) >
Bold ( Typeface) >
14 pt. (Size)>
OK.
(The “Size” may be specified in percent or in points. To
change from percent to points, delete the number in the
upper “Size” box and type a number followed by the
letters, pt., such as 25pt. To change from points to
percent, delete the “Size” number and type a number
followed by the percent symbol such as 25%.)
Double-click Heading
3.
(The word “Verbs” moves to the right. The line is
indented 1 inch.)
Add Paragraphs After "Verbs"
Press
the Enter key.
(The cursor moves down two lines. The Paragraph Style: Text
body is in effect.)
Type
the words, Some
verbs are active then
Press Enter.
(The cursor moves down two lines.)
Type the
words, Some
verbs are not active.
Apply The Paragraph
Style: Heading
3 For
"Nouns"
Press
the Enter key
then type the word, Nouns.
Double-click Heading
3. (The
word “Nouns” is indented and is in bold.)
Add Two Paragraphs After
"Nouns"
Press Enter then
type the words, A
person is a noun.
Press Enter then
type the words, A
place is a noun.
Apply The Paragraph
Style: Heading
3 For
"Paragraphs"
Press
the Enter key
then type the word, Paragraphs.
Double-click Heading
3. (The
word, “Paragraphs”, is indented and is in bold.)
Add
Paragraphs After the Paragraph
Style: Heading
3, "Paragraphs"
Press Enter.
Type
the words, This
is a paragraph, then
press Enter.
Type the
words, This
is also a paragraph.
Add
More Paragraphs After The Paragraph
Style: Heading
3, "Paragraphs"
Press Enter then
type the words, This
is a first paragraph.
Press Enter then
type the words, This
is the second paragraph.
Apply
The Paragraph
Style: Heading
2 For
"Math"
Press Enter then
type the word, Math.
Double-click Heading
2.
(The word, "Math", is
indented and is in bold.)
Add
One Paragraph After the Paragraph
Style: Heading
2, "Math"
Press
the Enter key.
Type the
words, Math
has many parts.
Apply The Paragraph
Style: Heading
3 For
"Addition"
Press Enter then
type the word, Addition.
Double-click Heading
3.
("Addition" is indented and is in bold.)
Add A Paragraph After
"Addition"
Press
the Enter key.
Type the
words, One
plus one equals two.
Apply The Paragraph
Style: Heading
3 For
"Subtraction"
Press Enter then
type the word, Subtraction.
Double-click Heading
3.
Add
A Paragraph After The Paragraph
Style: Heading
2, "Subtraction"
Press
the Enter key.
Type the
words, Four
minus two equals two.
Create A Table Of Contents
A Table of Contents is done
after you complete your document. The headings and
sub-headings in your document become the entries in the Table
of Contents.
Click
after the last word in the title of the document, just after
the words, My
Classes.
(The flashing
cursor appears after the letter “s”.)
Click Insert
> Indexes
& Tables > Indexes
& Tables.
(The “Insert Index/Table” window appears.)
Select
the Index/Table tab,
if it is not already selected. In the Type dialog
box , select Table
Of Contents, if
it is not already selected. Uncheck Protected
against manual
changes.
Click OK.
(The "Table of Contents" appears under the title
of your document.)
Modify
And Apply The Paragraph
Style: Contents
Heading
Click Index
Styles in
the dialog box at the bottom of the Paragraph
Styles window.
Scroll down to Contents
Heading.
(If the "Styles and Formatting" window is closed,
click "Format
> Styles
and Formatting". To
scroll down, put the pointer of the mouse on the
and
keep clicking on the
until
the words, “Contents Heading”, appear at the top of the
list.)
In
the Paragraph Styles window, right-click on Contents
Heading, (You
will see the small menu
.)
Click
the Modify
button, (The
“Paragraph Style: Contents Heading” window appears.)
Click
the Alignment tab.
(The “Alignment” window appears.) In the “Options”
section, click on the word, Center. (A
dot appears before the word, “Center”
indicating that “Center”
has been selected.) Click
the “Font”
tab (The “Font” window appears.) and then click “Arial”,
“Bold”
and 14pt. >
OK.
(The “Size” may be specified in percent or in points. To
change from percent to points, delete the number in the
upper “Size” box and type a number followed by the
letters, pt., such as 25pt. To change from points to
percent, delete the “Size” number and type a number
followed by the percent symbol such as 25%.)
Double-click Contents
Heading.
(This activates the “ Paragraph Style: Contents Heading”.
“Contents Heading” appears in the “Apply Styles”
dialog box. The words, “Table Of Contents”, move to the
center of the line.)
Close the Styles
and Formatting window.
(Click on the X in
the box in the upper right corner of the window.)
Add More Entries Into The
"Table Of Contents"
Any part of the document may
be added to the "Table Of Contents".
Highlight
(select) the words, second
paragraph.
(Put the cursor just before the letter “s” then press
and hold down the Shift key then press the right-facing
arrow key until both words are selected [have a black
background].)
Click Insert
> Indexes
and Tables > Entry.
(The “Insert Index Entry” window appears. In
the “Entry”
box are the words “second paragraph”.)
In
the “Index”
box, select Table
of Contents,
if it is not already there,
In
the “Level” box select 4.
Click
the Insert button.
Drag
the “Insert Index Entry” window out of the way. (Put the
cursor anywhere on the top blue line of the window. Press
and hold down the left button of the mouse then move the
mouse in the same direction as the window is to be moved.
Release the mouse button when the window is in the desired
location.)
Select
the words, first
paragraph”
then click anywhere in the Entry box.
(The words
“first paragraph” appear in the “Entry”
box.)
In
the “Level” box, select 4.
Click Insert
> Close.
Update The Table Of Contents
Any
time a change is made that is included in the Table Of
Contents, the Table Of Contents must be updated. Update
the Table Of Contents as follows:
Right-click anywhere
within the Table
Of Contents.
(A menu
appears.)
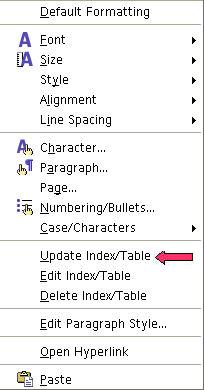
Click Update
Index/table.
(The words “second paragraph” and “first paragraph”
appear in the Table Of Contents.)
Change An Entry Already In The
Table Of Contents
Change a Heading
Make
the changes in the heading.
Right-click anywhere
within the Table
Of Contents.
Click Update
index/table.
(The entry in the "Table of Contents" changes.)
Editing or Deleting Entries in
The Table of Contents
Index
entries are inserted as fields into your document. To view
fields in your document, choose View and
ensure that Field
Shadings is
selected.
Place
your cursor immediately in front of the index entry in your
document, second
paragraph. (The
"Edit Index Entry" window appears.)
Right-click on
the entry. Choose Index Entry,
in the Entry box,
type third
paragraph. ("second
paragraph" is in the "Entry" box. "second
paragraph" becomes "third paragraph" in the
"Entry" box.) Click OK
> Close. (The
"Edit Index Entry" window closes.)
Right-click in
the Table
of Contents.
Click Update
Index/Table.
(The entry is now "third paragraph" in the Table
of Contents. To change "second paragraph" to third
paragraph in your document, highlight "second
paragraph" and type "third paragraph".)
Place
the cursor immediately in front of the index entry in your
document, third
paragraph. Right-click. Click Index Entry.
("third
paragraph" appears in the "Entry"
box.)Click Delete.
The
next Index
Entry, "first paragraph" appears
in the Entry box. Click Delete.
(The "Edit
Index Entry" window closes.)
Right-click in
the Table
of Contents. Click Update
Index/Table.
("First paragraph and third paragraph" are no
longer in the Table of Contents".)
Add Hyperlinks To The Table Of Contents
When a word(s) in the Table of
Contents is clicked, the cursor will go to where that
information is found. For example. “Add Hyperlinks to the
Table of Contents” will be in the Table of Contents of this
tutorial. When in the Table of Contents and the words “Add
Hyperlinks to the Table of Contents” are clicked, the
cursor will go to this section on this page.
If you have NOT inserted a Table of
Contents
Click
after the last word in the title of the document. (The
Insert Index/Table window appears.) Select the Index/
Table tab, if
it is not already selected. In the “Type” dialog
box , select Table
Of Contents, if
it is not already selected. Uncheck Protected
against manual
changes. Click OK.
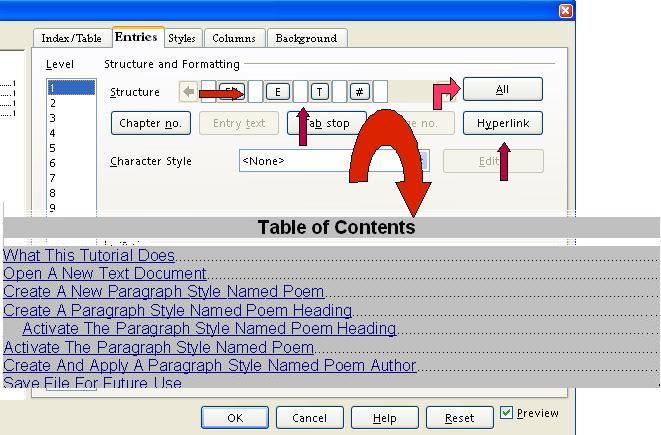
To make
the hyperlinks, click the Entries
tab of
the window, click to the left of the F and
click Hyperlink,
and click after the F and
click Hyperlink again.
Click All.
Click OK.
(The "Table "of Contents appears. All the headings
are in "blue and underlined" and are now
"hyperlinks". When you click on them, you will be
taken to that section.)
If you have already inserted the Table of Contents
Place the
cursor anywhere in the Table of Contents and right-click. (A
menu will appear,) Click Edit
Index/table. (The
Insert Index/Table window appears.)
To make
the hyperlinks, click the Entries
tab of
the window, click to the left of the F and
click Hyperlink,
and click after the F and
click Hyperlink again.
Click All.
Click OK.
After
doing Step 2 , you will need to right-click in the Table of
Contents and click Update
Index/Table. Be
careful not to click any of the hyperlinked text in the
Table of Contents. Clicking on a blank space between the
text and the page numbers is usually best. (The "Table
"of Contents appears. All the headings are in "blue
and underlined" and are now "hyperlinks".
When you click on them, you will be taken to that section.)
Additional Help
There
is additional information on the Table of Contents within
OpenOffice in the OpenOffice.org Help.
To
access that information, do the following:
On
the Menu Bar, click Help.
(A menu
appears.)
Click Contents.
(The "OpenOffice.org Help” window appears.)
In
the dialog box towards the top of the screen, select Help
about OpenOffice.org Writer,
if it is not already selected.
Click
on the Index tab.
In
the box, under the words, “Search term”, type the
word, creating.
Click table
of contents.
Click on the Display button
(There will be several items listing under "creating".
The Display button is located at the bottom right hand
corner. Information about a Table Of Contents appears on the
right side of the screen.)
Close
the OpenOffice.org Help window. (Click on the X in
the upper right corner of the "Help" window.)
Save File For Future Use
Click File
> Save As.
In
“File name:” box, type TOC_Lesson_1 .
(The name of the file will be “TOC_Lesson_1" .
"TOC_Lesson_1.odt" appears at the top of the
screen.)
Click File
> Close.
(The document is no longer on the screen.)
|


