

Chapter 8: Relationships
different types of employees, hourly and salaried. This may indicate that you should have an HourlyEmp class and a SalariedEmp class, each of which inherit from an Employee class. Attributes, operations, and relationships that are common to all employees are placed in the Employee class. Attributes, operations, or relationships that are unique to hourly or salaried employees are placed in the HourlyEmp or SalariedEmp classes.
4.
Examine your classes to look for additional generalization relationships. Try to find classes that have a great deal in common. For example, you may have two classes called CheckingAccount and SavingsAccount. Both have similar information and behavior. You can create a third class, called Account, to hold the information and behavior common to a checking and a savings account.
Be cautious of classes with too many relationships. One goal of a well−designed application is to reduce unnecessary relationships in the system. A class with many relationships may need to know about a great many other classes. It can therefore be harder to reuse, and your maintenance effort may also be greater. If any of the other classes change, the original class may be affected.
Associations
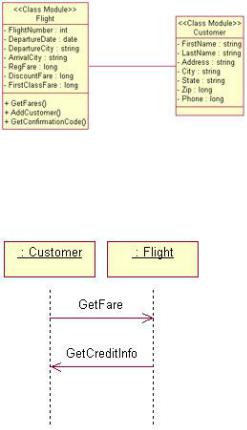
An association is a semantic connection between classes. An association allows one class to know about the public attributes and operations of another class. For example, in Figure 8.6, we have a bidirectional association between Flight and Customer.
Figure 8.6: Association relationship between the Flight class and the Customer class
The Flight class knows about the public attributes and operations of Customer, and the Customer class knows about the public attributes and operations of Flight. On a Sequence diagram, therefore, Flight can send messages to Customer, and Customer can send messages to Flight.
304
Chapter 8: Relationships
In the example above, the relationship is bidirectional. However, you will want to refine most of your associations to be unidirectional. Unidirectional relationships are easier to build and to maintain, and can help you find classes that can be reused. Let's look at the above example again, but this time the association is unidirectional. Figure 8.7 shows the unidirectional relationship.
Figure 8.7: Unidirectional association relationship
In this case, the Flight class knows about the public attributes and operations of Customer, but Customer does not know about the public attributes and operations of Flight. Messages on a Sequence or Collaboration diagram can be sent by Flight and received by Customer, but cannot be sent by Customer.
You can determine the direction of an association by looking at the Sequence and Collaboration diagrams. If every message on the Interaction diagrams is sent by Flight and received by Customer, there is a unidirectional relationship from Flight to Customer. If there is even one message from Customer to Flight, you will need a bidirectional relationship.
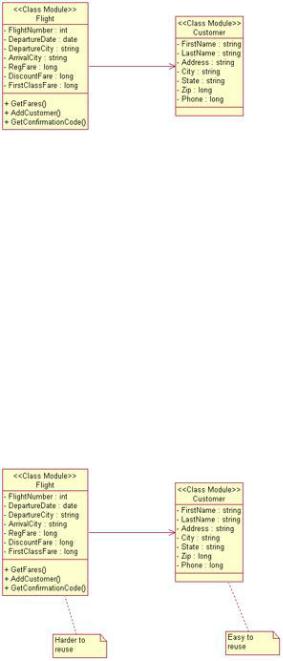
Unidirectional relationships can help you identify classes that are good candidates for reuse. If the association between Flight and Customer is bidirectional, each class needs to know about the other; neither class can, therefore, be reused without the other. But assume instead that there is a unidirectional relationship from Flight to Customer. Flight needs to know about Customer, so it can't be reused without Customer. However, Customer doesn't need to know about Flight, so Customer can be easily reused. Any class that has many unidirectional relationships coming out of it is hard to reuse; any class that has only unidirectional relationships coming into it is easy to reuse, as shown in Figure 8.8.
Figure 8.8: Reuse with unidirectional associations
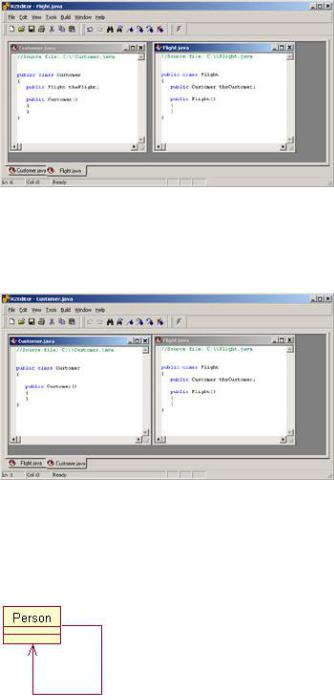
When you generate code for a bidirectional association, Rose will generate attributes in each class. In our Flight and Customer example, Rose will place a Flight attribute inside Customer, and a Customer attribute inside Flight. Figure 8.9 is an example of the code generated for these two classes.
305
Chapter 8: Relationships
Figure 8.9: Code generated for a bidirectional association
If, instead, we have a unidirectional association, Rose will place a Customer attribute inside Flight, but not a Flight attribute inside Customer. Figure 8.10 is an example of the code generated for a unidirectional association.
Figure 8.10: Code generated for a unidirectional association
Associations can also be reflexive. A reflexive association suggests that one instance of a class is related to other instances of the same class. For example, we may have a Person class. One person can be the parent of one or more other people. Because there are separate instances of Person with a relationship to each other, we have a reflexive association, as shown in Figure 8.11.
Figure 8.11: Reflexive association
Using Web Association Stereotypes
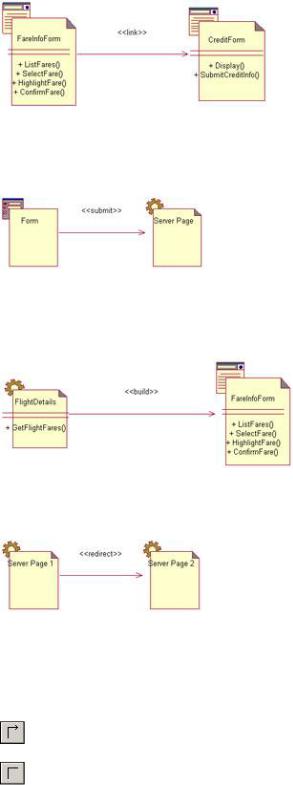
With the inclusion of web modeling, Rose now supports four stereotypes for associations. These are the link, submit, build, and redirect stereotypes.
The link stereotype is used to show a hypertext link between two client pages or from a client page to a server page. It is represented on a Class diagram as a unidirectional association with a stereotype of <<link>>:
306
Chapter 8: Relationships
The submit stereotype is used when a form sends the information in its fields to a server page for processing. This submittal of information is shown on a Class diagram as a unidirectional association relationship with a stereotype of <<submit>>.
The build stereotype is used when a server page builds a client page. Once the client page has been built, it can be displayed on the client browser. The relationship shows which server page builds which client page. It is shown on a class diagram as a unidirectional relationship with a stereotype of <<build>>:
Finally, the redirect stereotype is used to show one page passing processing control to another page. A redirect relationship is shown as a unidirectional association with a stereotype of <<redirect>>:
Creating Associations
In Rose, you create associations directly on a Class diagram. The Diagram toolbar includes buttons for creating both unidirectional and bidirectional associations.
If you create a bidirectional association, you can later change it to a unidirectional association by changing its navigability. Later in this chapter, in the "Working with Relationships" section, we will discuss the detailed specifications of an association, including navigability.
To create a bidirectional association on a Class diagram:
1.
307
Chapter 8: Relationships
Select the Association icon from the toolbox.
2.
Drag the association line from one class to the other class.
OR
1.
Select Tools → Create → Association.
2.
Drag the association line from one class to the other class.
To create a unidirectional association on a Class diagram:
1.
Select the Unidirectional Association icon from the toolbox.
2.
Drag the association line from one class to the other class.
OR
1.
Select Tools → Create → Unidirectional Association.
2.
Drag the association line from one class to the other class.
To set the navigability of a relationship:
1.
Right−click the desired relationship at the end to be navigated.
2.
Select Navigable from the menu.
OR
1.
Open the desired relationship's specification window.
2.
Select the Role Detail tab for the end to be navigated.
3.
Change the navigability using the Navigable check box.
To create a reflexive association on a Class diagram:
1.
308
Chapter 8: Relationships
Select the Association icon from the toolbox.
2.
Drag the association line from the class to somewhere outside of the class.
3.
Release the association line.
4.
Drag the association line back into the class.
OR
1.
Select Tools → Create → Association.
2.
Drag the association line from the class to somewhere outside of the class.
3.
Release the association line.
4.
Drag the association line back into the class.
To add documentation to an association:
1.
Double−click the desired association.
2.
Select the General tab.
3.
Enter documentation in the Documentation field.
OR
1.
Select the desired association.
2.
Select Browse → Specification.
3.
|
Select the General tab. |
4. |
|
|
Enter documentation in the Documentation field. |
To change a relationship to an association: |
|
1. |
309 |