Drawing and detailing with SolidWorks
.pdf
Drawing and Detailing with SolidWorks 2001/2001Plus |
Drawing Template and Sheet Format |
Exercise 1.4:
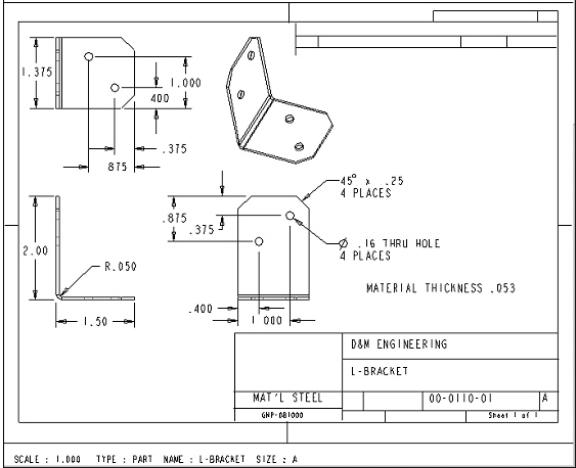
Your company uses SolidWorks and Pro/ENGINEER to manufacture Sheet Metal parts, Figure EX1.4. Import the empty A-size drawing format, FORMAT-A-PRO-E.DWG located in the 2001drwparts file folder. This document was exported from Pro/E as a DWG file. Save the PRO/E drawing format as a SolidWorks Sheet Format.
Figure EX1.4
Sheet Metal Strong Tie Reinforcing Bracket, courtesy of Simpson Strong Tie Corporation, CA, USA.
PAGE 1-49
Drawing Template and Sheet Format |
Drawing and Detailing with SolidWorks 2001/2001Plus |
Exercise 1.5:
You require AutoCAD to perform Exercise 1.5. Your company uses SolidWorks and AutoCAD. Open an A-size drawing template from AutoCAD. Review the Dimension Variables (DIMVARS) in AutoCAD. Record the DIMSTATUS for the following variables:
DIMTXSTY |
Dimensioning Text Style |
DIMASZ |
Arrow size |
DIMCEN |
Center Mark size |
DIMDEC |
Decimal Places |
DIMTDEC |
Tolerance Decimal Places |
DIMTXT |
Text Height |
DIMDLI |
Space between dimension lines for Baseline |
|
dimensioning |
Identify the corresponding values in SolidWorks Document Properties to contain the AutoCAD dimension variables.
For 2001Plus: Favorite dimension style settings are defined for a particular dimension. Favorite dimension styles are applied to other dimensions on the drawing, part and assembly documents. The styles are accessed through the Dimension PropertyManager.
Note: Early AutoCAD drawing formats contain fonts not supported in a Windows NT/2000 environment. These fonts imported into SolidWorks will be misaligned in the Sheet Format. Modify older AutoCAD formats to a True Type Font in SolidWorks.
PAGE 1-50
