

Drawing and detailing with SolidWorks
.pdfDrawing and Detailing with SolidWorks 2001/2001Plus |
Drawing Template and Sheet Format |
Use an existing AutoCAD drawing, FORMAT-C-ACAD.dwg in the 2001drwparts file folder. Import an AutoCAD drawing as the Sheet Format. Save the Sheet Format, C-FORMAT.slddrt.
Add the Sheet Format C-FORMAT.slddrt to the empty C-size Drawing Template. Create a new drawing template; C-ANSI-MM.drwdot. Add an A-size Sheet Format, A-FORMAT.slddrt to an empty A-size Drawing Template. Create an A-ANSI-MM.drwdot Drawing Template.
FORMAT-C-ACAD.DWG C-FORMAT.SLDDRT
C-ANSI-MM.DRWDOT
C-SIZE-ANSI-MM-EMPTY.DRWDOT C-FORMAT.SLDDRT
A-ANSI-MM.DRWDOT
A-SIZE-ANSI-MM-EMPTY.DRWDOT A-FORMAT.SLDDRT
Views from the part or assembly are inserted into the SolidWorks Drawing.
|
Top, Front, Right |
|
views of part. |
SolidWorks |
|
Drawing |
Sheet Format |
|
Drawing |
|
Template |
PART/ASSEMBLY
TITLE BLOCK LOGO CUSTOM PROPERTIES
ANSI UNITS – MM
FONT/ARROWS/ LINE STYLES LAYERS
PAGE 1-29
Drawing Template and Sheet Format |
Drawing and Detailing with SolidWorks 2001/2001Plus |
Open the AutoCAD drawing C-FORMAT.dwg.
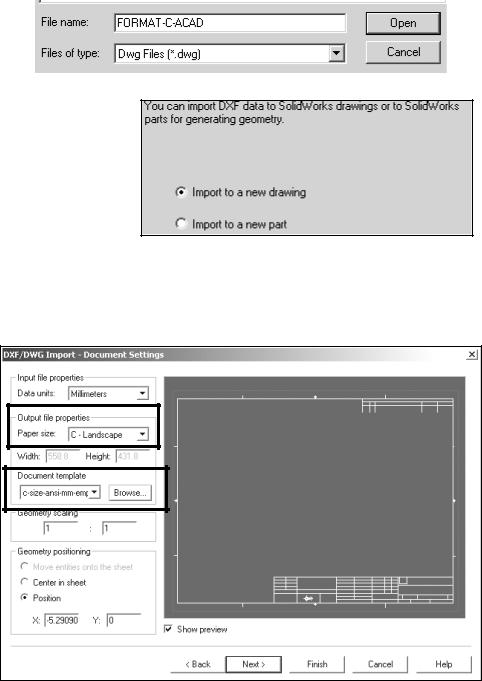
41)Click File, Open. Select Dwg Files (*.dwg) from the Files of type drop down list. Browse and select FORMAT-C-ACAD from the 2001drwparts file folder.
Click Open.
42)Click Import to a new drawing from the DXF/DWG Import dialog box. Click Next.
43)Select C-Landscape for Paper Size. Select the Browse button. Select the 2001drwparts for the Save in file folder. Select the C-SIZE-ANSI-MM-EMPTY for Drawing Template. Click Open button. Click the Show Preview check box. View the Sheet Format. Click Next.
PAGE 1-30

Drawing and Detailing with SolidWorks 2001/2001Plus |
Drawing Template and Sheet Format |
44)Click Import all data to Sheet Format. Click Finish. The Sheet Format is displayed on the Drawing Template.
Data imported from other CAD systems may require editing in SolidWorks to produce desired results.
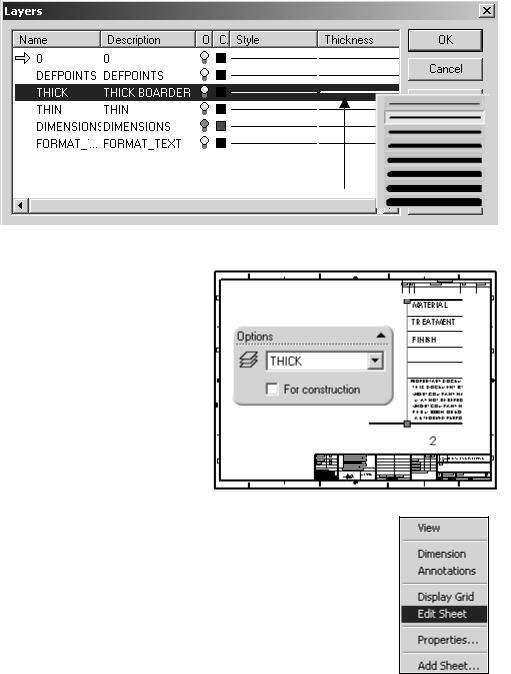
45)Right-click in the Graphics window. Click Edit Sheet Format.
46)Click Zoom in on the title block. There are two coincident horizontal lines below the CONTRACT NUMBER text. Click the first horizontal line below the CONTRACT NUMBER. Remove the line. Press the Delete key. Click the second horizontal line below the CONTRACT NUMBER. Remove the line. Press the Delete key. Lines and text created from the AutoCAD title block are edited in the Edit Sheet Format.
47)Align the NAME text and DATE text. Hold the Ctrl key down. Click NAME text. Click the DATE text. Right-click Align. Click Uppermost. Release the Ctrl key.
Note: Add drawing notes and title block information in the Edit
Sheet Format mode. This saves on rebuild time.
The sheet boundary and major title block heading are displayed with a THICK line style. Modify the drawing layer THICKNESS.
PAGE 1-31
Drawing Template and Sheet Format |
Drawing and Detailing with SolidWorks 2001/2001Plus |
48)Display the Layers dialog box. Click the Layer Properties folder  from the Layer toolbar. Rename the AutoCAD layer THICKNESS to THICK. Rename description from THICK to THICK BORDER. Click the line Thickness in the THICK layer. Select the second line thickness. Display the Thick line. Click OK.
49)The border and title block display the Thick line. The left line in the title block is on the Thin layer. Click on the left
line. Click Thick layer.
Note: Some printers cannot display the outside sheet boundary and or the Zone text.
50)Return to the Edit Sheet. Right-click in the Graphics window. Click Edit Sheet.
51)Click the drop down arrow in the Layer text box. Click None for Layer.
Note: Save Sheet Formats and Drawing Templates in the Edit Sheet mode. Drawing views are not displayed in the Edit Sheet Format mode. The Layer None is saved with the Drawing Template.
PAGE 1-32

Drawing and Detailing with SolidWorks 2001/2001Plus |
Drawing Template and Sheet Format |
52) Save the Sheet Format. Click File, Save Sheet Format.
New
Open
Close
Save Save As
Save to Web
Save Sheet Format
53)Click Custom Sheet Format.
Browse. Select the
2001drwparts file folder.
54)Enter C-FORMAT. The Sheet Formats file extension is “.slddrt”. Click Save. Click OK.
PAGE 1-33
Drawing Template and Sheet Format |
Drawing and Detailing with SolidWorks 2001/2001Plus |
Title Block Notes and Properties
Title blocks contain vital part and assembly information. Each company creates a unique version of a title block. Most title blocks contain the following type of information:
Company Name/Logo |
Part number |
Part name |
Drawing number |
Drawing description |
Revision number |
Sheet number |
Material & finish |
Tolerance |
Drawing scale |
Sheet size |
Revision block |
CAD file name |
Engineering Change Orders |
Quantity required |
Drawn by |
Checked by |
Approved by |
A title block is normally located in the lower right hand corner of the drawing. You need to be in the Edit Sheet Format mode to modify the Sheet Format text, lines or title block information. You need to be in the Edit Sheet mode to insert model views. Edit Sheet and Edit Sheet Format are the two major design modes used to develop a drawing.
The Edit Sheet Format mode provides the ability to:
•Create or change the title block size and text headings
•Incorporate a logo
•Add drawing, design or company text, and Custom Properties
The Edit Sheet mode provides the ability to:
•Add or modify views
•Add or modify dimensions
•Add or modify text
Notes can be created or modified in a title block. Notes can also be linked to SolidWorks Properties and Custom Properties. Linked notes reflect information in a title block such as file name, sheet name and sheet number.
PAGE 1-34

Drawing and Detailing with SolidWorks 2001/2001Plus |
Drawing Template and Sheet Format |
Edit Sheet Format - Title block.
55)Edit company name. Right-click Edit Sheet Format from the Pop-up menu in the Graphics window.
56)View the right side of the title block. Click Zoom to Area  on the Sheet Format title block. Double-click the D&M Engineering text. Enter a new
company name if desired. Change the font height to fit your company name inside title block if required.
57)Right-click Properties on the selected text. Uncheck the Use Drawing font check box from the Note PropertyManager. Change the font size. Click the Font button. Click OK. The text is displayed in the title block.
58)For SolidWorks2001Plus: Click the Font button in the Text Format box to access the Property Manager on the left side of the Graphics window.
SolidWorks 2001 |
SolidWorks 2001Plus |
PAGE 1-35

Drawing Template and Sheet Format |
Drawing and Detailing with SolidWorks 2001/2001Plus |
A company logo is normally located in the title block. Create a company logo by copying a picture file from Microsoft ClipArt using Microsoft Word. Copy/Paste the logo into the title block
The following logo example was created in Microsoft Word 2000 using the COMPASS.wmf and WordArt text. Any ClipArt picture, scanned image or bitmap can be used.
Create a logo.
59)Create a New Microsoft Word Document. Click New  from the Standard toolbar in MS Word. Click ClipArt
  from the Draw toolbar.
 ClipArt
60)Drag the COMPASS.wmf file in the WORD document. The
COMPASS.wmf picture file  is displayed in the WORD document.
61)Copy the picture. Select
the compass picture. Click Copy  .
.
62)The logo is placed into the Clipboard. The logo is used again to create an A-size Drawing Template. Save the logo. Click Save. Enter Logo for the WORD filename.
63)Place the logo into the title block. Click a position to the left of the company name in the title block.
64)Click Edit, Paste. Size the logo to the SolidWorks title block by dragging the picture handles.
65)Close Microsoft Word. Click File, Exit.
Link notes in the title block to the SolidWorks Properties. The drawing TITLE text describes the drawing. Create a note for the title of the drawing that is linked to the SolidWorks file name. Complete the drawing. Create additional notes.
PAGE 1-36

Drawing and Detailing with SolidWorks 2001/2001Plus |
Drawing Template and Sheet Format |
Create a new Layer for the Title Block notes.
66)Click the Layer Property Manager. Click the New button. Enter TB Text for Name. Enter TITLE BLOCK TEXT for Description. Click OK. Note: The larger arrow next to TB TEXT indicates the current layer.
Create a Linked Note.
67)Click Zoom to Area  on the TITLE section of the title block. Display the
Annoations toolbar. Click View, Toolbars, Annotations. Click a start point to the lower right the TITLE text. Click Note  from the Annotations toolbar.
68)The Note Property dialog box is displayed. Click No leaders in the Leader text box. Click Link to
Property |
from |
|
|
|
|
|
|
|
the Text Format box. |
|
|
|
|
|
|
|
|
The Link to Property |
|
|
|
|
|
|
|
|
|
|
|
|
|
|
|
||
dialog box is |
|
|
|
|
|
|
|
|
displayed. Click No |
|
|
|
|
|
|
|
|
|
|
|
|
|
|
|
||
leaders in the |
|
|
|
|
|
|
|
|
Leader text box. |
|
|
|
|
|
|
|
|
Select SW- |
|
|
|
|
|
|
|
|
|
|
|
|
|
|
|
|
|
FileName from the |
2001 |
|
2001Plus |
|||||
|
|
|
||||||
drop down list. The variable
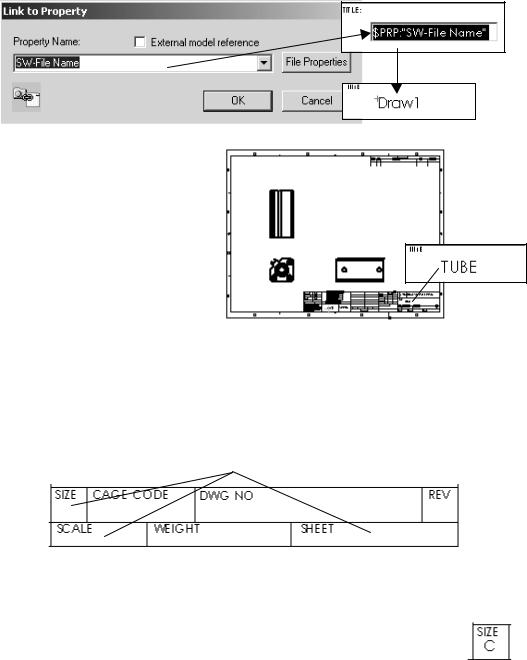
$PRP“SW-File Name” is displayed in the Note text box. Click OK.
PAGE 1-37
Drawing Template and Sheet Format |
Drawing and Detailing with SolidWorks 2001/2001Plus |
69)Uncheck the Use document’s font. Click the Font button. Enter 6mm for text height. Click OK. Draw1 is the current file name.
Note: The $PRP“SW-File Name” property will update to contain the part filename. Example: Insert the part TUBE into a Drawing Template in Project 2. The text TUBE will replace the SW-FileName.
Additional notes are required in the title block. The text box headings: SIZE C, DWG. NO., REV., SCALE, WEIGHT and SHEET 1 OF 1 are entered in the SolidWorks default Sheet Format. SIZE, SHEET and SCALE text will be created with Linked Properties. Change the Sheet Scale. The new value updates in the title block. Add a new sheet. The drawing and the SHEET text values increment.
70)Create a Linked Property to the SIZE text. Click a start point in the upper left hand corner below the SIZE text. Click Note  from the Annotations toolbar. Click Link to Property
  from the Text Format box. Select SW-Sheet Format
Size from the drop down list. Click OK. The variable $PRP“SW-Sheet Format Size” is displayed in the Note text box. Click No leaders. Display the Sheet Format Size. Click OK.
71)Click the OF text in the lower right corner of the title block. Press the Delete key.
PAGE 1-38