

Drewett_1999_Field_Archaeology
.pdfPUBLISHING THE REPORT |
177 |
and perhaps reconstructions. Increasingly maps, plans, sections and reconstructions are computer-drawn using CAD software, but object drawing usually requires the skill of a draftsperson, although flat-bed scanning of an object is possible (Houk and Moses 1998).
Many archaeologists still draw site plans and sections by hand for publication. If drawn this way, field drawings may be traced using tubular-nibbed drawing pens on plastic drafting film. Tracing paper is not suitable due to its differential expansion and contraction under changes of humidity. Original pencil field drawings should never be directly inked-up as they are an essential element of the primary site archive. Correcting errors on drawings for publication has always been a major concern using traditional materials, so highly-skilled archaeological draftspeople were in great demand. Since about 1963 however, the skills of draftspeople have, initially slowly and in recent years very rapidly, been overtaken by computers. The SKETCHPAD system developed at the Massachusetts Institute of Technology by Ivor Sutherland started this process (Sutherland 1965). Now field drawings can be simply scanned into computers and images enlarged or reduced, lines made thinner or thicker as required. Both the available hardware and software are developing so fast that any particular system recommended here would almost certainly be out of date before this book is published. It is perhaps more important for the field archaeologist to know what illustrations are needed in what form to convey information about a site.
The one area of archaeological illustration that has remained firmly the province of the draftsperson is the illustration of objects. This is partly because it is not a purely mechanical process like producing a map, but involves interpretation, and to some extent selection. Archaeological object illustration has developed independently in different parts of the world, and indeed within different parts of individual countries. There are, therefore, no universallyaccepted conventions, although there are general guiding principles. The basic aim is that the drawing should be produced in such a way that anyone understanding the principles used can understand the drawing and use it for purposes of comparison.
The first stage of drawing an object is to examine it and, perhaps in conjunction with a specialist, understand what the object is, how it was used and how it was made, and what it is made of. Without this level of knowledge it is perfectly possible to produce an artistic image of the object, but perhaps not a drawing of use to an archaeologist. For this reason sometimes people trained in art require an element of retraining to produce archaeological illustrations. The aim is to produce objective drawings, although how far this is possible is open to debate (Orton, Tyers and Vince 1993, Fig. 7.3).
Archaeological objects always have three dimensions, but publication, other than electronically, is in two dimensions. To give an impression of the third dimension, objects are always drawn as if the light were coming from the top left-hand corner of the illustration. Orientation is also an important principle. The vertical axis of the object should be parallel to the side of the page with side views achieved by rotating the object by 90°. Most object drawings should also include a representation of a reconstructed section cut through the object (Griffiths and Jenner 1990).
Basic drawing equipment used for archaeological illustration includes a drawing board, pencils(2HtoHB),eraser,dividers,bleed-proofdrawingpaperorplasticdraftingfilm,anengineer s
178 FIELD ARCHAEOLOGY
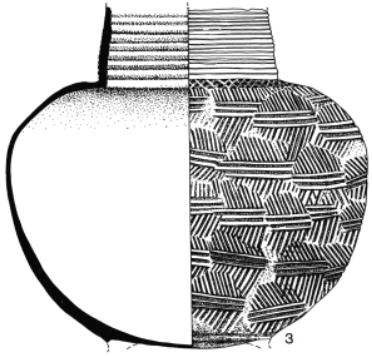
Figure 10.1 Conventional archaeological drawing of a pot (Lys Drewett).
square, calipers and tubular-nibbed drawing pens. If a properly equipped drawing office is not available, the illustrator will also require a well-lit space with adjustable desk and chair. Natural daylight is best enhanced with a desk lamp to light the object from the top left-hand corner.
Archaeological drawing of pottery is in many ways the most conventionalized form of archaeological illustration. The conventions are best understood by looking at a whole-pot and a whole-pot drawing before attempting to draw a sherd. The convention is to draw the pot as though it were standing upright and was then cut into two with the outside and its profile on the right and the section and interior on the left (Fig. 10.1). The two halves of the pot are bisected with a vertical line. In the United States the convention is reversed, with the section and interior on the right.
Most illustrators evolve their own ways of drawing whole pots, but the basic framework required is the base diameter, the rim diameter and the height of the vessel. If the pot is wheelturned the rim and base are likely to be roughly circular and parallel to each other. Hand-made pots are rarely so regular. To draw the pot, place the whole pot on its side on the drawing paper (it can be held by small wooden blocks or re-usable adhesive). Then, with an engineer s square, project points around the pot down onto the paper. By joining these spots you have the shape of the pot. A line is then drawn from halfway along the rim down to halfway across the base.

PUBLISHING THE REPORT |
179 |
Figure 10.2 Conventional archaeological drawings of rim and base sherds (Lys Drewett).
Using a rigid frame of drawn right angles, as some illustrators recommend, generally has the effect of evening up irregularly-shaped pots and should be avoided.Alternatively you could use a profile gauge to register the shape of the pot, then draw carefully around it. The thickness of the pot for the section drawing can be measured using calipers. Remember to take several measurements as the thickness of a pot is not always constant. If the pot is of a fine wheelturned fabric, parallel lines of variable thickness are used both to represent the marks of wheelturning and to illustrate shape. For coarser wares the actual components of the fabric are usually drawn, particularly larger pieces of filler like grog or burnt flint. Simple repetitive decoration can be drawn directly onto the pot drawing, but complex non-repetitive decoration may need to be drawn separately, rolled out (Griffiths and Jenner 1990).
Potsherds should, where possible, be incorporated in their correct position in a reconstruction drawing of the whole pot. A rim sherd should become the top of a whole-pot drawing, the base sherd the bottom (Fig. 10.2). Diameters of rim and base sherds can be calculated by using a radius chart. This is simply a series of concentric circles drawn at 1 cm intervals. By placing the rim or base curve on the radius chart its diameter can be easily estimated. Care should be taken, particularly with the angle of rim sherds. If the sherd is from a wheel-turned pot it should be

180 FIELD ARCHAEOLOGY
Figure 10.3 Line drawing of flaked flint tool (1) and stippled polished stone tool (2) (Lys Drewett).
placed with the top of the rim flat on the radius chart. The angle is correct when no light can be seen passing under the sherd. Body sherds are often more difficult to locate correctly as if they were part of a whole pot. They are, however, usually drawn only if their decoration is of particular interest.
For illustration purposes, stone artefacts are generally divided into those with evidence of conchoidal fracture, like flint and obsidian, and those without, like sandstone. Flake scars showing conchoidal fracture are illustrated by roughly parallel curved lines, the lines thinning out across the flake scar surface, while other worked stone is stippled (Fig. 10.3). Most flaked tools are drawn in three views with the dorsal view on the left, ventral on the right, and lateral profile between, although there is no great standardization in lithic drawings. Basically, draw enough views to show the size and shape of the object, and how it has been chipped. The outline can be created by fixing the object to your drawing paper with re-usable adhesive and carefully projecting the edge down on to the paper using a set square. The points where the flake facets hit the edge of the object can be recorded in the same way. The flake facets are then drawn using a combination of dividers and eye. Flake facets are indicated using hatching, which not only shows the direction of flaking but also gives an impression of depth.
PUBLISHING THE REPORT |
181 |
The principles of drawing all other classes of object are basically the same. Understand the object, decide how many views are required, create a measured outline and then, using dividers, measure in detail, remembering to show depth by lighting from the top left-hand corner. Each class of object does, however, have its own problems. Generally corrosion is not drawn on metal objects, as it only creates confusion and often alters the original shape of the object. If totally corroded, the real shape may only be obtained by tracing off an x-ray of the object. The drawn surfaces of metal objects are generally shown as smooth, indicated by parallel lines, or cross-hatching in shaped areas. Likewise polished bone should be shown as smooth; natural variations in the bone structure are generally not shown. The natural surface of rough materials like antler may, however, be stippled. Wooden objects are generally lineshaded while leather may be line-shaded or stippled.
Most objects are drawn at a scale of 1:1, for reduction to 1:4. However, small objects are often published at 1:1 so should be drawn at double scale. Given that final published drawings are reductions, care should be taken to use ink lines thick enough to reduce, and never too close or they will black in on reduction. The traditional way of preparing object drawings for publication was to mount them on white mounting card, numbering each object and adding a linear scale. Now drawings can be scanned into a computer, moved into place, numbered, and scales added.
Many people question why so much effort is put into archaeological illustration of objects rather than simply using photographs. The proportion of object drawings to photographs does in fact vary considerably around the world. British archaeologists, for example, tend to publish more drawings and fewer photographs than Chinese archaeologists. Drawings and photographs both have advantages and disadvantages. A good photograph can give a real view of an object with fine detail of texture, while drawings can incorporate sections and provide more accurate dimensional information.
Although photographs adequate for lecturing can be produced using 35 mm cameras, large-format cameras are better for producing publication-quality object photographs. These can record finer detail, and using camera-movements foreshortening can be eliminated. If a 5 × 4 inch (12.8 × 10.2 cm) camera is used, a standard 150 mm lens is suitable for most work. In addition a strong tripod, contrast filters, light meter and object stand will be required (Dorrell 1989, 155 77). Care should be taken to select a suitable background against which to photograph an object, and all photographs should include a small, unobtrusive, but clear and well-made scale.
For black-and-white photographs, a background of either black or white is usually best as other colours appear as variations of grey. Colour photographs look better with a coloured background, although not one that will dominate the object. To bring out the texture of an object, careful lighting is required. Continuous tungsten lighting has the advantage that it can be moved around the object and the photographer can see the best angles, but such lighting becomes hot which may not be good for some objects. Electronic flash is safer but it is less easy to predict what the finished image will be like. Cameras with built-in flash units are usually unsuitable,

182 FIELD ARCHAEOLOGY
Figure 10.4 Photograph of whole pot for publication (photo: C. S. Fung).
except for record shots, as they tend to flatten the image. Flash units need to be carefully positioned at an angle to the object to bring out fine texture.
Most archaeological publications only use black-and-white photographs, essentially for reasons of cost (Fig. 10.4). The prints should be on glossy paper and generally either at publication size or double size. It is essential to discuss with the editor or printer exactly how photographs should be presented. All should, however, be clearly labelled on the back of the print with the article and author s name, and figure or plate number. This should be done in soft pencil or fibre-tip pen, not ball-point which can impress the surface of the photograph or adhesive labels which can fall off. Also mark any required cropping of the photograph in soft pencil on the back.
Writing a report
There are essentially three types of field reports being written by archaeologists today: archive reports, technical reports in developer-funded archaeology, and reports for publication. The three types have different aims, readership, and therefore content.
PUBLISHING THE REPORT |
183 |
The archive report has already been touched on earlier in this chapter. This is basically a record of data ordered in such a way as to be accessible, and with an interpretation of the history of the site. It will include detailed, quantified artefact and environmental reports. The actual structure of an archive report will depend on the type and period of a site, but in many ways it is similar to the structure of a traditional published excavation report considered below. The aim of archive reports is the long-term preservation of data.
Technical reports produced in developer-funded (contract) archaeology are, by contrast, for immediate use, and used often not by archaeologists. Unfortunately, however, they are increasinglybecomingthesolerecordofmuchsalvagearchaeology.Cultural resourcemanagement in North America has created an enormous number of these technical reports, often referred to as grey literature as it is desk-top published in small numbers, essentially for commercial clients. Some reports, particularly based on work done on military property, are never available to the wider archaeological community.This problem of grey literature is increasingly becoming an issue in Britain as most excavation, following PPG 16, is now developer-led.
Technical reports are the product a developer will expect if funding an evaluation excavation, or indeed a full site excavation. Evaluation reports must be produced quickly as they are often an essential element in the planning process. They should be clear, well written and illustrated, jargon-free and easy to use by developers, planners and lawyers who may need to cite them at a public inquiry into a planning application.
Although there is no agreed standard for such technical reports, most roughly follow a set pattern. A clear, dated title page is followed by a contents list of chapter headings, appendices, plans and figures, and photographs. The text should start with a brief, clear non-technical summary. This should outline exactly what was done and what was found. Here, and throughout the text, each paragraph should be numbered (Section 1, 1.1, 1.2, 1.3 and so on, Section 2, 2.1, 2.2, 2.3 and so on) as specific points may need to be referred to in public inquiries or other parts of the planning process.
The main text then starts with an introduction stating where the site was, who commissioned the work and why, an outline of previous knowledge, what form the current work took and when it was undertaken, and finally who did the fieldwork and prepared the report. Section 2 considers the aims and objectives of the project, while Section 3 describes the methodology used. Section 4 describes in clear terms the evaluation results, particularly where what features were found and the stratigraphy of the site. Section 5 outlines the finds, artefacts and ecofacts found, while the final section discusses the evidence and draws conclusions. Fine detail in all these sections is best left to appendices. These can include tables summarizing contexts found and listing artefacts and ecofacts, together with any specialist finds reports.Aclear stratigraphic matrix is a good way of summarizing the sequence of contexts on a site. Finally location maps, trench and context plans and sections, and site photographs are included.
Ideally these technical reports should be considered simply as temporary documents and any field project must have a site archive and published report. The sheer volume of field
184 FIELD ARCHAEOLOGY
archaeology now being undertaken, and the detail of information that can be obtained from the smallest excavationis,however,creatingasevereproblem intheareaofarchaeological publication. Added to this are concerns expressed by some archaeologists about the actual process of writing up field projects (Hodder 1989).
Traditional excavation reports are essentially designed so that future archaeologists can reinterpret a site from the data published without recourse to an archive, except perhaps a reexamination of selected finds. Such a report should start with a clear abstract of about 200 words outlining the project and the importance of key discoveries. With so much archaeology being published, this is probably the most read section of the report. Ideally it will be published not only in the language of the country in which the site is located, but also in major international languages. The introduction should locate the site, place it in its environmental and historical context, and explain the reasons for the excavation and the methodology employed. The main body of the text involves a description of the contexts found on the site, including dimensions, stratification, and soil descriptions. This is followed by finds reports covering artefacts and ecofacts. Details may, however, be relegated to appendices. The final section in the main report is a discussion of the interpretation of the site, and conclusions.
Each of these sections will include illustrations, location plans and photographs in the introduction; site plans, sections and photographs in the site description; and object drawings and photographs in the finds reports. Much of the specialist data has always been relegated to appendices which, from the 1960s onwards, often became larger than the main report. If appendices are used they should be relevant and clearly cross-referenced to the main body of the report. Finally, every report should have clear acknowledgements to all who contributed, and a bibliography of sources referred to.
This traditional form of excavation report (Joukowsky 1980, 457 66) goes back over a hundred years to pioneers of field archaeology like General Pitt-Rivers and Sir Mortimer Wheeler (Grinsell, Rahtz and Warhurst 1966). The aim is to publish all data recovered so that anyone in the future can understand, check and, if required, reinterpret the site. As already mentioned, however, there are problems with this type of report. The sheer amount of archaeological data available is becoming overwhelming and the cost of conventional publication is becoming prohibitive. Published reports must therefore be far more selective in what appears on the printed page, with reference back to the unpublished archive. Only findings of significance should be published, with sufficient data to support these findings. Most excavations produce a great deal of low-grade data which will be reported in detail in the archive, and simply referenced in the published report. Finds reports should relate to the interpretation of the site, and not simply be lists of finds common on any similar site excavated in the area. Ideally, regional synthetic finds reports will be published, which can then be cross-referenced in the published excavation report. Endless publication of similar material, simply because it is there, is not a good use of limited resources.
One of the problems with brief, synthetic published reports with a full but unpublished archive is that the archive has to be stored in a single place which may not be convenient to the
PUBLISHING THE REPORT |
185 |
researcher wishing to access it. Archive stores have to have opening and closing times and restrictions on the use of data. Hard-pressed researchers may need to access hundreds of archives in different locations. There will always be a tendency to use and accept the published version of the excavation report without detailed checking of the archive data.Archives therefore really must be accessible. Fortunately this can now be done with electronic publishing, which will almost certainly be the way forward in archaeological publishing. The entire archive can then become available through the Internet, but only accessed when researchers wish to follow up specific information referred to in the published report.
Getting a report published
No field archaeology project is complete until a report is published. Getting reports published is a combination of skill, careful judgement and luck. Skill is required in the actual production of the report, careful judgement is required in selecting a suitable journal, and luck is required in relation to editors, referees and available space. Some archaeologists appear to have terrible trouble getting anything published; others manage to get everything, however awful, published.
If you are attempting to get a field report published, it is essential that firstly you select the right journal, and secondly you adhere to the notes for contributors provided by the editors of virtually all journals. Publication in monograph form will require detailed discussion with the publishing organization. Most archaeological reports, however, appear in journals.
Archaeological journals are in three basic tiers: international, national and local. Few international journals publish excavation reports. Journals like World Archaeology publish thematic volumes of potential international interest. Antiquity will publish short articles on major new field discoveries, but not excavation reports as such. Most continents or countries have journals which will publish major discoveries derived from field projects within the area, but most have a preference for synthetic articles rather than straight excavation reports, unless of major significance. The Society forAmericanArchaeology, for example, publishes American Antiquity for NorthAmerica and Latin American Antiquity for SouthAmerica and the Caribbean.
Britain s major national journals are period-based, being the journals of societies with period interests: Proceedings of the Prehistoric Society, Britannia (for Roman Britain), Medieval Archaeology and Post-Medieval Archaeology, although there are also wider-based journals like
The Antiquaries Journal and The Archaeological Journal. All will accept British excavation reports, although only if clearly of national importance. Most excavation reports are published at the local level, in Britain generally by the county archaeological societies. Journals such as
Wiltshire Archaeological Magazine or Sussex Archaeological Collections have been published annually for over a hundred years. In the United States, State historical societies like the Idaho State Historical Society or the Minnesota Historical Society fulfil a similar role to the British county archaeological societies.
186 FIELD ARCHAEOLOGY
Having selected a suitable journal, consult the editor to see whether he or she also agrees that your report would be suitable. Most journals produce detailed notes for contributors which, if you want an article published quickly, you must follow closely. Also, use recently published reports in the same journal as models. If a word limit is prescribed, stick to it. Many journals have word limits of about 8,000 words. Most journals have a house style which will include how references should be presented, and possibly even illustration style. Do not use footnotes if the journal clearly does not allow them. Most editors require two or more hard copies of the report plus a version on disc. Remember, however, that editors, printers and postmen are human and do sometimes lose things, so always keep your own back-up copies of everything sent out.