

Professional Java.JDK.5.Edition (Wrox)
.pdfChapter 10
In the past, the use of sockets was the primary way for applications to communicate with each other. This of course was not an object-oriented approach to communication and, if you have ever worked with socket code, you realized real fast just how tedious it was to create a client/server architecture that had some complexity to it and performed all the necessary operations you may have needed.
Remote Procedure Call (RPC) services were the next attempt at eliminating the complicated communication layer of using sockets and to also make it easier for programmers to call remote procedures, but the parameters that could be passed to these procedures usually weren’t very complex. If the need to pass more complex parameters arose, the burden would lie on the programmer to process the types and perform monotonous conversions. Plus, the parameters were usually not very portable between languages.
RMI picks up where RPC services left off by being designed in an object-oriented fashion which allows programmers to communicate using objects and not just predefined data types that are language-centric. These objects can be as complex as you need them to be and values that are returned can be of any type. The communication layer is completely hidden from the programmer, which allows you to concentrate on more important aspects of programming, like the business logic.
RMI makes applet coding a dream since you can now have your applets easily communicate with backend distributed systems. RMI is also very secure and uses security managers to prevent malicious code from attacking your network. If your applications require multithreading, RMI also supports threads flawlessly.
Exploring RMI’s Architecture
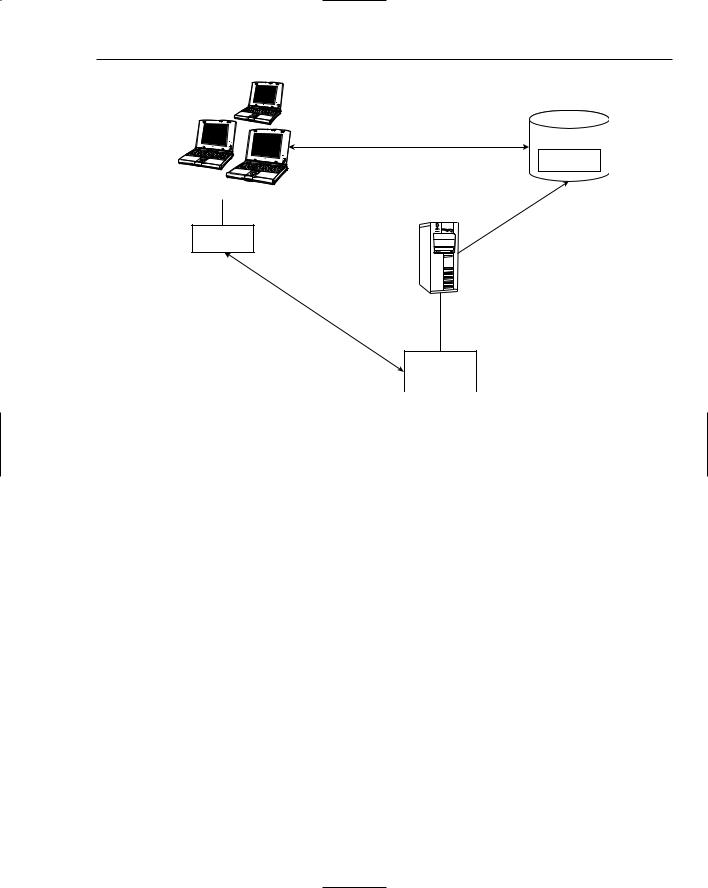
RMI’s basic architectural components usually consist of a client, a server, and an RMI registry, which exists on the server side. The client is able to look up and retrieve the remote objects from the server. The server receives client requests for objects and looks for them in the RMI registry. The server also has the task of registering any remote objects with the RMI registry when it is started. Figure 10-1 shows the basic RMI architecture that was just described.
|
|
ol |
|
toc |
|
MI |
Pro |
|
R |
|
|
R |
|
|
MI P |
|
|
|
r |
|
|
o |
|
|
to |
|
|
|
col |
The Java Objects are registered in the
RMI registry
RMI
Registry
SERVER with Java Objects
Figure 10-1
446

Communicating between Java Components with RMI and EJB
The communication transport protocol is completely handled by RMI and is invisible to the programmer. There is no need for you to have to worry about writing any socket code or other transport methods to establish communication with the server. However, you do need to process remote exceptions because at various points, communication breakdowns can occur.
The beauty of RMI is that it lets you call methods on remote objects in the same way you would call methods of a normal Java object. It appears to be almost completely transparent to the programmer. Now, there are certain things you do need to know that affect only RMI applications:
Clients only interact with remote objects that are tied to a remote interface. They can never actually interface with the implementation classes of those interfaces.
Networks can fail, and because at any given time the network connection to the server can drop, you must capture java.rmi.RemoteExceptions. Also, servers must have the method signatures they expose to clients throw java.rmi.RemoteExceptions in the event of a communication failure.
Arguments are passed by value (copy) instead of by reference. When you are programming in Java, objects are passed by reference; with RMI applications, you are dealing with separate Java Virtual Machines, so you can only pass object arguments by value. However, keep in mind that remote objects are passed by reference. A simple rule to remember when dealing with passing objects is that if it is not a remote object, it is passed by value instead of reference.
It is important that you also consider your security architecture when you are dealing with RMI applications. All of your object calls are being transmitted over the network and therefore can be intercepted by someone who could then alter the contents of your calls or simply monitor what you are transmitting. Therefore, for applications that need to be security aware, it is imperative that you do your upfront security design work before developing your applications. Security should never be an afterthought. It will cost you valuable development time if you ignore security requirements in the beginning.
Another design consideration when dealing with RMI is performance. Make sure that you try to design your RMI applications to be as lightweight as possible and avoid any unnecessary overhead. You should definitely plan out your scalability requirements ahead of time during the design phase of your project.
The other aspect of RMI that is transparent to you is remote garbage collecting. Java RMI has incorporated a remote garbage collector for you so you do not need to worry about cleaning up any unused objects.
Although it may seem like there are lots of differences between normal Java applications and RMI Java applications, the differences are relatively simple to grasp and use. The more you develop with RMI, the more the differences will make sense, and you will also discover that all the differences are extremely valuable to you when developing RMI applications. For instance, without remote exceptions, you would never be able to tell when a network error occurred. Having this capability allows you to not only make correct programming decisions when remote exceptions occur, but to also display useful error messages to the users of your applications.
447

Chapter 10
Developing RMI Applications
When developing RMI applications, there is a component called stubs that you need to know about in order to develop and communicate successfully with an RMI application. Stubs basically act as remote object proxies that are local to a client. Stubs are generated after you have defined your remote interface containing all the methods you wish to expose to clients. To generate the stubs, you will need to use the rmic tool that comes with your installation of Java. The rmic tool will take a specified class and generate the stub file for that class, which exposes all the methods to be used by the client. Stub classes are named with the name of the class that is used followed by a _Stub tag. So if you had a class called RMIChatImpl.class and ran the rmic tool against it, the resulting file would be called RMIChatImpl_Stub.class.
Note: The new Java 5 SDK supports dynamic generation of stub classes at run time, which eliminates the need to use the rmic tool to pregenerate your stub classes for your remote objects. However, you will still need to use the rmic tool if you plan to support clients that use earlier versions of the Java SDK.
Stubs are then used transparently by the client. Clients will call methods that reside in the local stub and then the local stub will execute the necessary protocol to call the method on the remote object. The protocol the stub uses involves the following steps:
Establish a connection with the remote JVM that contains the remote object to be used.
Take the parameters for the remote method and marshall them to the remote JVM.
Note: Marshalling is the act of taking an object and converting it into a byte stream that is compatible with the connection protocol you are using for communication and sending it through the connection pipe. Java accomplishes this by using its serialization specification. Unmarshalling is the act of taking the byte stream and converting it back to its original object form.
Wait for the results that may be returned from the process of invoking the remote object.
Unmarshall the results back to their original object forms.
All the communication layers, including marshalling, are hidden from the clients calling the remote object methods and the developer. Figure 10-2 depicts the usage of stubs and the basic RMI architecture.
Using Threads in RMI
Threading is usually great for performance issues but can be a bit cumbersome when dealing with remote objects. The RMI specification has no set way of mapping remote objects to threads that the clients use. Therefore you must make sure that your application is thread-safe when it needs to deal with remote object calls. This simply means that if you plan to use threads, then you need to take the necessary time to architect your application in a manner that will be thread-friendly and also to make sure that you have considered any potential thread pitfalls in your architectural design.
448
Communicating between Java Components with RMI and EJB
Clients
Bank_Stub
Lookup remote object |
RMI Registry |
Bank_Stub
Invoke |
Remote |
|
|
Methods |
|
|
|
|
|
|
to |
Bind |
Impl |
y |
|
|
registr |
||
RMI |
|
|
|
Server
BankImpl
Figure 10-2
Using Dynamic Class Loading
One of the greatest features of RMI is its ability to download classes from another virtual machine that may not exist in the receiving virtual machine. The ability to download almost any object type as long as it is serializable makes RMI extremely simple to use from a development standpoint and eliminates the need for the developer to be concerned with doing any type of custom marshalling and unmarshalling of Java objects. The large benefit is that you can use the downloaded class objects just like you would use any other Java object and call its methods. The only real requirement is to make sure that you capture RemoteExceptions.
Distributed Garbage Collection
A mess that can occur with distributed systems is the need to keep track of all the remote objects you are creating and make sure that you destroy them so that you are not creating memory leaks anywhere. Luckily for you, RMI has a distributed garbage collector that keeps track of all the remote objects and deletes them when they are no longer in use. Without this feature, you would have to do your own garbage collecting, which could be quite burdensome and error-prone.
Examining Remote Object Activations
Systems that would use an RMI type of architecture could potentially be systems that need to support thousands of object creations, and at any given time there could be a need to have access to all those objects if the situation arose. For instance, say you developed a super IM chat system that covered the entire east coast and a certain event happened that caused users to get on and chat with each other all at the same time. Even though all the users are logged on, would you want to continuously keep their
449

Chapter 10
objects in memory? RMI has a mechanism, called Remote Object Activations, that allows on-demand access to remote objects. These are called activatable remote objects. To make activatable remote objects work, two things were developed:
A class called java.rmi.activation.Activatable, which makes remote objects activatable.
An activation daemon called rmid. The rmid manages the creation of activatable objects and it also manages how the objects are executed.
So just how do you make your remote interfaces activatable, you might ask? Well, first you must include the java.rmi.activation package, and then you must extend the class Activatable for your class while implementing your remote interface. Here is a quick example demonstrating how to use basic activations.
TestRemoteInterface Interface
This TestRemoteInterface looks like a standard remote interface class for RMI. Basically, there is no difference between creating a remote interface with activations and a remote interface without activations. The changes start to come into play when you create the implementation and client classes. The following code demonstrates how to create the TestRemoteInterface:
import java.rmi.*;
public interface TestRemoteInterface extends Remote {
public String rmiWelcome() throws RemoteException;
}
TestActivationImpl Class
The implementation class is the first exposure to the activation world in this text. In this class, you need to extend the java.rmi.activation.Activatable class and set up a constructor that takes two new parameters. In the constructor, you must call the parent construct to register the new object with the parent class and have it assign an anonymous port to the class:
import java.rmi.*;
import java.rmi.activation.*;
public class TestActivationImpl extends Activatable implements TestRemoteInterface
{
public TestActivationImpl(ActivationID activationID, MarshalledObject mObject) throws RemoteException {
// Register the object super(activationID, 0);
}
// Now you will need to implement your remote interface methods here public String rmiWelcome() throws RemoteException {
return (String) “Welcome to activatable RMI!”;
}
}
450

Communicating between Java Components with RMI and EJB
At this point, you have achieved the creation of a remote interface and an implementation of the remote interface. You now need to turn your attention to the client class and how it uses activations.
TestClient Class
In order to test out the activation capability, a client must be created to look up the remote objects and execute the methods associated with them. The following code will demonstrate to you all the intricacies involved in creating the client code:
import java.rmi.*;
public class TestClient {
public static void main(String args[]) {
String sURI = “rmi://127.0.0.1/TestActivationImpl”;
// Get a security manager
RMISecurityManager rmSM = new RMISecurityManager(); System.setSecurityManager(rmSM);
The preceding code creates a variable to hold the URL to the TestActivationImpl. This variable is currently pointing to localhost but could easily point to any server available on the network. The security manager must be set up so that the client can download and access the remote objects stub. That is accomplished with the method call System.setSecurityManager(rmSM):
try {
TestRemoteInterface testRI = (TestRemoteInterface)Naming.lookup(sURI);
String sResponse = (String)testRI.rmiWelcome();
System.out.println(“Received the following response from “ +
“activatable remote object: “ + sResponse);
}catch (Exception e) { e.printStackTrace();
}
}
}
The URL is looked up using the call Naming.lookup(sURI), and if everything is successful, a TestRemoteInterface object should be received. After obtaining the remote object, the remote method TestRemoteInterface.rmiWelcome can now be executed to create the welcome message. That is all there is to the basics of activations. It gets a little more hairy when you introduce the Register class. This text explores that class next.
451

Chapter 10
Register Class
The main purpose of this class is to handle the registration of the implementation class with the RMI registry and the rmid daemon. Once the implementation class has been registered, the class can then be looked up remotely:
import java.rmi.*;
import java.rmi.activation.*; import java.util.Properties;
public class Register {
public static void main(String[] args) throws Exception {
RMISecurityManager rmiMGR = new RMISecurityManager();
System.setSecurityManager(rmiMGR);
The first thing you need to do is get and set a security manager to use so that you have access to the necessary files to perform your registration options:
Properties pProperties = new Properties(); pProperties.put(“java.security.policy”, “C:/rmitest/policy”);
ActivationGroupDesc.CommandEnvironment actCommandEnv = null;
ActivationGroupDesc actGroup = new ActivationGroupDesc(
pProperties, actCommandEnv);
ActivationGroupID actGroupID = ActivationGroup.getSystem().registerGroup(actGroup);
The activation groups above will provide the rmid with the required information it needs to contact the VM of the activatable object. Here you are simply setting up a policy that will allow the VM to be contacted:
String sFileLocations = “file:///C:/rmitest/”;
//Create the rest of the parameters that will be passed to
//the ActivationDesc constructor
//
MarshalledObject mObject = null;
ActivationDesc actDesc = new ActivationDesc(actGroupID, “TestActivationImpl”, sFileLocations, mObject);
The activation description shown above will provide the rmid with the necessary info it needs to create a new instance of the implementation class. Here you are telling the rmid the name of the implementation class and the file location and are also providing it with a MarshalledObject:
452

Communicating between Java Components with RMI and EJB
// Register with rmid TestRemoteInterface trInterface =
(TestRemoteInterface)Activatable.register(actDesc);
// Bind the stub that we received with the RMI registry Naming.rebind(“TestActivationImpl”, trInterface);
}
}
Finally, you need to register with the rmid and the RMI registry. This now allows you to test the sample code fully. Remember, you must also have a policy file created and located in C:\rmitest\policy. Here is an example of the contents of a policy file that grants the program all permissions:
grant {
permission java.security.AllPermission;
};
You have not yet started the RMI registry or the rmid daemon server. These must be started for the code to function properly and for the registration to occur.
Starting the Activation Tools
There are two main tools that you need to start before running the above code. You must start the RMI registry and you must start the rmid daemon.
To start the RMI registry, type the following from a command prompt:
start rmiregistry
To start the rmid daemon, you will need to type following from a command prompt:
start rmid -J-Djava.security.policy=rmid.policy
After both tools are running, you should then be able to run your remote-activatable object code and register with the RMI registry and rmid daemon tools.
In the next section of this chapter I will show you an example of a nonactivatable application called RMIChat. The RMIChat example is much more complex than the previous activatable example and it will dive into the more intricate details of RMI.
RMIChat Example
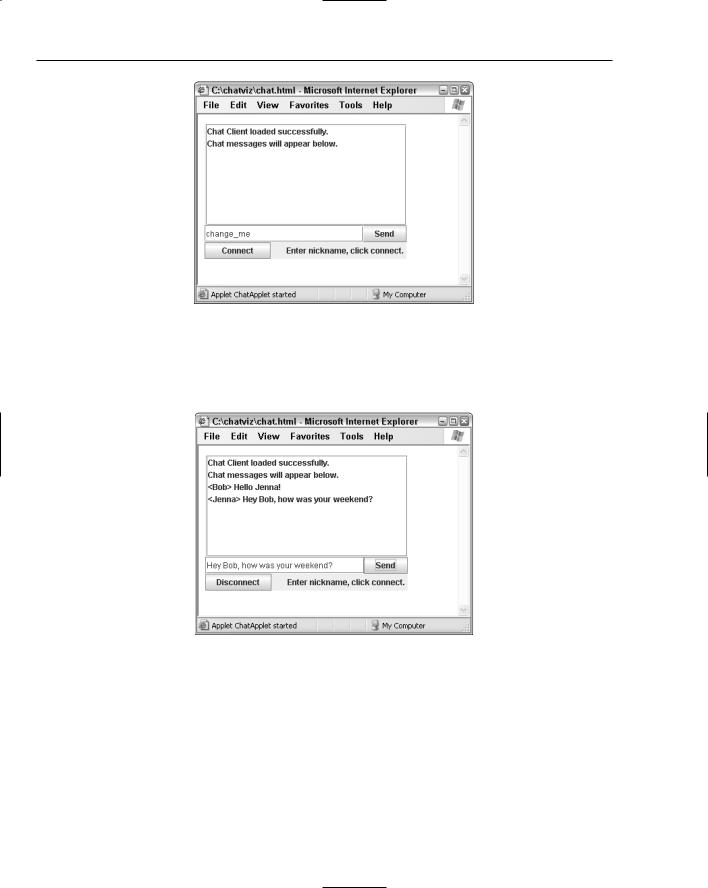
The RMIChat example that I will discuss here shows you how to create a chat server, a chat applet, and how to register the objects with the RMI registry. The RMIChat example allows multiple users to communicate with each other via an applet that is embedded in a Web browser. A single server will be used for communication. The following illustration, Figure 10-3, shows the graphical user interface (GUI) of the RMIChat application.
453
Chapter 10
Figure 10-3
Figure 10-4 shows the chat application being used by multiple users at the same time from different browsers. There are two users, Bob and Jenna, who are currently using the chat application. This is Jenna’s view of the application.
Figure 10-4
This type of design would normally require an enormous amount of upfront socket work just to establish the communication layer that RMI provides you with. It is pretty amazing how fast you can build your own chat application with little effort. So, with that said, dive into the example and explore the different classes and methods that it uses to achieve its communication and presentation goals.
RMIChat Interface
This RMIChat interface is the interface that exposes the methods that can be accessed remotely by RMI clients. For this interface to function properly, it must extend the java.rmi.Remote interface. This interface will be used by the RMIChatImpl as a guideline for implementation.
454

Communicating between Java Components with RMI and EJB
You should also take note that all the methods that will be exposed remotely to RMI clients must throw RemoteExceptions. RemoteExceptions are what the RMI clients will receive when an error occurs during communication with the RMI server:
import java.rmi.Remote;
import java.rmi.RemoteException; import java.util.ArrayList;
/**
* RMIChat is the main remote interface for the RMIChat application. */
public interface RMIChat extends Remote {
public ChatUser logIn(String sNickName) throws RemoteException; public boolean logOut(ChatUser cu) throws RemoteException;
void sendMessage(String sMessage, ChatUser cu) throws RemoteException; String getMessage() throws RemoteException;
ChatUser findUser(String sNickName)throws RemoteException;
ArrayList getUsers() throws RemoteException;
int getUserCount() throws RemoteException;
}
RMIChatImpl Class
The RMIChatImpl class is the class that is the implementation of the RMIChat interface. It defines each of the methods that exist in the RMIChat interface and its primary purpose is to act as a server for connecting RMIClients. So when new chat sessions are created via the chat applet, they will communicate with the RMIChatImpl class. This class is also registered with the RMI registry so that clients can look it up in the registry and obtain a remote object to the class:
import java.rmi.RemoteException;
import java.rmi.server.UnicastRemoteObject; import java.rmi.Naming;
import java.rmi.RMISecurityManager;
import java.util.ArrayList;
/*
* The RMIChatImpl class is the implementation of the RMIChat interface class. */
public class RMIChatImpl extends UnicastRemoteObject implements RMIChat {
private String m_sServerName; private String m_sLastMsg; private int nGUID;
public ArrayList m_alUsers;
The RMIChatImpl class implements the RMIChat interface and begins to define its methods. In case you haven’t noticed, the class also extends the UnicastRemoteObject. The reason for this is that RMI requires
455