

CHAPTER 10 USING THE WEB WORKERS API
log("error: " + e.message);
}
Coding the blurWorker.js Web Worker Script
Next, we add the code that our workers use to communicate with the page to the file blurWorker.js (see Listing 10-6). As the Web Workers finish blocks of computation, they can use postMessage to inform the page that they have made progress. We will use this information to update the image displayed on the main page. After creation, our Web Workers wait for a message containing image data and the instruction to commence blurring. This message is a JavaScript object containing the type of message and the image data represented as an array of Numbers.
Listing 10-6. Sending and Handling Image Data in the File blurWorker.js
function sendStatus(statusText) { postMessage({"type" : "status",
"statusText" : statusText} );
}
function messageHandler(e) {
var messageType = e.data.type; switch (messageType) {
case ("blur"):
sendStatus("Worker started blur on data in range: " +
e.data.startX + "-" + (e.data.startX+e.data.width)); var imageData = e.data.imageData;
imageData = boxBlur(imageData, e.data.width, e.data.height, e.data.startX);
postMessage({"type" : "progress", "imageData" : imageData, "width" : e.data.width, "height" : e.data.height, "startX" : e.data.startX
});
sendStatus("Finished blur on data in range: " +
e.data.startX + "-" + (e.data.width+e.data.startX));
break;
default:
sendStatus("Worker got message: " + e.data);
}
}
addEventListener("message", messageHandler, true);
Communicating with the Web Workers
In the file blur.html, we can use our workers by sending them some data and arguments that represent a blur task. This is done by using postMessage to send a JavaScript object containing the Array of RGBA image data, the dimensions of the source image, and the range of pixels for which the worker is responsible. Each worker processes a different section of the image based on the message it receives:
254

CHAPTER 10 USING THE WEB WORKERS API
function sendBlurTask(worker, i, chunkWidth) { var chunkHeight = image.height;
var chunkStartX = i * chunkWidth; var chunkStartY = 0;
var data = ctx.getImageData(chunkStartX, chunkStartY, chunkWidth, chunkHeight).data;
worker.postMessage({'type' : 'blur', 'imageData' : data, 'width' : chunkWidth, 'height' : chunkHeight, 'startX' : chunkStartX});
}
Canvas Image Data
Frank says: “postMessage is specified to allow efficient serialization of imageData objects for use with the canvas API. Some browsers that include the Worker and postMessage APIs may not support the extended serialization capabilities of postMessage yet.
Because of this, our image processing example presented in this chapter sends imageData.data (which serializes like a JavaScript Array) instead of sending the imageData object itself. As the Web Workers compute their tasks, they communicate their status and results back to the page. Listing 10-6 shows how data is sent from the worker(s) to the page after the blur filter has processed it. Again, the message contains a JavaScript object with fields for image data and coordinates marking the boundaries of the processed section.”
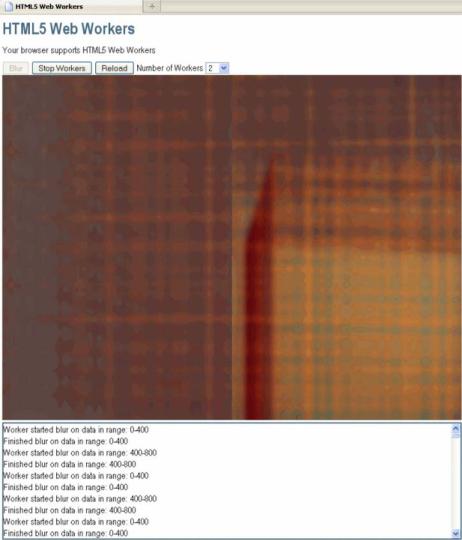
On the HTML page side, a message handler consumes this data and uses it to update the canvas with the new pixel values. As processed image data comes in, the result is immediately visible. We now have a sample application that can process images while potentially taking advantage of multiple CPU cores. Moreover, we didn’t lock up the UI and make it unresponsive while the Web Workers were active. Figure 10-7 shows the application in action.
255
CHAPTER 10 USING THE WEB WORKERS API
Figure 10-7. The blur application in action
The Application in Action
To see this example in action, the page blur.html has to be served up by a web server (for example, Apache or Python’s SimpleHTTPServer). To following steps show how you can use Python SimpleHTTPServer to run the application:
1.Install Python.
256
v
CHAPTER 10 USING THE WEB WORKERS API
2.Navigate to the directory that contains the example file (blur.html).
3.Start Python as follows:
python -m SimpleHTTPServer 9999
4.Open a browser and navigate to http://localhost:9999/blur.html. You should now see the page shown in Figure 10-7.
5.If you leave it running for a while, you will see the different quadrants of the image blur slowly. The number of quadrants that blur at the same time depends on the number of workers you started.
Example Code
For completeness, Listings 10-7, 10-8, and 10-9 contain the full code for the example application.
Listing 10-7. Content of the File blur.html
<!DOCTYPE html>
<title>Web Workers</title>
<link rel="stylesheet" href = "styles.css">
<h1>Web Workers</h1>
<p id="status">Your browser does not support Web Workers.</p>
<button id="startBlurButton" disabled>Blur</button> <button id="stopButton" disabled>Stop Workers</button>
<button onclick="document.location = document.location;">Reload</button>
<label for="workerCount">Number of Workers</label> <select id="workerCount">
<option>1</option>
<option selected>2</option> <option>4</option> <option>8</option> <option>16</option>
</select>
<div id="imageContainer"></div> <div id="logOutput"></div> <script>
var imageURL = "example2.png"; var image;
var ctx;
var workers = [];
function log(s) {
var logOutput = document.getElementById("logOutput");
257
CHAPTER 10 USING THE WEB WORKERS API
logOutput.innerHTML = s + "<br>" + logOutput.innerHTML;
}
function setRunningState(p) {
// while running, the stop button is enabled and the start button is not document.getElementById("startBlurButton").disabled = p; document.getElementById("stopButton").disabled = !p;
}
function initWorker(src) {
var worker = new Worker(src); worker.addEventListener("message", messageHandler, true); worker.addEventListener("error", errorHandler, true); return worker;
}
function startBlur() {
var workerCount = parseInt(document.getElementById("workerCount").value); var width = image.width/workerCount;
for (var i=0; i<workerCount; i++) {
var worker = initWorker("blurWorker.js"); worker.index = i;
worker.width = width; workers[i] = worker;
sendBlurTask(worker, i, width);
}
setRunningState(true);
}
function sendBlurTask(worker, i, chunkWidth) { var chunkHeight = image.height;
var chunkStartX = i * chunkWidth; var chunkStartY = 0;
var data = ctx.getImageData(chunkStartX, chunkStartY, chunkWidth, chunkHeight).data;
worker.postMessage({'type' : 'blur', 'imageData' : data, 'width' : chunkWidth, 'height' : chunkHeight, 'startX' : chunkStartX});
}
function stopBlur() {
for (var i=0; i<workers.length; i++) { workers[i].terminate();
}
setRunningState(false);
}
258
CHAPTER 10 USING THE WEB WORKERS API
function messageHandler(e) {
var messageType = e.data.type; switch (messageType) {
case ("status"): log(e.data.statusText); break;
case ("progress"):
var imageData = ctx.createImageData(e.data.width, e.data.height);
for (var i = 0; i<imageData.data.length; i++) { var val = e.data.imageData[i];
if (val === null || val > 255 || val < 0) { log("illegal value: " + val + " at " + i); return;
}
imageData.data[i] = val;
}
ctx.putImageData(imageData, e.data.startX, 0);
// blur the same tile again
sendBlurTask(e.target, e.target.index, e.target.width); break;
default:
break;
}
}
function errorHandler(e) { log("error: " + e.message);
}
function loadImageData(url) {
var canvas = document.createElement('canvas'); ctx = canvas.getContext('2d');
image = new Image(); image.src = url;
document.getElementById("imageContainer").appendChild(canvas);
image.onload = function(){ canvas.width = image.width; canvas.height = image.height; ctx.drawImage(image, 0, 0);
window.imgdata = ctx.getImageData(0, 0, image.width, image.height); n = ctx.createImageData(image.width, image.height); setRunningState(false);
log("Image loaded: " + image.width + "x" + image.height + " pixels");
};
}
259
CHAPTER 10 USING THE WEB WORKERS API
function loadDemo() { log("Loading image data");
if (typeof(Worker) !== "undefined") {
document.getElementById("status").innerHTML = "Your browser supports Web Workers";
document.getElementById("stopButton").onclick = stopBlur; document.getElementById("startBlurButton").onclick = startBlur;
loadImageData(imageURL);
document.getElementById("startBlurButton").disabled = true; document.getElementById("stopButton").disabled = true;
}
}
window.addEventListener("load", loadDemo, true); </script>
Listing 10-8. Content of the File blurWorker.js
importScripts("blur.js");
function sendStatus(statusText) { postMessage({"type" : "status",
"statusText" : statusText} );
}
function messageHandler(e) {
var messageType = e.data.type; switch (messageType) {
case ("blur"):
sendStatus("Worker started blur on data in range: " +
e.data.startX + "-" + (e.data.startX+e.data.width)); var imageData = e.data.imageData;
imageData = boxBlur(imageData, e.data.width, e.data.height, e.data.startX);
postMessage({"type" : "progress", "imageData" : imageData, "width" : e.data.width, "height" : e.data.height, "startX" : e.data.startX
});
sendStatus("Finished blur on data in range: " +
e.data.startX + "-" + (e.data.width+e.data.startX));
break;
default:
sendStatus("Worker got message: " + e.data);
}
}
260