

CHAPTER 7 USING THE WEBSOCKET API
Now that we’ve got a working echo server, we need to write the client side. The web browsers implement the connecting half of the WebSocket Protocol. We can use the API from JavaScript to communicate with our simple server.
Using the WebSocket API
In this section, we’ll explore the use of WebSocket in more detail.
Checking for Browser Support
Before you use the WebSocket API, you will want to make sure there is support in the browser for what you’re about to do. This way, you can provide some alternate text, prompting the users of your application to upgrade to a more up-to-date browser. Listing 7-7 shows one way you can test for browser support.
Listing 7-7. Checking for Browser Support
function loadDemo() {
if (window.WebSocket) {
document.getElementById("support").innerHTML = "HTML5 WebSocket is supported in your browser.";
} else {
document.getElementById("support").innerHTML = "HTML5 WebSocket is not supported in your browser.";
}
}
In this example, you test for browser support in the loadDemo function, which might be called when the application’s page is loaded. A call to window.WebSocket will return the WebSocket object if it exists, or trigger the failure case if it does not. In this case, the page is updated to reflect whether there is browser support or not by updating a previously defined support element on the page with a suitable message.
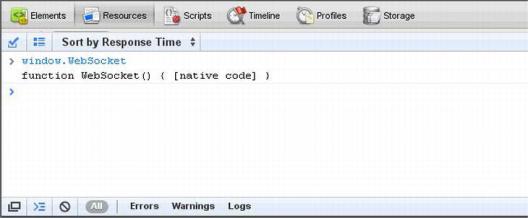
Another way to see if WebSocket is supported in your browser, is to use the browser’s console (Firebug or Chrome Developer Tools for example). Figure 7-7 shows how you can test whether WebSocket is supported natively in Google Chrome (if it is not, the window.WebSocket command returns “undefined.”)
176
CHAPTER 7 USING THE WEBSOCKET API
Figure 7-7. Testing WebSocket support in Google Chrome Developer Tools
Basic API Usage
The sample code for the following examples is located on the book web site in the WebSocket section. This folder contains a websocket.html file and a broadcast.html file (and a tracker.html file used in the following section) as well as the WebSocket server code shown previously that can be run in Python.
Creating a WebSocket object and Connecting to a WebSocket Server
Using the WebSocket interface is straight-forward. To connect to an end-point, just create a new WebSocket instance, providing the new object with a URL that represents the end-point to which you wish to connect. You can use the ws:// and wss:// prefixes to indicate a WebSocket and a WebSocket Secure connection, respectively.
url = "ws://localhost:8080/echo"; w = new WebSocket(url);
When connecting a WebSocket, you have the option of listing the protocols your application can speak. The second argument to the WebSocket constructor can be a string or array of strings with the names of the “subprotocols” that your application understands and wishes to use to communicate.
w = new WebSocket(url, protocol);
You can even list several protocols:
w = new WebSocket(url, [“proto1”, “proto2”]);
Hypothetically, proto1 and proto2 are well defined, perhaps even registered and standardized, protocol names that both the client and server can understand. The server will select a preferred protocol from the list. When the socket opens, its protocol property will contain the protocol that the server chose.
onopen = function(e) {
// determine which protocol the server selected
177
CHAPTER 7 USING THE WEBSOCKET API
log(e.target.protocol)
}
Protocols you might use include Extensible Messaging and Presence Protocol (XMPP, or Jabber), Advanced Message Queuing Protocol (AMQP), Remote Frame Buffer (RFB, or VNC) and Streaming Text Oriented Messaging Protocol (STOMP). These are real-world protocols spoken by many clients and servers. Using a standard protocol ensures interoperability between web applications and servers from different organizations. It also opens the door for public WebSocket services. You can speak to a server using a known protocol. Client applications that understand the same protocol can then connect and participate.
This example does not use a standard protocol. We aren’t introducing external dependencies or taking the space to implement a complete standard protocol. As an example, it uses the WebSocket API directly, just as you would if you were starting to write code for a new protocol.
Adding Event Listeners
WebSocket programming follows an asynchronous programming model; once you have an open socket, you simply wait for events. You don’t have to actively poll the server anymore. To do this, you add callback functions to the WebSocket object to listen for events.
A WebSocket object dispatches three events: open, close, and message. The open event fires when a connection is established, the message event fires when messages are received, and the close event fires when the WebSocket connection is closed. The error event fires in response to unexpected failure. As in most JavaScript APIs, there are corresponding callbacks (onopen, onmessage, onclose, and onerror) that are called when the events are dispatched.
w.onopen = function() { log("open");
w.send("thank you for accepting this websocket request");
}
w.onmessage = function(e) { log(e.data);
}
w.onclose = function(e) { log("closed");
}
w.onerror = function(e) { log(“error”);
}
Let’s have another look at that message handler. The data attribute on the message event is a string if the WebSocket protocol message was encoded as text. For binary messages, data can be either a Blob or an ArrayBuffer, depending on the value of the WebSocket’s binaryType property.
w.binaryType = "arraybuffer"; w.onmessage = function(e) {
// data can now be either a string or an ArrayBuffer log(e.data);
}
178
CHAPTER 7 USING THE WEBSOCKET API
Sending Messages
While the socket is open (that is, after the onopen listener is called and before the onclose listener is called), you can use the send function to send messages. After sending one or more messages, you can also call close to terminate the connection, or you can also leave the connection open.
document.getElementById("sendButton").onclick = function() { w.send(document.getElementById("inputMessage").value);
}
That’s it. Bidirectional browser communication made simple. For completeness, Listing 7-8 shows the entire HTML page with the WebSocket code.
In more advanced uses of WebSocket, you may want to measure how much data is backed up in the outgoing buffer before calling send(). The bufferedAmount attribute represents the number of bytes that have been sent on the WebSocket that have not yet been written onto the network. This could be useful for throttling the rate at which the application sends data.
document.getElementById("sendButton").onclick = function() { if (w.bufferedAmount < bufferThreshold) {
w.send(document.getElementById("inputMessage").value);
}
}
In addition to strings, WebSocket can send binary data. This is especially useful to implement binary protocols, such as the standard Internet protocols typically layered on top of TCP. The WebSocket API supports sending Blob and ArrayBuffer instances as binary data.
var a = new Uint8Array([8,6,7,5,3,0,9]); w.send(a.buffer);
Listing 7-8. websocket.html Code
<!DOCTYPE html>
<title>WebSocket Test Page</title>
<script>
var log = function(s) {
if (document.readyState !== "complete") { log.buffer.push(s);
} else {
document.getElementById("output").textContent += (s + "\n")
}
}
log.buffer = [];
if (this.MozWebSocket) { WebSocket = MozWebSocket;
}
url = "ws://localhost:8080/echo"; w = new WebSocket(url);
w.onopen = function() {
179
CHAPTER 7 USING THE WEBSOCKET API
log("open");
//set the type of binary data messages to ArrayBuffer w.binaryType = "arraybuffer";
//send one string and one binary message when the socket opens w.send("thank you for accepting this WebSocket request");
var a = new Uint8Array([8,6,7,5,3,0,9]); w.send(a.buffer);
}
w.onmessage = function(e) { log(e.data.toString());
}
w.onclose = function(e) { log("closed");
}
w.onerror = function(e) { log("error");
}
window.onload = function() { log(log.buffer.join("\n"));
document.getElementById("sendButton").onclick = function() { w.send(document.getElementById("inputMessage").value);
}
}
</script>
<input type="text" id="inputMessage" value="Hello, WebSocket!"><button id="sendButton">Send</button>
<pre id="output"></pre>
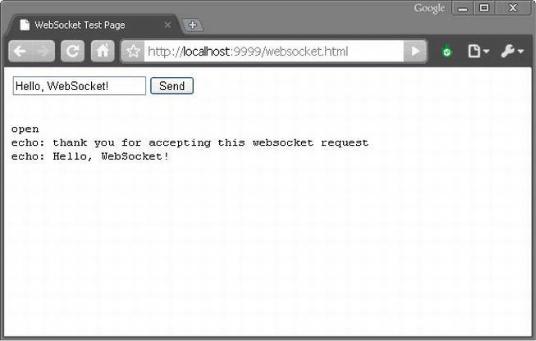
Running the WebSocket Page
To test the websocket.html page that contains the WebSocket code, open a command prompt, navigate to the folder that contains the WebSocket code, and issue the following command to host the HTML file:
python -m SimpleHTTPServer 9999
Next, open another command prompt, navigate to the folder that contains the WebSocket code, and issue the following command to run the Python WebSocket server:
python websocket.py
Finally, open a browser that supports WebSocket natively and navigate to
http://localhost:9999/websocket.html.
Figure 7-8 shows the web page in action.
180
CHAPTER 7 USING THE WEBSOCKET API
Figure 7-8. websocket.html in action
The example code folder also contains a web page that connects to the broadcast service that was created in the previous section. To see that action, close the command prompt that is running the WebSocket server and navigate to the folder that contains the WebSocket code, and issue the following command to run the python WebSocket server.
python broadcast.py
Open two separate browsers that supports WebSocket natively and navigate (in each browser) to http://localhost:9999/broadcast.html.
Figure 7-9 shows the broadcast WebSocket server in action on two separate web pages.
181