
- •Contents at a Glance
- •Contents
- •Foreword
- •About the Authors
- •About the Technical Reviewer
- •Acknowledgments
- •Introduction
- •Who This Book Is For
- •An Overview of This Book
- •Example Code and Companion Web Site
- •Contacting the Authors
- •Overview of HTML5
- •The Story So Far—The History of HTML5
- •The Myth of 2022 and Why It Doesn’t Matter
- •Who Is Developing HTML5?
- •A New Vision
- •Compatibility and Paving the Cow Paths
- •Utility and the Priority of Constituencies
- •Interoperability Simplification
- •Universal Access
- •A Plugin–Free Paradigm
- •What’s In and What’s Out?
- •What’s New in HTML5?
- •New DOCTYPE and Character Set
- •New and Deprecated Elements
- •Semantic Markup
- •Simplifying Selection Using the Selectors API
- •JavaScript Logging and Debugging
- •window.JSON
- •DOM Level 3
- •Monkeys, Squirrelfish, and Other Speedy Oddities
- •Summary
- •Using the Canvas API
- •Overview of HTML5 Canvas
- •History
- •What Is a Canvas?
- •Canvas Coordinates
- •When Not to Use Canvas
- •Fallback Content
- •CSS and Canvas
- •Browser Support for HTML5 Canvas
- •Using the HTML5 Canvas APIs
- •Checking for Browser Support
- •Adding a Canvas to a Page
- •Applying Transformations to Drawings
- •Working with Paths
- •Working with Stroke Styles
- •Working with Fill Styles
- •Filling Rectangular Content
- •Drawing Curves
- •Inserting Images into a Canvas
- •Using Gradients
- •Using Background Patterns
- •Scaling Canvas Objects
- •Using Canvas Transforms
- •Using Canvas Text
- •Applying Shadows
- •Working with Pixel Data
- •Implementing Canvas Security
- •Building an Application with HTML5 Canvas
- •Practical Extra: Full Page Glass Pane
- •Practical Extra: Timing Your Canvas Animation
- •Summary
- •Working with Scalable Vector Graphics
- •Overview of SVG
- •History
- •Understanding SVG
- •Scalable Graphics
- •Creating 2D Graphics with SVG
- •Adding SVG to a Page
- •Simple Shapes
- •Transforming SVG Elements
- •Reusing Content
- •Patterns and Gradients
- •SVG Paths
- •Using SVG Text
- •Putting the Scene Together
- •Building an Interactive Application with SVG
- •Adding Trees
- •Adding the updateTrees Function
- •Adding the removeTree Function
- •Adding the CSS Styles
- •The Final Code
- •Summary
- •Working with Audio and Video
- •Overview of Audio and Video
- •Video Containers
- •Audio and Video Codecs
- •Audio and Video Restrictions
- •Browser Support for Audio and Video
- •Using the Audio and Video API
- •Checking for Browser Support
- •Accessibility
- •Understanding Media Elements
- •Working with Audio
- •Working with Video
- •Practical Extras
- •Summary
- •Using the Geolocation API
- •About Location Information
- •Latitude and Longitude Coordinates
- •Where Does Location Information Come From?
- •IP Address Geolocation Data
- •GPS Geolocation Data
- •Wi-Fi Geolocation Data
- •Cell Phone Geolocation Data
- •User–Defined Geolocation Data
- •Browser Support for Geolocation
- •Privacy
- •Triggering the Privacy Protection Mechanism
- •Dealing with Location Information
- •Using the Geolocation API
- •Checking for Browser Support
- •Position Requests
- •Building an Application with Geolocation
- •Writing the HTML Display
- •Processing the Geolocation Data
- •The Final Code
- •Practical Extras
- •What’s My Status?
- •Show Me on a Google Map
- •Summary
- •Using the Communication APIs
- •Cross Document Messaging
- •Understanding Origin Security
- •Browser Support for Cross Document Messaging
- •Using the postMessage API
- •Building an Application Using the postMessage API
- •XMLHttpRequest Level 2
- •Cross-Origin XMLHttpRequest
- •Progress Events
- •Browser Support for HTML5 XMLHttpRequest Level 2
- •Using the XMLHttpRequest API
- •Building an Application Using XMLHttpRequest
- •Practical Extras
- •Structured Data
- •Framebusting
- •Summary
- •Using the WebSocket API
- •Overview of WebSocket
- •Real-Time and HTTP
- •Understanding WebSocket
- •Writing a Simple Echo WebSocket Server
- •Using the WebSocket API
- •Checking for Browser Support
- •Basic API Usage
- •Building a WebSocket Application
- •Coding the HTML File
- •Adding the WebSocket Code
- •Adding the Geolocation Code
- •Putting It All Together
- •The Final Code
- •Summary
- •Using the Forms API
- •Overview of HTML5 Forms
- •HTML Forms Versus XForms
- •Functional Forms
- •Browser Support for HTML5 Forms
- •An Input Catalog
- •Using the HTML5 Forms APIs
- •New Form Attributes and Functions
- •Checking Forms with Validation
- •Validation Feedback
- •Building an Application with HTML5 Forms
- •Practical Extras
- •Summary
- •Working with Drag-and-Drop
- •Web Drag-and-Drop: The Story So Far
- •Overview of HTML5 Drag-and-Drop
- •The Big Picture
- •Events to Remember
- •Drag Participation
- •Transfer and Control
- •Building an Application with Drag-and-Drop
- •Getting Into the dropzone
- •Handling Drag-and-Drop for Files
- •Practical Extras
- •Customizing the Drag Display
- •Summary
- •Using the Web Workers API
- •Browser Support for Web Workers
- •Using the Web Workers API
- •Checking for Browser Support
- •Creating Web Workers
- •Loading and Executing Additional JavaScript
- •Communicating with Web Workers
- •Coding the Main Page
- •Handling Errors
- •Stopping Web Workers
- •Using Web Workers within Web Workers
- •Using Timers
- •Example Code
- •Building an Application with Web Workers
- •Coding the blur.js Helper Script
- •Coding the blur.html Application Page
- •Coding the blurWorker.js Web Worker Script
- •Communicating with the Web Workers
- •The Application in Action
- •Example Code
- •Summary
- •Using the Storage APIs
- •Overview of Web Storage
- •Browser Support for Web Storage
- •Using the Web Storage API
- •Checking for Browser Support
- •Setting and Retrieving Values
- •Plugging Data Leaks
- •Local Versus Session Storage
- •Other Web Storage API Attributes and Functions
- •Communicating Web Storage Updates
- •Exploring Web Storage
- •Building an Application with Web Storage
- •The Future of Browser Database Storage
- •The Web SQL Database
- •The Indexed Database API
- •Practical Extras
- •JSON Object Storage
- •A Window into Sharing
- •Summary
- •Overview of HTML5 Offline Web Applications
- •Browser Support for HTML5 Offline Web Applications
- •Using the HTML5 Application Cache API
- •Checking for Browser Support
- •Creating a Simple Offline Application
- •Going Offline
- •Manifest Files
- •The ApplicationCache API
- •Application Cache in Action
- •Building an Application with HTML5 Offline Web Applications
- •Creating a Manifest File for the Application Resources
- •Creating the HTML Structure and CSS for the UI
- •Creating the Offline JavaScript
- •Check for ApplicationCache Support
- •Adding the Update Button Handler
- •Add Geolocation Tracking Code
- •Adding Storage Code
- •Adding Offline Event Handling
- •Summary
- •The Future of HTML5
- •Browser Support for HTML5
- •HTML Evolves
- •WebGL
- •Devices
- •Audio Data API
- •Touchscreen Device Events
- •Peer-to-Peer Networking
- •Ultimate Direction
- •Summary
- •Index

CHAPTER 10 USING THE WEB WORKERS API
Building an Application with Web Workers
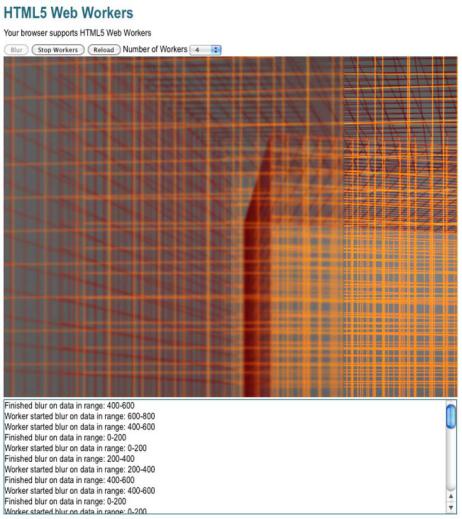
So far, we’ve focused on using the different Web Worker APIs. Let’s see how powerful the Web Workers API can really be by building an application: a web page with an image-blurring filter, parallelized to run on multiple Web Workers. Figure 10-5 shows what this application looks like when you start it.
Figure 10-5. Web Worker–based web page with image-blurring filter
This application sends image data from a canvas to several Web Workers (you can specify how many). The Web Workers then process the image with a simple box-blur filter. This may take several seconds, depending on the size of the image and the computational resources available (even machines
250

CHAPTER 10 USING THE WEB WORKERS API
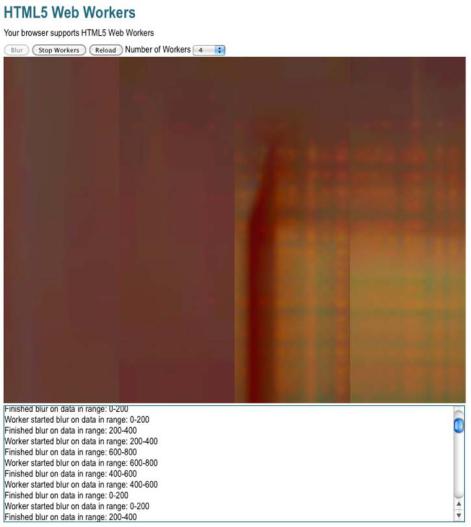
with fast CPUs may have load from other processes, causing JavaScript execution to take more wallclock time to complete). Figure 10-6 shows the same page after running the blur filtering process for a while.
Figure 10-6. Image-blurring web page after running for a while
However, because the heavy lifting takes place in Web Workers, there is no danger of slow-script warnings and, therefore, no need to manually partition the task into scheduled slices—something you would have to consider if you could not use Web Workers.
251
CHAPTER 10 USING THE WEB WORKERS API
Coding the blur.js Helper Script
Inside the blur.js application page, we can use a straightforward implementation of a blur filter that loops until it has completely processed its input, as shown in Listing 10-4.
Listing 10-4. A JavaScript Box-blur Implementation in the File blur.js
function inRange(i, width, height) {
return ((i>=0) && (i < width*height*4));
}
function averageNeighbors(imageData, width, height, i) { var v = imageData[i];
// cardinal directions
var north = inRange(i-width*4, width, height) ? imageData[i-width*4] : v; var south = inRange(i+width*4, width, height) ? imageData[i+width*4] : v; var west = inRange(i-4, width, height) ? imageData[i-4] : v;
var east = inRange(i+4, width, height) ? imageData[i+4] : v;
// diagonal neighbors
var ne = inRange(i-width*4+4, width, height) ? imageData[i-width*4+4] : v; var nw = inRange(i-width*4-4, width, height) ? imageData[i-width*4-4] : v; var se = inRange(i+width*4+4, width, height) ? imageData[i+width*4+4] : v; var sw = inRange(i+width*4-4, width, height) ? imageData[i+width*4-4] : v;
// average
var newVal = Math.floor((north + south + east + west + se + sw + ne + nw + v)/9);
if (isNaN(newVal)) {
sendStatus("bad value " + i + " for height " + height); throw new Error("NaN");
}
return newVal;
}
function boxBlur(imageData, width, height) { var data = [];
var val = 0;
for (var i=0; i<width*height*4; i++) {
val = averageNeighbors(imageData, width, height, i); data[i] = val;
}
return data;
}
In brief, this algorithm blurs an image by averaging nearby pixel values. For a large image with millions of pixels, this takes a substantial amount of time. It is very undesirable to run a loop such as this in the UI thread. Even if a slow-script warning did not appear, the page UI would be unresponsive until the loop terminated. For this reason, it makes a good example of background computation in Web Workers.
252
CHAPTER 10 USING THE WEB WORKERS API
Coding the blur.html Application Page
Listing 10-5 shows the code for the HTML page that calls the Web Worker. The HTML for this example is kept simple for reasons of clarity. The purpose here is not to build a beautiful interface, but to provide a simple skeleton that can control the Web Workers and demonstrate them in action. In this application, a canvas element that displays the input image is injected into the page. We have buttons to start blurring the image, stop blurring, reset the image, and specify the number of workers to spawn.
Listing 10-5. Code for the Page blur.html
<!DOCTYPE html>
<title>Web Workers</title>
<link rel="stylesheet" href = "styles.css">
<h1>Web Workers</h1>
<p id="status">Your browser does not support Web Workers.</p>
<button id="startBlurButton" disabled>Blur</button> <button id="stopButton" disabled>Stop Workers</button>
<button onclick="document.location = document.location;">Reload</button>
<label for="workerCount">Number of Workers</label> <select id="workerCount">
<option>1</option>
<option selected>2</option> <option>4</option> <option>8</option> <option>16</option>
</select>
<div id="imageContainer"></div> <div id="logOutput"></div>
Next, let’s add the code to create workers to the file blur.html. We instantiate a worker object, passing in a URL of a JavaScript file. Each instantiated worker will run the same code but be responsible for processing different parts of the input image:
function initWorker(src) {
var worker = new Worker(src); worker.addEventListener("message", messageHandler, true); worker.addEventListener("error", errorHandler, true); return worker;
}
Let’s add the error handling code to the file blur.html, as follows. In the event of an error in the worker, the page will be able to display an error message instead of continuing unaware. Our example shouldn’t encounter any trouble, but listening for error events is generally a good practice and is invaluable for debugging.
function errorHandler(e) {
253