
- •Contents at a Glance
- •Contents
- •Foreword
- •About the Authors
- •About the Technical Reviewer
- •Acknowledgments
- •Introduction
- •Who This Book Is For
- •An Overview of This Book
- •Example Code and Companion Web Site
- •Contacting the Authors
- •Overview of HTML5
- •The Story So Far—The History of HTML5
- •The Myth of 2022 and Why It Doesn’t Matter
- •Who Is Developing HTML5?
- •A New Vision
- •Compatibility and Paving the Cow Paths
- •Utility and the Priority of Constituencies
- •Interoperability Simplification
- •Universal Access
- •A Plugin–Free Paradigm
- •What’s In and What’s Out?
- •What’s New in HTML5?
- •New DOCTYPE and Character Set
- •New and Deprecated Elements
- •Semantic Markup
- •Simplifying Selection Using the Selectors API
- •JavaScript Logging and Debugging
- •window.JSON
- •DOM Level 3
- •Monkeys, Squirrelfish, and Other Speedy Oddities
- •Summary
- •Using the Canvas API
- •Overview of HTML5 Canvas
- •History
- •What Is a Canvas?
- •Canvas Coordinates
- •When Not to Use Canvas
- •Fallback Content
- •CSS and Canvas
- •Browser Support for HTML5 Canvas
- •Using the HTML5 Canvas APIs
- •Checking for Browser Support
- •Adding a Canvas to a Page
- •Applying Transformations to Drawings
- •Working with Paths
- •Working with Stroke Styles
- •Working with Fill Styles
- •Filling Rectangular Content
- •Drawing Curves
- •Inserting Images into a Canvas
- •Using Gradients
- •Using Background Patterns
- •Scaling Canvas Objects
- •Using Canvas Transforms
- •Using Canvas Text
- •Applying Shadows
- •Working with Pixel Data
- •Implementing Canvas Security
- •Building an Application with HTML5 Canvas
- •Practical Extra: Full Page Glass Pane
- •Practical Extra: Timing Your Canvas Animation
- •Summary
- •Working with Scalable Vector Graphics
- •Overview of SVG
- •History
- •Understanding SVG
- •Scalable Graphics
- •Creating 2D Graphics with SVG
- •Adding SVG to a Page
- •Simple Shapes
- •Transforming SVG Elements
- •Reusing Content
- •Patterns and Gradients
- •SVG Paths
- •Using SVG Text
- •Putting the Scene Together
- •Building an Interactive Application with SVG
- •Adding Trees
- •Adding the updateTrees Function
- •Adding the removeTree Function
- •Adding the CSS Styles
- •The Final Code
- •Summary
- •Working with Audio and Video
- •Overview of Audio and Video
- •Video Containers
- •Audio and Video Codecs
- •Audio and Video Restrictions
- •Browser Support for Audio and Video
- •Using the Audio and Video API
- •Checking for Browser Support
- •Accessibility
- •Understanding Media Elements
- •Working with Audio
- •Working with Video
- •Practical Extras
- •Summary
- •Using the Geolocation API
- •About Location Information
- •Latitude and Longitude Coordinates
- •Where Does Location Information Come From?
- •IP Address Geolocation Data
- •GPS Geolocation Data
- •Wi-Fi Geolocation Data
- •Cell Phone Geolocation Data
- •User–Defined Geolocation Data
- •Browser Support for Geolocation
- •Privacy
- •Triggering the Privacy Protection Mechanism
- •Dealing with Location Information
- •Using the Geolocation API
- •Checking for Browser Support
- •Position Requests
- •Building an Application with Geolocation
- •Writing the HTML Display
- •Processing the Geolocation Data
- •The Final Code
- •Practical Extras
- •What’s My Status?
- •Show Me on a Google Map
- •Summary
- •Using the Communication APIs
- •Cross Document Messaging
- •Understanding Origin Security
- •Browser Support for Cross Document Messaging
- •Using the postMessage API
- •Building an Application Using the postMessage API
- •XMLHttpRequest Level 2
- •Cross-Origin XMLHttpRequest
- •Progress Events
- •Browser Support for HTML5 XMLHttpRequest Level 2
- •Using the XMLHttpRequest API
- •Building an Application Using XMLHttpRequest
- •Practical Extras
- •Structured Data
- •Framebusting
- •Summary
- •Using the WebSocket API
- •Overview of WebSocket
- •Real-Time and HTTP
- •Understanding WebSocket
- •Writing a Simple Echo WebSocket Server
- •Using the WebSocket API
- •Checking for Browser Support
- •Basic API Usage
- •Building a WebSocket Application
- •Coding the HTML File
- •Adding the WebSocket Code
- •Adding the Geolocation Code
- •Putting It All Together
- •The Final Code
- •Summary
- •Using the Forms API
- •Overview of HTML5 Forms
- •HTML Forms Versus XForms
- •Functional Forms
- •Browser Support for HTML5 Forms
- •An Input Catalog
- •Using the HTML5 Forms APIs
- •New Form Attributes and Functions
- •Checking Forms with Validation
- •Validation Feedback
- •Building an Application with HTML5 Forms
- •Practical Extras
- •Summary
- •Working with Drag-and-Drop
- •Web Drag-and-Drop: The Story So Far
- •Overview of HTML5 Drag-and-Drop
- •The Big Picture
- •Events to Remember
- •Drag Participation
- •Transfer and Control
- •Building an Application with Drag-and-Drop
- •Getting Into the dropzone
- •Handling Drag-and-Drop for Files
- •Practical Extras
- •Customizing the Drag Display
- •Summary
- •Using the Web Workers API
- •Browser Support for Web Workers
- •Using the Web Workers API
- •Checking for Browser Support
- •Creating Web Workers
- •Loading and Executing Additional JavaScript
- •Communicating with Web Workers
- •Coding the Main Page
- •Handling Errors
- •Stopping Web Workers
- •Using Web Workers within Web Workers
- •Using Timers
- •Example Code
- •Building an Application with Web Workers
- •Coding the blur.js Helper Script
- •Coding the blur.html Application Page
- •Coding the blurWorker.js Web Worker Script
- •Communicating with the Web Workers
- •The Application in Action
- •Example Code
- •Summary
- •Using the Storage APIs
- •Overview of Web Storage
- •Browser Support for Web Storage
- •Using the Web Storage API
- •Checking for Browser Support
- •Setting and Retrieving Values
- •Plugging Data Leaks
- •Local Versus Session Storage
- •Other Web Storage API Attributes and Functions
- •Communicating Web Storage Updates
- •Exploring Web Storage
- •Building an Application with Web Storage
- •The Future of Browser Database Storage
- •The Web SQL Database
- •The Indexed Database API
- •Practical Extras
- •JSON Object Storage
- •A Window into Sharing
- •Summary
- •Overview of HTML5 Offline Web Applications
- •Browser Support for HTML5 Offline Web Applications
- •Using the HTML5 Application Cache API
- •Checking for Browser Support
- •Creating a Simple Offline Application
- •Going Offline
- •Manifest Files
- •The ApplicationCache API
- •Application Cache in Action
- •Building an Application with HTML5 Offline Web Applications
- •Creating a Manifest File for the Application Resources
- •Creating the HTML Structure and CSS for the UI
- •Creating the Offline JavaScript
- •Check for ApplicationCache Support
- •Adding the Update Button Handler
- •Add Geolocation Tracking Code
- •Adding Storage Code
- •Adding Offline Event Handling
- •Summary
- •The Future of HTML5
- •Browser Support for HTML5
- •HTML Evolves
- •WebGL
- •Devices
- •Audio Data API
- •Touchscreen Device Events
- •Peer-to-Peer Networking
- •Ultimate Direction
- •Summary
- •Index
CHAPTER 10 USING THE WEB WORKERS API
Browser Support for Web Workers
The majority of the modern web browsers support Web Workers. Check the web site http://caniuse.com (search for Web Workers) for the most up-to-date support matrix. While there are polyfill (emulation) libraries available for most other APIs—for example, for HTML5 Canvas there are libraries such as excanvas.js and flashcanvas.js that provide an emulation of the Canvas APIs (using Flash under the covers)—an emulation for Web Workers does not make a lot of sense, however. You can either call your worker code as a worker, or run the same code inline in your page, blocking the UI thread. The improved responsiveness of the worker-based page may just be enough to have people upgrade to a more modern browser (at least we hope it will).
Using the Web Workers API
In this section, we’ll explore the use of the Web Workers API in more detail. For the sake of illustration, we’ve created a simple browser page: echo.html. Using Web Workers is fairly straightforward—you create a Web Worker object and pass in a JavaScript file to be executed. Inside the page you set up an event listener to listen to incoming messages and errors that are posted by the Web Worker and if you want to communicate from the page to the Web Worker, you call postMessage to pass in the required data. The same is true for the code in the Web Worker JavaScript file—event handlers must be set up to process incoming messages and errors, and communication with the page is handled with a call to postMessage.
Checking for Browser Support
Before you call the Web Workers API functions, you will want to make sure there is support in the browser for what you’re about to do. This way, you can provide some alternate text, prompting the users of your application to use a more up-to-date browser. Listing 10-1 shows the code you can use to test for browser support.
Listing 10-1. Checking for Browser Support
function loadDemo() {
if (typeof(Worker) !== "undefined") { document.getElementById("support").innerHTML =
"Excellent! Your browser supports Web Workers";
}
}
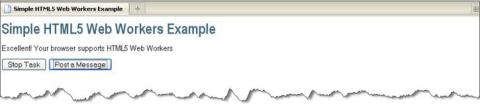
In this example, you test for browser support in the loadDemo function, which might be called when the page is loaded. A call to typeof(Worker) will return the window’s global Worker property, which will be undefined if the browser doesn’t support the Web Workers API. In this example, the page is updated to reflect whether there is browser support by updating a previously defined support element on the page with a suitable message, as shown at the top of Figure 10-2.
242

CHAPTER 10 USING THE WEB WORKERS API
Figure 10-2. Example of showing whether Web Workers is supported
Creating Web Workers
Web Workers are initialized with the URL of a JavaScript file, which contains the code the worker will execute. This code sets event listeners and communicates with the script that spawned it. The URL for the JavaScript file can be a relative or absolute URL with the same origin (the same scheme, host, and port) as the main page:
worker = new Worker("echoWorker.js");
Inline Workers
To start a worker you need to point to a file. You may have seen some examples of script elements that have the type javascript/worker, as shown in the following example:
<script id="myWorker" type="javascript/worker">
Don’t let this fool you into thinking that you can simply set the type of a script element to run the JavaScript code as a Web Worker. In this case, the type information is used to signal the browser and its JavaScript engine not to parse and run the script. In fact, the type may as well have been anything other than text/javascript. The script example shown is a building block for inline Web Workers—a feature that can be used only if your browser also supports the File System API (Blob Builder or File Writer). In that case you can programmatically find the script block (in the previous case, the element with the myWorker id) and write the Web Worker JavaScript file to disk. After that, you can call the inline Web Worker in your code.
Shared Workers
There is yet another type of worker, which is not widely supported at the time of this writing: the shared Web Worker. A shared Web Worker is like a normal Web Worker, but it can be shared across multiple pages on the same origin. Shared Web Workers introduce the notion of ports that are used for PostMessage communication. Shared Web Workers can be useful for data synchronization among multiple pages (or tabs) on the same origin or to share a long-lived resource (like a WebSocket) among several tabs.
The syntax for starting a shared Web Worker is as follows:
sharedWorker = new SharedWorker(sharedEchoWorker.js');
243
CHAPTER 10 USING THE WEB WORKERS API
Loading and Executing Additional JavaScript
An application composed of several JavaScript files can contain <script> elements that synchronously load JavaScript files as the page loads. However, because Web Workers do not have access to the document object, there is an alternative mechanism for synchronously importing additional JavaScript files from within workers—importScripts:
importScripts("helper.js");
Importing a JavaScript file simply loads and executes JavaScript into an existing worker. Multiple scripts can be imported by the same call to importScripts. They are executed in the order specified:
importScripts("helper.js", "anotherHelper.js");
Communicating with Web Workers
Once the Web Worker is spawned, you can use the postMessage API to send data to and from Web Workers. This is the same postMessage API that is used for cross-frame and cross-window communication. postMessage can be used to send most JavaScript objects, but not functions or objects with cyclic references.
Let’s say that you want to build a simple Web Worker example that allows users to send a message to a worker, which in turn echoes back the message. This example may not be very useful in real life, but it’s useful enough to explain the concepts you need to build more complex examples. Figure 10-3 shows this example web page and its Web Worker in action. The code for this simple page is listed at the end of this section.
244