

CHAPTER 1 OVERVIEW OF HTML5
We can now build great software to create and enjoy images, music, movies, and more. Even better, the software we make will be on and off the Web: a platform that is ubiquitous, empowering, and online.”
What’s New in HTML5?
Before we start programming HTML5, let’s take a quick look at what’s new in HTML5.
New DOCTYPE and Character Set
First of all, the DOCTYPE for web pages has been greatly simplified. Compare, for example, the following HTML4 DOCTYPEs:
<!DOCTYPE HTML PUBLIC "-//W3C//DTD HTML 4.01 Transitional//EN" "http://www.w3.org/TR/html4/loose.dtd">
Who could ever remember any of these? We certainly couldn’t. We would always just copy and paste some lengthy DOCTYPE into the page, always with a worry in the back of our minds, “Are you absolutely sure you pasted the right one?” HTML5 neatly solves this problem as follows:
<!DOCTYPE html>
Now that’s a DOCTYPE you might just remember. Like the new DOCTYPE, the character set declaration has also been abbreviated. It used to be
<meta http-equiv="Content-Type" content="text/html; charset=utf-8">
Now, it is:
<meta charset="utf-8">
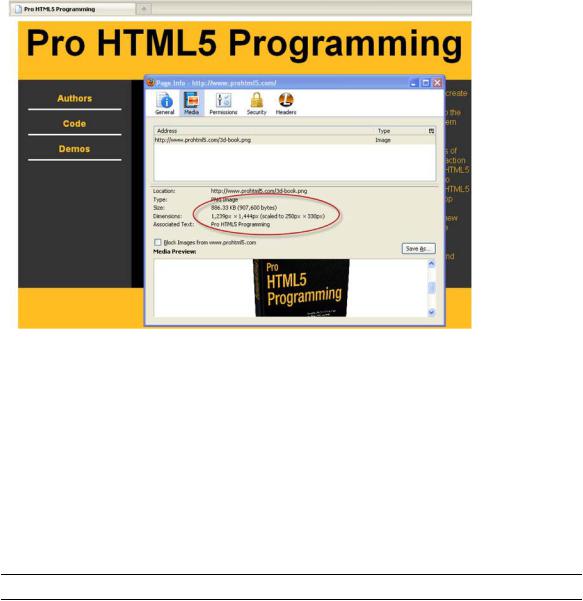
You can even leave off the quotation marks around “utf-8” if you want to. Using the new DOCTYPE triggers the browser to display pages in standards mode. For example, Figure 1-1 shows the information you will see if you open an HTML5 page in Firefox, and you click Tools Page Info. In this example, the page is rendered in standards mode.
8
CHAPTER 1 OVERVIEW OF HTML5
Figure 1-1. A page rendered in standards-compliant mode
When you use the new HTML5 DOCTYPE, it triggers browsers to render the page in standardscompliant mode. As you may know, Web pages can have different rendering modes, such as Quirks, Almost Standards, and Standards (or no-quirks) mode. The DOCTYPE indicates to the browser which mode to use and what rules are used to validate your pages. In Quirks mode, browsers try to avoid breaking pages and render them even if they are not entirely valid. HTML5 introduces new elements and has marked others as obsolete (more on this in the next section). If you use these obsolete elements, your page will not be valid. However, browsers will continue to render them as they used to.
New and Deprecated Elements
HTML5 introduces many new markup elements, which it groups into seven different content types. These are shown below in Table 1-1.
Table 1-1. HTML5 Content Types
Content Type |
Description |
Embedded |
Content that imports other resources into the document, for example audio, video, |
|
canvas, and iframe |
Flow |
Elements used in the body of documents and applications, for example form, h1, and |
|
small |
9

CHAPTER 1 OVERVIEW OF HTML5
Heading |
Section headers, for example h1, h2, and hgroup |
Interactive |
Content that users interact with, for example audio or video controls, button, and |
|
textarea |
Metadata |
Elements—commonly found in the head section— that set up the presentation or |
|
behavior of the rest of the document, for example script, style, and title |
Phrasing |
Text and text markup elements, for example mark, kbd, sub, and sup |
Sectioning |
Elements that define sections in the document, for example article, aside, and title |
|
|
Most of these elements can be styled with CSS. In addition, some of them, such as canvas, audio, and video, can be used by themselves, though they are accompanied by APIs that allow for fine-grained native programmatic control. These APIs will be discussed in much more detail later in this book.
It is beyond the scope of this book to discuss all these new elements, but most of the sectioning elements (discussed in the next section) are new. The canvas, audio, and video elements are also new in HTML5.
Likewise, we’re not going to provide an exhaustive list of all the deprecated tags (there are many good online resources online for this), but many of the elements that performed inline styling have been marked as obsolete in favor of using CSS, such as big, center, font, and basefont.
Semantic Markup
One content type that contains many new HTML5 elements is the sectioning content type. HTML5 defines a new semantic markup to describe an element’s content. Using semantic markup doesn’t provide any immediate benefits to the end user, but it does simplify the design of your HTML pages. What’s more, it will make your pages more machine-readable and accessible. For example, search and syndication engines will definitely be taking advantage of these elements as they crawl and index pages.
As we said before, HTML5 is all about paving the cow paths. Google and Opera analyzed millions of pages to discover the common ID names for DIV tags and found a huge amount of repetition. For example, since many people used DIV id="footer" to mark up footer content, HTML5 provides a set of new sectioning elements that you can use in modern browsers right now. Table 1-2 shows the different semantic markup elements.
Table 1-2. New Sectioning HTML5 Elements
Sectioning Element |
Description |
|
|
header |
Header content (for a page or a section of the page) |
footer |
Footer content (for a page or a section of the page) |
section |
A section in a web page |
article |
Independent article content |
10
CHAPTER 1 OVERVIEW OF HTML5
aside |
Related content or pull quotes |
nav |
Navigational aids |
|
|
All of these elements can be styled with CSS. In fact, as we described in the utility design principle earlier, HTML5 pushes the separation of content and presentation, so you have to style your page using CSS styles in HTML5. Listing 1-1 shows what an HTML5 page might look like. It uses the new DOCTYPE, character set, and semantic markup elements—in short, the new sectioning content. The code file (sample.html) is available in the code/intro folder.
Listing 1-1. An Example HTML5 Page
<!DOCTYPE html> <html>
<head>
<meta charset="utf-8" > <title>HTML5</title>
<link rel="stylesheet" href="html5.css"> </head>
<body>
<header>
<h1>Header</h1>
<h2>Subtitle</h2> <h4>HTML5 Rocks!</h4>
</header>
<div id="container"> <nav>
<h3>Nav</h3>
<a href="http://www.example.com">Link 1</a> <a href="http://www.example.com">Link 2</a> <a href="http://www.example.com">Link 3</a>
</nav>
<section>
<article>
<header>
<h1>Article Header</h1> </header>
<p>Lorem ipsum dolor HTML5 nunc aut nunquam sit amet, consectetur adipiscing elit. Vivamus at
est eros, vel fringilla urna.</p>
<p>Per inceptos himenaeos. Quisque feugiat, justo at vehicula pellentesque,
turpis
lorem dictum nunc.</p> <footer>
<h2>Article Footer</h2> </footer>
</article>
11
CHAPTER 1 OVERVIEW OF HTML5
<article>
<header>
<h1>Article Header</h1> </header>
<p>HTML5: "Lorem ipsum dolor nunc aut nunquam sit amet, consectetur adipiscing elit. Vivamus at est eros, vel fringilla urna. Pellentesque
odio</p>
<footer>
<h2>Article Footer</h2> </footer>
</article>
</section>
<aside>
<h3>Aside</h3>
<p>HTML5: "Lorem ipsum dolor nunc aut nunquam sit amet, consectetur adipiscing elit. Vivamus at est eros, vel fringilla urna. Pellentesque odio
rhoncus</p>
</aside>
<footer>
<h2>Footer</h2>
</footer>
</div>
</body>
</html>
Without styles, the page would be pretty dull to look at. Listing 1-2 shows some of the CSS code that can be used to style the content. The code file (html5.css) is available in the code/intro folder. This style sheet uses some of the new CSS3 features, such as rounded corners (border-radius) and rotate transformations (transform: rotate();). CSS3—just like HTML5 itself—is still under development, and it is modularized with subspecifications for easier browser uptake (for example, transformation, animation, and transition are all areas that are in separate subspecifications).
Experimental CSS3 features are prefixed with vendor strings to avoid namespace conflicts should the specifications change. To display rounded corners, gradients, shadows, and transformations, it is currently necessary to use prefixes such as -moz- (for Mozilla), o- (for Opera), -webkit- (for WebKitbased browsers such as Safari and Chrome), and -ms- (for Internet Explorer) in your declarations.
Listing 1-2. CSS File for the HTML5 Page
body {
background-color:#CCCCCC; font-family:Geneva,Arial,Helvetica,sans-serif; margin: 0px auto;
max-width:900px; border:solid; border-color:#FFFFFF;
}
header {
background-color: #F47D31; display:block; color:#FFFFFF; text-align:center;
12
CHAPTER 1 OVERVIEW OF HTML5
}
header h2 {
margin: 0px;
}
h1 {
font-size: 72px; margin: 0px;
}
h2 {
font-size: 24px; margin: 0px; text-align:center; color: #F47D31;
}
h3 {
font-size: 18px; margin: 0px; text-align:center; color: #F47D31;
}
h4 {
color: #F47D31; background-color: #fff;
-webkit-box-shadow: 2px 2px 20px #888; -webkit-transform: rotate(-45deg); -moz-box-shadow: 2px 2px 20px #888; -moz-transform: rotate(-45deg); position: absolute;
padding: 0px 150px; top: 50px;
left: -120px; text-align:center;
}
nav {
display:block;
width:25%;
float:left;
}
nav a:link, nav a:visited { display: block;
border-bottom: 3px solid #fff; padding: 10px; text-decoration: none; font-weight: bold;
13
CHAPTER 1 OVERVIEW OF HTML5
margin: 5px;
}
nav a:hover {
color: white; background-color: #F47D31;
}
nav h3 {
margin: 15px; color: white;
}
#container {
background-color: #888;
}
section { display:block; width:50%; float:left;
}
article {
background-color: #eee; display:block;
margin: 10px; padding: 10px;
-webkit-border-radius: 10px; -moz-border-radius: 10px; border-radius: 10px; -webkit-box-shadow: 2px 2px 20px #888; -webkit-transform: rotate(-10deg); -moz-box-shadow: 2px 2px 20px #888; -moz-transform: rotate(-10deg);
}
article header { -webkit-border-radius: 10px; -moz-border-radius: 10px; border-radius: 10px; padding: 5px;
}
article footer { -webkit-border-radius: 10px; -moz-border-radius: 10px; border-radius: 10px; padding: 5px;
}
14
CHAPTER 1 OVERVIEW OF HTML5
article h1 {
font-size: 18px;
}
aside {
display:block;
width:25%;
float:left;
}
aside h3 {
margin: 15px; color: white;
}
aside p {
margin: 15px; color: white; font-weight: bold; font-style: italic;
}
footer {
clear: both; display: block;
background-color: #F47D31; color:#FFFFFF; text-align:center; padding: 15px;
}
footer h2 {
font-size: 14px; color: white;
}
/* links */ a {
color: #F47D31;
}
a:hover {
text-decoration: underline;
}
15
CHAPTER 1 OVERVIEW OF HTML5
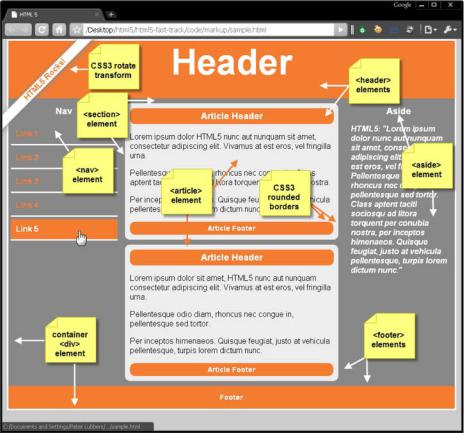
Figure 1-2 shows an example of the page in Listing 1-1, styled with CSS (and some CSS3) styles. Keep in mind, however, that there is no such thing as a typical HTML5 page. Anything goes, really, and this example uses many of the new tags mainly for purposes of demonstration.
Figure 1-2. An HTML5 page with all the new semantic markup elements
One last thing to keep in mind is that browsers may seem to render things as if they actually understand these new elements. The truth is, however, that these elements could have been renamed foo and bar and then styled, and they would have been rendered the same way (but of course, they would not have any benefits in search engine optimization). The one exception to this is Internet Explorer, which requires that elements be part of the DOM. So, if you want to see these elements in IE, you must programmatically insert them into the DOM and display them as block elements. A handy script that does that for you is html5shiv (http://code.google.com/p/html5shiv/).
16