

Примеры брендбуков / microsoft_windows-xp
.pdfWindows XP Visual Guidelines: Icons
To support trademark and Windows branding guidelines, we are not using Windows flag icons with the exception of the Windows update icon.
Common Icons
Common Toolbar Icons:
Step 2: Illustrate
To illustrate Windows XP-style icons, we recommend using a vector tool such as Freehand or Illustrator. Use the palette and style characteristics as outlined in the Icon Design Overview.
1.Illustrate your image using Freehand or Illustrator.
2.Create 3 sizes of the image. Because there will be a drop shadow added to the image later, you should create 3 sizes that are around 46x46, 30x30 and 14x14 pixels.
3.Copy and paste the vector images into Photoshop.
file:///C|/temp/icons.htm (5 of 11)28.02.2004 0:36:16
Windows XP Visual Guidelines: Icons
Note: Photoshop is the recommended image creation tool because the tool we use to create the .ico files, Gif Movie Gear, offers a direct import of Photoshop files. Any image created in Photoshop that uses the "RGB" mode has an alpha channel attached. If there is transparency in the image or layer, that channel becomes meaningful for icon purposes.
Step 3: Creating the 24-bit images
After pasting your vector files into Photoshop, the next step is to finalize the 24-bit images.
1.Once you've pasted your 3 sizes in Photoshop, check the readability and resolution of your images, especially at the 16x16 size. You may need to do some pixel-pushing. If the 16x16 is not reading clearly, consider going back to Freehand to simplify the image at that size.
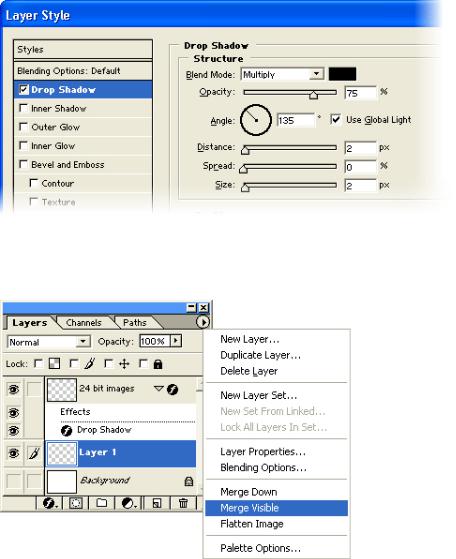
2.Add the drop shadow to your images by double-clicking on the image's layer and selecting Drop Shadow. Then change the angle to 135, Distance to 2 and Size to 2. The drop shadow is black at 75% opacity.
3.To merge the drop shadow and the 24-bit images together, create a new blank layer. In the Layers menu, select Merge Visible and merge the 3 layers together.
4.Create 3 new Photoshop files, one for each size: 48x48, 32x32 and 16x16 pixels. Copy and paste the appropriate image. If an image's drop shadow gets cropped, you should go back to Freehand and scale down the image and follow the steps again.
5.Save each file as a .psd file. Do NOT merge the image layer with the Background layer. It's helpful to include the size and color depth in
file:///C|/temp/icons.htm (6 of 11)28.02.2004 0:36:16

Windows XP Visual Guidelines: Icons
the file name.
Step 4: Creating the 8-bit and 4-bit images
Now that you have the 24-bit images ready to be made into 32-bit icons, you need to create 8-bit versions. The 8-bit icons will be displayed in any color mode lower than 32-bit.
The 8-bit versions will not have the 8-bit alpha channel. They will need to have their edges cleaned up because there's no anti-aliasing, so their edges will be jaggy.
1.In Photoshop, duplicate your 24-bit image layer and rename the layer to 8-bit images.
2.Create a new blank layer and fill the layer with a dark color such as blue.
3.Merge the 8-bit image layer with the new layer.
4.Clean up the edges with solid colors, removing any anti-aliased pixels. Use consistent stair-stepping to make your jaggies less pronounced.
5.Check your image on a light background such as white to see how the image looks.
6.Create 3 new Photoshop files for each size: 48x48, 32x32 and 16x16 pixels. Copy and paste the appropriate image.
7.Next you need to index the images down to 256 colors. The 8-bit icons can have custom palettes.
a.Take your 48x48 image and fill the background color with a unique background color that your image is not using. Windows XP icons often use magenta (R255 G0 B255).
b.Go to Image>Mode>Indexed Color and select Flatten Layers.
c.In the Palette dropdown, select Custom. In the Custom dialog, click OK. Click OK in the Indexed Color dialog.
d.Save the file as a .psd file.
e.Save the other 2 size files using the same background color and applying the custom palette.
8.Save each file as a .psd file.
If you want your icons to look good on older versions of Windows, provide 16 color versions of your icon.
1.Index your 8-bit images to the Windows 16 color palette.
2.Clean up your images using only the colors from the 16 color palette.
3.Use a black outline on the bottom and right edges of the image.
4.Use a dark gray or dark color outline for the left and top edges of the image.
5.Save the 3 sizes using the same background color. Be sure that the background color isn't used in the image because that's the color that will be the transparent color.
file:///C|/temp/icons.htm (7 of 11)28.02.2004 0:36:16

Windows XP Visual Guidelines: Icons
Step 5: Creating the .ico files
Once you have all of your images, it's time to compile them into an .ico file. To create 32-bit icons, we use a tool called Gif Movie Gear (GMG). To get this tool, go to www.gamani.com/foricons.
These steps will walk you through the process of creating a typical .ico file which has 3 sizes and 3 color depths.
1.You should have a total of 9 files- 3 sizes per color depth: 48x48 at 24 bit
32x32 at 24 bit
16x16 at 24 bit
48x48 at 8 bit
32x32 at 8 bit
16x16 at 8 bit
48x48 at 4 bit
32x32 at 4 bit
16x16 at 4 bit
2.Open Gif Movie Gear (GMG) and simply drag each image file into the window (or use File>Insert Frames). Each image will become a frame.
3.When you drag the 24-bit images (or any .psd file with layers) into GMG, you will be prompted with a dialog:
Check that the settings are: Layers as multiple frames, No blending, and Keep background transparency.
4.The background layer of each 24-bit image will appear as a frame. Remove these blank frames by selecting the frame and hit the Delete key.
5.Now you should have a total of 9 frames. The icons should be ordered in increasing color resolution: the first three are 4-bit (16 color), the next three are 8-bit (256 color), and the last three are 24-bit color with an 8-bit alpha channel (32-bit total).
file:///C|/temp/icons.htm (8 of 11)28.02.2004 0:36:16

Windows XP Visual Guidelines: Icons
Note: To check your image's attributes, move your mouse over the images. You will notice a tooltip box containing resolution information about each image. The default setting shows dimensions, transparency, and bit count. You can add or remove the items shown by going to Edit>Preferences>Frame Tips.
6.For the 8-bit and 4-bit versions, you need to make the background transparent. GMG uses lime green to represent the "transparent" color. You can set your own color (or stick with the default background color) by using the View>Transparency As menu item. The color chosen is only used for viewing and does not affect the images.
7.To make the 8-bit and 4-bit versions transparent:
a.Select a frame and click the dropper toolbar icon (the Pick Transparency Color icon).
b.A dialog will open showing your icon. With the dropper, click the background color of the icon. This color will change to the lime green (or whatever color has been chosen as the transparent background color in GMG).
c.Repeat for all 4-bit and 8-bit frames.
8.To save the icon, select File>Save Icon As…
Toolbar Creation
The Windows toolbar icons follow the same style as other icons except that they do not use a drop shadow. Because toolbar icons are fairly small, we recommend keeping the images simple. You can make the images straight-on rather than angled if it helps clarify the meaning of the image.
The Windows toolbar displays 2 sizes: 24x24 and 16x16 pixels. There are 2 states: default and hot (mouseover). For the hot state, we slightly increase the saturation of the images.
The process for creating toolbar icons is very similar to other icons,
file:///C|/temp/icons.htm (9 of 11)28.02.2004 0:36:16

Windows XP Visual Guidelines: Icons
except that the images are put into .bmp strips -- basically an ordered row of icons.
1.Once you've illustrated the icons in Freehand at each size, copy and paste them into Photoshop. Put the 24x24s on one layer and the 16x16s on another.
2.2. Draw a single row of boxes for each size on a separate layer, one row of 16x16 boxes and another row of 24x24 boxes.
3.Place each image in a square in the order you need them. Check that there's no overlap between images.
4.Save your Photoshop file.
5.Next you will create the hot states in Photoshop.
a.Take your 24x24 and 16x16 layers and duplicate each one. Rename the layers so they're clearly labeled as the hot versions.
b.For each hot version, select the layer and go to Image>Adjust>Levels… and move the middle arrow to 0.75. Click OK.
6.Once you've created the hot versions, you should have 1 layer per strip: 1 default 24x24, 1 hot 24x24, 1 default 16x16, and 1 hot 16x16.
7.Next you need to create individual files for each strip.
a.One way to do this is to use the Crop tool and crop the file down to a strip's dimensions and then save that file. Each strip must be measured from the beginning of the first box to the end of the last box.
b.Save each strip as a separate 24-bit .psd file.
8.To save a strip as a 32-bit image, drag a strip into GMG. Remove any blank frames. Go to File>Export as>Filmstrip. On the Film Export dialog, check that BMP/DIB and 24-bit with Alpha is selected.
file:///C|/temp/icons.htm (10 of 11)28.02.2004 0:36:16
Windows XP Visual Guidelines: Icons
AVI Creation
Windows XP uses 8-bit AVIs. The process for creating .avi files is the same as for icons: you prepare the pieces in Photoshop then drag them into GMG. Follow the instructions for creating 8-bit icon versions.
To save your AVIs using GMG, go to File>Export As>AVI file…
Considerations when creating .avi files:
●Use magenta (R255 G0 B255) as the background transparency color.
●In Photoshop, it's important that you don't have any stray pixels that could appear. Set your fill tolerances to 0 and make sure antialiasing is not checked.
©2001 Microsoft Corporation. All rights reserved. Terms of Use
file:///C|/temp/icons.htm (11 of 11)28.02.2004 0:36:16

Windows XP Visual Guidelines: Controls
Welcome
What's
New
About the
Design
Fonts
Colors
Icons
Controls
Radio Buttons
Check Boxes
Command Buttons
Text Boxes
Tabs
Group Boxes
DropDown Combo
Boxes
Scroll Bars
Spin Button
Slider
Windows Status Bar
Window Title Bar and
Frame
Toolbars
Menus
Folders &
Layouts
FAQ
Windows XP Visual Guidelines
Controls
Controls in Windows XP are characterized by round corners, subtle dimensionality, and color to help distinguish states. The images in this section are shown in the default Blue color scheme and change color if the user selects the Silver or Olive Green schemes.
Radio Buttons
Radio buttons have 3 sizes: 13x13, 16x16 and 25x25 pixels. Only the 16x16 size is available in Windows XP. Windows XP automatically uses the best size based on the video card DPI settings.
The text for a radio button should change depending on its state. The following RGB values should be used for the text of these states:
Checked Disabled Text: R: 161 G: 161 B: 146
Unchecked Disabled Text: R: 161 G: 161 B: 146
Radio button states
Check Boxes
Check boxes have 3 sizes: 13x13, 16x16, and 25x25 pixels. Windows XP automatically uses the best size based on the video card DPI settings.
The text for a check box should change depending on its state. The following RGB values should be used for the text of these states:
Checked Disabled Text: R: 161 G: 161 B: 146
Unchecked Disabled Text: R: 161 G: 161 B: 146
Mixed Disabled Text: R: 161 G: 161 B: 146
file:///C|/temp/controls.htm (1 of 14)28.02.2004 0:36:27

Windows XP Visual Guidelines: Controls
Check box states
Command Buttons
A command button should typically be 75 pixels wide (50 dialog units) by 23 pixels tall (14 dialog units). The curve of a command button is a 1 pixel indent.
The button text for a command button should change depending on its state.
Disabled Text: R: 161 G: 161 B: 146
Command button states
Text Boxes
The colors for an edit box should change depending on its state.
Normal Border Color: R: 127 G: 157 B: 185
Fill Color:
Disabled: R: 235 G: 235 B: 228
Read Only: R: 235 G: 235 B: 228
Text Color:
Disabled: R: 161 G: 161 B: 146
Read Only: R: 0 G: 0 B: 0
file:///C|/temp/controls.htm (2 of 14)28.02.2004 0:36:27

Windows XP Visual Guidelines: Controls
Text box states
Tabs
Tabs have a rollover state as shown below.
Tabs
Group Boxes
Group boxes can be any size necessary to accommodate the intended grouping of controls.
A group box title should change depending on its state.
Text Color:
Normal: R: 0 G: 70 B: 213
Disabled: R: 161 G: 161 B: 146
Group Box
DropDown Combo Boxes
A dropdown combo box's text should change depending on its state.
Text Field Fill Color:
Normal: R: 255 G: 255 B: 255
Disabled: R: 201 G: 199 B: 186
file:///C|/temp/controls.htm (3 of 14)28.02.2004 0:36:27