

0470045272
.pdf06_045275 ch01.qxp 11/28/06 8:28 PM Page 11
i-TTL. Supports i-TTL, D-TTL, TTL, and full Manual operation.
Advanced Wireless Lighting. This allows you to control up to three different groups of Speedlights in TTL, AA, A, or M mode.
Slow Sync. Enables you to match the ambient background lighting with the flash so the background doesn’t end up black.
Red-eye reduction. Fires off a preflash to contract the pupils to avoid “devil-eyes.”
AF-Assist light. Emits an array of light from an LED to assist in focusing in low-light situations.
FP High-Speed Sync. Allows you to shoot with a shutter speed higher than the rated sync speed of the camera. This is useful when shooting portraits in bright light using a wide aperture to blur the background.
Chapter 1 Exploring the CLS 11
Flash Value lock. Using the FV lock you can get a reading from your subject then recompose the shot while retaining the original exposure.
Distance-priority Manual flash mode. With this mode you put in the distance information and the aperture, the SB-800 adjusts the power level accordingly.
Modeling flash. Releases a short burst of flashes allowing you to see what the light falling on your subject looks like.
Repeating Flash mode. Fires off a specified amount of flashes like a strobe light.
Tilting/rotating flash-head for bouncing flash. Allows you to point the flash-head up for bouncing light from the ceiling or to the side to bounce off of the wall. The SB-800 also allows you to tilt the head downward 7° for close-up subjects.
Understanding the Guide Number
Although the actual power of the flash is fixed, the Guide Number (GN) of the flash changes with the ISO setting of the camera and also varies with the zoom setting of the flash. This is due to the increased sensitivity of the sensor and the actual dispersion of the light when set to a specific zoom range. When the ISO is at a higher setting, the sensor is more sensitive to light, in effect making the flash more powerful, hence a higher GN.
Also, when the zoom is set to a wide-angle, the flash tube is set further back in the flash head, diffusing the light and giving it wider coverage. This makes the flash somewhat less bright, thereby warranting a lower GN.
Remember that the Guide Number is exactly that — a guide. In reality, it is nothing more than a number assigned by the manufacturer to assist you in obtaining the correct exposure. Refer to your owner’s manual for a table with the GN of the Speedlight at the specific zoom ranges.

06_045275 ch01.qxp 11/28/06 8:28 PM Page 12
12 Part I Using the Creative Lighting System
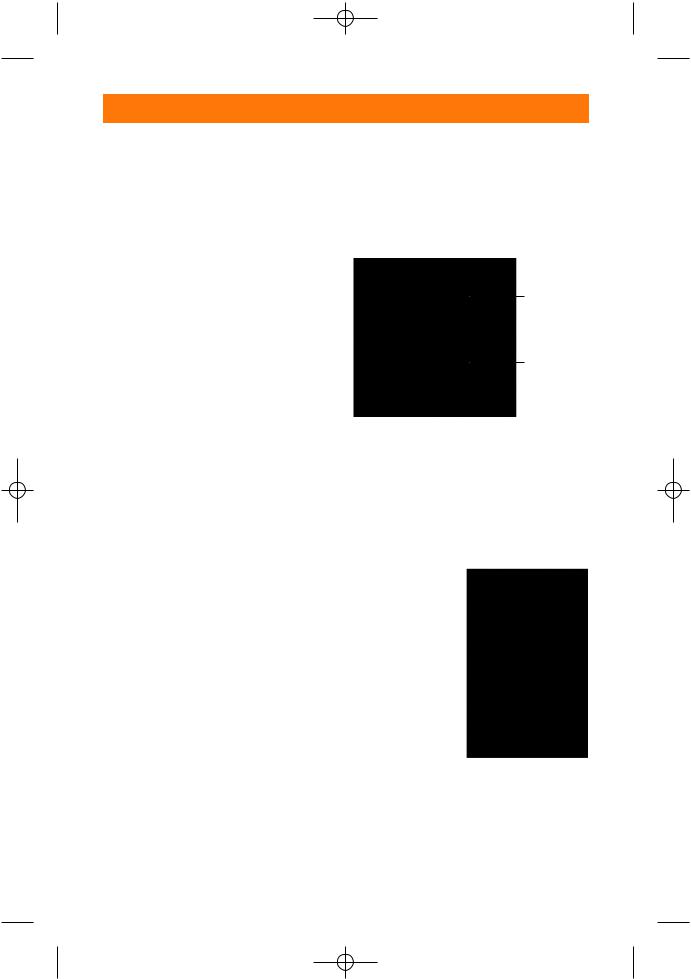
Main parts
The main parts of the SB-800 Speedlight are identified and discussed in the following sections. Figures and explanations of each part and feature are included so you have a clear understanding of how each is used.
Flash head. This is where the flashbulb is located. Inside is a mechanism that zooms the flashbulb back and forth to provide flash coverage for lenses of different focal lengths. The flash head is adjustable; it can be tilted upward to 90° and downward to 7°. It can also be adjusted horizontally 180° to the left or 90° to the right.
Flash head
Flash head lock release button
Battery compartment lid
Light sensor for TTL wireless flash
Digital sensor for automatic non-TTL flash
External power source terminal
AF assist illuminator
1.1 The front of the SB-800 Speedlight

06_045275 ch01.qxp 11/28/06 8:28 PM Page 13
Chapter 1 Exploring the CLS 13
Flash head lock release button.
This button releases the flash head lock allowing you to adjust the angle for bounce flash.
Battery compartment lid. Slide this downward to open the battery compartment to change out the batteries.
Flash head tilting angle scale
Modeling flash illuminator button
LCD panel
Control buttons
Ready light
Mounting foot locking lever
1.2 The back of the SB-800 Speedlight
06_045275 ch01.qxp 11/28/06 8:28 PM Page 14
14 Part I Using the Creative Lighting System
Light sensor for TTL wireless flash. This sensor reads signals from Commander units enabling wireless flash.
Light sensor for automatic nonTTL flash. This sensor reads the light reflected off of the subject telling the flash when to shut off when operating in AA (aperture automatic mode), or A (non-TTL automatic mode).
AF-assist illuminator. Emits an LED light array to achieve focus in low-light situations.
External power source terminal.
Nikon’s optional external power sources can be plugged in to this terminal, these power sources include the SC-7 DC unit, the SD-8A high performance battery pack, and the SK-6/SK-6A power bracket unit.
Flash head tilting angle scale.
Allows you to set the flash head at 45°, 60°, 75°, or 90° tilt.
Modeling flash illuminator button. Fires the flash repeatedly to allow a preview to what the shadows and lighting looks like on the subject.
LCD panel. This is where all of the Speedlight settings and controls are viewed.
Control buttons. These are used to set and change setting on the Speedlight.
Ready light. Lights up indicating the Speedlight is ready to fire. After the Speedlight is fired this light blinks until the Speedlight is fully recycled and ready to fire again.
Mounting foot locking lever.
Locks the Speedlight into the hot shoe or the AS-19 Speedlight stand.
Wide-angle lens adaptor. This built-in diffuser provides you with the ability to use the Speedlight with a lens as wide as 14mm without having light fall-off at the edges of the image.
Bounce/ Catchlight card
Wide-angle lens adapter
1.3 Wide-angle lens adaptor and built-in catchlight card
Bounce or Catchlight card. This white card reflects light down into the eyes providing a catchlight when the flash is used in the bounced position.
TTL multiple flash terminal. This is used for linking more than one flash together using TTL metering; requires a Nikon TTL flash cord such as
the SC-27, SC-26, SC-19, or SC-18.
1.4 TTL multi-flash terminal (top) and PC sync terminal (bottom)

06_045275 ch01.qxp 11/28/06 8:28 PM Page 15
PC sync terminal. This is used for linking more than one flash unit in non-TTL mode, usually in manual mode.
External AF-assist contacts. These contacts are for use with the optional SC-29 TTL remote cord. This allows you to use the AF-assist beam when using your flash off camera.
1.5 External AF-assist contacts and the hot shoe mounting foot
Hot shoe mounting foot. This slides into the hot shoe on your camera body and locks down with a lever.
Chapter 1 Exploring the CLS 15
Flash head rotating angle scale.
This enables you to rotate the flash head horizontally left 30º, 60º, 90º, 120º, 150º, and 180º. To
the right it |
1.6 Flash head |
|
can be |
||
rotating angle scale |
||
adjusted 30º, |
|
|
60º, and 90º. |
|
Control buttons
There are several control buttons on the SB800 and you should know what each of them does in order to get the best results from your Speedlight. Some of them are obvious, like the On/Off button, but others control the menus you select. You need to know how to navigate your Speedlight.
1.7 SB-800 control panel
06_045275 ch01.qxp 11/28/06 8:28 PM Page 16
16 Part I Using the Creative Lighting System
Multi-selector button. This main button can be pressed up and down, left and right, or in the center.
•Up and down. Labeled as + for up and – for down, these buttons allow you to move up and down in the menu, which displays on the LCD when the Speedlight is turned on. Use them to select from the various menu items.
•Left and right. The left button is labeled with three small trees, symbolizing wide angle. The right button has one large tree, which indicates telephoto. The buttons are used to change the zoom of the flash head for different lens coverage from 24mm wide angle to 105mm telephoto.
•Select. The center button is the Select button. This button is used to select an item to be highlighted for change after using the up and down buttons to navigate to the item. Press the Select button for two seconds to get to the Custom Settings Mode (CSM). CSM is used to set up specific functions of the SB-800, such as the wireless flash modes, ISO settings, the power zoom function, and many other things.
The Custom Settings Menu and the specific functions you can control are covered in detail in Chapter 2.
The On/Off button. This button does just what it says it does. Press it for about a half a second to turn the Speedlight on or off.
The Flash button. Press this button to test fire the SB-800 to ensure it is functioning properly or to take a test reading using a hand held flash meter
The Mode button. The mode button is used to cycle through the LCD menu among the different flash modes of the SB-800 Speedlight. The different modes are:
•TTL BL – i-TTL balanced fill flash. The exposure is determined by the camera and matched with the ambient light.
•TTL – i-TTL flash. The exposure is determined by the camera to sufficiently illuminate the subject that is focused on.
•AA – Auto Aperture. An aperture-based automatic mode. You enter the aperture value and the Speedlight determines the flash power.
•GN – distance based automatic mode. You enter the distance to the subject and the Speedlight determines the flash power.
•M – full manual mode. You determine the flash power by using the guide number of the flash and dividing this number by the distance of the Speedlight from the subject, with the quotient being the aperture to which you need to set your camera. You can also use a flash meter to determine the flash and camera settings.

06_045275 ch01.qxp 11/28/06 8:28 PM Page 17
Note |
Depending on which camera |
|
and lens you are using, all of |
|
the SB-800 flash modes may or |
|
may not be available. |
In addition to the standard buttons on the back of the Speedlight, there are some functions that can only be accessed by pressing two buttons at the same time:
Mode and Select. When these two buttons are pressed in conjunction, the SB-800 shows what the underexposure level was when using the i-TTL flash mode. This is shown as a numeric value on the LCD, such as 1.7 ev.
Mode and On/Off. Pressing these two buttons simultaneously for two seconds resets all settings to the default factory settings. Refer to your owners manual if you aren’t sure what the default settings are.
On/Off and Select. Pressing these two buttons together locks all of the buttons of the flash to prevent the accidental change of settings. The Flash button and the Modeling Light button are not affected by locking the buttons.
SB-800 accessories
Along with the SS-800 soft case for storing and carrying your SB-800, other important accessories include
SD-800 quick recycle battery pack. This allows faster recycle time by adding an additional battery.
AS-19 Speedlight stand. Enables you mount your SB-800 to a stand or tripod, but it also makes it easier to stand the Speedlight on a flat surface.
Chapter 1 Exploring the CLS 17
SJ-800 colored filter set. The set includes tungsten and fluorescent filters for matching the flash to ambient light, and it also includes red and blue for special effects.
SW-10H diffusion dome. The dome softens the flash output resulting in more natural looking shadows.
SB-600
The SB-600, while not as feature-rich as the SB-800, still has many features that you will find useful in when shooting with flash. As with the SB-800, you’ve likely got the flash in hand and have at least skimmed through the manual. At this point, you are probably familiar with the basic features of your Speedlight. The material in the next few sections gives you a better idea of not only what the features are, but also why they are important.
SB-600 feature overview
The SB-600 has less features and a lower Guide Number than the SB-800, but it’s still a great flash. Most of the missing features are shooting modes that you may find aren’t necessary to have. And, although the GN is lower, the SB-600 is still a powerful flash. Firing the SB-600 at full power using an aperture of f/2.8 it’s possible to get a fairly well lit shot at almost two hundred and fifty feet.
This section provides a brief look at different features that are available on the SB-600 Speedlight. It is important to note, however, that some features may not be available to use depending on the camera body you are using. For example, when using the D50 or
06_045275 ch01.qxp 11/28/06 8:28 PM Page 18
18 Part I Using the Creative Lighting System
D70/s the FP High Speed Sync feature is unavailable.
Guide Number. 125 at ISO 100 on the 35mm setting. See your owner’s manual for more specifics on GNs for specific zoom ranges.
Automatic zooming flash-head.
Provides lens coverage from 24mm up to 105mm. 14mm with the included wide-angle adaptor.
i-TTL. Supports i-TTL, D-TTL, TTL, and full Manual operation.
Slow Sync. Enables you to match the ambient background lighting with the flash so the background doesn’t end up black.
Red-eye reduction. Fires off a preflash to contract the pupils to avoid “devil-eyes.”
AF-Assist light. Emits an array of light from an LED to assist in focusing in low-light situations.
FP High-Speed Sync. Allows you to shoot with a shutter speed higher than the rated sync speed of the camera. This is useful when shooting portraits in bright light using a wide aperture to blur the background. Works with D200, D2X, and D2H camera bodies.
Modeling flash. Releases a short burst of flashes allowing you to see what the light falling on your subject looks like. Works with D200, D2X, and D2H camera bodies.
Tilting/rotating flash head for bouncing flash. Allows you to point the flash head up for bouncing light from the ceiling or to the side to bounce off of the wall.
Main parts
Even though the SB-600 Speedlight is similar to the SB-800, it is still important to go over each of the important parts of the equipment. I’ve included figures and explanations of the parts and features to give you a better understanding of how each is used.
Flash head. This is where the flashbulb is located. Inside is a mechanism that zooms the flashbulb back and forth to provide flash coverage for lenses of different focal lengths. The flash head is adjustable; it can be tilted upward to 90°. It can also be adjusted horizontally 180° to the left or 90° to the right.
Flash head lock release button.
This button releases the flash head lock allowing you to adjust the angle for bounce flash.
Battery compartment lid. Slide this downward to open the battery compartment to change out the batteries.
Light sensor for TTL wireless flash. This sensor reads signals from Commander units enabling wireless flash.

06_045275 ch01.qxp 11/28/06 8:28 PM Page 19
Chapter 1 Exploring the CLS 19
Wireless remote ready light.
Works as a ready light when the SB-600 is being used as a remote flash.
AF-assist illuminator. Emits an LED light array to achieve focus in low-light situations.
Flash head
Flash head lock release button
Wireless remote ready light
Battery compartment lid
Light sensor for TTL wireless flash
Flash head tilting angle scale.
Allows you to set the flash head at 45°, 60°, 75°, or 90° tilt.
LCD panel. This is where all of the Speedlight settings and controls are viewed.
AF assist illuminator
1.8 The front of the SB-600 Speedlight

06_045275 ch01.qxp 11/28/06 8:28 PM Page 20
20 Part I Using the Creative Lighting System
Flash head tilting angle scale
LCD panel |
Ready |
|
light |
||
|
Control buttons
Mounting foot locking lever
1.9 The back of the SB-600 Speedlight
Ready light. Lights up indicating that the Speedlight is ready to fire. After the Speedlight is fired this light blinks until the Speedlight is fully recycled and ready to fire.
Control buttons. Used to set and change setting on the Speedlight.
Mounting foot locking lever.
Locks the Speedlight into the hot shoe or the AS-19 Speedlight stand.
Wide-angle lens adaptor. This built-in diffuser provides you with the ability to use the Speedlight with a lens as wide as 14mm without having light fall-off at the edges of the image.