

Practical Database Programming With Java
.pdf5.3 Exploring NetBeans IDE 6.8 259
5. Go to Tools > Plugins menu item to open the Plugins dialog box.
6.Click on the Installed tab to open a list that contains all installed components for your NetBeans IDE. Make sure that the following components are in this list, which means that they have been installed in your IDE:
A.Maven
B.Ant
C.Hibernate
If any component is missed from this list, you need to perform another Plugin operation to add each of the missed component.
7.To add a missed component, click on the Available Plugins tab to open all available components that can be plug-ined.
8.Browse down the list and select the missed component by checking the associated checkbox, and click on the Install button to add this component to the system.
9.Follow the instructions on the screens to finish this installation.
The artifacts that are used by Maven to build all your projects are stored in your local Maven repository. When an artifact is declared as a project dependency, the artifact is downloaded to your local repository from one of the registered remote repositories.
Several well-known indexed Maven repositories are registered and listed in the repository browser by default. The registered repositories contain most of the public artifacts necessary for users to build their projects. In most cases, it does not need to register any additional repositories unless your project requires artifacts found only in a private repository.
You can use the Maven Repository Browser to view the contents of your local and remote repositories. Any artifact that is in your local or remote repositories can be added as a project dependency. You can expand the Local Repository node to see the artifacts that are present locally.The artifacts listed under the remote repository nodes can be added as project dependencies, but not all of them are present locally. They are only added to the Local Repository when they are declared as project dependencies.
Perform the following operations to open the Maven Repository Browser:
1. Choose Window > Other > Maven Repository Browser from the main menu.
2.When your cursor is over an artifact, the IDE displays a tooltip with the artifact’s coordinates, as shown in Figure 5.100. You can view additional details about an artifact by double clicking the artifact’s JAR file in the browser.
3.You can search for an artifact by clicking the Find button in the toolbar of the Maven Repository Browser or by using the Quicksearch textfield in the main toolbar.
A sample of using the Maven Repository Browser to view the default local repository is shown in Figure 5.100.
Now let’s start to build a Maven project that can be used to access some data source to perform certain data actions against databases.
5.3.6.5 Creating a Maven Database Application Project
Support for Maven is fully integrated in starting in NetBeans IDE 6.8. You can create applications from the bundled Maven archetypes or from archetypes in remote

260 Chapter 5 Introduction to NetBeans IDE
Figure 5.100. A sample view the default local repository.
repositories in the New Project wizard. The Maven Repository Browser enables you to explore your local and remote Maven repositories, examine artifacts, and add project dependencies to the project’s POM.
In this section,we will create a simple Java Swing application project JavaMavenDBApp. We will create the project from one of the bundled Maven archetypes and then modify the default project settings.
We can use the New Project wizard to create a Maven project from a Maven archetype. The NetBeans IDE includes several archetypes for common NetBeans project types, but we can also locate and choose archetypes in remote repositories in the wizard. In this application, we will use the Maven Quickstart Archetype as the project template.
Perform the following operations to create this new Maven project:
1. Choose File > New Project (Ctrl-Shift-N).
2.Select Maven Project from the Maven category.
3.Click on the Next button to continue.
4.Select Maven Quickstart Archetype from the opened New Project dialog box, and click on the Next button.
5.Type JavaMavenDBApp for the project name and set the project location.
6.Change the default Group Id to com.mymaven and keep the Version unchanged.
7.The Group Id and Version will be used as the coordinates for the artifact in the local repository when we build the project.
8.Keep the default Package unchanged and click on the Finish button to complete this creation of the new Maven project process.
Your finished new Maven project JavaMavenDBApp should match one that is shown in Figure 5.101.
After we create a Maven project using the wizard, the default project properties are based on the archetype. In some cases, we may need to modify the default properties

5.3 Exploring NetBeans IDE 6.8 261
Figure 5.101. The completed dialog of creation of new Maven project.
according to our system and the project’s requirements. For example, for this project, we want to make sure that the Source level is set to 1.5 because the project uses annotations.
Perform the following operations to set up this source level:
1.Right click on our new project node and choose the Properties menu item.
2.Select the Sources category from the Properties window.
3.Select 1.5 from the drop-down list at the Source/Binary Format property.
4.Select UTF-8 from the drop-down list at the Encoding property.
5.Click on the OK button to close this dialog.
Next, let’s handle adding the Hibernate framework to our project since we need it to interface to our data source.
5.3.6.6 Adding Hibernate Files and Dependencies
To add support for Hibernate, we need to make the Hibernate libraries available by declaring the necessary artifacts as dependencies in the POM.The NetBeans IDE includes wizards to help us to create the Hibernate files we need in our project. We can use the wizards provided by the NetBeans IDE to create a Hibernate configuration file and a utility helper class. If we create the Hibernate configuration file using a wizard, the
NetBeans IDE will automatically update the POM to add the Hibernate dependencies to the project.
We can add dependencies to the project in the Projects window or by editing pom. xml directly.

262 Chapter 5 Introduction to NetBeans IDE
To add a dependency in the Projects window,
1.Right click on the Libraries node from the Projects window.
2.Choose the Add Dependency item from the pop-up menu to open the Add Dependency dialog box.
3.When a dependency is added into the project, the IDE updates the POM and downloads any required artifacts to the local repository that are not already present locally.
To add a dependency by editing the pom.xml file directly,
1.Open the file by expanding the Project Files node in the Projects window.
2.Double clicking on the pom.xml item.
First, let’s create the Hibernate configuration file for our project.
5.3.6.6.1 Creating the Hibernate Configuration File The Hibernate configuration file, hibernate.cfg.xml, contains information about the database connection, resource mappings, and other connection properties. When we create a Hibernate configuration file using a wizard, we need to specify the database connection by choosing our data source from a list of database connection registered with the NetBeans IDE. When generating the configuration file, the NetBeans IDE automatically adds the connection details and dialect information based on the selected database connection. The NetBeans IDE also automatically modifies the POM to add the required Hibernate dependencies. After creating the configuration file, we can edit the file using the multiview editor, or edit the XML directly in the XML editor.
Perform the following operations to complete this editing:
1. Open the Services window and right click on the JavaDB Sample database connection URL jdbc:derby://localhost:1527/sample [app on APP], and choose the Connect item.
2. Right click on the Source Packages node from the Projects window and choose New > Other to open the New File wizard.
3. Select Hibernate from the Categories list, and Hibernate Configuration Wizard from the File Types list. Click on the Next button to continue.
4.Keep the default file name hibernate.cfg unchanged.
5.Click on the Browse button and specify the src/main/resources directory as the Folder location. Click on the Next button to continue.
6.Select the jdbc/sample database connection URL in the Database Connection drop down list, and then click on the Finish button.
Your finished New Hibernate Configuration Wizard should match one that is shown in Figure 5.102.
When you click on the Finish button, the NetBeans IDE opens the hibernate. cfg.xml in the editor. The configuration file contains information about a single database.
By expanding the Libraries node in the Projects window, you can see that the NetBeans IDE added the required Hibernate artifacts as dependencies, as shown in Figure 5.103. The NetBeans IDE lists all direct and transitive dependencies required to

5.3 Exploring NetBeans IDE 6.8 263
Figure 5.102. The finished New Hibernate Configuration Wizard.
Figure 5.103. The added Hibernate artifacts by NetBeans IDE.
compile the project under the Libraries node. The artifacts that are direct dependencies, which mean that those dependencies are specified in the project’s POM, are indicated by color JAR icons.An artifact is in gray color if it is a transitive dependency, or an artifact that is the dependency of one or more direct dependency.
We can also view details of artifacts by right clicking a JAR and choosing View Artifact Details. The Artifact Viewer contains tabs that provide details about the selected artifact. For example, the Basic tab provides details about the artifact’s coordinates and available versions. The Graph tab provides a visual representation of the dependencies of the selected artifact. An example of a detailed view of hibernate- 3.2.5.ga.jar is shown in Figure 5.104.
Next, let’s modify the Hibernate configuration file to make it match to our application.

264 Chapter 5 Introduction to NetBeans IDE
Figure 5.104. An example detailed view of the hibernate-3.2.5.ga.jar artifact.
Figure 5.105. The finished Add Hibernate Property dialog box.
5.3.6.6.2 Modifying the Hibernate Configuration File In this section, we will edit the default properties specified in hibernate.cfg.xml file to enable debug logging for SQL statements.
Perform the following operations to complete this modification:
1. Open |
hibernate.cfg.xml in the Design tab by expanding the file nodes |
src |
> main > resources in the Files window and double clicking on the hiber- |
nate.cfg.xml.
2. Expand the Configuration Properties node under Optional Properties.
3. Click on the Add button to open the Add Hibernate Property dialog box.
4.In the dialog box, select the hibernate.show_sql property and set the value to true. Your finished dialog should match one that is shown in Figure 5.105.
This will enable the debug logging of the SQL statements.
If you click on the XML tab in the editor, you can see the file in XML view. Your modified Hibernate configuration file should look like that shown in Figure 5.106. You

5.3 Exploring NetBeans IDE 6.8 265
Figure 5.106. The modified Hibernate configuration file.
can save all changes and modifications to the file by selecting the File > Save All menu item.
Later, on when you run this project, you will be able to see the SQL query printed in the NetBeans IDE’s Output window.
Now let’s create the Hibernate helper class file to handle startup and accessing Hibernate’s SessionFactory to obtain a Session object.
5.3.6.6.3 Creating the HibernateUtil.java Helper File To use the Hibernate framework, we need to create a helper class that handles startup and that accesses Hibernate’s SessionFactory to obtain a Session object. The class calls Hibernate’s configure() method, loads the hibernate.cfg.xml configuration file, and then builds the SessionFactory to obtain the Session object.
In this section, we will use the New File wizard to create the helper class file HibernateUtil.java. Perform the following operations to create this helper class file:
1. Right click on the Source Packages node in the Projects window and select New > Other menu item to open the New File wizard.
2. Select Hibernate from the Categories list and HibernateUtil.java from the
File Types list, and then click on the Next button.
3.Type HibernateUtil for the class name and customer.util as the package name, as shown in Figure 5.107. Click on the Finish button.
Next, let’s create Hibernate mapping files and related Java classes to perform the data actions against the default JavaDB sample database.
5.3.6.7 Generating Hibernate Mapping Files and Java Classes
In this section, we will use a plain old Java object (POJO), Customer.java, to represent the data in the table Customer in the JavaDB sample database. The class specifies the fields for the columns in the tables and uses simple setters and getters to retrieve and write the data. To map Customer.java to the Customer table, we can use a Hibernate mapping file or use annotations in the class.

266 Chapter 5 Introduction to NetBeans IDE
Figure 5.107. The finished New HibernateUtil.java dialog box.
We can use the Reverse Engineering wizard and the Hibernate Mapping Files and POJOs from a Database wizard to create multiple POJOs and mapping files based on database tables that we selected. Alternatively, we can use wizards provided by the NetBeans IDE to help us to create individual POJOs and mapping files from scratch.
A point to be noted is that if you want to create mapping files for multiple tables, you may most likely want to use the wizards. In this application, you only need to create one POJO and one mapping file so it is fairly easy to create the files individually.
5.3.6.7.1 Creating Reverse Engineering File To use the POJOs and Mapping Files from Database wizard, we need to first create the reveng.xml reverse engineering file in the src/main/resources directory where we created our hibernate.cfg.xml.
Perform the following operations to create this reverse engineering file:
1. |
Right click on the Source Packages node from the Projects window and select the |
||
|
New > Other menu item to open the New |
File wizard. |
|
2. |
Select Hibernate from the Categories list and Hibernate |
Reverse |
|
|
Engineering Wizard from the File |
Types list. Click on the Next button to |
|
|
continue. |
|
|
3.Type hibernate.reveng for the file name.
4.Specify src/main/resources as the Folder location, and then click on the Next button.
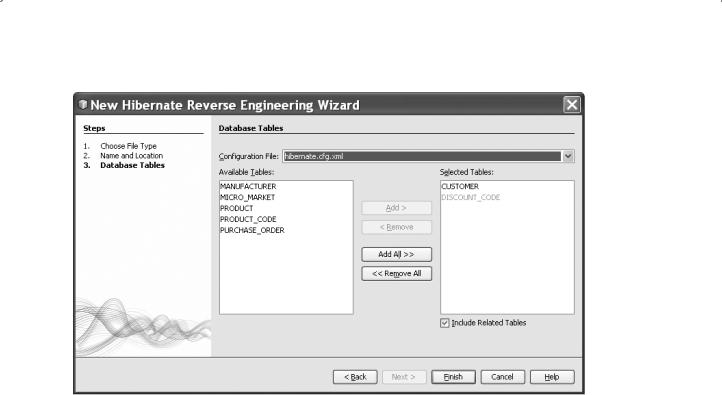
5.Select CUSTOMER in the Available Tables pane and click on the Add button to add this data table. The related table DISCOUNT_CODE is also added, as shown in Figure 5.108.
6.Click on the Finish button to complete this process.
The wizard generates a hibernate.reveng.xml reverse engineering file.
Now let’s create Hibernate mapping files and POJOs from the JavaDB sample database.
5.3 Exploring NetBeans IDE 6.8 267
Figure 5.108. The added data table CUSTOMER.
5.3.6.7.2 Creating Hibernate Mapping Files and POJOs from a Database The Hibernate Mapping Files and POJOs from a Database wizard generates files based on tables in the connected database. When using the wizard, the NetBeans IDE generates POJOs and mapping files for us based on the database tables specified in hibernate. reveng.xml and then adds the mapping entries to hibernate.cfg.xml. When we use the wizard, we can choose the files that we want the NetBeans IDE to generate, for example, only the POJOs, and select code generation options, for example, generate code that uses EJB 3 annotations.
Perform the following operations to create mapping files and POJOs:
1. Right click on the Source Packages node in the Projects window and choose New > Other menu item to open the New File dialog.
2. Select Hibernate from the Categories list and Hibernate Mapping Files and POJOs from a Database from the File Types list. Click on the Next button to continue.
3.Select hibernate.cfg.xml from the Hibernate Configuration File dropdown list, if not selected.
4.Select hibernate.reveng.xml from the Hibernate Reverse Engineering File dropdown list, if not selected.
5. Ensure that the Domain Code and Hibernate XML Mappings options are selected.
6. Type customer.entity for the Package name. The finished New Hibernate Mapping Files and POJOs from Database wizard is shown in Figure 5.109.
7. Click on the Finish button to complete this creation process.

268 Chapter 5 Introduction to NetBeans IDE
Figure 5.109. The finished New Hibernate Mapping Files and POJOs from Database wizard.
When clicking on the Finish button, the NetBeans IDE generates the POJO
Customer.java with all the required fields in the src/main/java/customer/entity directory. The NetBeans IDE also generates a Hibernate mapping file in the src/main/ resources/customer/entity directory and adds the mapping entry to hibernate. cfg.xml.
Now that we have the POJO and necessary Hibernate-related files, we can now create a simple Java GUI front end for our application. We will also create and then add an HQL query that queries the database to retrieve the data. In this process, we also use the HQL editor to build and test the query.
5.3.6.8 Creating the Application GUI
In this section, we will create a simple JFrame Form with some fields for entering and displaying data. We will also add a button that will trigger a database query to retrieve the data from the Customer table.
To create a new JFrame Form, perform the following operations:
1. Right click on our project node JavaMavenDBApp in the Projects window and choose
New > JFrame Form to open the New JFrame Form wizard.
2.Type JavaMavenDBApp for the Class Name and type customer.ui for the Package. Click on the Finish button to create this new JFrame Form.
The NetBeans IDE will create the JFrame class and opens the JFrame Form in the Design view of the editor when you click on the Finish button.