

3D Game Programming All In One (2004)
.pdf478 Chapter 15 ■ Making a Vehicle Model
And replace it with this line:
shapeFile = "~/data/shapes/car/wheel.dts";
4. Save the file.
Okay, now it's time to run the racing demo. The following may look familiar to you, since we did this back in Chapter 9.
1.Browse to C:\3DGPAi1 and click the Run racing Demo shortcut.
2.Click Start Mission.
3.In the Launch dialog box, make sure that the Multiplayer Mission box is cleared.
4.Select Car Race Track from the mission list.
5.Click Launch.
6.After the game loads, have at it! You probably should switch to Chase view by pressing the Tab key—there's more to see. See Table 15.1 for the keyboard controls.
|
Table 15.1 |
Torque Racing Demo Controls |
|
|
Key |
Description |
|
|
mouse |
steering left or right |
|
|
Up Arrow |
accelerate |
|
|
Down Arrow |
brake |
|
|
Tab |
toggle from firstto third-person viewpoint |
|
|
Escape |
exit the game |
|
|
|
|
|
Moving Right Along
Building the model is only half the battle—well, maybe three-quarters. There is still the matter of defining the vehicle's characteristics, like mass, drag, speeds, particle generators, collision handlers, and so on. You take care of these things in scripts that run on the server.
To do the testing you just did, you used the existing demo buggy script that comes with the Torque Engine and simply substituted our model in place of the dune buggy. It looks like a roadster but drives like a dune buggy! In fact you will recall that you had a test-drive of a dune buggy back in Chapter 9.
Later, in Chapter 22, we will create the script that will define the behavior of the vehicle that we've modeled here and its response to user inputs and game environment stimuli.
Coming up next in Chapter 16, we'll continue with MilkShape and make some weapons and other items.
Team LRN
chapter 16
Making Weapons
and Items
In this chapter we're going to make a bunch of things. Most of the techniques used will basically be a review for you, so you can see this chapter as one big exercise in applying what you've learned to different situations.
We're going to make a few weapons, and in order to maintain balance, we'll make something that can be used in game to counteract the effects of these weapons.
We'll also make some items that one might call decorations for the game. The purpose of these items—some trees and a rock—is to provide some clutter. This is to help fill out otherwise sterile-looking game worlds, making them more interesting to wander around in.
The Health Kit
We'll start out with an easy one. Like I said, this will be a basic review, but it's important to go over the process involved in creating an item for use in the game so that the broad steps become obvious and second nature.
The Model
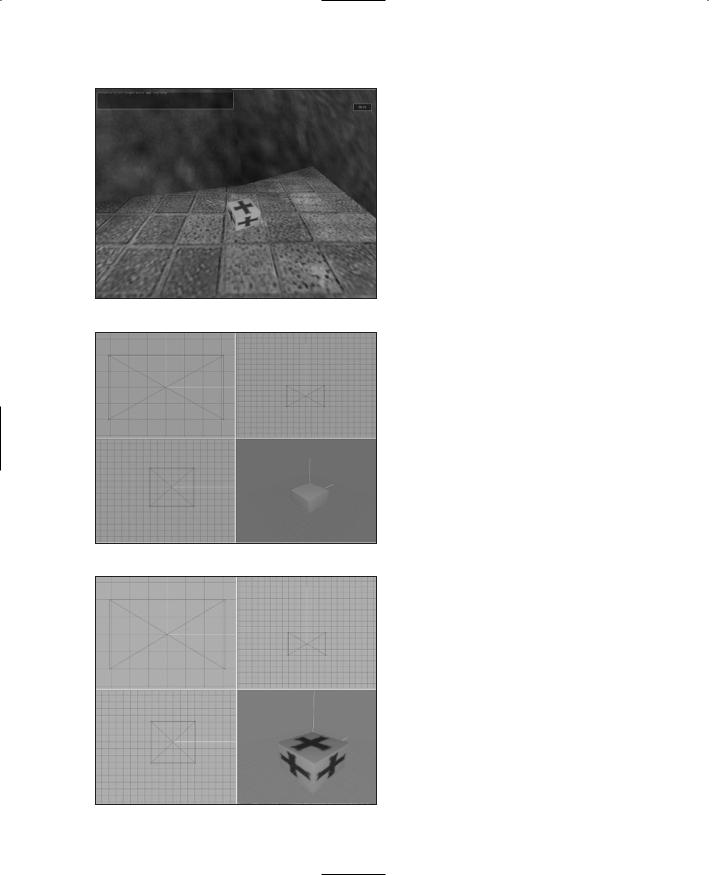
The Health Kit is little more than a fancy-looking box, as you can see from Figure 16.1. So this won't take long.
1.Fire up MilkShape and create an empty document.
2.Use the Box tool to create a box, as shown in Figure 16.2.
3.Align the box to be centered at the origin for all three axes, as you can see in Figure 16.2.
479
Team LRN
480 Chapter 16 ■ Making Weapons and Items
Figure 16.1 The Health Kit in game.
Figure 16.2 The box.
Figure 16.3 The Health Kit model.
4.On the Materials tab, create a new material, using C:\3DGPAi1\RESOURCES\CH16 \ healthkit.png as the bitmap.
5.Name the material "healthkit".
6.Select the box and assign the healthkit material to it.
7.Make sure that the 3D view has been set to texture mode. You should see a nice, shiny new firstaid kit kind of item there, like that in Figure 16.3. This one always has bandages in it!
8.Save your work.
9.After saving your work, choose File, Export, Torque Game Engine DTS. You will see the Torque Game Engine (DTS) Exporter appear.
10.You want to take the defaults but have Collision Mesh set to None.
11.Export the box to C:\3DGPAi1\ fps\data\shapes\items\healthkits.dts. Click Yes if you get an alert asking if you want to replace an existing file with that name.
Testing the Health Kit
To use the Health Kit in game, you merely have to run over it to pick it up. Then you activate it by pressing the "h" key to restore your health whenever it gets too low. You may remember using a kind of first-aid kit in one of your sample games from an earlier chap- ter—Emaga5—where you got health back just by running over the first-aid kit, or Health Kit. This one you have to
Team LRN
A Rock 481
pick up and activate; we'll test that functionality later when we get back into server scripts. Right now we just want to see our fine creation in the game world.
1.Browse to C:\3DGPAi1 and click the Run fps Demo shortcut.
2.Click Start Mission.
3.In the Launch dialog box, make sure that the Multiplayer Mission box is cleared.
4.Select Water World from the mission list.
5.Click Launch.
6.After the game loads, look around for a big gray block jutting out from the side of a hill into the water. Figure 16.4 shows what the block (marked by the arrow) looks like.
7.Run over to the block. On top of it you will find the Health Kit. You can stand there and admire it for a while if you like.
8.Run over the kit to automatically pick it up. You will see a message in your chat window telling you that you've picked it up.
A Rock
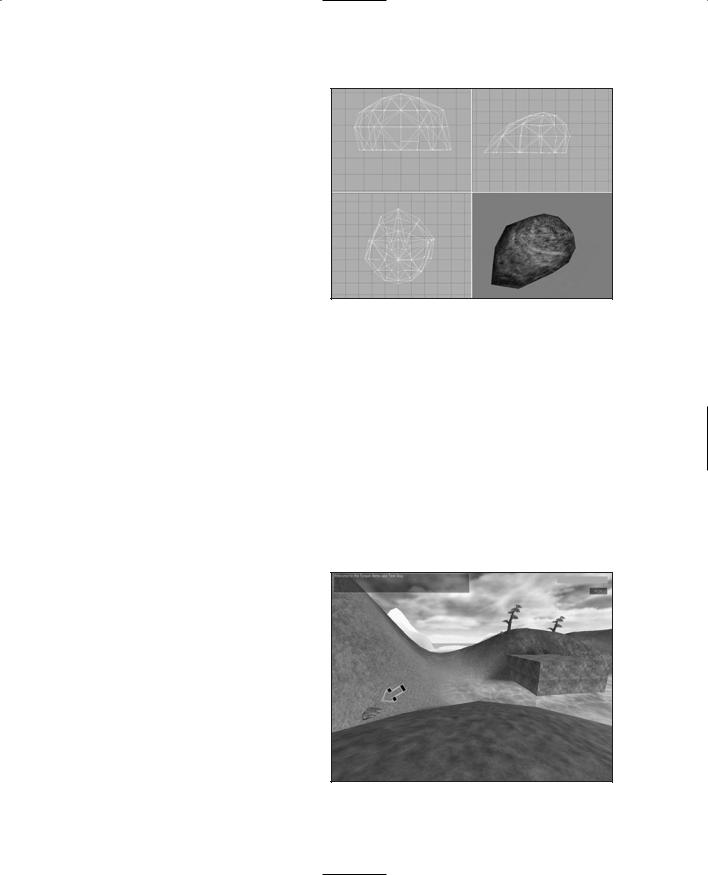
Oh, big deal, a rock—what's up with that, you ask? Well, it is going to be your own handmade rock! That should be worth something.
The point here is that, even though the rock is not much more complex than the Health Kit, it is somewhat more complex nonetheless. It does less for us in the game, but it is one of those decoration-type items I mentioned— and stuff like this, while unglamorous,
can greatly contribute to the ambience |
Figure 16.4 Locating the big gray block. |
|
|
of your game. |
|
1.Fire up MilkShape and create an empty document.
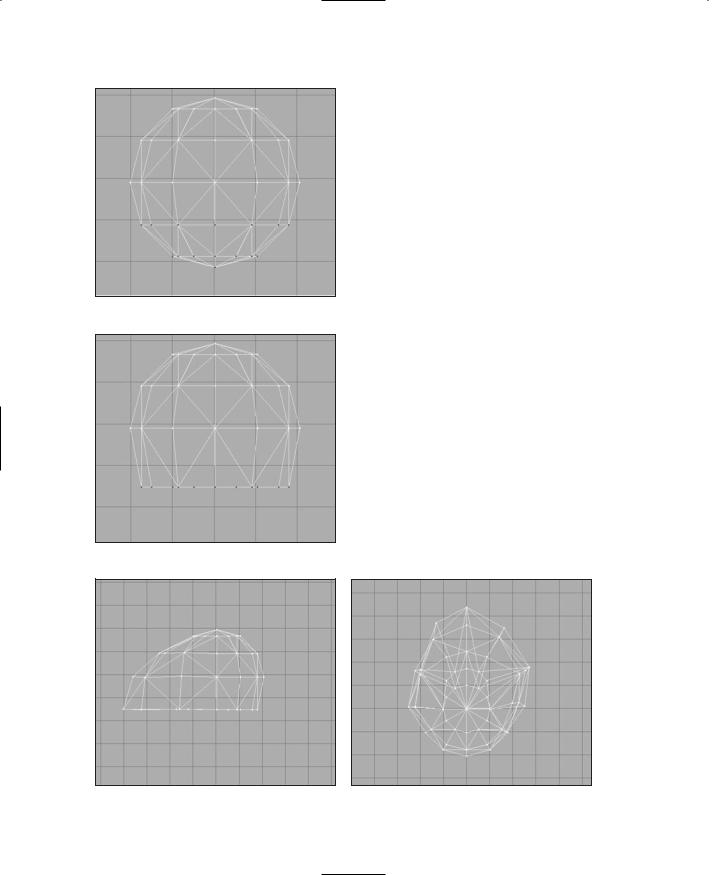
2.Use the Sphere tool to create a sphere, as shown in Figure 16.6.
3.In the Side view, select the bottom three rows of vertices.
4.Choose Vertex, Flatten, Y. The bottom
three rows should be squished together Figure 16.5 The rock in game.
Team LRN
482 Chapter 16 ■ Making Weapons and Items
Figure 16.6 The sphere.
Figure 16.7 The truncated sphere.
in a horizontal flat plane, as shown in Figure 16.7. Already it's starting to look like a rock.
5.Still in the Side view, drag the vertices around on the left side until you get something resembling Figure 16.8.
6.Now in the Top view, drag some more vertices around until you get something resembling Figure 16.9. It's almost a rock now!
7.On the Materials tab, create a new material, using C:\3DGPAi1\RESOURCES\ CH16\rock.png as the bitmap.
8.Name the material "rock".
9.Select the entire rock model and assign the rock material to it.
10.Make sure that the 3D view has been set to texture mode. You should see a nice lumpy and ancient-looking rock there, like that in Figure 16.10.
11.Save your work.
12.After saving your work, choose File, Export, Torque Game Engine DTS.
Figure 16.8 The stretched rock-sphere. |
Figure 16.9 The almost rock. |
Team LRN
Trees 483
13.You want to take all the defaults (Collision Mesh should be set to Bounding Box).
14.Export the box to C:\3DGPAi1\fps\data\ shapes\organic\rock1.dts. Click Yes if you get an alert asking if you want to replace an existing file with that name.
Testing the Rock
The rock has a bounding box set for
Figure 16.10 The rock model.
collision because it is, after all, a rock—you can't go through it.
1.Browse to C:\3DGPAi1 and click the Run fps Demo shortcut.
2.Click Start Mission.
3.In the Launch dialog box, make sure that the Multiplayer Mission box is cleared.
4.Select Water World from the mission list.
5.Click Launch.
6.After the game loads, look around for your rock jutting out from a saddle between two hills into the water. Figure 16.11 shows what the rock (marked by the arrow) looks like.
7.Run over to the rock. On top of it you will find the Health Kit.
8.Run over the kit to automatically pick it up. You will see a message in your chat window telling you that you've
picked it up.
Trees
If Joyce Kilmer had been a game developer, he might have written, "I think that I shall never see, a model so annoying as a tree." Or something like that. But he didn't, so that's too bad. Really talented game developer poets are rare.
Nonetheless, computer model |
trees |
|
really are annoying. There is |
this |
Figure 16.11 Locating the rock. |
Team LRN

484Chapter 16 ■ Making Weapons and Items
conundrum: If you can interact reasonably well with a model tree, then it looks awful. If the tree looks really good, then interacting with it is awful.
The problem is twofold. We see them everywhere, in most parts of the world, so they provide a great deal of the background to our daily lives. This means that in virtual worlds, if there are no trees in the background, we just know something's wrong even if we can't quite put our finger on the problem. They are ubiquitous. And that means we also have a highly developed subconscious sense of what they should look like, when we aren't…um… actually looking at them. With me so far? Okay, that's problem number one.
The other problem is that they are so dad-blamed complex! Even a sapling has lots of little branches and twigs and leaves and buds and stuff. If you have a polygon budget (and if you are making games, you have a polygon budget!), then these suckers will dry up that account faster than a barking moonbat can change its mind.
So, on the one hand, to have convincing trees that satiate the subconscious gamer's mind, we need to be attentive to details. And on the other hand, those very details can drag our frame rates lower than a snake's belly in a wheel rut.
To interact well with a tree means several things: When you approach it, circle it, look up into its branches and leaves, you see things properly in three-dimensional perspective. You can collide with the thicker parts like the trunk and the big lower branches, but if you fell onto a tree from above, you would likely fall a long way down through the airy upper structures before you stopped.
But unless you want to put 30,000 polygon trees into your game world, you'll have to compromise on all those fiddly details. There are ways to strip off a few thousand polygons here and there, but long before you get anywhere reasonable, your compromises start making the tree much less treelike. So then you have to pass a few edicts like this:
From this point hence, this tree, and all other trees like this tree that grace our fair land, may only be viewed from certain angles—all of the aforementioned angles being from a level on the ground to a level not exceeding the height that one man can jump.
But then you start to drain the flexibility out of your game world. What if you are standing on the back of a truck? Or on a nearby hill? Or flying overhead in an ornithopter? Well, you can't do any of those things if you really want to save the trees!
And don't even talk to me about having forests of these things in a game. Though there are ways to make trees look absolutely stunning from a distance, and only take two polygons to accomplish the task! Using a technique called billboarding we can create trees that look great from any angle as long we are at least moderately far from the tree—say a couple dozen meters or more. But up close they are nothing but flat planes that turn to always face you. You can't look up into them from below and search for robin's nests. You can't climb them. And you certainly can't fall into them from above! I mean, what fun is that?
Team LRN
Trees 485
So why all the blather, you ask? Well, I'll tell you. We're going to look at modeling some game-friendly trees in this section, and I want you to enter into this prepared, understanding why I'm going to show you two different ways to model a tree. There are other ways, but the two represent the opposite extremes. First, we'll create a "normal" low-poly- gon solid tree with a collision mesh. One that you could potentially climb using appropriate program code. One that you could actually get beneath and peer up into. It won't look all that great, but it will look like a tree. After that, we'll create a billboard tree that can be used to make vast forests of trees that will actually look like forests.
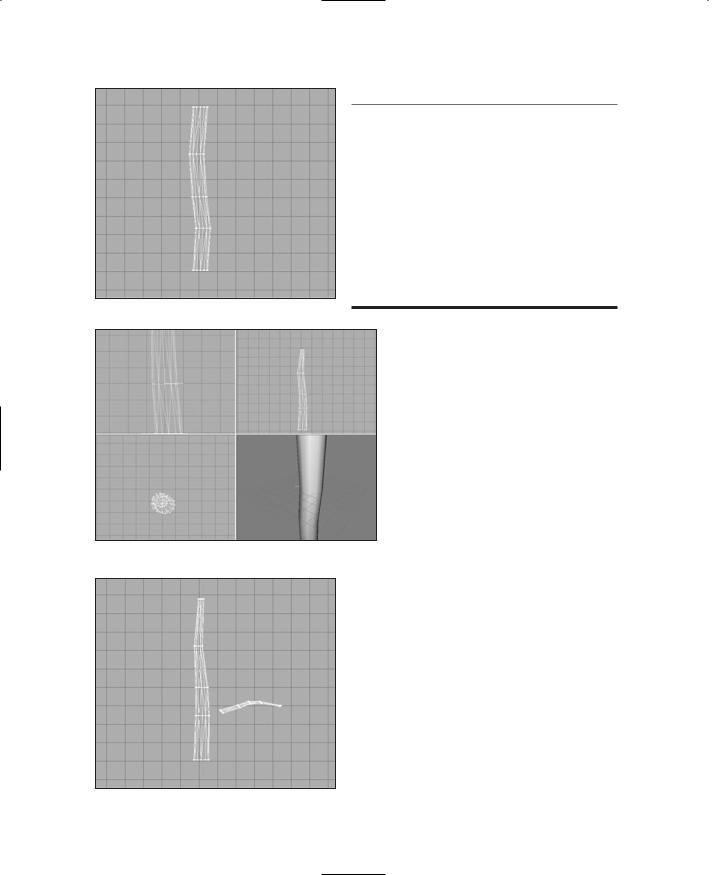
The Solid Tree
The solid tree is constructed of 3D object primitives, mostly cylinders that join end to end and taper. The one we'll make won't have any leaves—it's a generic big backyard tree in the winter.
I should warn you now that we aren't going to build a megapolygon old oak tree or anything like that here. Instead, we're going to do just enough so you'll have a good idea where you can go with the model and what's involved with this approach.
Having said all that, go ahead and create a new empty document in MilkShape, and let's get crackin'.
1.Select the Cylinder tool and set it to 4 stacks and 12 slices in the parameter boxes.
2.Click your cursor in the Side view, and drag down and to the right to create a cylinder like the one shown in Figure 16.12.
3.Still in the Side view, select the vertices in the second row from the bottom, and then use the Move tool to shift them to one side.
4.Switch to the Top view and do the same thing, moving the vertices slightly away from being aligned with the center of the cylinder.
5.Repeat steps 3 and 4 with the next two rows of vertices going up, one row at a time, using Figure 16.13 as a guide.
6.Do an incremental scaling working from the second row of vertices going up, so that you get a tapered trunk, like that shown in Figure 16.14.
7.Use the Duplicate function to make a
copy of the trunk. |
Figure 16.12 Four-stack cylinder. |
Team LRN
486 Chapter 16 ■ Making Weapons and Items
t i p
If you've forgotten how to duplicate an object, I'll go over it quickly here.
First make sure that the object to be copied has been selected in face mode. Then choose Edit, Duplicate Selection. Make sure you only do that once, and don't click your mouse in the window.
It will look like nothing happened, but a copy was made in place. Select the Move tool and then drag the selected object to a clear area. There you go— you will have the copy, and the original object will have been left behind.
Figure 16.13 Crooked cylinder.
8. Move the copy to one side. Then scale it and rotate it so that you get something that looks like Figure 16.15.
9. Drag the branch over to the trunk and place it with the larger end inside the bounds of the trunk.
10. Make more copies of the branch, scaling, rotating, and tweaking them as desired, until you get
Figure 16.14 Crooked cylinder becomes a tree trunk.
something like the model shown in Figure 16.16.
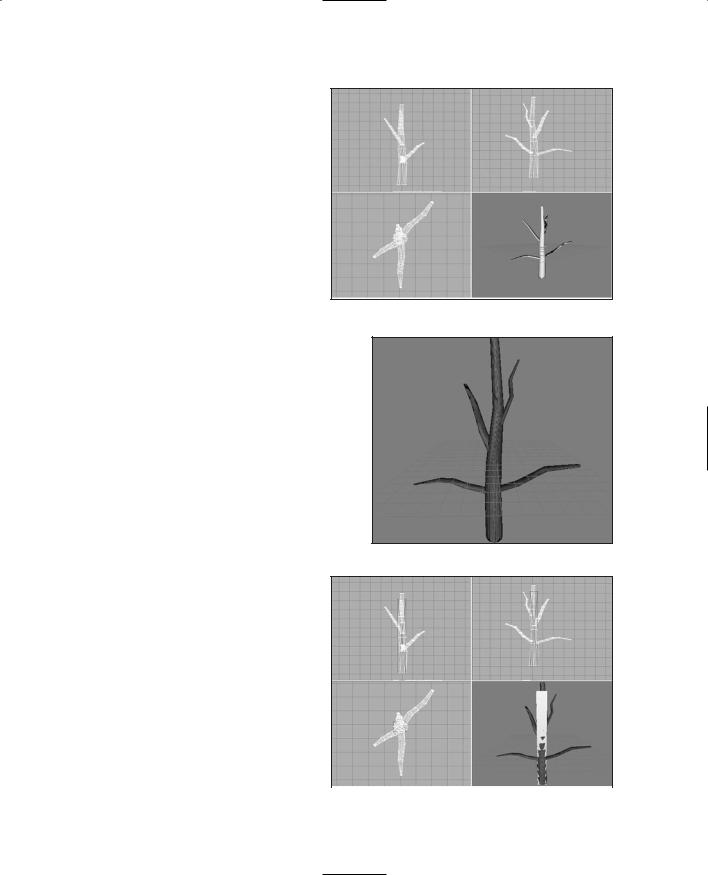
11. On the Materials tab, create a new material, using C:\3DGPAi1\RESOURCES\CH16\bark.p ng as the bitmap.
12. Name the material "bark".
13. Select the trunk using the Groups tab, and assign the bark material to it.
14. Assign the bark material to each of the branches. Do not select them all at once and assign the material—instead, do them one at a time.
Figure 16.15 Branching out.
Team LRN
Trees 487
15. Make sure that the 3D view has |
|
|
been set to texture mode. You |
|
|
should see the textured tree |
|
|
there, like that in Figure 16.17. |
|
|
Okay, we'll stop there. Of |
|
|
course, we could go on and on, |
|
|
making it more detailed, and |
|
|
that's certainly something I |
|
|
encourage you to do. It's just |
|
|
pointlessly repetitive to do it |
|
|
right now. Let's move along and |
|
|
add a collision mesh. |
Figure 16.16 Adding more branches. |
|
16. Create a box and position it as |
||
|
||
shown in Figure 16.18. |
|
17.Rename the box, calling it "Collision".
18.Save your work.
19.After saving your work, choose File, Export, Torque Game Engine DTS.
20.You want to take all the defaults (Collision Mesh should set to Bounding Box).
21.Export the box to C:\3DGPAi1\ fps\data\shapes\organic\tree1.dts. Click Yes if you get an alert asking if you
want to replace an existing file with |
Figure 16.17 The textured tree. |
that name. |
|
Testing the Solid Tree
The solid tree has a collision mesh— you can't go through it. You also can't climb it as is (you could if you wrote the appropriate script code). Anyway, to test out our solid tree, do the following:
1. |
Browse to C:\3DGPAi1 and click |
|
|
|
the Run fps Demo shortcut. |
|
|
2. |
Click Start Mission. |
|
|
Figure 16.18 The tree collision mesh. |
|||
|
|
Team LRN