

3D Game Programming All In One (2004)
.pdf568 Chapter 20 ■ Game Sound and Music
className = "WeaponImage"; |
|
item = TommyGun; |
|
ammo = TommyGunAmmo; |
|
projectile = TommyGunProjectile; |
|
projectileType = Projectile; |
|
casing = TommyGunShell; |
|
armThread = "look2"; |
|
// State Data |
|
stateName[0] |
= "Preactivate"; |
stateTransitionOnLoaded[0] |
= "Activate"; |
stateTransitionOnNoAmmo[0] |
= "NoAmmo"; |
stateName[1] |
= "Activate"; |
stateTransitionOnTimeout[1] |
= "Ready"; |
stateTimeoutValue[1] |
= 0.7; |
stateSequence[1] |
= "Activated"; |
stateSound[1] |
= WeaponSwitchSound; |
stateName[2] |
= "Ready"; |
stateTransitionOnNoAmmo[2] |
= "NoAmmo"; |
stateTransitionOnTriggerDown[2] |
= "Fire"; |
stateScript[2] |
= "onReady"; |
stateTransitionOnReload[2] |
= "Reload"; |
stateName[3] |
= "Fire"; |
stateTransitionOnTimeout[3] |
= "Ready"; |
stateTimeoutValue[3] |
= 0.096; |
stateFire[3] |
= true; |
stateRecoil[3] |
= LightRecoil; |
stateAllowImageChange[3] |
= false; |
stateSequence[3] |
= "Fire"; |
stateScript[3] |
= "onFire"; |
stateSound[3] |
= TommyGunFireSound; |
stateEmitter[3] |
= TommyGunFireEmitter; |
stateEmitterTime[3] |
= 1.0; |
stateEmitterNode[3] |
= "muzzlePoint"; |
stateName[4] |
= "Reload"; |
stateTransitionOnNoAmmo[4] |
= "NoAmmo"; |
Team LRN

Weapon Sounds 569
stateTransitionOnTimeout[4] |
= "FinishedReloading"; |
|
stateTimeoutValue[4] |
|
= 3.5; // 0.25 load, 0.25 spinup |
stateAllowImageChange[4] |
= false; |
|
stateSequence[4] |
|
= "Reload"; |
stateScript[4] |
|
= "onReload"; |
stateSound[4] |
|
= TommyGunReloadSound; |
stateName[5] |
|
= "FinishedReloading"; |
stateTransitionOnTimeout[5] |
= "Activate"; |
|
stateTimeoutValue[5] |
|
= 0.04; |
stateScript[5] |
|
= "onFinishedReloading"; |
stateName[6] |
|
= "NoAmmo"; |
stateTransitionOnAmmo[6] |
= "Reload"; |
|
stateSequence[6] |
|
= "NoAmmo"; |
stateScript[6] |
|
= "onNoAmmo"; |
stateTransitionOnTriggerDown[6] |
= "DryFire"; |
|
stateName[7] |
|
= "DryFire"; |
stateSound[7] |
|
= TommyGunDryFireSound; |
stateScript[7] |
|
= "onDryFire"; |
stateTimeoutValue[7] |
|
= 0.5; |
stateTransitionOnTimeout[7] |
= "NoAmmo"; |
|
stateName[8] |
|
= "WaitTriggerRelease"; |
stateScript[8] |
|
= "onWaitTriggerRelease"; |
stateTransitionOnTimeout[8] |
= "WaitTriggerRelease"; |
|
stateTimeoutValue[8] |
|
= 0.01; |
stateTransitionOnTriggerUp[8] |
= "Ready"; |
|
autoFire = true; |
|
|
weaponDamage = 60; |
|
|
minSpread = 0.01; |
|
|
maxSpread = 0.045; |
|
|
spreadRate = 0.019; |
// amount spread should increase per shot |
|
spreadRecoverRate = 0.003;
};
The first thing this new code does is define a bunch of audio profiles, TommyGunMountSound,
TommyGunReloadSound, TommyGunFireSound, TommyGunDryFireSound, and WeaponSwitchSound. These profiles are used in each of the different weapon firing states. Those states are defined in the next part of the new code.
Team LRN

570Chapter 20 ■ Game Sound and Music
That next part is a datablock of the type ShapeBaseImageData. This is what defines the gun itself and how it works.
First, there is a set of basic properties, like where to find the model that represents the image and so on. For this example, I have used the same model as the one that is used for the external view—the view of your player model that everyone else sees. You, though, only see the weapon image. This means that to do this right, you will need to make another model of the weapon for use in this image. Later on you will see why this matters.
Now we add the WeaponImage name space as a parent. The WeaponImage name space provides some hooks into the inventory system that are necessary for picking up the gun.
Next are a bunch of pointers that tell what various resources we will need in order to use this gun.
Finally, we encounter the code that defines the state machine. What happens is that when you pick up the gun, the Torque Engine sets it to the first state: Preactivate.
In the Preactivate state, we have only two variables, and they tell the state machine what to do immediately next. If the gun is loaded, it should change to the Activate state; if not, it should change to the NoAmmo state. If you scroll down until you find the line that says stateName[6] = "NoAmmo"; you will find that state's definition.
In the NoAmmo state, there are several directives that the engine must follow while in this state. If we suddenly receive some ammo, then we change to the Reload state. If the gun's trigger is pressed, we enter the DryFire state. Note that there is also a pointer to a function (the onNoAmmo function) that we can execute when we find ourselves in this state. This can also be called the state handler.
All of the rest of the states operate in a similar way, and the directives are quite easy to read and follow. The important ones for this chapter are the stateSound directives, which tell the engine which audio profiles to use when we arrive in that state.
The state machine definition in the TommyGunImage datablock you've just seen is really quite easy to follow. You can modify it in all sorts of ways to accommodate any variation you can imagine.
Now after getting C:\koob\control\server\weapons\tommygun.cs typed in and doublechecking it all, let's try it out.
Launch your Koob game. Once you have spawned in, we are going to use the World Editor to insert a Tommy gun and some ammo into the game world.
1.Press F8. This will set your player into camera fly mode.
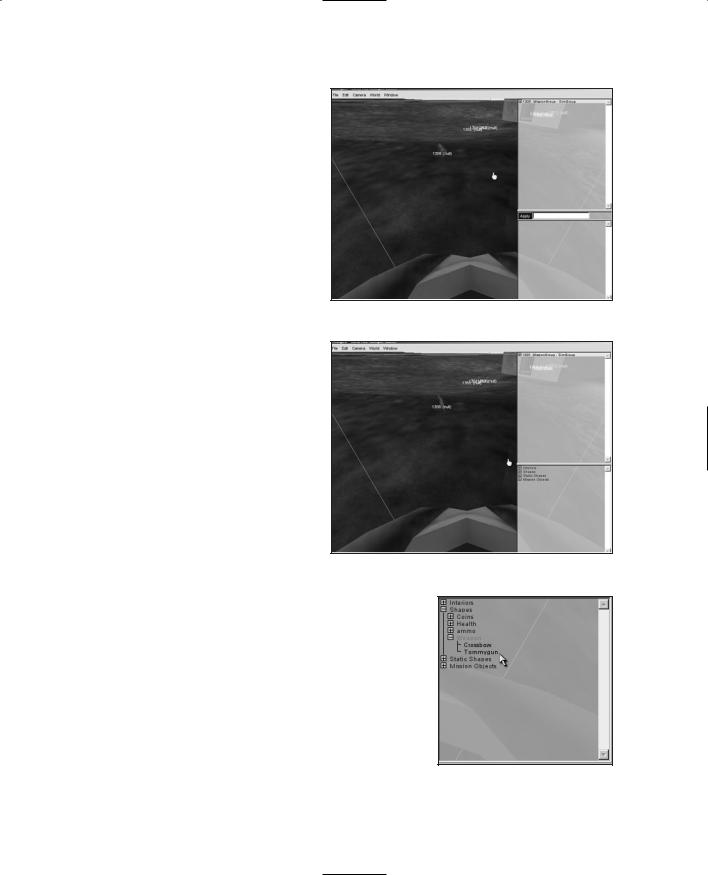
2.Press F11. This will open up the World Editor, as shown in Figure 20.1.
Team LRN
Weapon Sounds 571
3.Press F4. This will open up the World Editor Creator, as shown in Figure 20.2. The Creator frame is at the lower-right corner of the window.
4.In the Creator frame, click the plus sign next to the entry Shapes. This will expand the listing.
5.Locate Weapon and click the plus sign to open it as well. You should now have a Tree view similar to Figure 20.3.
6.Make sure that the center of the view is located in an open area about 10 virtual feet in front of you. To move the view in the World Editor, hold down the right mouse button, and move the mouse.
7.Click Tommygun in the Tree view. The Tommy gun model will appear; it will probably be somewhat embedded in the ground, as shown in Figure 20.4, and it will be rotating.
Figure 20.1 World Editor.
Figure 20.2 World Editor Creator.
8.Move the cursor over on top of
the vertical line (labeled Z) that sprouts from the top of the gun model. The Z label will become highlighted, as shown in Figure 20.5.
9.Click the vertical Z line and drag it up just a few pixels, until the gun is completely out of the ground, as depicted in Figure 20.6.
Note that this is the reason why you needed to switch to camera fly mode before entering the World Editor. If you had stayed in normal FPS view mode, you would not have been able to grab the Z line and move it.
Figure 20.3 The Creator Tree view.
Team LRN

572Chapter 20 ■ Game Sound and Music
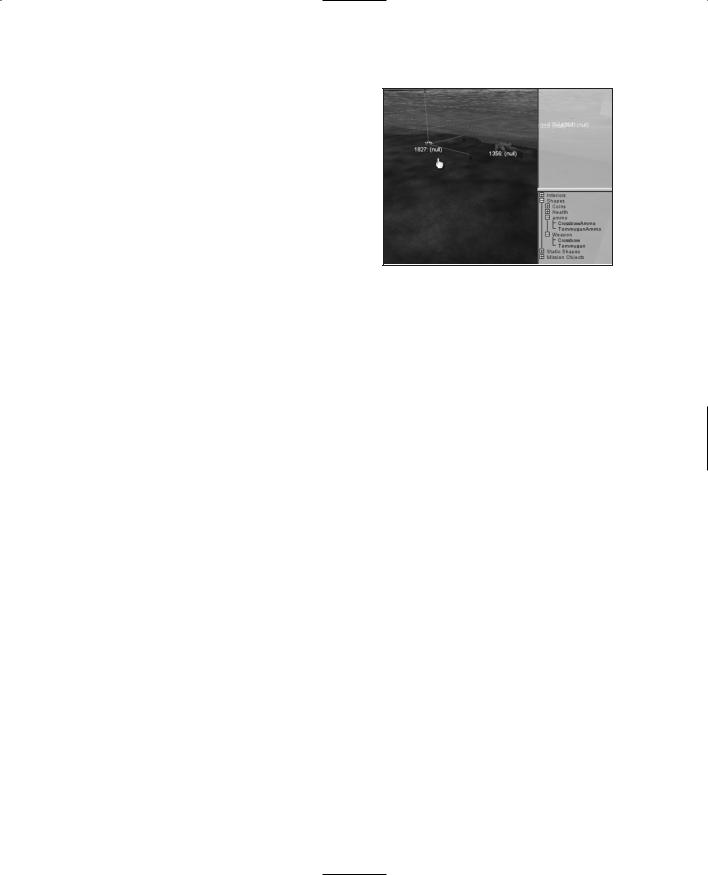
10.Now turn your view slightly to the side, and repeat the same process by placing an ammo box, as shown in Figure 20.7. The ammo box can be found in the Tree view at Shapes, Ammo, TommygunAmmo.
11.Now press F11 to toggle out of the World Editor.
Figure 20.4 Tommy gun model.
Okay, now run on over and pick up the ammo and the Tommy gun by just passing right over on top of them.
You will immediately notice that the gun doesn't carry properly. However, go ahead and shoot it, and listen to the firing sequence and all of the sounds we've been dealing with. You can make another model to act as the mounted (carried) version of the gun. Also, you will need to adjust your model animations to ensure the model will carry the gun proper- ly—the provided example character doesn't do that.
You can go back to your ShapeBaseImageData in the tommygun.cs file and fiddle with the state machine and other variables and see how they affect your gun's behavior.
Vehicle Sounds
Figure 20.5 The Z label.
Figure 20.6 Repositioned Tommy gun.
Vehicles are obvious sound sources. An idling engine, squealing tires, whirring propellers—the kind of vehicle dictates the needs. Torque has several defined vehicle types, but we'll just look at the wheeled vehicle and add some sound effects to the runabout.
To start, you will need to record sound effects for the following:
■engine idle
■acceleration
■wheel impact
■wheel squeal
■soft crash
■hard crash
In lieu of creating your own, feel free to use the sounds that I have provided at C:\3DGPAi1\RESOURCES\CH20\. Deposit the files into C:\koob\control\data\sound\.
Team LRN
Vehicle Sounds |
573 |
Next, copy the car definition module, C:\3DGPAi1\RESOURCES\CH20\CAR.CS, to C:\koob\control\data\server\vehicles. If the directory doesn't exist, create it.
Then copy your runabout model and all its artwork into C:\koob\control\data\models\vehicles. Again, if the directory doesn't exist, create it. Make sure your runabout is named "runabout.dts" and the wheel model is named
"wheel.dts".
Figure 20.7 Placing ammo box.
Now open the file C:\koob\control\server\server.cs and find the line that reads as follows:
$Game::StartTime = 0;
Just beyond that line is a block of exec() statements. Insert the following at the top or bottom of that block of statements:
Exec("./vehicles/car.cs");
This tells the engine to load your car definition file.
And finally, open the file you copied earlier, C:\koob\control\server\vehicles\car.cs, and add the following lines to the end:
datablock AudioProfile(CarSoftImpactSound)
{
filename = "~/data/sound/vcrunch.wav";
description = AudioClose3d; preload = true;
};
datablock AudioProfile(CarHardImpactSound)
{
filename = "~/data/sound/vcrash.wav";
description = AudioClose3d; preload = true;
};
datablock AudioProfile(CarWheelImpactSound)
{
filename = "~/data/sound/impact.wav";
description = AudioClose3d;
Team LRN

574 |
Chapter 20 ■ |
Game Sound and Music |
|
|
preload = true; |
|
|
|
}; |
|
|
|
datablock AudioProfile(CarThrustSound) |
||
|
{ |
|
|
|
filename |
= "~/data/sound/caraccel.wav"; |
|
|
description = AudioDefaultLooping3d; |
||
|
preload = true; |
|
|
|
}; |
|
|
|
datablock AudioProfile(CarEngineSound) |
||
|
{ |
|
|
|
filename |
= "~/data/sound/caridle.wav"; |
|
|
description = AudioClose3d; |
|
|
|
preload = true; |
|
|
|
}; |
|
|
|
datablock AudioProfile(CarSquealSound) |
||
|
{ |
|
|
|
filename |
= "~/data/sound/squeal.wav"; |
|
|
description = AudioClose3d; |
|
|
|
preload = true; |
|
|
|
}; |
|
|
|
datablock WheeledVehicleData(DefaultCar) |
||
|
{ |
|
|
|
category = "Vehicles"; |
|
|
|
className = "Car"; |
|
|
|
shapeFile = "~/data/models/vehicles/runabout.dts"; |
||
|
emap = true; |
|
|
|
maxDamage = 1.0; |
|
|
|
destroyedLevel = 0.5; |
|
|
|
maxSteeringAngle = 0.785; |
// Maximum steering angle |
|
|
tireEmitter = TireEmitter; // All the tires use the same dust emitter |
||
|
// 3rd person camera settings |
||
|
cameraRoll = true; |
// Roll the camera with the vehicle |
|
|
cameraMaxDist = 6; |
// Far distance from vehicle |
|
|
cameraOffset = 1.5; |
// Vertical offset from camera mount point |
|
|
cameraLag = 0.1; |
// Velocity lag of camera |
|
Team LRN

|
Vehicle Sounds |
575 |
cameraDecay = 0.75; |
// Decay per sec. rate of velocity lag |
|
// Rigid Body |
|
|
mass = 200; |
|
|
massCenter = "0 -0.5 0"; |
// Center of mass for rigid body |
|
massBox = "0 0 0"; |
// Size of box used for moment of inertia, |
|
|
// if zero it defaults to object bounding box |
|
drag = 0.6; |
// Drag coefficient |
|
bodyFriction = 0.6; |
|
|
bodyRestitution = 0.4; |
|
|
minImpactSpeed = 5; |
// Impacts over this invoke the script callback |
|
softImpactSpeed = 5; |
// Play SoftImpact Sound |
|
hardImpactSpeed = 15; |
// Play HardImpact Sound |
|
integration = 4; |
// Physics integration: TickSec/Rate |
|
collisionTol = 0.1; |
// Collision distance tolerance |
|
contactTol = 0.1; |
// Contact velocity tolerance |
|
// Engine |
|
|
engineTorque = 4000; |
// Engine power |
|
engineBrake = 600; |
// Braking when throttle is 0 |
|
brakeTorque = 8000; |
// When brakes are applied |
|
maxWheelSpeed = 30; |
// Engine scale by current speed / max speed |
|
//Energy maxEnergy = 100; jetForce = 3000; minJetEnergy = 30; jetEnergyDrain = 2;
//Sounds
engineSound = CarEngineSound; jetSound = CarThrustSound; squealSound = CarSquealSound; softImpactSound = CarSoftImpactSound; hardImpactSound = CarHardImpactSound;
wheelImpactSound = CarWheelImpactSound;
};
As you've seen in earlier sections, we start out with a gaggle of AudioProfiles that define each of our sounds.
After that comes the vehicle datablock. Most of the properties are explained in the code commentary or are self-explanatory. The ones that we are interested in the most are at the end.
Team LRN

576Chapter 20 ■ Game Sound and Music
The engineSound property is the sound the vehicle makes while idling. As long as the vehicle is running, it will make this noise.
The jetSound property is the one used when the vehicle accelerates. The name is a holdover from the Tribes 2 game engine in the early Torque days.
The squealSound property is the sound emitted by the tires when the vehicle is manhandled around a corner, causing the tires to slip.
The two impact sound properties, softImpactSound and hardImpactSound, are used when the vehicle collides with objects at different speeds, as defined by the softImpactSpeed and hardImpactSpeed properties earlier in the datablock.
Finally, the wheelImpactSound is the sound emitted when the wheels hit something at greater than the minimum impact speed, defined by minImpactSpeed earlier in the datablock.
Now we have to make some changes to our player's behavior. What we want is to have the player get in the car when he goes up to it.
Open the file C:\koob\control\server\players\player.cs and locate this line:
%this = %col.getDataBlock();
and add the following after it:
if ( %this.className $= "Car" )
{
if (%this.salvageFlag) %this.salvageFlag=0;
%node = 0; // Find next available seat %col.mountObject(%obj,%node); %obj.mVehicle = %col;
}
else
{
Then scroll down until you find this line:
%col.applyImpulse(%pos,%vec);
and add a closing brace ("}") after that line.
Next, add the following code to the end of the file:
function HumanMaleAvatar::onMount(%this,%obj,%vehicle,%node)
{
%obj.setTransform("0 0 0 0 0 1 0");
%obj.setActionThread(%vehicle.getDatablock().mountPose[%node]);
if (%node == 0)
Team LRN

Vehicle Sounds |
577 |
{
%obj.setControlObject(%vehicle);
%obj.lastWeapon = %obj.getMountedImage($WeaponSlot); %obj.unmountImage($WeaponSlot);
%db = %vehicle.getDatablock();
}
}
function HumanMaleAvatar::onUnmount( %this, %obj, %vehicle, %node )
{
%obj.mountImage(%obj.lastWeapon, $WeaponSlot);
}
function HumanMaleAvatar::doDismount(%this, %obj, %forced)
{
//This function is called by the game engine when the jump trigger
//is true while mounted
//Position above dismount point
%pos = getWords(%obj.getTransform(), 0, 2);
%oldPos = %pos;
%vec[0] = " 1 1 1"; %vec[1] = " 1 1 1"; %vec[2] = " 1 1 -1"; %vec[3] = " 1 0 0"; %vec[4] = "-1 0 0";
%impulseVec = "0 0 0";
%vec[0] = MatrixMulVector( %obj.getTransform(), %vec[0]);
// Make sure the point is valid %pos = "0 0 0";
%numAttempts = 5;
%success = -1;
for (%i = 0; %i < %numAttempts; %i++)
{
%pos = VectorAdd(%oldPos, VectorScale(%vec[%i], 3)); if (%obj.checkDismountPoint(%oldPos, %pos))
{
%success = %i;
Team LRN