

What is a Microcontroller (Paralax, v2.2, student guide, 2004)
.pdfPage 274 · What’s a Microcontroller?
Imagine that Pos. 126 is closed. If you want to set the tap to 125, (open pos. 126 and close pos. 125), set U/D low, then apply a pulse to CLK. If you want to set the tap to Pos 127, set U/D high, and apply 2 pulses. If you want to bring the tap down to 1, set U/D low, and apply 126 pulses.
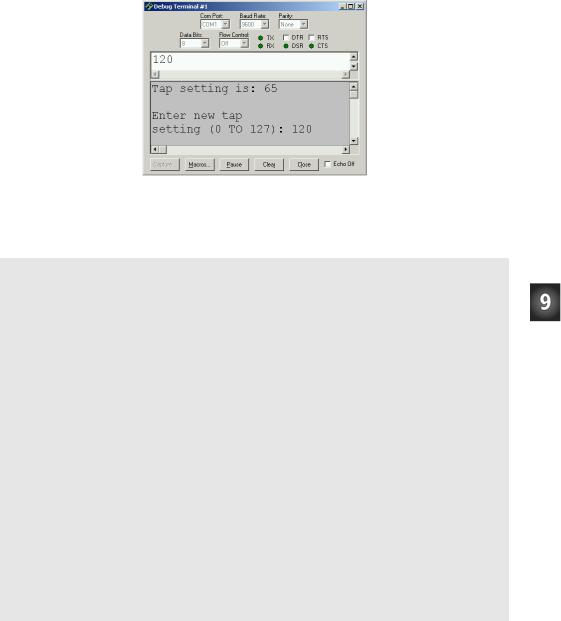
This next example program uses the Debug Terminal to ask you which tap setting you want. Then it decides whether to set the U/D pin high or low, and applies the correct number of pulses to move the tap from its old setting to the new setting.
With the exception of EEPROM Data, the next example program also has all the sections you could normally expect to find in an application program:
•Title – comments that include the filename of a program, its description, and the Stamp and PBASIC directives.
•EEPROM Data – The DATA declarations used by the program.
•I/O Definitions – constant declarations that define I/O pin numbers.
•Constants – constant declarations that define other values used in the program.
•Variables – variable declarations.
•Initialization – a routine that gets the program started on the right foot. In this next program, the potentiometer’s tap needs to be brought down to zero.
•Main – the routine that handles the primary jobs the program has to do.
•Subroutines – the segments of code that do specific jobs, either for each other, or in this case, for the main routine.
Example Program: TerminalControlledDigtialPot.bs2
You can use this example program and the Debug Terminal to set the digital pot’s tap. By changing the tap setting on the digital pot, you change the brightness of the LED connected to the transistor that the digital pot controls. Figure 9-9 shows an example of entering the value 120 into the Debug Terminal’s Transmit Windowpane while the program is running. Since the old tap setting was 65, the LED becomes nearly twice as bright when it is adjusted to 120.
Chapter #9: Electronic Building Blocks · Page 275
Windowpanes |
|
Figure 9-9 |
|
|
Sending Messages |
Transmit |
→ |
to the BASIC Stamp |
|
|
Click the Transmit |
|
|
(upper) Windowpane |
|
Receive → |
and enter the |
|
numbers for the new |
||
|
||
|
tap setting. |
√Enter and run TerminalControlledDigtialPot.bs2.
√Enter values between 0 and 127 into the Debug Terminal. Make sure to press the enter key after you type in the digits.
'-----[ Title ]-----------------------------------------------------------
'What's a Microcontroller - TerminalControlledDigitalPot.bs2
'Update digital pot's tap based on Debug Terminal user input.
'{$STAMP BS2}
'{$PBASIC 2.5}
'-----[ EEPROM Data ]-----------------------------------------------------
'-----[ I/O Definitions ]-------------------------------------------------
UdPin |
|
CON |
5 |
' Set values of I/O pins |
|
ClkPin |
|
CON |
6 |
' connected to CLK and U/D. |
|
' ----- |
[ Constants ] |
------------------------------------------------------- |
|
|
|
DelayPulses |
CON |
10 |
' Delay to observe LED fade. |
||
DelayReader |
CON |
2000 |
|
|
|
' ----- |
[ Variables ]------------------------------------------------------- |
|
|
|
|
counter |
|
VAR ... |
Byte |
' Counter for FOR |
NEXT. |
oldTapSetting |
VAR |
Byte |
' Previous tap setting. |
||
newTapSetting |
VAR |
Byte |
' New tap setting. |
|
|
' ----- |
[ Initialization --------------------------------------------------] |
|
|
||
oldTapSetting = 0 |
|
' Initialize new and old |
|||
newTapSetting = 0 |
|
' tap settings to zero. |
|||
Page 276 · What’s a Microcontroller? |
|
|
|
|
|
|
|
LOW UdPin |
' |
Set U/D pin for Down. |
|
FOR counter = 0 TO 127 |
' |
Set tap to lowest position. |
|
|
PULSOUT 6,5 |
|
|
|
PAUSE 1 |
|
|
NEXT |
|
|
|
' |
-----[ Main Routine ]---------------------------------------------------- |
|
|
DO |
|
|
|
|
GOSUB Get_New_Tap_Setting |
' |
User display and get input. |
|
GOSUB Set_Ud_Pin |
' |
Set U/D pin for up/down. |
|
GOSUB Pulse_Clk_pin |
' |
Deliver pulses. |
LOOP |
|
|
|
' |
-----[ Subroutines ]----------------------------------------------------- |
|
|
Get_New_Tap_Setting: |
' |
Display instructions and |
|
|
|
' |
get user input for new |
|
DEBUG CLS, "Tap setting is: ", |
' |
tap setting value. |
|
DEC newTapSetting, CR, CR |
|
|
|
DEBUG "Enter new tap", CR, "setting (0 TO 127): " |
||
|
DEBUGIN DEC newTapSetting |
|
|
|
RETURN |
|
|
Set_Ud_Pin: |
' |
Examine new and old tap values |
|
|
|
' |
to decide value of U/D pin. |
|
IF newTapSetting > oldTapSetting THEN |
' |
Notify user if values are |
|
HIGH UdPin |
' |
equal. |
|
oldTapSetting = oldTapSetting + 1 |
' |
Increment for Pulse_Clk_pin. |
|
ELSEIF newTapSetting < oldTapSetting THEN |
|
|
|
LOW UdPin |
|
|
|
oldTapSetting = oldTapSetting - 1 |
' |
Decrement for Pulse_Clk_pin. |
|
ELSE |
|
|
|
DEBUG CR, "New and old settings", CR, |
|
|
|
"are the same, try ", CR, |
|
|
|
"again...", CR |
|
|
|
PAUSE DelayReader |
' |
Give reader time to view |
|
ENDIF |
' |
Message. |
|
RETURN |
|
|
Pulse_Clk_pin: |
|
|
|
|
' Deliver pulses from old to new values. Keep in mind that Set_Ud_Pin |
||
|
' adjusted the value of oldTapSetting toward |
newTapSetting by one. |
|
|
' This keeps the FOR...NEXT loop from executing one too many times. |
||

Chapter #9: Electronic Building Blocks · Page 277
FOR counter = oldTapSetting TO newTapSetting
PULSOUT ClkPin, 1
PAUSE DelayPulses
NEXT
oldTapSetting = newTapSetting |
' |
Keep track |
of new and old |
|
' |
tapSetting |
values. |
RETURN |
|
|
|

Page 278 · What’s a Microcontroller?
SUMMARY
This chapter introduced integrated circuits and how they can be used with the BASIC Stamp. A transistor was used as a current valve, and a digital potentiometer was used to control the amount of current passing through the transistor. Examining the digital potentiometer introduced the reference notch and pin map as important elements of electronic chips. The function of each of the digital potentiometer pins was discussed, as well as the device’s internal structure. The PBASIC command TOGGLE was introduced as a means to save program memory.
Questions
1.What are the names of the terminals on the transistor you used in this chapter?
2.Which terminal controls the current passing through the transistor?
3.What can you do to increase or decrease the current passing through the transistor?
Exercise
1.Write a program that adjusts the tap in the digital pot to position 0 regardless of its current setting.
Project
1.Add a photoresistor to your project and cause the brightness of the LED to adjust with the brightness seen by the photoresistor.
Solutions
Q1. Emitter, base, and collector.
Q2. The base controls the current passing through the transistor.
Q3. Increase or decrease the current allowed into the transistor's base.
E1. To solve this exercise, look at TerminalControlledDigitalPot.bs2. The first thing it does, in the Initialization section, is to set the tap to the lowest position. This exact code is used in the solution below.
'What's a Microcontroller - Ch9Ex01_SetTapToZero.bs2
'Turn tap on digital pot all the way down to zero
'{$STAMP BS2}
'{$PBASIC 2.5}
DEBUG "Program Running!"
|
|
|
Chapter #9: Electronic Building Blocks · Page 279 |
|
|
|
|
UdPin |
CON |
5 |
' Set values of I/O pins |
ClkPin |
CON |
6 |
' connected to CLK and U/D. |
counter |
VAR |
Byte |
' Counter for FOR...NEXT. |
|
|
|
|
LOW UdPin |
|
|
' Set U/D pin for Down. |
FOR counter = 0 TO 128 |
|
' Set tap to lowest position. |
|
PULSOUT ClkPin,5 |
|
|
|
PAUSE 1 |
|
|
|
NEXT |
|
|
|
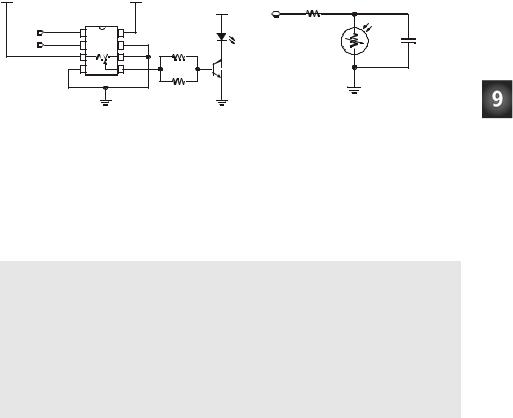
P1. Use the digital potentiometer circuit from Figure 9-6, p. 269 and the photoresistor circuit from Figure 7-2, p. 191.
Vdd |
|
|
|
|
Vdd |
|
|
AD5220 |
|
|
|
P6 |
1 |
CLK |
Vdd 8 |
|
|
P5 |
2 |
U/D |
CS 7 |
|
|
|
3 |
A1 |
B1 |
6 |
|
|
4 |
GND |
W1 |
5 |
100 kΩ |
|
|
|
|
|
100 kΩ |
Vss
Vdd |
P2 |
|
|
|
220 Ω |
|
0.01 µF |
|
Vss |
Vss |
|
This solution is based on TerminalControlledDigitalPot.bs2, except instead of being controlled by typing in the Debug Terminal, it is controlled by reading the photoresistor. A subroutine, Read_Photoresistor, reads the photoresistor using RCTIME as shown in Chapter 5. The reading from the photoresistor becomes the new tap setting, and the original program does the work to set the tap. The parts of the original program that ask for input from the Debug Terminal were deleted, including the Get_New_Tap_Setting subroutine.
'What's a Microcontroller - Ch9Prj01_PhotoControlledDigitalPot.bs2
'Update digital pot's tap based on photoresistor reading
'{$STAMP BS2}
'{$PBASIC 2.5}
DEBUG "Program Running!"
' ----- |
[ Declarations and Initialization] |
------------------------------ |
|||
UdPin |
|
CON |
5 |
' |
Set values of I/O pins |
ClkPin |
|
CON |
6 |
' |
connected to CLK and U/D. |
PhotoPin |
CON |
2 |
' |
Photoresistor on pin P2 |
|
DelayPulses |
CON |
10 |
' |
Delay to observe LED fade. |
|
DelayReader |
CON |
2000 |
|
|
|

Page 280 · What’s a Microcontroller? |
|
|
|
||
|
|
|
|
|
|
|
counter |
VAR |
Byte |
' Counter for FOR...NEXT. |
|
|
oldTapSetting |
VAR |
Byte |
' Previous tap setting. |
|
|
newTapSetting |
VAR |
Byte |
' New tap setting. |
|
|
lightReading |
VAR |
Word |
' reading from photoresistor |
|
|
oldTapSetting = 0 |
|
' Initialize new and old |
||
|
newTapSetting = 0 |
|
' tap settings to zero. |
||
|
LOW UdPin |
|
|
' Set U/D pin for Down. |
|
|
FOR counter = 0 TO 128 |
|
' Set tap to lowest position. |
||
|
PULSOUT 6,5 |
|
|
|
|
|
PAUSE 1 |
|
|
|
|
|
NEXT |
|
|
|
|
|
' -----[ Main Routine ]------------------------------------------------ |
||||
|
DO |
|
|
|
|
|
GOSUB Read_Photoresistor |
|
|
||
|
newTapSetting = lightReading |
|
|
||
|
GOSUB Set_Ud_Pin |
|
' Set U/D pin for up/down. |
||
|
GOSUB Pulse_Clk_pin |
|
' Deliver pulses. |
||
|
LOOP |
|
|
|
|
|
' -----[ Subroutines ]------------------------------------------------- |
||||
|
Set_Ud_Pin: |
|
|
|
' Examine old and new |
|
IF newTapSetting > oldTapSetting THEN |
|
' tap values to decide |
||
|
ELSEIF newTapSetting < oldTapSetting THEN |
' value of UdPin. Notify |
|||
|
LOW UdPin |
|
|
|
' user if values are |
|
ENDIF |
|
|
|
' equal. |
|
RETURN |
|
|
|
|
|
Pulse_Clk_pin: |
|
|
|
' Deliver pulses |
|
FOR counter = oldTapSetting TO newTapSetting ' from old to new |
||||
|
PULSOUT ClkPin, 1 |
|
|
' values. |
|
|
PAUSE DelayPulses |
|
|
|
|
|
NEXT |
|
|
|
|
|
oldTapSetting = newTapSetting |
' Keep track of new and old |
|||
|
RETURN |
|
|
' tapSetting values. |
|
Read_Photoresistor:
HIGH PhotoPin
PAUSE 100
RCTIME PhotoPin, 1, lightReading
RETURN
Further Investigation
“Industrial Control”, Student Guide, Version 2.0, Parallax Inc., 2002
Industrial Control uses the transistor as an on/off switch for a resistor heating element. It also uses a phototransistor to detect the passage of stripes on a spinning wheel.

Chapter #10: Running the Whole Show · Page 281
Chapter #10: Running the Whole Show
SUBSYSTEM INTEGRATION
Most of the activities in this text introduce how to program the BASIC Stamp to interact with one or two circuits at a time. Many microcontrollers have to handle tens or even hundreds of circuits. This chapter will demonstrate a few of the techniques used to manage a variety of circuits with a single microcontroller. Programming the microcontroller to orchestrate the activities of different circuits performing unique functions is called subsystem integration.
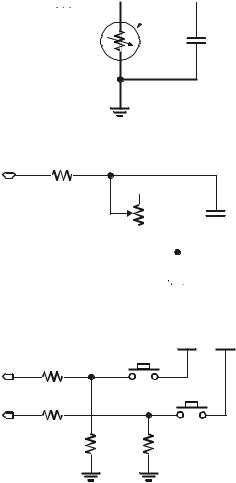
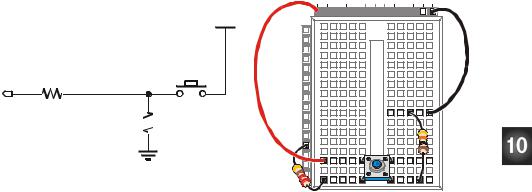
The example in this chapter uses a sensor array consisting of two pushbutton circuits, a potentiometer circuit and a photoresistor circuit. The activities in this chapter will guide you through building and testing each subsystem individually. After each subsystem is built and tested, you will then write a program that combines each subsystem into a working unit. Figure 10-1 shows the circuit schematic for the system you will build, and the master parts list is below.
Always remember: whenever possible, test each subsystem individually before trying to make them work together. If you follow this rule, your projects will go much more smoothly, and your chances of success will be greatly improved. The activities in this chapter will guide you through the process.
Sensor Array Parts List
(4) Resistors – 220 Ω (red-red-brown)
(2) Resistors – 10 kΩ (brown-black-orange)
(2) Pushbuttons – normally open
(2) Capacitors – 0.1 µF
(1) Potentiometer – 10 kΩ
(1) Photoresistor
(5) Jumper wires


 220
220 

 10 k
10 k


