

СУБД Oracle / Литература / PowerDesigner 9 / CDM_Tutorial
.pdf&KDSWHU 'HILQLQJ %XVLQHVV 5XOHV 'RPDLQV DQG 'DWD ,WHPV
17Click the 3URSHUWLHV tool.
RU
Double click the arrow at the beginning of the line. The property sheet for the domain appears.
18Click the Question Mark button next to the 'DWD 7\SH dropdown listbox.
The 6WDQGDUG 'DWD 7\SHV dialog box appears. You use this dialog box to specify the form of the data affected by the domain.
19Click the 6KRUW LQWHJHU radio button.
The code SI indicates that the Percent domain has a short integer data type. The Length and Precision boxes are not available because you do not need to specify a length and precision for the short integer data type.
20Click 2. in each of the dialog boxes.
'HIDXOW GDWD W\SH
When you do not define a data type for a domain, it receives the default data type. You can designate a default data type by selecting Tools→Model Options.
What you learned In this section, you learned how to:
♦Look for data items storing similar types of data, and create a domain to standardize the data characteristics of these data items
♦Identify a domain by a name and a code
♦Specify the data type, length, and precision of the domain
CDM Getting Started |
|
&UHDWH D GDWD LWHP
&UHDWH D GDWD LWHP
To manage books with multiple authors, you will create data items for the percentage of royalties for each author and for the order of an author’s name in the list of authors.
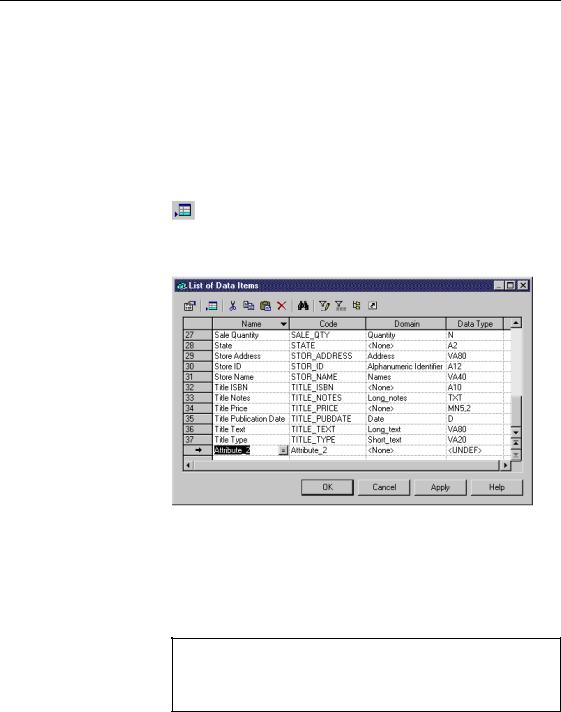
1Select 0RGHO→'DWD ,WHPV from the menu bar.
The List of Data Items displays existing data items.
2Click the $GG D 5RZ tool.
An arrow appears at the start of the first blank line and a default name and code are entered.
3Type 7LWOH$XWKRU 3HUFHQW in the 1DPH column.
This is the name of the data item. The equivalent code is entered in the Code column automatically.
4Click $SSO\.
The creation of the data item is committed.
1DPHV VRUWHG DOSKDEHWLFDOO\
When you click $SSO\ or 2., all names in the list are sorted alphabetically. The order of appearance of the names in the list will therefore.
|
PowerDesigner |
&KDSWHU 'HILQLQJ %XVLQHVV 5XOHV 'RPDLQV DQG 'DWD ,WHPV
5Click the data item line.
An arrow appears at the beginning of the line.
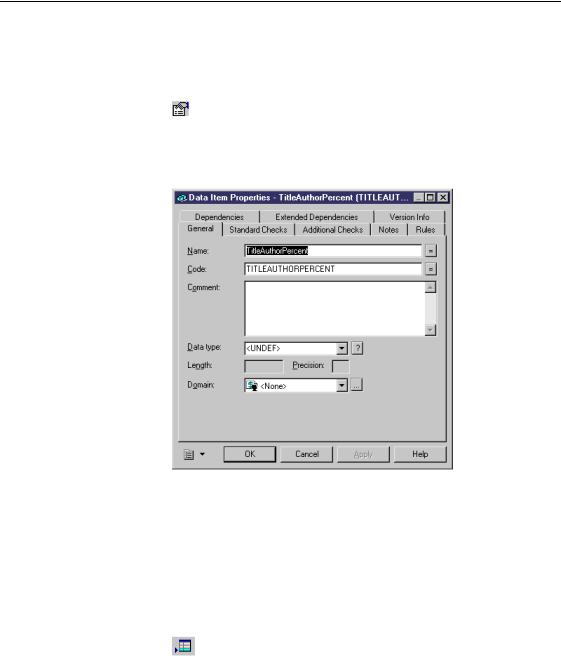
6Click the 3URSHUWLHV tool.
RU
Double click the arrow at the beginning of the line. The property sheet for the data item appears.
7Select 3HUFHQW from the 'RPDLQ dropdown listbox in the bottom part of the dialog box.
This applies the data type of the Percent domain to the data item. In the Data Type column, SI indicates a short integer.
8Click OK.
You return to the List of Data Items.
9Click the $GG D 5RZ tool.
An arrow appears at the start of the first blank line and a default name and code are entered.
10Type 7LWOH$XWKRU 2UGHU in the Name column.
CDM Getting Started |
|
&UHDWH D GDWD LWHP
This is the name of the data item. The equivalent code is entered in the
Code column automatically.
11Click $SSO\.
The creation of the data item is committed.
12Click the data item line.
An arrow appears at the beginning of the line.
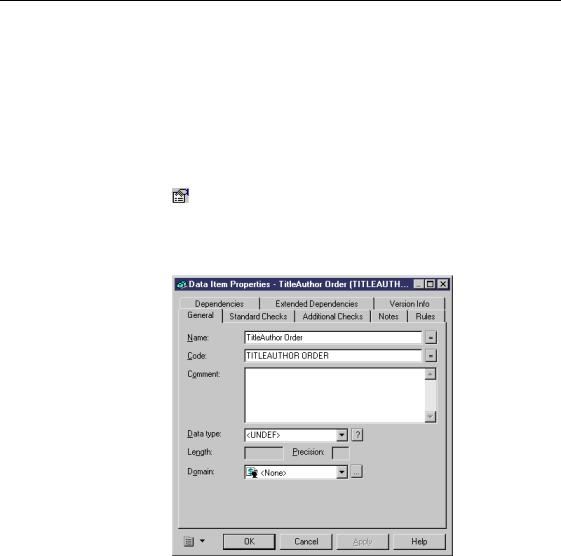
13Click the 3URSHUWLHV tool.
RU
Double click the arrow at the beginning of the line. The property sheet for the data item appears.
14Click the 4XHVWLRQ 0DUN button next to the Data Type dropdown listbox. The Standard Data Types dialog box appears.
15Click the ,QWHJHU radio button.
|
PowerDesigner |

&KDSWHU 'HILQLQJ %XVLQHVV 5XOHV 'RPDLQV DQG 'DWD ,WHPV
This gives the TitleAuthor Order data item an Integer data type.
16Click 2. in each of the dialog boxes. You return to the model window.
What you learned In this section, you learned how to:
♦Refer to the statement of the business problem to decide what additional information you need to be able to manage
♦Create data items to reflect these needs
♦Identify a data item by a name, a code, and a data type
♦Select a data type by attaching a data item to a domain
♦Select a data type for a specific data item
CDM Getting Started |
|

$WWDFK D GDWD LWHP WR D GRPDLQ
$WWDFK D GDWD LWHP WR D GRPDLQ
You will attach the AMOUNT domain to all data items that store amounts of money and the PERCENT domain to all data items that store percentages.
1Select 0RGHO→'DWD ,WHPV from the menu bar. The List of Data Items dialog box appears.
2Click the number of the data item $XWKRU $GYDQFH.
Press while you click the number of the data item 5R\DOW\ $PRXQW. Press while you click the number of the data item 6DOH $PRXQW. Press while you click the number of the data item 7LWOH 3ULFH.
These data items are selected.
3 Scroll to the right until the 'RPDLQ column appears.
/LVW FROXPQ LV QRW YLVLEOH
If a list column is not visible, click the Customize Columns and Filter tool from the toolbar. A selection box appears listing all the columns displayed in the list. Select the appropriate checkbox for the column that is not displayed, then click OK. The column appears in the list.
4Click in the 'RPDLQ column for the line Author Advance.
A down arrowhead appears at the end of the line. This indicates that a dropdown list is available for the Domain column. The list contains all the domains available in the model.
|
PowerDesigner |

&KDSWHU 'HILQLQJ %XVLQHVV 5XOHV 'RPDLQV DQG 'DWD ,WHPV
5 Click the down arrowhead and select $PRXQW.
Amount automatically appears in the Domain column for each of the other selected data items. When you assign a property to a selected item in a list, all other selected list items are automatically assigned the same property.
The data items inherit the data type of the domain. MN8,2 appears in the Data Type column. This code indicates a money data type with a length of 8 and a precision of 2.
CDM Getting Started |
|

$WWDFK D GDWD LWHP WR D GRPDLQ
The data items Author Advance, Royalty Amount, Sales Amount, and Title Price which before had different data types, now inherit a standardized data type from the Amount domain.
6Click the number of the data item 'LVFRXQW 3HUFHQW and select 3(5&(17 from the dropdown listbox in the Domain column.
7Click 2..
What you learned In this section, you learned how to ensure data consistency by attaching data items to domains.
It is good practice to attach data items to domains. By doing so, when you modify a domain you can globally update the characteristics of the attached data items.
|
PowerDesigner |
C H A P T E R 5
'HILQLQJ (QWLWLHV
About entities
Why create an entity
Why create an associative entity
About entity attributes
About entity identifiers
An HQWLW\ is an object about which you want to store information. For example, in the tutorial model the AUTHOR entity groups information like author name and address.
The business problem indicates which entities you need to create. For example, to identify and store pictures of authors, you will create a PICTURE entity that contains all information related to pictures.
To respond to another business problem, you need to keep track of the percentage of royalties received by each author of each title.
One title may be written by many authors, and one author may have many titles to his or her credit. This is called a many-to-many relationship.
Because each author must be unique in the Author entity, and each Title must be unique in the Title entity, you will create an associative entity that has a unique occurrence for each title-author combination. You will then be able to attach a percentage to each unique case.
An HQWLW\ DWWULEXWH is an elementary piece of information (data item) which you attach to an entity. For example, Last Name is an attribute of the AUTHOR entity because it provides information about an author. You will add a biography attribute to the AUTHOR entity.
An HQWLW\ LGHQWLILHU is made up of one or more attributes unique to the entity, such that each value of the identifier corresponds to one, and only one, occurrence of the entity. For example, ISBN is the identifier of the TITLE entity because an ISBN uniquely identifies a title. You will assign a picture identification number as the identifier of the PICTURE entity.
Attaching business You attach a business rule to an entity as a reminder of the conditions rules to entities attached to the entity. You will attach the business rule you created in the
preceding lesson to one of the entities.
CDM Getting Started |
|
&UHDWH DQ HQWLW\
What you will do In this chapter you will:
♦Create an entity
♦Create an associative entity
♦Define entity attributes
♦Designate an identifier
♦Attach a business rule to an entity
+RZ ORQJ ZLOO LW WDNH"
About 15 minutes
|
PowerDesigner |