

СУБД Oracle / Литература / PowerDesigner 9 / CDM_Tutorial
.pdf&KDSWHU $ERXW WKH &'0 7XWRULDO
:KDW \RX ZLOO OHDUQ
You will learn basic PowerDesigner techniques for creating a CDM, including:
♦How to create the basic elements of a CDM: domains, data items, business rules, and entities
♦How to create different types of relationships between entities
♦How to create packages and add objects to a package
♦How to create an inheritance
♦How to use the display functions to arrange symbols and to center the model on the page
♦How to generate a Physical Data Model (PDM) from a CDM
CDM Getting Started |
|

6HWWLQJ XS
6HWWLQJ XS
Before you begin, make sure that the files you need for the exercises are on your hard disk. When you install PowerDesigner, these files are installed in the Examples\Tutorial directory of PowerDesigner. When you have finished with this tutorial you can delete them if you want.
The CDM tutorial uses the following files:
)LOH |
'HVFULSWLRQ |
|
CDMBEFOR.CDM |
Starting tutorial CDM |
|
CDMAFTER.CDM |
Finished tutorial CDM |
|
|
|
|
PowerDesigner |
C H A P T E R 2
6WDWLQJ WKH %XVLQHVV 3UREOHP
|
The first step to creating a Conceptual Data Model (CDM) is to formulate a |
|
statement of the business problems that the CDM will address. To do this, |
|
you draw up a description of business activities. This helps you decide: |
|
♦ What information you need to store |
|
♦ What entities are involved in the business |
|
♦ How the business operates |
|
When the way the business operates is clear, you can begin to develop the |
|
CDM. |
Business |
You will start this tutorial with a CDM that is the conceptual model of the |
description |
information system for a publishing company. |
|
A business description indicates that the entities involved in the business |
|
include titles, authors, book stores, and discounts. It indicates the details |
|
related to each of these entities: from international standard book numbers |
|
(ISBN) for titles to store addresses. |
Business problem In the course of the CDM tutorial, you will solve three business problems:
♦ |
5R\DOWLHV IRU PXOWLSOH DXWKRUV Keep track of different royalty |
|
percentages for authors of the same book |
♦ |
$XWKRU SLFWXUHV DQG ELRJUDSKLHV Identify and store author pictures |
|
and biographies for use on book covers |
♦7LWOH FDWHJRULHV Classify each title as a periodical or a non-periodical and save related information
On the basis of these business problems, you will extend the tutorial model to manage additional data. For example, you will add an entity for pictures and you will create a data item to store information about percentages of royalties that a particular author receives.
CDM Getting Started |
|

6WDWLQJ WKH %XVLQHVV 3UREOHP
|
PowerDesigner |

C H A P T E R 3
+RZ WR %HJLQ WKH &'0 7XWRULDO
You will begin the tutorial by running PowerDesigner. You will learn how to use the tool palette.
You will open the tutorial file and assign it preferences, options, and properties. Next, you will save it under a different name so that you can go back and use the original model again if you want to repeat the exercises.
What you will do |
In this chapter you will: |
|
|
♦ |
Start PowerDesigner |
|
♦ Use the tools in the tool palette |
|
|
♦ Open the tutorial CDM |
|
|
♦ Define CDM preferences and options |
|
|
♦ |
Define CDM properties |
♦ Save the tutorial CDM
+RZ ORQJ ZLOO LW WDNH"
About 10 minutes.
CDM Getting Started |
|
6WDUW 3RZHU'HVLJQHU
6WDUW 3RZHU'HVLJQHU
♦Click the 3RZHU'HVLJQHU program icon.
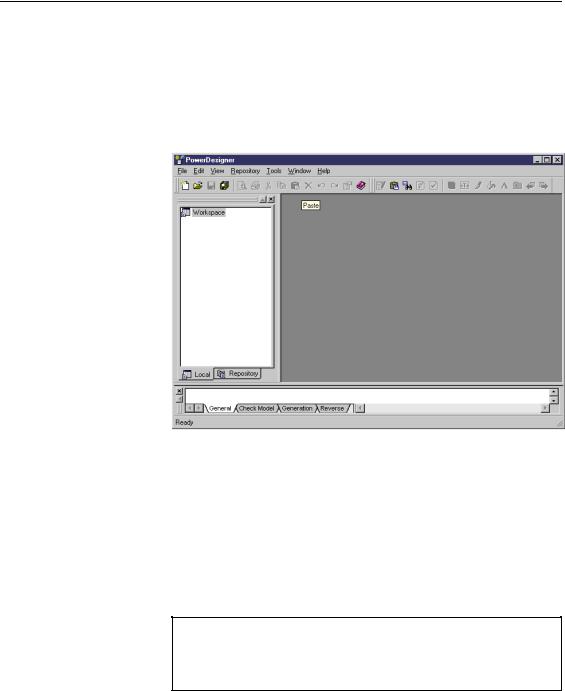
The PowerDesigner main window appears. It contains an object browser window docked to the left, and an output window docked to the bottom of the main window.
The object browser window shows the contents of the workspace in a tree view. You can use the object browser to organize the objects in each of your models.
The ZRUNVSDFH is the name for the current PowerDesigner session.
Workspace is the default node in the object browser tree view. The new
CDM that you will open will be created and saved in a workspace.
The output window shows the progression of any process that you run from PowerDesigner, for example the process of generating a PDM from a CDM is shown in this window.
<RXU VFUHHQ ORRNV GLIIHUHQW
All the screen captures in this book were taken with a resolution that may be different from the one you use, as a result the appearance and proportions of the images on your screen may be slightly different.
|
PowerDesigner |
&KDSWHU +RZ WR %HJLQ WKH &'0 7XWRULDO
2SHQ D QHZ &'0
1Select )LOH→1HZ.
A selection window appears. It lists the types of models that you can open in the PowerDesigner main window.
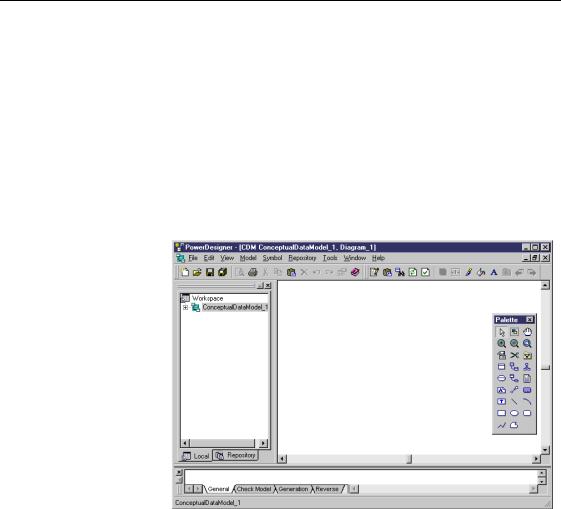
2Select &RQFHSWXDO 'DWD 0RGHO.
3Click 2..
A CDM model window appears. It contains a diagram window (as yet empty), a palette, and the Browser and Output windows are docked to the left and bottom of the screen respectively.
CDM Getting Started |
|
8VH WKH WRROV LQ WKH WRRO SDOHWWH
8VH WKH WRROV LQ WKH WRRO SDOHWWH
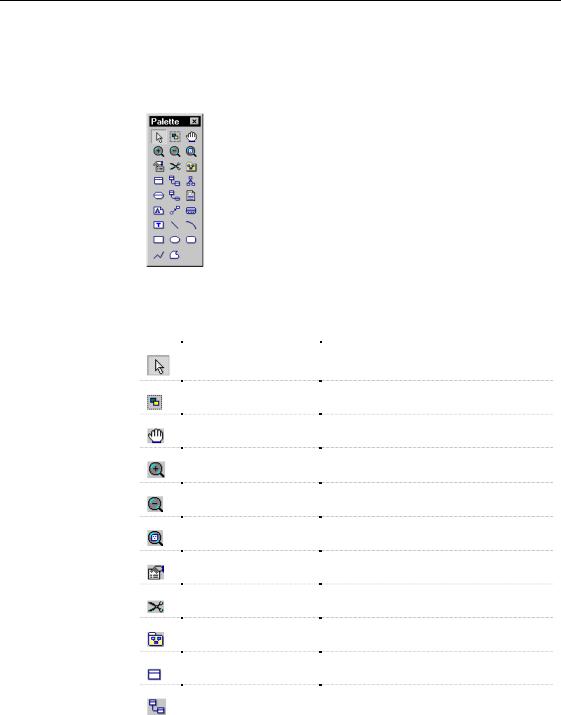
The buttons in the CDM tool palette enact all major functions needed to build and modify a CDM.
The following table indicates the names and functions of each tool in the palette:
|
7RRO |
1DPH |
$FWLRQ |
|
|
Pointer |
Selects symbol |
|
|
Lasso |
Selects symbols in an area |
|
|
||
|
|
Grabber |
Selects, moves and resizes all symbols |
|
|
||
|
|
Zoom In |
Increases view scale |
|
|
||
|
|
Zoom Out |
Decreases view scale |
|
|
||
|
|
Open Package Diagram |
Display diagram for selected package |
|
|
||
|
|
Properties |
Display property sheet for selected symbol |
|
|
||
|
|
Delete |
Delete symbol |
|
|
||
|
|
Package |
Insert package symbol |
|
|
||
|
|
Entity |
Insert entity symbol |
|
|
||
|
|
Relationship |
Insert relationship symbol |
|
|
||
|
|
|
|
|
PowerDesigner |
||

|
|
|
&KDSWHU +RZ WR %HJLQ WKH &'0 7XWRULDO |
||
|
|
|
|
|
|
|
|
|
|
|
|
|
7RRO |
1DPH |
|
$FWLRQ |
|
|
|
Inheritance |
|
Insert inheritance symbol |
|
|
|
Association |
|
Insert association symbol |
|
|
|
|
|||
|
|
Association Link |
|
Insert association link symbol |
|
|
|
|
|||
|
|
File |
|
Insert a file symbol |
|
|
|
|
|||
|
|
Note |
|
Insert note symbol |
|
|
|
|
|||
|
|
Link/Extended |
|
Draws a graphical link between symbols in |
|
|
|
|
|||
|
|
Dependency |
|
the diagram |
|
|
|
|
|
Draws a note link between a Note and an |
|
|
|
|
|
object |
|
|
|
|
|
Draws an extended dependency between two |
|
|
|
|
|
objects that support extended dependencies |
|
|
|
Title |
|
Insert title symbol |
|
|
|
|
|||
|
|
Text |
|
Insert text |
|
|
|
|
|||
|
|
Line |
|
Draw a line |
|
|
|
|
|||
|
|
Arc |
|
Draw an arc |
|
|
|
|
|||
|
|
Rectangle |
|
Draw a rectangle |
|
|
|
|
|||
|
|
Ellipse |
|
Draw an ellipse |
|
|
|
|
|||
|
|
Polyline |
|
Draw a jagged line |
|
|
|
|
|||
|
|
Polygon |
|
Draw a polygon |
|
|
|
|
|||
|
|
|
|
|
|
So that you know how to use these tools before you begin creating the CDM, you will create a few objects using the tool palette.
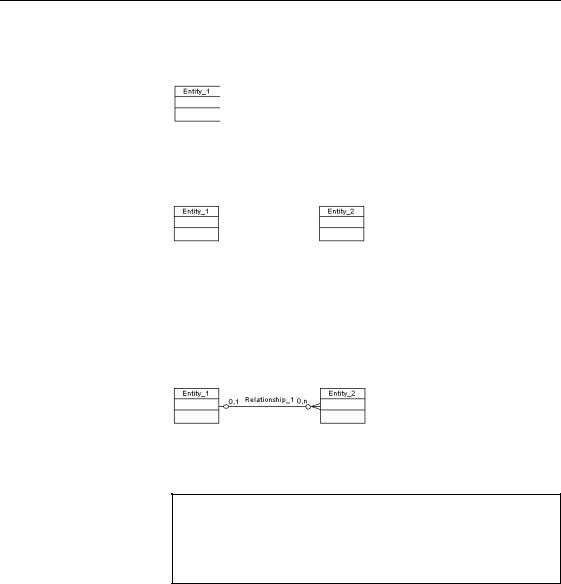
1Click the (QWLW\ WRRO in the tool palette.
The cursor takes the form of an entity when it is moved into the diagram.
2Click anywhere in the CDM diagram.
CDM Getting Started |
|
8VH WKH WRROV LQ WKH WRRO SDOHWWH
An entity symbol appears at the click position. The entity has the name Entity_Q, where n is a number assigned to the entity in the order of creation of objects.
3The Entity tool is still active, so click again in the CDM diagram to create another entity.
There are now two entities in the CDM diagram.
4Click the 5HODWLRQVKLS WRRO in the tool palette.
The Entity tool is now released and the Relationship tool is active.
5Click inside the ILUVW HQWLW\ and while continuing to hold down the mouse button, drag the cursor to the second entity. Release the mouse button inside the second entity.
This creates a relationship.
6Click the ULJKW PRXVH EXWWRQ. You release the relationship tool.
7R UHOHDVH D WRRO
A tool remains active until you release it. You can release a tool, by selecting another tool or by clicking the right mouse button. By default, when you click the right mouse button, the Pointer tool is activated.
7Click the /DVVR tool in the palette. The Lasso tool is now active.
8Click the cursor above a corner of the first entity and while continuing to hold down the mouse button, drag the cursor so that you draw a rectangle around the two entities.
Release the mouse button.
|
PowerDesigner |