

СУБД Oracle / Литература / PowerDesigner 9 / PDM_Tutorial
.pdf&KDSWHU +RZ WR %HJLQ WKH 3'0 7XWRULDO
A table symbol appears at the click position. The table has the name Table_Q, where Q is a number assigned to the table in the order of creation of objects.
3Click again in the PDM diagram window to create another table.
4Click the 5HIHUHQFH tool in the palette.
The Table tool is now released and the Reference tool is active.
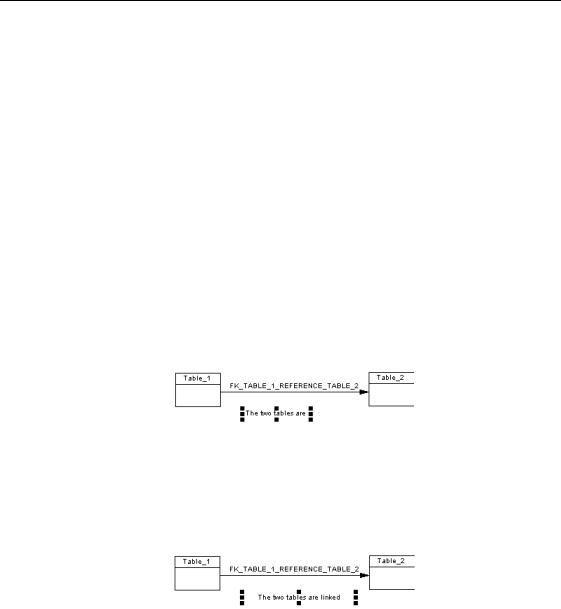
5Click inside the first table and while continuing to hold down the mouse button, drag the cursor to the second table. Release the mouse button inside the second table.
You create a reference between the two tables.
6Click the right mouse button. You release the Reference tool.
5HOHDVLQJ D WRRO
A tool remains active until you release it. You can release a tool by selecting another tool or by clicking the right mouse button. By default, when you click the right mouse button, the Pointer tool is activated.
7Click the /DVVR tool in the palette. The Lasso tool is now active.
8Click the cursor above a corner of the first table and while continuing to hold down the mouse button, drag the cursor so that you draw a rectangle around the two tables.
Release the mouse button.
The tables and the reference are selected. Handles appear on the table symbols to show that they are selected.
PDM Getting Started |
|
8VH WKH WRROV LQ WKH 3DOHWWH
9Click one of the selected tables and drag it to a new position. The selected symbols are moved.
10Click the 7H[W tool in the palette. The Text tool is now active.
11Click the cursor under the reference and while continuing to hold down the mouse button, drag the cursor to draw a small rectangle.
Release the mouse button.
Some text appears in the area indicated by the rectangle.
12Click the right mouse button. You release the Text tool.
13Double-click the text. A text box appears.
14Type a short text into the text box.
15Click OK.
The text appears in the diagram. Handles appear around the text.
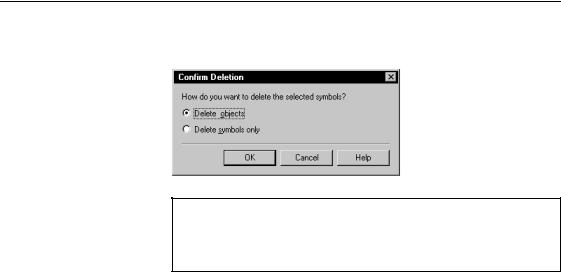
16Click a handle at the right edge of the text and while continuing to hold down the mouse button, drag the cursor to the right until all the text appears.
Release the mouse button.
Click on the diagram background. The handles around the text disappear.
17Click the 3RLQWHU tool in the palette.
You will use this tool to select and delete one of the symbols.
18Click on one of the table symbols.
This selects the object you want to delete.
19Press the DEL key.
|
PowerDesigner |
&KDSWHU +RZ WR %HJLQ WKH 3'0 7XWRULDO
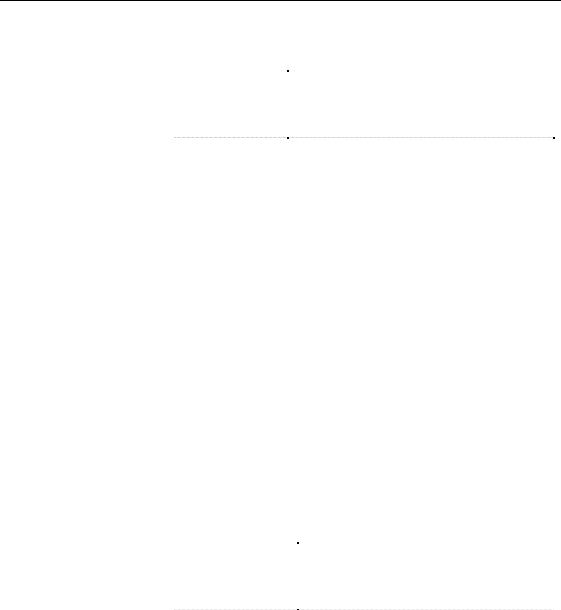
The Confirm Deletion message box appears, asking you how you want to delete the selection.
'HOHWLQJ REMHFWV
If you select Delete object, you erase the graphic symbol and delete the object from the model. If you select Delete symbols only, you erase the graphic symbol, but keep the object in the model.
20Click OK.
The table and associated reference are removed from the diagram. The objects are also deleted from the model.
21Click in the remaining table.
Press SHIFT while you click the text. The two objects are selected.
22Press the DEL key, and click OK when the deletion message appears. The remaining table and text are erased.
What you learned In this section, you learned how to use some of the tools in the palette. You can now:
♦Select a tool
♦Release the active tool either by selecting another tool or by clicking the right mouse button
♦Select a group of objects
♦Move graphic objects
♦Create text to document the PDM
♦Delete objects
PDM Getting Started |
|

'HILQH 3'0 SUHIHUHQFHV DQG RSWLRQV
'HILQH 3'0 SUHIHUHQFHV DQG RSWLRQV
Before you begin working, you will define certain display preferences and model options for the PDM.
For a complete description of all PDM preferences and options, see the
*HQHUDO )HDWXUHV *XLGH.
1Select 7RROV→'LVSOD\ 3UHIHUHQFHV from the menu bar. The Display Preferences dialog box appears.
2Select the 7DEOH node, under the 2EMHFW YLHZ node, in the &DWHJRU\ tree view.
The Table page appears.
3Select or clear the following display preferences:
*URXS ER[ |
6HOHFWHG LWHP |
|
Table |
Columns |
|
|
All columns |
|
Table column |
Key indicators |
|
|
Index indicators |
|
|
|
For each table symbol, these preferences display all columns of a table, and identify all key and index columns.
4Select the 5HIHUHQFH node, under the 2EMHFW 9LHZ node, in the &DWHJRU\ tree view
The Reference page appears.
5Select or clear the following display preferences:
*URXS ER[ |
6HOHFWHG LWHP |
|
Center Text |
- |
|
End Text |
Cardinality |
|
Display Mode |
Relational |
|
|
|
The cardinality of the reference is displayed for each reference symbol.
6Select the 9LHZ node, under the 2EMHFW 9LHZ node, in the &DWHJRU\ tree view.
The View page appears.
|
PowerDesigner |
&KDSWHU +RZ WR %HJLQ WKH 3'0 7XWRULDO
7 Select or clear the following display preferences:
*URXS ER[ |
6HOHFWHG LWHP |
|
View |
Columns |
|
|
No formulas |
|
|
Tables |
|
View columns |
Name |
|
|
|
For each view symbol, these preferences display all view columns, tables, and indicate the name for each view column.
8Click the )RUPDW node. The Format page appears.
9Click the 0RGLI\ button at the bottom right of the page. The Symbol Format page appears.
10Verify that the Auto adjust to text checkbox is selected.
11Click 2..
You return to the Display Preferences dialog box.
12Click 2..
You return to the PowerDesigner main window.
13Select 7RROV→0RGHO 2SWLRQV from the menu bar.
The Model Options dialog box appears. The Model node is selected by default in the Category tree view.
14Select or clear the following model options:
*URXS ER[ |
6HOHFWHG LWHP |
|
Column & Domain |
Enforce non-divergence |
|
|
Data type |
|
|
Default data type: Undefined |
|
Reference |
Unique code |
|
|
Auto-migrate columns |
|
|
Default link on creation: Primary key |
|
|
|
PDM Getting Started |
|

'HILQH 3'0 SUHIHUHQFHV DQG RSWLRQV
For the entire model, these preferences enforce non divergence of data type for columns and domain. References are set as having a unique code and auto-migrating columns is activated.
$XWR PLJUDWLQJ IRUHLJQ NH\V
When Auto-migrate columns is selected, the primary key in a parent table automatically migrates to the child table as a foreign key when you create a reference between the two tables
15Click the 1DPLQJ &RQYHQWLRQ node. The Naming Convention page appears.
16Select the Code radio button.
You display codes in the object symbols in the diagram.
17 Click 2..
|
PowerDesigner |
&KDSWHU +RZ WR %HJLQ WKH 3'0 7XWRULDO
$UUDQJLQJ V\PEROV LQ WKH GLDJUDP ZLQGRZ
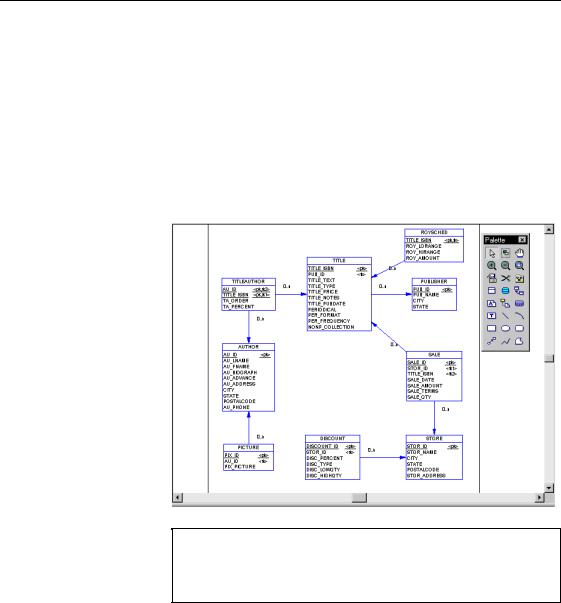
You can arrange objects displayed in the diagram window by selecting a symbol and dragging it to a new position. When a model has been reversed engineered, you often need to rearrange the symbols to improve the readability of the display.
You will arrange the table symbols in the diagram.
♦Arrange the table symbols in the diagram by clicking on a symbol and dragging it to a new position so the model appears in the diagram window as shown below:
$OLJQLQJ PXOWLSOH V\PEROV
To align multiple symbols, press SHIFT while clicking on the symbols that you want to arrange and then select Symbol→Align and choose an align option from the menu.
PDM Getting Started |
|
6DYH WKH WXWRULDO 3'0
6DYH WKH WXWRULDO 3'0
You will save the tutorial PDM in another file. This leaves the original tutorial PDM intact so you can use it again if you want to redo the exercises.
1Select )LOH→6DYH $V.
The File Save As dialog box appears.
2Type 78725,$/ 3'0 in the File Name box.
This is the name of the file in which you will work and save your modifications.
3Click 6DYH.
6DYH \RXU ZRUN
Save your work periodically while doing these exercises by selecting File→Save.
|
PowerDesigner |
C H A P T E R 3
&UHDWLQJ D 7DEOH LQ WKH 3'0
|
When maintaining a database, you often need to create new tables in a PDM |
|
to store new data as a result of development or modifications in the |
|
information system. |
|
You will create a table in the PDM. This table will be named HISTORY and |
|
will contain a record of all sales. |
Adding tables to |
The table HISTORY stores sales data but has no role in the functional |
the PDM |
structure of the database. When you must add tables that are part of the |
|
functional structure of a database, do it at the Conceptual Data Model (CDM) |
|
level before generating the new tables in a PDM. |
|
For more information on the CDM, see the &RQFHSWXDO 'DWD 0RGHO |
|
8VHU *XLGH. |
|
You will also add columns, designate a primary key for the table, create a |
|
domain, create a column, and create indexes. |
About keys |
A key is a column, or several columns, in which each of the values |
|
correspond to one unique row in the table. A SULPDU\ NH\ is a key that has |
|
been designated as the primary identifier for a table. All tables must have a |
|
primary key composed of one or more of its columns. |
|
For example, the primary key for an author table can be author last names. |
About domains |
A domain defines a standard data structure that you can apply to multiple |
|
columns. When you modify a domain you globally update the columns |
|
associated with the domain. This makes it easier to standardize data |
|
characteristics and modify your model consistently when you need to make |
|
changes. |
|
For example, the domain for author last names can be defined as a set |
|
number of characters. |
About indexes |
An index is a data structure that speeds up access to data when you are |
|
searching for information in tables. Indexes are normally created for columns |
|
that are accessed regularly, and where response time is important. |
PDM Getting Started |
|

$GG D WDEOH
|
Indexes are most effective when they are used on columns that contain mostly |
|
unique values. When a column is attached to an index, the index orders the |
|
column rows in such a way so it is more efficient for the search process to |
|
find rows matching a search criteria, than to scan through the data contained |
|
in each row. |
|
For example, an index can be the primary key column containing author last |
|
names. |
Primary and |
It is common to index primary key columns as they are often searched and |
foreign key indexes |
contain only unique values. You will create an index for the primary key |
|
column in the HISTORY table. |
Indexes on non- |
You can also create indexes for other columns, depending on the type of |
key columns |
information you want to access in the database. |
|
For example, to find an author in the database, you can use author last names |
|
to index the columns which contain this information. You will create an index |
|
for the column Author Last Name in the Author table. |
In this chapter you will:
♦Add a table
♦Add columns to the table
♦Designate a primary key
♦Create a domain
♦Add existing columns to the domain
♦Create a column
♦Create an index on a primary key
♦Create an index on a non-key column
+RZ ORQJ ZLOO LW WDNH"
About 15 minutes.
|
PowerDesigner |