


The Chopper Builders Handbook – Chopper Saddles
Lacing
At this point it’s a good time to talk about lacing and punching in general as there are several different routes that can be followed.
As mentioned earlier you can buy a variety of tools or punches to cut both ‘slits’ and ‘holes’ for laces. These tools typically cut slits or holes that are either 1/16”, 1/8” or 3/32” wide or round. Likewise lace is sold in corresponding widths.
Figure 63 depicts some of the typical thronging chisels that can be purchased. Punches are also available in the same styles.
Figure 63
The problem with these types of tools is that they cut slits or holes that are spaced to closely together for most cycle saddle work. For the 1/8” sized tools the lacing holes are only 1/8” apart and on a seat given some rough treatment these holes have a tendency to tear out over time. This is the reason some makers punch each hole or thong slit individually using a single punch or rotary tool as pictured earlier.
There is no hard and fast rule about hole spacing for saddles but I’ve found that one half inch spacing seems to work satisfactorily for most applications, assuming that you use 1/8” or even 3/16” thong or lace. I personally think that on saddles with some significant shape or contour changes that the lace hole spacing looks best if it’s proportionally applied rather than set up on a mathematically perfect spacing scheme. The holes are closer where the curves are tighter and expand in distance between centers on the straight sections.
62

The Chopper Builders Handbook – Chopper Saddles
Keep in mind that the lacing will look best if the spacing between the holes is identical both horizontally and vertically. In other words the holes will be set one quarter inch in from the raw edge of each piece to be connected so the distance total distance between holes is one half inch. Don’t forget to add in any distance used for overlapping seams.
The lacing itself comes in several varieties and different colors including natural un-dyed leather. The best lacing is made from Kangaroo skin but it’s also outlandishly expensive running about fifty dollars for a 25-yard spool. Next down the line is Calfskin at about thirty dollars for a 50-yard spool. You can generally go down two more grades and eventually get into the synthetics, which aren’t even worth mentioning. I do however use a product sold by Tandy called Pro-Lace which is a semi synthetic material on practice pieces or when I’m trying to learn a new lacing style. It’s very affordable at twelve dollars for a 50-yard spool but not very enjoyable to handle. Don’t use it on something you’ll actually use. If you can afford it the Kangaroo lace is the only material that should be used on a chopper Saddle but if you’re on a tight budget regular calf leather lace will give you years of service.
There are perhaps a dozen or so lacing patterns or techniques that are commonly used to join two pieces of leather together. Tandy sells several pamphlets that describe how these patterns are done and I’d buy all of their lacing booklets since some have better illustrations than others.
Many of the patterns used in the trade are not necessarily suitable for cycle saddles and are intended for projects that are smaller in scale and exposed to less rigorous duty. Some of the patterns tend to build up to thickly so that a slight ridge is formed along the lacing line and this can be very uncomfortable for a rider. Some of the patterns, while looking very good are usually just too hard to learn for many amateurs like myself and they consume a huge amount of material.
In my opinion the lacing pattern for a saddle should be simple yet strong and not use up to much lace in the making. There are two patterns that meet this criterion. One is called the ‘Single Whip Stitch’ and the other is the ‘Double Whip Stitch’.
These also just happen to be the two most elementary types of stitches used in leatherwork and are typically the first stitches used by beginners.
63

The Chopper Builders Handbook – Chopper Saddles
Figure 64
Figure 64 illustrates the two stitches. On the left is the single whip and on the right is the double whip. The symmetry of these simple stitches can be made perfect if one takes care in laying out the lacing holes. On these examples we just punched by eyeball and the lacing material used here is the cheap synthetic material so don’t judge the ‘looks’ of these patterns from the poor quality of the examples we’ve shown.
Another very popular stitch pattern is called the ‘Cross Whip’ and you’ll see this used on some of the top quality seats. It is also a very easy stitch to learn.
Figure 65
There are variations on almost all lace patterns and we’ve only shown the most basic designs here so the reader needs to find some good source material to research the variations that best suit a particular project.
64
The Chopper Builders Handbook – Chopper Saddles
Of the three patterns shown the Double Whip is the strongest as you go through each hole twice with the lacing so you end up with a fairly substantial amount of material both over the seam and behind it.
Be advised that the popular cross whip stitch and its variations are not very strong lacing methods even thought they look appealing and when used, the maker will typically have to glue the seat top and gussets together so the lacing becomes more or less decorative. Sometimes what you see at the shows and on the Internet is ‘just for looks’ and isn’t really a ‘structural’ element as some stitches are known in the leather trade.
The visual appearance of any stitch pattern can be altered very easily just by trying different combinations of hole spacing and this is much more practical to do than trying to incorporate some fancy and complicated stitch which really isn’t needed for strength.
I personally like to use the double whip (Figure 64) with symmetrical half-inch spacing and 1/8” lace on most seats. It’s very fast and easy to do, very strong and doesn’t use up a tremendous amount of material.
Figure 66
On a fancy seat you’d want to use closer hole spacing that we’ve shown here so more of the seam is covered but this gives you an idea of the general appearance of the double whip at half inch punching. Quarter inch spacing gives you an almost solid band of extremely strong lacing.
One of the problems most first-timers make is not pulling the stitches tight, I mean really tight. You should pull the lacing so tight that the underlying material just barely starts to ‘pucker’. Once the lacing is oiled it will ‘relax’ to a remarkable degree so it needs to be extremely tight when first applied or you’ll end up with a ‘baggy’ seam.
65

The Chopper Builders Handbook – Chopper Saddles
Before we go much further I should point out that you really do need a clean work area if you want to do cycle saddle work. I’ve put more scars in the material I bought for this project just by trying to use the makeshift plywood table over my welding bench than the hide got during the entire life of the cow. The weld spatter and grinding dust doesn’t help much either.
Figure 67
Ideally if I did more of this work I’d like to have one worktable about 2’x4’ with a thin carpeted surface for handling and cutting and another butcher block top table about the same size for punching and tooling.
Might also mention at this point that you really do need a good pair of leather shears for cutting. You can try using X-Acto knives or regular scissors but the shears are the way to go if you want nice crisp, smooth and straight edges on your material.
Figure 68 illustrates our saddle parts arranged to begin the lacing.
Figure 68
66

The Chopper Builders Handbook – Chopper Saddles
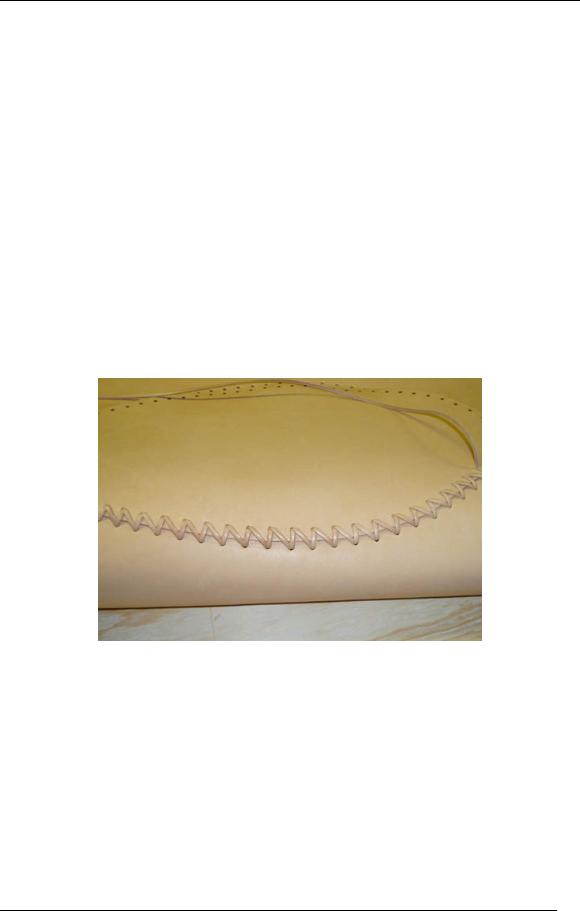
Figure 69 shows the platform and gusset laced together.
This may look like a lot of material but on this particular seat the lacing itself ran in about 1.5 inches from the perimeter, the foam was 2 inches thick (2.5 in places) and I wanted to wrap the gusset at least 2 inches under the perimeter of the pan so I needed at least 5.5 inches of material as shown.
Figure 69
For a seat with thinner padding and/or the lacing running more towards the edges of the pan the gusset width would be considerably narrower than what we show here. Be warned however that too much material is far better than too little material and if in doubt cut the gusset extra wide as it can always be trimmed back later.
So far we’ve made the cutting patterns, cut the material, punched the lacing holes and looked at lacing patterns. Now it’s time to talk about material preparation prior to covering.
At this point in the work different makers will take different approaches in handling their materials. For instance if you’re going to dye the leather this is the point where you’d want to do that operation. If you were going to do any tooling it also occurs at this stage.
Tooling and dye work are both specialized areas of the craft and I suggest that the reader buy as much material as possible on each subject as they are to lengthy to discuss in this small article.
I’m not a big fan of dyes. To me any coloring just hides the natural beauty of real leather and tends to make it stiff and somewhat brittle. Native leather, when waterproofed with oils or wax will begin to mellow, soften and darken considerably with age and wear until it takes on the patina of what’s called hand-rubbed leather. Throughout history the
67