


The Chopper Builders Handbook – Chopper Saddles
Many makers at this stage will sheath the whole body in a casing of thin Dacron material. This sheath helps to define the smooth contours of the padding and is a tremendous aid in making it easy to slip the finished upholstery or leather covering over the body.
If you find that you need to add some hardware or localized backing plates or reinforcing to the pad after the foam has been applied use #10 self-taping sheet metal screws. Drill a small pilot hole in the pan. Be sure to use a drill stop on the bit. This allows you to grind down the pointed end of the screw. Use screws that are just barely long enough to get three or four threads into the pan, one eighth of an inch at the most.
Part V
Upholstery
Once we’re 100% satisfied with the shape of the saddle and all of the hardware is in place and trial fits on the frame have been completed it’s time to think about a covering.
You don’t have to use leather since there are dozens of synthetic materials out there that can be used and many look so much like some of the exotic leathers that you can’t tell the difference unless you look at the underside of the product. In general these synthetic materials, naugahyde for instance, are much easier to work with and far less expensive than the real thing. In addition the synthetics are waterproof which may or may not be important to you.
Unfortunately doing upholstery covering or leatherwork are crafts akin to the welding trade in that you can’t really learn how to do it without actually doing it. In other words you’ll never learn the skills by reading about it alone. It’s just something you need handson experience with. For this reason I’m not even going to attempt to tell you how to become an upholsterer or leatherworker in this article. There are literally dozens of good books out there about both crafts and if you’re serious about learning this stuff you’ll do your own research and study.
If you’ve finished a pan and it’s ready for covering you can always send it out to a shop for the final covering. Many of the top saddle makers actually prefer that the owner send them a finished pan and base to cover instead of having to make one of their own.
This isn’t to say that an amateur can’t do good work and you’ll never know unless you try it. I personally think that it’s somewhat easier to learn leatherwork if you’re just starting out as compared to learning how to upholster with synthetics so this is what we’ll concentrate on.
If you have the desire and patience to really learn the upholstery trade however you’ll soon find that the modern synthetics are almost as good as real leather, in some respects they are superior, but you work with them in a completely different fashion than leather.
44

The Chopper Builders Handbook – Chopper Saddles
Figure 47 depicts some random samples of synthetic coverings I picked up today at the local fabric store.
Figure 47
The blue stuff on the left is typical vinyl fabric at about five dollars a yard. It’s used for patio furniture and seat covers on boats. Whatever you do don’t use it on bike seats.
The tan colored stuff on the right is high quality naugahyde that is typically used for gussets on real leather seats as found in high ticket imported cars. It cost about fifteen dollars a yard and to the untrained eye you can’t tell that it’s not real leather. Unfortunately in these pictures the grain and texture doesn’t show up but believe me this is nice looking stuff.
The fabric in the center is an imitation of some kind of leather, probably from an endangered species, and it is also naugahyde and top quality at around eighteen dollars a yard. I’m tempted to make a vest out of this stuff.
Figure 48
45

The Chopper Builders Handbook – Chopper Saddles
Figure 48 is a close-up of the grain pattern on this particular fabric. The grain in the tan material is to fine to show up which is unfortunate as it’s a very nice high quality material.
The point to this diversion is that synthetics do have a place on custom scooters but you really have to know the upholstery craft in order to take advantage of the products and for most of us semi-part-time builder/fabricators it’s just easier to use real leather as ironic as this may sound.
I learned how to work with leather the hard way when I was a guest of the state down in Texas once upon a time but I had a very good teacher, a guy who used to be one of the main men with Tony Lama back in the old days when boots were actually handmade.
Believe it or not the state had an extensive vocational-rehabilitation series of classes for the guests that taught leather work from the ground up so we could become shoe repairmen when we were released but in reality we never even saw a pair of shoes or boots as most of the work was on western saddles, belts, car seats, dashboards, wallets, purses, gun cases and pistol holsters for the guards.
I certainly wouldn’t recommend this training avenue for newcomers but it worked for me and I soon became hooked on leatherwork. It’s probably more addictive than drugs but at least it’s a constructive endeavor and you can make some significant cash if you eventually get good at the craft.
That particular experience certainly colored the style that I eventually developed as it was a regional Southwestern-Mexican school of design that I still favor as opposed to what most folks in the chopper scene seem to favor which is a tribal or gothic design theme.
You have to stay true to your roots however and do whatever it is that you enjoy whether other people like it or not.
Just because a person has a good teacher doesn’t necessarily guarantee that the student will become a master of the craft. You have to have some natural talent and skill to begin with, combined with certain personality traits demanded by the trade. I had one of the best teachers imaginable but I do not have the patience for this type of work nor the delicate skills required to ever become a professional in this line of work. I kind of rank my own saddle building expertise as being slightly above the average guy who has to make his own bike stuff because he can’t afford to pay anyone whose really good to do it for him. In other words even after all of these years of practice I’m still in the amateur ranks. In many ways this actually makes me better qualified to write this material than some guy who is indeed a highly skilled professional.
46

The Chopper Builders Handbook – Chopper Saddles
Leather
Leather is an organic material and as a result you work with it and handle it in a completely different fashion and manner than you would with synthetic materials. In many respects real leather is far easier to work with than synthetics and far more forgiving of minor mistakes or inconsistencies, up to a point.
Leatherworking can be very addictive. It seems to get inside your soul. It’s a very therapeutic craft and many people find a deep almost mystical place of ‘being’ when they’re working the material. Many psychiatric clinics use leather working classes as part of primary therapy. I personally think a lot of it has to do with the smell of raw leather and the fact that 98% of work is done exclusively with hand tools. Some have suggested that we all carry in the core of our brains chemical memories from the far distant past when our ancestors relied on leather as a mainstay of daily existence.
No matter what the reasons are it remains a fact that working with leather is relatively easy, enjoyable and sometimes profitable.
Leather is an incredibly strong yet supple material that is extremely durable if properly cared for. Well-made leather items can provide good service for generations over several decades, sometimes centuries of time.
It’s the ‘real thing’ as they say and that’s part of the problem. If you want to work leather you have to give the material respect. Some animal’s life was ended in order for the worker to have that material and if you can’t get in touch with the somewhat spiritual or mystical aspects of using something’s skin for your particular project then you’re a complete idiot and no doubt you’ll end up in a bad way someday from a karmic standpoint. I’m not kidding here. Do you want your hide on some asshole’s bike someday?
If you’re properly respectful of the material and pure in your intentions the leather will let you work it into beautiful creations. As your fingers are working the hide you’re making contact with a part of what used to be a living entity and even though it’s now dead there is still a part of that animal that endures in what was left behind. If you’re an uncaring hack you’ll end up with a handful of crap, which you probably deserve.
Think about all of this as you’re waiting on your order of leather to arrive at the doorstep. What do you expect to find in the box and how will you treat it? What you do and what you think will make all the difference in the world in how your project turns out. Trust me, this advice was passed down to me from people who knew their shit and it has never failed me.
I’m really serious about this esoteric stuff and you can doubt it if you want to but believe me it’s easier if you eventually become a true believer but for now lets just get some leather and go at it.
47

The Chopper Builders Handbook – Chopper Saddles
Unless you’re really lucky and have a tannery nearby you’ll be forced into ordering material via the Internet. The stuff you want for a chopper seat is usually called ‘vegetable tanned leather’. This is just raw uncolored leather that is relatively supple and easy to mold into various shapes just as you receive it from the supplier.
Leather is sold by the square foot but the thickness is expressed in ounces of weight. I haven’t found a handy conversion table provided by any of the suppliers that relates weight to thickness so here’s one of our own making for your convenience.
Weight |
Thickness |
|
|
4 oz. |
1/16” |
5 oz. |
5/64” |
6 oz. |
3/32” |
7 oz. |
7/64” |
8 oz. |
1/8” |
As you can see one ounce of leather is equal to 1/64” in thickness.
Since leather is an organic material these weights or thickness actually vary throughout a complete hide. As a result a piece of leather sold as, let’s say, 5 oz. Will probably vary from as thin as 1/16” to as much as 3/32” in thickness over it’s complete expanse. If you expect to do any tooling in the material you need to order at least 5 ounce weight and I personally prefer much thicker stock, as heavy as 7 ounce for the saddle platform.
Leather that weighs in at around 4 ounces is about the same thickness as synthetic naugahyde if this helps to give you some comparison as to relative workability. This is the type of stuff that thin gloves are made from.
Many suppliers list their hides by a range of weights when it can’t be definitively pinned down. For instance some typical standard ordering weights might be:
3-4 oz.
4-5 oz.
5-6 oz.
6-7 oz.
7-8 oz.
8-9 oz.
For what you get I personally think that most commercially sold leather is a bargain at around five-dollars per square foot. This is of course about three times the cost of the ultra high quality synthetic naugahyde but you get what you pay for.
48
The Chopper Builders Handbook – Chopper Saddles
With the synthetics however you can buy fractional yardages, just enough to cover a seat. With leathers you usually need to buy whole hides or at least big pieces of a hide so if you only need 2 square feet for a seat you’ll have to buy about 8 square feet of leather.
You can visit the Tandy web site to get an idea of the types, quantities and nomenclature of leather cuts and different grades and qualities.
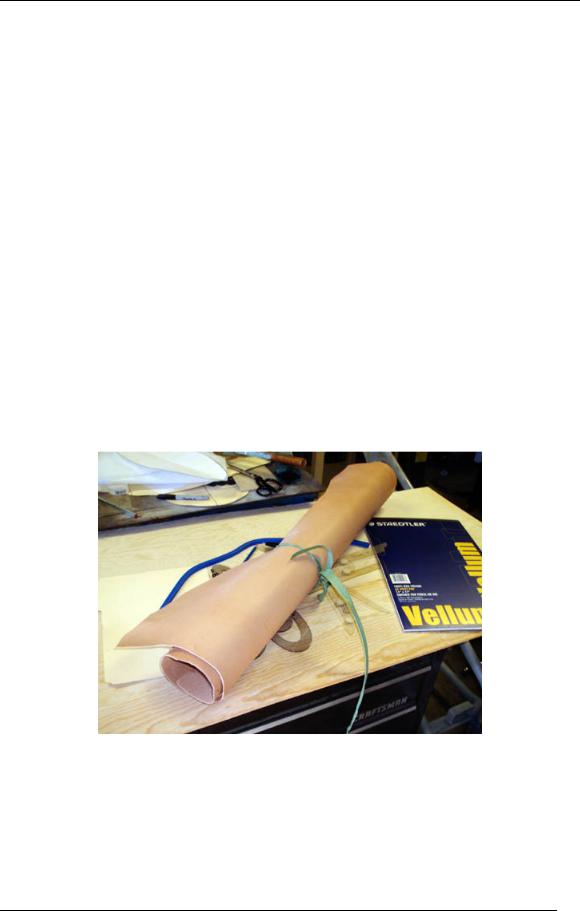
For chopper saddles you need to get the highest quality, blemish free, leather you can find and it’ll be worth every penny you pay for it. Double Shoulders are what most makers buy and these typically contain around 12 to 16 square feet of material depending upon the size of the cow that gave it up. This type of order will set you back about a hundred bucks for the ultra good stuff but you can usually get at least one, sometimes two, seats out of it counting the gussets as well. If you make more saddles you can buy an entire ‘side’ which ranges up to 20 square feet, basically this one half of a complete cowhide. If you look closely at a typical side you’ll find that it’s thickest up towards the shoulders and starts to thin out as you move down the sides and towards the rear. You can take advantage of this and cut the platforms from the thicker portions and use the thin stuff for the gussets. In the early sixties I could buy whole hides for ten dollars. Today this won’t buy enough material for a ladies purse.
If you shop around however you can find top quality ‘sides’ for fewer than seventy dollars and this usually gives you enough material for about two chopper saddles.
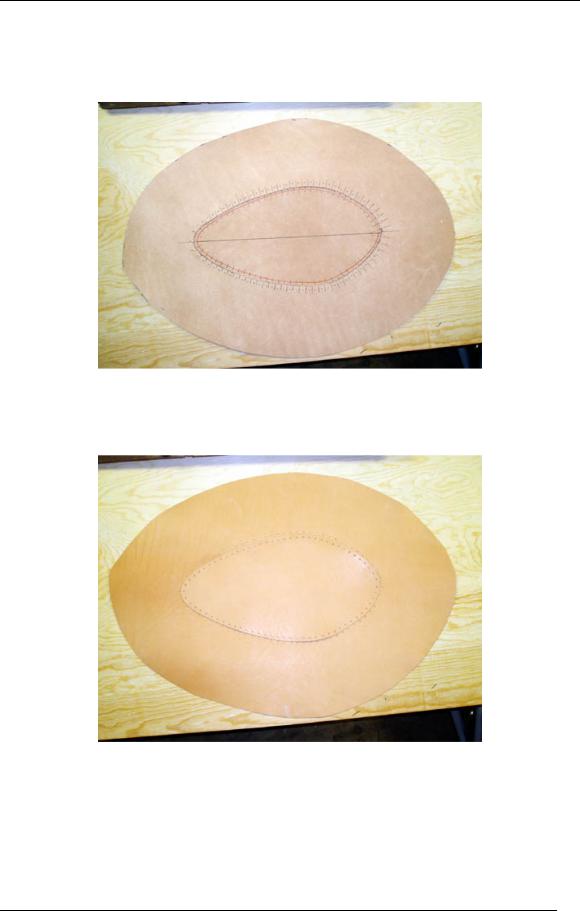
Figure 49
Figure 49 is a picture of a nice new ‘side’ I bought to illustrate this article, doesn’t look like much here yet but this is a lot of leather and it’s pretty good stuff even though there are a lot of small range marks and some scratches from warehouse handling.
49
The Chopper Builders Handbook – Chopper Saddles
Figure 50
It does look a little more impressive when it’s unrolled however. Unfortunately this is only enough material in this particular side to get two good saddles, maybe three smaller ones. The reason is that all hides, even the highest grades will have blemishes that come from the everyday life of the cow. In the trade they’re called ‘range marks’ but those old cows, just like us humans wear their life on their skin and every time you get a cut it leaves a scar. The blemishes in cow hides usually come about from tic bites, barbed wire, fights, falls, gouges from tree branches, branding irons, steel fence posts and pens and mistreatment by their human handlers. It all takes a toll over time and leaves a mark of that particular event in the life of the animal just as it does on us. Other blemishes occur in the routine handing of the skin at the warehouse or retail outlet. Scratches are very common and are actually more detrimental than range marks.
I personally like to find some ‘character’ in the hides I use so the so-called ‘blemishes’ don’t really bother me too much unless they get in the way of any tooling work. Other folks find it very offensive and will pay huge sums of money for skins from ‘stall’ animals, which are usually calfskins.
The ultra high quality skins are typically reserved for areas of the saddle where you’re going to be doing tooling as the blemishes distract from the artwork and make cutting harder and in some cases impossible with respect to scared areas of the leather.
There is no rule that says chopper seats have to be tooled and some of the best looking seats are just plain unadorned hand rubbed leather but if you’ve got a hankering for working leather nothing beats a hand tooled home made saddle.
Remember however that riding on a tooled platform can be very uncomfortable which is why most serious road bikes have smooth saddles. This is just another one of those little things about Choppers where looking cool and being practical don’t necessarily coincide.
50

The Chopper Builders Handbook – Chopper Saddles
Leatherwork
As mention earlier working with leather is in many respects much easier to learn than trying to pick up the quirks of the upholstery trade and using synthetic materials. Unlike the vinyls and naugahydes leather is an organic material and as a result it can far more easily take on shapes that have compound curvatures. In fact leather can be molded to follow extremely fine and detailed contours. You’ll see this trait exhibited in fine quality custom pistol holsters.
Leather is far stronger than any synthetic, probably ten to twenty times stronger. Leather has a far greater resistance to abrasion than the naugahyde’s and being organic it ‘breathes’ to a certain extent so it’s much more comfortable to sit on for long periods of time.
A leather surface can be ‘tooled’ or ‘carved’ and made extremely three dimensional with a combination of molding and tooling until it becomes a sculpted piece of art.
Leather is enduring and if properly cared for can last almost indefinitely. A well-made leather object can easily have a useful working lifespan of fifty years and even one hundred years is not uncommon. We happen to have an old antique ‘bellows’ made around 1790 that has a deerskin leather airbag on it and I use this thing every winter for my fireplace and it still works perfectly. It’s over two hundred years old and may last for another century.
As mentioned earlier leatherwork is addictive and once you’ve had access to this material for any period of time you’ll tend to find that your area of interest may expand and go beyond seat making. Many folks go on into making vests, jackets, chaps, saddlebags and tool bags. Some of my friends now do some fancy holster work, make bullwhips and dabble in the western saddle business. You’ll never know where you’ll end up once you’ve had a taste.
I’m not a professional motorcycle saddle maker. In fact I haven’t made a ‘seat’ for anything in over twenty years so if I can do this stuff I imagine that almost anybody can pull it off with a little practice.
Most of the ‘experts’ recommend that you use 5-6 ounce material for the platform and 4- 5 ounce material for the gusset but this isn’t a hard and fast rule. In fact some makers use leather as thick as 7 oz. for the top, especially if it’s tooled even though I’ve seen good work done on 4 oz. platforms. For the first attempt I’d suggest 4-5 for the top and 3-4 for the gussets since it’s easier to mold around the seat form.
If at all possible buy your leather in person even if it means a pretty far drive to find an outlet. Tandy has shops throughout the United States and almost any sizable town will have some type of leather or craft shop, even overseas. If you’re there in person you’ll have a chance to compare materials and weights first hand and you can see dozens of types and colors of lacing that are hard to judge from a photograph.
51

The Chopper Builders Handbook – Chopper Saddles
I’m in the fortunate position of having one of worlds largest leather wholesalers right here in town and in fact at one time Napa was the leather tanning Mecca of the old west where the first operations were opened in 1860. This is the place where all of the Buffalo hides ended up being processed back in the day of the herd extinctions.
The Hide House is only a few blocks from my home and I must say it’s a joy to visit this place where you can examine over 700 different varieties and colors of leathers including metallic and even fluorescents finishes if that’s your thing. This is a wholesale operation but they will sell to the public but with a 15% surcharge. We’re trying to work something out for members of the site however.
Before you undertake a leather saddle project I strongly advise that you buy some basic leatherworking books, as we’ll only cover the basic fundamentals in this article.
Construction
There are two basic schools of thought about leather coverings. Traditionalists generally prefer to build saddles that are completely sheathed having a leather bottom as well as a top. Contemporary makers prefer instead to simply wrap the gusset under the lip of the pan by about an inch or so and secure it in place using pop-rivets. Sometimes a fabric covering the hides raw edges and rivets is glued in place for a more finished appearance. I’ve used both approaches and don’t find much difference between the two as far as skills or techniques are concerned. It’s up to you to decide which style you prefer to use.
We’ve already talked about smooth verses a tooled platform and again this is a personal matter. Be aware that about 90% of the tooled saddles you see in magazines and at shows are not the saddles the owner usually has installed on the bike for daily riding. Some of these creations are pure showpieces and actually wouldn’t hold up to well in daily use. This is especially true if the carved saddle has been extensively dyed or painted.
Cutting Patterns
Assuming that we’ve got our leather and lacing material it’s time to make the cutting patterns.
The easiest way to do this is by using thin tracing paper as an overlay on the seat foundation foam. Fold this paper in half to form a centerline and then lay it out flat on the seat. Mark a light pencil line on this paper that follows some pleasing contour around the edge of the foam padding at a height where you want the seam between the platform and gusset to lay. Fold this paper in half in half again to be sure that the pencil line on each half of the paper is symmetrical. This first trace represents the platform, or top, piece of the saddle.
52

The Chopper Builders Handbook – Chopper Saddles
I typically refine this initial rough hand-drawn line by using some French curves, battens, templates, flexible curves or whatever other drafting tools may be necessary to get a nice smooth fair line to follow for cutting. I’ll transfer this ‘refined’ outline to some thin cardboard, poster board or file folders to use as the actual cutting template.
Figure 51
Figure 51 illustrates some of the drafting tools that make pattern work easier. Almost all of these can be found in any large office supply store. Some of the longer curves, called ship curves, might have to be ordered via the Internet. The blue thing at the top of the picture is one of those weird ‘flexible’ gizmos that can come in pretty handy on complex projects.
There is no magic formula that determines where the transition point between and top and sides occur. This is the area around the saddle where the line of lacing will be running. If you look at pictures you’ll soon note that every maker has a different take on this positioning. Some like to keep the lacing low, just slightly above the line of the steel pan itself. Others prefer to have the lace very high on the seat, almost up into the platform area. I try to shoot for a position that places the seam of the lacing exactly in line with the point where the foam on the side starts to curve inward into the top area so that the leather below the line of lace, the gusset material, is oriented more or less vertically and the top leather is of course horizontal.
If you have a saddle that is contoured into a fancy tank and rear fender with a lot of compound curves in it you’ll probably end up having to create a line around the seat for the lacing that is called a ‘fair’ curve. This helps to equalize both the spacing and tension on the covering that will reduce ‘puckering’ and ‘wrinkles’ in the leather.
Figure 52 illustrates my initial paper trace for the platform and the cutting pattern made from that trace transferred to an old manila folder. Note that the saddle now has the final layer of soft foam padding installed over the denser blue foam foundation.
53

The Chopper Builders Handbook – Chopper Saddles
Figure 52
Wherever possible I try to use the material that surrounds the leather I cut out for the top piece as the gusset since if everything went smoothly both cut lines will be perfectly aligned. This isn’t always possible, especially if you’re using a lighter weight material for the sides of the saddle and have to switch to another hide. The lines will not coincide between the top and sides if you’re using an ‘overlapped’ seam in which case you’ll have to make another template to define the inside cut line for the gusset.
To start out making a cover for a saddle where we intend on using a butt seam between the top and sidepieces we just transfer the single pattern we made for the top to a side or shoulder of leather and cut out the center portion, which will be the top. From the perimeter of the resulting cutout we make another cut, about five inches away, which will be the extreme outside edge of the gusset. The cut line for the top and the cut line for the bottom are in fact the same lines so this method uses less material for each saddle you plan on making.
Making a cover for a saddle where we want an overlapped seam between the top and bottom is a little more complicated.
In this case we need to make two different cutting patterns. One will be for the top, or platform, portion of the seat and the other will be for the sides, or gussets. For the top piece to overlap the sidepiece it has to be slightly larger than the ‘hole’ we’ll cut in the gusset material. Conversely we can say that the inside perimeter of the gusset pattern has to be slightly small than the perimeter of the top material. Create a three-dimensional picture in your mind of a simple seat using an overlapped seam. The edge of the top has to overlap the edge of the bottom all around the perimeter by about one quarter of an inch.
54

The Chopper Builders Handbook – Chopper Saddles
Over time butt seams tend to open-up exposing the padding beneath. The edges get a little puckered and no longer look smooth. In addition it’s impossible to make a saddle with a butt seam waterproof as liquid just runs in through the exposed seam.
Saddles with overlapped seams, especially if slits are used for the lacing instead of holes, can be made waterproof and look much better over long periods of use, sometimes improving with age. Unfortunately such saddles are harder to make which is why most ‘wham-bam’ custom chopper seat makers use simple butt seams even on thousand dollar seats. It’s one of those cases where an uneducated public doesn’t know the difference so why should makers, in an extremely competitive market, spend extra time making something special when everybody seems content to buy second tier quality.
Even though the saddle we’re building in this article is intended to be a ‘bargain’ type costing less than fifty dollars in materials I think we still need to cover it properly for long term durability.
For this reason we’ll cover the basics of making patterns for overlapped types of seams. Keep in mind that the general principals apply to the simpler butt seam patterns.
Figure 53
To begin we take the initial pattern for the seat top that we made earlier (see Figure 52) and then make another pattern for the bottom that is one-quarter inch smaller all around the perimeter. In other words the pattern for the sides or gusset will be one half inch shorter and narrower than the pattern for the top as seen in Figure 53. In reality the pattern for the sides or gusset will end up being a template for a ‘hole’ we’ll be cutting in a rather large piece of leather so the sides can wrap around the bottom of the pan.
55

The Chopper Builders Handbook – Chopper Saddles
Figure 54
Figure 54 shows the relative sizes of the cutting templates for the top and bottom of the saddle. Note that the template for the bottom is smaller than the template for the top, which is underneath. This arrangement is only necessary where you want the piece of leather for the top to overlap the leather for the side gussets. For a butt type seam you only need a cutting template for the top as it is also used to cut the hole for the sides.
56

The Chopper Builders Handbook – Chopper Saddles
Figure 55
Figure 55 shows the process for laying out the control lines that mark the position for the lacing holes (or slits) around the perimeter of the two cutting templates.
In this case were using holes instead of slits and spacing them one half inch apart and one quarter of an inch in from the edge of the leather. Remember that the holes in the top and bottom pieces must align with one another. To do this requires that the spacing expand in a radial fashion. For instance we’ve designed this template so that the innermost holes are on exact half inch centers but since we have to have a corresponding hole on the outer piece of leather the spacing there ends up being slightly wider, more like nine-sixteenths of an inch or even five eighths of an inch. It doesn’t make any difference if you have an even number of holes or an odd number of holes so long as you have the exact same number of holes in both pieces of leather.
You can buy fancy multi-point thronging chisels and punches but in general the spacing is much to close for most heavy-duty saddle work. I usually punch holes by ‘eyeball’ using one of the cheap rotary type punches as pictured below.
57

The Chopper Builders Handbook – Chopper Saddles
Figure 56
I’ve been doing this stuff for a long time but I’m still amazed at how many so-called professional seat makers don’t know how to use this handy tool because it ‘hurts’ their hand. In practice you never squeeze the grips with your fingers but instead just place the tang of the lower grip on a tabletop and depress the upper shank with the palm of your hand in a downward pressing motion. Even with just a little practice you can punch about fifty holes a minute with great accuracy and no hand fatigue.
The tool in this picture was my father’s and I imagine that it’s around sixty years old at least. It’s a little rusty but still sharp as can be.
While we’re on the subject of holes I’d like to mention that an old-timer taught me to punch holes one size under the size of the lacing you intend to use, which is totally contrary to what the experts will tell you to do. I think this idea works out very well and you might try it out yourself to see if it works for you. It makes for a much tighter fit-up between the leather and lacing and the holes can more easily be waterproofed with almost any wax leather compound.
Some makers prefer to use slits instead of holes and I think that for ultra high quality work you have to use them but in my experience they tend to tear out if the seat is really used hard over a long period of time. Slits make for a much cleaner and flatter seam line and where appearance is important they can’t be beat. I use nippers to cut slits, using the tool almost exactly like the hole-puncher, as it’s a lot faster than the multi-prong thonging chisels.
Getting back to the work at hand it’s now time to cut out the sides or gusset piece using the template we prepared for what we usually call the ‘bottom’ of the saddle.
Figure 57 illustrates the piece of leather we’re going to use for the sides or gussets of the saddle for this project.
58

The Chopper Builders Handbook – Chopper Saddles
Figure 57
As you can see it’s an incredibly large piece of material being about 30” long and 24” wide, about twice the size of the seat pan itself.
The exact width of the gusset material is dependent on the size and thickness of your particular seat as well as where the lacing line is situated in relation to the pan. On some seats the gusset will only be two inches wide. You only need enough width so that the sides can be turned under the pan and riveted or sewn down the center if using a fully upholstered type of saddle covering.
Figure 58
In Figure 58 we’ve cut away the hole in that portion of the gusset that the saddle top will eventually lace to. The surrounding band of material will wrap around the sides of the pan and be secured with rivets.
59
The Chopper Builders Handbook – Chopper Saddles
Figure 59
Figure 59 gives you some idea of how and why we cut the gusset in the way that we did. As you can see the ‘hole’ is the top of the gusset where the top piece of saddle leather will be sewn or laced. The sides of the gusset will wrap around the foam padding and steel pan. Since this leather is still dry and stiff all I could do was just ‘tuck’ the edges under slightly to give an indication of what’s going to be happening.
It should be pointed out here that you can make better use of material if you cut the gusset from two or more pieces of leather which you’ll eventually lace together as it’s fitted to the saddle. It’s not uncommon to have a back gusset and two side gussets.
In Figure 59 we have the main portion of the platform leather cut and punched for lacing
Figure 60
The irregularity of the edge seen in this snapshot is not because the piece was cut crudely but rather due to the fact that once you begin working with leather it starts moving and distorting. In this case punching the lace holes caused the edge to pucker slightly so that
60
The Chopper Builders Handbook – Chopper Saddles
it no longer lays flat on the table. This is a natural phenomenon of the material and nothing to be concerned with. If you put a piece of glass over the sample you’d find that the edge is still nice and fair viewed face on.
Figure 61
Figure 61 shows the underside (flesh side) of the two pieces as we transferred over the control lines for punching the lacing holes.
Figure 62
Figure 62 is a few of the top side (grain side) of the two pieces after being punched with the lacing holes. Keep in mind that we may end up cutting the gusset into three pieces in order to fit it to the pan and if so then additional holes will be needed for lacing the gussets together.
61