


The Chopper Builders Handbook – Chopper Saddles
Part I
Seats and Saddles
This is an article I’ve wanted to do for several years now and in the true tradition of the Chopper Builders Handbook we’re going to show the nitty-gritty details on how to get the job done effectively and not just a few pictures of some guy putting together bits of foam and leather.
It’s pretty hard to ride a bike without something to sit on so eventually you’ll be faced with deciding on whether or not to make a custom saddle or resort to a store-bought thing to sit your ass on. Notice that I said ‘saddle’ and not ‘seat’.
In true Chopper parlance motorcycles don’t actually have a ‘seat’ as such, since those devices are usually only found on bicycles. Two wheeled motor-driven vehicles have ‘saddles’. There is huge difference between a ‘seat’ and a ‘saddle’ and after a couple thousand miles your back-end will begin to tell you about such differences.
Unfortunately there are dozens of companies and individuals out there who still try to build ‘seats’ for motorcycles since they don’t know the difference between the two objects and such makers generally don’t do much real riding. I have noticed that many of these seat makers also make ‘saddlebags’ but don’t make ‘seat bags’ which seems confusing.
It seems pretty obvious to me that you don’t put a ‘seat’ on a steel pony unless that pony is on some kind of carousel or merry-go-round. If the pony in question is a real motorcycle it needs to be saddled so in this article we’re going to be building a ‘Saddle’ for our steed.
In reality however almost everybody refers to the saddle as a seat so you can call it pretty much anything you like, especially if you make it yourself.
The first real ‘paying’ job I had in a chopper shop was making saddles for custom bikes. In those days we built these huge camel-humped monsters that were upholstered like car seats with welted seams and diamond pleats but the pans were made the same then as they are today. When something works well it tends not to change over time and the old standard metal saddle pan is one of those things that works really well.
In my opinion fiberglass pans are a pain in the ass to make. They take a lot of time, look crappy, cheap and unsubstantial and just seem out of place on an Iron Horse. If you like plastic and flimsy staples instead of steel and rivets I guess they’re okay. I’m probably prejudiced but I’d rather ride on bare rails than on plastic and that might explain why some folks call me a pretty hard-assed bastard. I just hate cheap half-assed shit in general.
5

The Chopper Builders Handbook – Chopper Saddles
Tools
You don’t really need many specialized tools to do saddle work but this is what I find helps me out and makes the job easier.
Figure 1
Beginning in the upper left hand corner of the picture we have the old tried and true 3M super 77 spray adhesive. Next to the can are two body dollies for doing pan shaping. Below are tin snips and a pop-rivet gun. Following in line from left to right are an awl, metal scribe, Xacto knife, center punch, bread-knife, three lobed de-burr tool, Sharpie markers, scissors, Surform rasp, drill, sheet metal shears and mallet. Down below are a pair of parallel smooth-jaw pliers, sandpaper and ‘pincher pliers’, sometimes called ‘grippers’. On the top row we have a metal yardstick, ruler and some 80-grit emery or crocus cloth.
We’ll list other tools as we go through the process of making the pan and covering.
Pattern Making
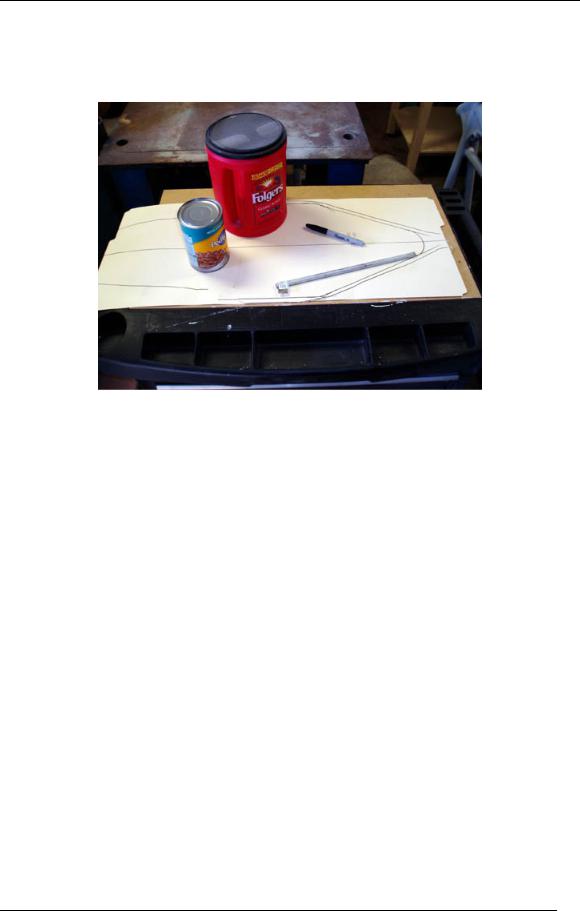
To get started on our own real steel saddle pan we need some poster board, thin cardboard or even just a few manila file folders to use as pattern making material. In this example project we’re going to be using file folders since we already had them in hand so it saved a trip down to the office supply store to buy some fancy poster board.
For this application I just used two file folders, laid out flat, and taped together at the joining edges to make a master for our saddle pan template. I know that poster board would have looked way spiffier and even some bright red or blue file folders would have given this article a big boost but the regular old manila versions were all that we happened to have laying around.
Actually almost any large piece of relatively stiff paper will do the job. Back in the day we’d use old grocery bags taped together but I have to admit that the file folders are better for the task at hand and don’t smell like rotten lettuce.
6

The Chopper Builders Handbook – Chopper Saddles
Figure 2
Here’s what we start with, a big piece of stiff cardboard or paper that’s larger in all dimensions that the saddle pan we’re interested in making. It also helps if we have a scooter frame to begin with but you’d be amazed at the amount of mail I get about seat making from guys who don’t even have a bike to work on.
Before you make the pattern however it’s important to have the rear fender properly positioned and I like to loosen the axle nuts and slide the wheel and fender to full forward and the full aft position to find a good compromise point to start from. There is no sense in making a saddle pan that won’t fit when a new chain is installed or when an old one is fully stretched to the maximum.
To create the blank pattern we just tape a few folders together to get the length we might need and then scribe a centerline with felt pen down the middle. Make corresponding centerline marks on your frame backbone and fender so you can align the pattern template with the frame.
Lay the blank template on the frame rails. You can use a piece of tubing as a weight to help the cardboard hold a shape as it starts to curve up the rear fender, or bare tire if you’re really a hardcore builder.
7

The Chopper Builders Handbook – Chopper Saddles
Figure 3
Using a felt tipped pen trace the outline of the frame rails from the underside of the cardboard. Try to keep the pen perfectly perpendicular to the rails as you trace. What we want is a fairly accurate tracing of the outside edge of the frame and fender.
It helps keep the blank template flat if you place a stiff piece of thick cardboard (the white object in Figure 4) or even thin plywood on the upper side as you’re tracing from below.
This seems like a simple task at first glance but you’d be amazed how many people just can’t seem to find the time to make a half way accurate tracing of their own frame rails.
Believe it or not I once corresponded with a guy via email for weeks that was trying to use a pattern for his own bike project but somebody else made the pattern from a completely different bike but it was supposed to be a ‘name’ bike so I guess he thought that the pattern was something special and he was determined to use it. He couldn’t figure out why it wouldn’t fit his frame since it was a trace from a ‘professionally’ made chassis.
Custom saddles in almost all cases are completely unique to a specific frame and can’t be ‘exchanged’ like a stock seat might be.
8

The Chopper Builders Handbook – Chopper Saddles
Figure 4
The outline of the rails should include portions of the rear fender, or the rear tire, but at this point great accuracy isn’t the goal. All we’re looking for is a rough trace of the perimeter rails and fender outlines.
The resulting trace might look as simple as that shown below.
Figure 5
Using this rough outline trace we can cut away all of the extra template material and get down to something we can refine in detail.
9
The Chopper Builders Handbook – Chopper Saddles
Figure 6
Now we’ve got something we can do some serious work with. I call this a ‘proto-pattern’ meaning it’s just the shell we’ll use to develop the final cutting pattern or patterns.
That piece of tubing on top of the cardboard is just a weight to help hold the pattern in position during the working stage.
What we need to do next is to chop that rough pattern down to follow the centerline of the frame rails and to blend into whatever fender contour we happen to have. Remember that the pan is the structure of the saddle so it has to bear on the frame rails and fender for support. If we cut it to large we’ll have a finished product that looks too large for the frame. If we cut it to small the pan will start to droop since it’s not getting support from the rails.
At this point I usually transfer the outline of the first rough-cut template to a new layout of poster board or folders so I don’t end up destroying the master copy and then do all subsequent work on a copy of the original rough pattern. This is a good practice to establish since if you make a mistake and cut away too much material you can always go back to the previous template.
Since our tracing represents the outside edges of the frame and fender the first thing we need to do to refine the rough pattern is to cut it back to follow the centerline of the frame rails.
10
The Chopper Builders Handbook – Chopper Saddles
Most chopper saddles look best when about half of the rail shows along the sides but some makers prefer to see the entire rail while others like the pan to completely conceal the rails altogether. It’s a personal choice and I just prefer about half of the rail exposed.
Figure 7
Since I’ve traced the frame rail outline to the pattern board I have some guidelines to work from. This particular frame is made from 1.25” tubes so I know that if I offset the perimeter traces by .625 inch I have a line that represents the tube centerlines. Using a section of 5/8” bar stock as a straightedge to lay down some new offset cut lines with a felt tipped pen is the easy way to do this.
To radius the end points and corners I use whatever round objects I have nearby in the shop. When I took these pictures I had a dog food can and an old coffee can handy, which were good enough for the curves I was looking for. Paint cans, oil cans, coffee cups and almost anything round can be used as curve templates. Remember that it’s a lot easier to make an upholstery cover lay smooth if it follows long gentle curves instead of sharp bends.
You can get fancy and break out a compass but the end result will be the same.
11

The Chopper Builders Handbook – Chopper Saddles
You can see in this picture that I’m refining only the outline of the front portion of the pan. The sides and rear section will come a little later.
Figure 8
We’re getting a little closer to having a good pan template to work with. In this snapshot you can see that we need to radius the corners a little more and bring the edges in about another eighth of an inch. We also need to determine how we want the rear portion of the pan to interface with the fender.
In this situation we can’t have a nice smooth and contoured fit to the fender because the fender will have about one inch of possible adjustment movement fore and aft. It’s also not a very elegant fender to begin with so highlighting it’s shape with a fitted seat will only serve to draw attention to an area we don’t want to emphasize.
If we could afford a nice contoured fender from Exile we’d be doing something pretty fancy on the rear of the pan but that wasn’t the case in this situation.
You might have noticed by now that you can see the light penned outline of my proposed trim line around the skirt of the fender in a few of these snapshots. I usually try to work on the rear fender, the oil bag and seat pan all at the same time during the fabrication of a new bike since the position of all three items and even the mounts are closely interrelated.
12

The Chopper Builders Handbook – Chopper Saddles
Figure 9
On the first go round I simply cut a long smooth curve along the back of the pan template but I wanted to look at other alternatives so I used this pattern to create another one to experiment with.
Figure 10
On this template I contoured the back a little more to reduce the bulky look of the first pattern. It stills needs to be refined a little but I did like the look a lot better and this is the design we chose to use.
A third alternative was to build a ‘composite’ saddle pan. What I call a composite pan consists of two or more parts welded together, and hammered, in such a fashion as to
13

The Chopper Builders Handbook – Chopper Saddles
follow complex contours. This isn’t the type of pan to cut your teeth on and this particular frame-fender combination didn’t warranty this level of work but we’ll be doing another article on fancy pans later on down the line.
Once the pattern is finalized it’s time to lay down the lines on the actual piece of steel we’re going to use for the saddle pan. In this case we’re using 16 gauge cold rolled steel sheet than can be found in almost all hardware stores or builder supply outlets. The size of the sheet pictured here is 18”x24” and works out just fine for almost all types of bikes.
Keep in mind that the pan edging and final leather cover will add about an extra eighth of an inch all around to the overall dimensions of the saddle so cut the pan an eighth smaller to get a perfect final fit.
Pan Material
I personally think that 16 gauge steel is a little to flimsy for pans and prefer to use 14 or even 12 gauge stock but it’s much harder to find in small segments. Some makers use 10gauge material so there are no hard and fast rules that you have to adhere to. If your particular design calls for heavier material you can build up a pan from two pieces of thin gauge material bonded together with rosette welds or even pop-rivets. Some makers prefer to use one-eighth inch aluminum but again this is pretty flimsy stuff.
If you need to stiffen a pan you can weld or rivet localized reinforcement plates or strips in areas where the pan wants to flex and it should go without saying that you always need to add backing plates anywhere you intend to install hardware.
Some makers stiffen up a pan by adding a one-inch layer of what’s called rigid structural foam. In reality most of this stuff is just the ‘expanding’ urethane foam sold in home supply centers for insulating around pipe penetrations. To use it, build up a crude form from cardboard around the sides of pan and spray it in. Shape it with a ‘Surform’ rasp or disk sander. If the cured chunk wants to separate from the pan secure it in place with 3M spray adhesive or weather-strip glue if necessary. Since the urethane cures with a smooth ‘skin’ on it the glue holds better if you rough up the foam with course grit paper.
If you plan on running an un-upholstered type of pan you need to use 10-gauge material at the very least and this is one area where stainless steel would be a good choice.
14

The Chopper Builders Handbook – Chopper Saddles
Figure 11
To transfer the pattern onto the pan I usually start out by setting one edge of the steel sheet as my control line and then draw a centerline and an opposite control line. In this case the pan needed to be 10 inches wide to align with the frame centerlines so this is where we start, five inches to center and another five inches to the opposite side.
Place the cardboard template on the steel sheet and trace the outline with a felt pen.
Figure 12
If you’ve knarled up the template by bending it into all kinds of shapes try taping it down to the steel plate. It isn’t critical, but it’s fairly important that the trace be as accurate and smooth as you can get it since it saves time dressing down the steel later on.
15

The Chopper Builders Handbook – Chopper Saddles
Figure 13
Now we’re getting to the fun part where we can finally start working with steel but don’t trash those paper templates.
I save all of my paper templates and label each one with the name of the owner, the bikes name, frame type, fender type and dates. They always seem to come in handy years down the road.
You can cut out the pan using almost anything or any method that cuts steel without warping it. The thin stuff can be cut with snips but the edges tend to get a pretty bad curl so I don’t recommend doing it. If you’ve got a band saw that’s great. A pneumatic sheet metal nibbler as shown below also works but most folks end up using a regular old saber saw with a fine-toothed bimetal blade.
Keep moving the sheet as you’re cutting to keep the point of the blades path close to the edge of your worktop to prevent the sheet from flopping around like a dead fish.
I strongly suggest that you wear gloves while doing this since the raw edges of that plate will be very sharp. If you’ve got kids or pets around the house it’s also a good idea to bend over the pointed ends of the sheet material that’s left over after the pan is cut out.
16

The Chopper Builders Handbook – Chopper Saddles
Figure 14
We’ll we’ve finally got a nice little metal saddle pan to play with but before we start bending it into shape it’s time to drill some holes for the rivets that’ll hold the upholstery skirt in place. You can do this after the pan is shaped but it’s a lot easier and faster to do it now while the plate is laid out flat.
Figure 15
Once you’ve finished cutting out the pan you’ll have to fair in all the little inconsistencies found along the perimeter of the cut edge.
The best way to spot where the hills and valleys lay is to tip the pan up on edge and slowly rotate it around as you sight down the sharp edges. You just can’t see any but the major dips or peaks if you look at the pan as it lays down flat on the worktable. Tipped on edge however ever little dip, crevice, bump and bend will show up extremely well.
17

The Chopper Builders Handbook – Chopper Saddles
Mark the bad spots with a felt pen and use a belt sander to blend and fair the perimeter until it is a smooth flowing line from start to finish. If you don’t have a sander use a long file or even a long sanding block and some elbow grease to smooth the contour of the edge cut. Even the best upholstery job in the world can’t hide a poorly contoured pan.
At the same time it’s a good idea to dull the raw edge by rounding it over with the sander or file until it’s so smooth you can run the edge across your cheek without a worry about getting nicked or cut. If this edge isn’t baby-butt smooth it’ll eventually cut through the edge binding and your upholstery. You can use some crocus cloth in shoeshine fashion to really dull down those edges in short order.
Figure 16
You can see in this snapshot three major places where we need to fair the edge into the overall contour of the pan.
If you plan on using some type of upholstery or leather covering over the pan you’ll have to drill some holes for pop rivets and these are typically placed along a line that runs parallel, but inset one inch, to the pan perimeter.
Different makers will use a different offset. Some might prefer three quarters of an inch while others might use one and a half inches. This is a matter for individual judgment. In general you can keep the holes closer to the pan edge if you’re using naugahyde for a covering instead of leather.
18

The Chopper Builders Handbook – Chopper Saddles
Figure 17
A quick and easy way to lay out a control line around the perimeter consists of using a small segment of one-inch steel strap as a guide. You just eyeball the areas where the curves occur as seen in figure 17.
Figure 18
When you’ve got the control line marked around the perimeter you can begin locating the position of the individual rivet holes.
Again these are typically laid out on one-inch centers around the perimeter of the pan. I use the same piece of one-inch steel strap as a gauge to mark their locations, shown by the small red x-marks in figure 18.
You’ll eventually learn from experience that certain ‘coverings’ need more or less ‘tucks’ at the curves, which means that you might have to narrow the rivet hole spacing along the areas where the pan has tighter curves. There is no hard and fast rule about this so I’m
19
The Chopper Builders Handbook – Chopper Saddles
sorry I can’t give more specifics. If you do have to make holes closer together try to stagger them by about one quarter inch or you’ll weaken the pan.
It is fairly typical to space the rivets closer if you’re covering with a synthetic like naugahyde. Five eighths inch spacing might be a good starting point compared to one inch for leather.
Most saddles will use rivets having a shank diameter of .125 inches so the holes we need to drill in the pan should be made with a 9/64 inch drill bit. Try to find the so-called ‘selfstarting’ or ‘self-centering’ bits so you don’t have to center punch each rivet hole location.
De-burr the holes very slightly using a handheld reamer or countersink. The material in the pan is way to thin to risk thinning it even more at the rivet hole locations by using a powered countersink.
After the holes are drilled I sand the whole pan down with 100-grit sandpaper in a palm sander to knock down the surface ridges that occur at the rivet holes. This also gets rid of any mill scale or nicks in the sheet.
Figure 19
You’ll thank yourself down the line if you take a moment to scribe the centerline in place on both sides of the pan before you start to bend it into shape. Once it’s bent and in primer you’ll have hell to pay trying to figure out where the center lays when it’s time to attach hardware.
20
The Chopper Builders Handbook – Chopper Saddles
Figure 20
The trial bends and fitting are looking pretty good. Now that the pan takes a shape we can see a few areas we need to fair down a little more for a smooth line as the edge follows a curve. The contours of the pan after it’s shaped may be significantly different than what you expected while working with a flat pattern and this kind of overlaps into the metal shaping craft, which is a completely different story that we don’t have space to address in this particular article.
The entire process to this point has taken just a little under an hour. If we had used fiberglass we’d still be masking and building up the seat form prior to laying down the first layer of cloth or matt.
Figure 21
21

The Chopper Builders Handbook – Chopper Saddles
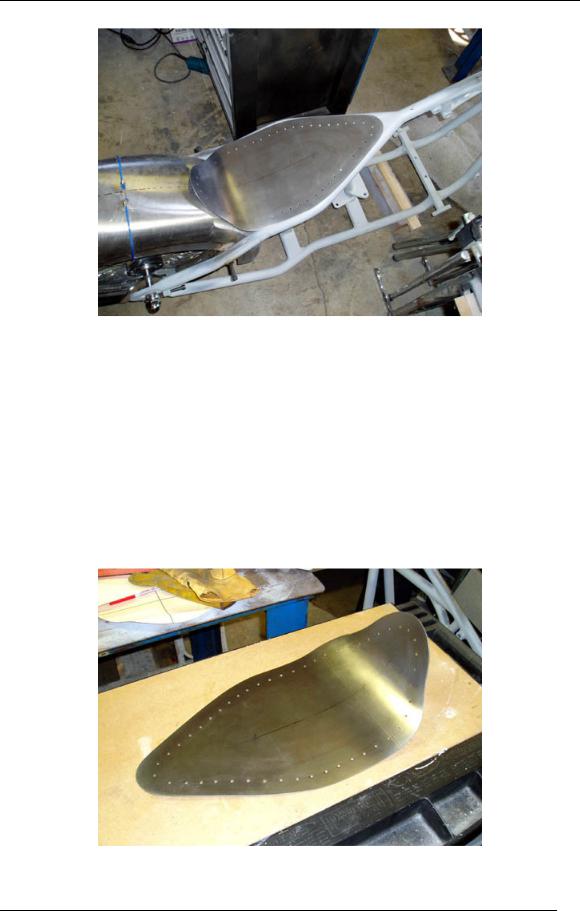
I don’t know about other people but to me there is nothing that says ‘Chopper’ more than a well-formed hand made steel saddle pan. It’s an easy thing to make and one of those small items on a bike that any owner can say he made himself from scratch.
The principals of pan construction are identical regardless of the shape or type of design you’re planning on making and in fact it’s so easy to make a pan I sometimes fabricate three or four different designs for a single bike just so I have something for visual comparison purposes.
Figure 22 shows a traditional type of saddle pan.
Figure 22
Figure 23 gives an indication of what it would look like on the bike if front hinged with rear suspension springs. Being able to compare things side by side in real scale is far more beneficial than looking at magazine pictures, drawings or sketches.
The so-called solo seats like this one really need to be given form by shaping the metal to roll the edges and contour the rear rise around the hip area. They don’t look very visually appealing if they’re just a rolled flat plate like the one pictured here. Unfortunately that involves some sheet metal work that is more appropriately described in a section about fabrication. We don’t have the space to divert into that area at this point in a seat article but there is a wealth of information out there on the net that will provide the basics for simple shaping like a seat requires.
In a similar vein there are dozens of inventive ways to mount this type of seat that involve tradition springs, mini-shocks, air-bags and even polymer cylinders that the reader should try and research before making a commitment to any particular mount method.
22