

2-20
PERIODIC MAINTENANCE
Maintenance
Procedure
Cooling
System
Cooling
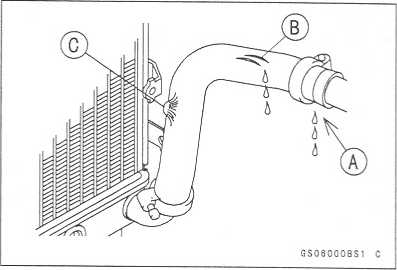
Hose and Connection Inspection
OThe
high pressure inside the radiator hose can cause coolant to leak [A]
or the hose to burst if the line is not properly maintained.
Visually inspect the hoses for signs of deterioration. Squeeze the
hoses. A hose should not be hard and brittle, nor should it be soft
or swollen.
Replace
the hose if any fraying, cracks [B] or bulges [C] are noticed.
Check
that the hoses are securely connected and clamps are tightened
correctly.
Torque
- Radiator Hose Clamp Screws: 2.5 Nm (0.25 kgf-m, 22 in-lb)
Coolant
Change
To
avoid burns, do not remove the radiator cap or try to change the
coolant when the engine is still hot. Wait until it cools down.
Coolant on tires will make them slippery and can cause an accident
and injury. Immediately wipe up or wash away any coolant that spills
on the frame, engine, or other painted parts.
Since
coolant is harmful to the human body, do not use for drinking. *
•
•
Remove:
A warning
Right Inner Cover (see Frame chapter)
Radiator Cap [A]
O Remove the radiator cap in two steps. First turn the cap counterclockwise to the first stop. Then push and turn it further in the same direction and remove the cap.
Remove:
Left Lower Fairing (see Frame chapter)
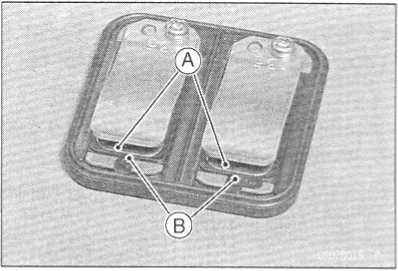
• Place a containers under the drain plugs [A] and [B] at the bottom of the water pump cover and cylinder.
Drain the coolant from the radiator and engine by removing the drain plugs.

http://moto.amoti.rtt/
Maintenance
Procedure
PERIODIC
MAINTENANCE 2-21
Remove:
Coolant
Reserve Tank [A] (see Cooling System chapter)
Remove
the cap [B] and pour the coolant into a container.
Install
the reserve tank (see Cooling System chapter).
Tighten
the drain plugs with the washers.
O
Replace the drain plug gasket with a new one if it is damaged.
Torque
- Coolant Drain Plug (Water Pump): 12 N-m (1.2 kgf-m, 106 in-lb)
Coolant
Drain Plug (Cylinder): 10 N-m (1.0 kgf-m, 89 in-lb)
Fill
the radiator up to the radiator filler neck [A] with coolant, and
install the radiator cap.
NOTE
O
Pour
in the coolant slowly so that it can expel the air from the engine
and radiator.
Fill
the reserve tank up to the full level line with coolant, and
install the cap.
CAUTION ~
Soft
or distilled water must be used with the antifreeze (see below
for antifreeze) in the cooling system.
Water
and Coolant Mixture Ratio (Recommended) Soft Water: 50 %
Coolant:
Freezing Point: Total Amount:
50
%
-
35°C (- 31°F)
L
(2.5 US qt)
NOTE
O
Choose
a suitable mixture ratio by referring to the coolant manufacturer’s
directions.
http://moto.amoti.ru/

If hard water is used in the system, it causes scales accumulation in the water passages, and considerably reduces the efficiency of the cooling system.

2-22
PERIODIC MAINTENANCE
Maintenance
Procedure
Bleed
the air from the cooling system as follows.
O
Start the engine with the radiator cap removed and run it until no
more air bubbles [A] can be seen in the coolant.
oTap
the radiator hoses to force any air bubbles caught inside.
OStop
the engine and add coolant up to the radiator filler neck.
Install
the radiator cap.
Start
the engine, warm it up thoroughly until the radiator fan turns on
and then stop the engine.
Check
the coolant level in the reserve tank after the engine cools
down.
If
the coolant level is lower than the low level line, add coolant to
the full level line.
CAUTION
Do
not add more coolant above the full level line.
Engine
Top End
Air
Suction Valve Check
Remove
the air suction valve (see Engine Top End chapter).
Visually
inspect the reeds [A] for cracks, folds, warps, heat damage, or
other damage.
If
there is any doubt as to the condition of the reed, replace the air
suction valve as an assembly.
Check
the reed contact areas [B] of the valve holder for grooves,
scratches, any signs of separation from the holder, or heat damage.
If
there is any doubt as to the condition of the reed contact areas,
replace the air suction valve as an assembly.
If
any carbon or other foreign particles have accumulated between the
reed and the reed contact area, wash the valve assembly with a high
flash-point solvent.
CAUTION ~
*
•
Do
not scrape off the deposits with a scraper as this could damage the
rubber, requiring replacement of the suction valve assembly.
Valve
Clearance Check Valve
Clearance Inspection
NOTE
o
Valve
clearance must be checked and adjusted when the engine is cold (at
room temperature).
•
Remove:

Lower Fairings (see Frame chapter) Pickup Coil Cover
http://moto.amoti.ru/
Maintenance
Procedure
PERIODIC
MAINTENANCE 2-23
Cylinder
Head Cover (see Engine Top End chapter) • Position the crankshaft
at 1,4 piston TDC.
TDC
Mark [A] for #1, 4 Pistons
Timing
Mark [B] (crankcase halves mating surface)
•
Using
a thickness gauge [A], measure the valve clearance between the cam
and the valve lifter.
