

- •Contents
- •Introduction
- •Acknowledgments
- •The Goals of ASP.NET 2.0
- •Developer productivity
- •Administration and management
- •Performance and scalability
- •Device-specific code generation
- •Additional New Features of ASP.NET 2.0
- •New developer infrastructures
- •New compilation system
- •Additions to the page framework
- •New objects for accessing data
- •New server controls
- •A New IDE for Building ASP.NET 2.0 Pages
- •The Document Window
- •Views in the Document Window
- •The tag navigator
- •Page tabs
- •Code change status notifications
- •Error notifications and assistance
- •The Toolbox
- •The Solution Explorer
- •Lost Windows
- •Other Common Visual Studio Activities
- •Creating new projects
- •Making references to other objects
- •Using smart tags
- •Saving and importing Visual Studio settings
- •Application Location Options
- •Built-in Web server
- •Web site requiring FrontPage Extensions
- •The ASP.NET Page Structure Options
- •Inline coding
- •New code-behind model
- •New Page Directives
- •New attributes
- •New directives
- •New Page Events
- •Cross-Page Posting
- •New Application Folders
- •\Code folder
- •\Themes folder
- •\Resources folder
- •Compilation
- •The New Data Source Controls
- •The SqlDataSource and GridView Controls
- •Reading data
- •Applying paging in the GridView
- •Sorting rows in the GridView control
- •Defining bound columns in the GridView control
- •Enabling the editing of rows in the GridView control
- •Deleting data from the GridView
- •Dealing with other column types in the GridView
- •Selecting which fields to display in the DetailsView control
- •Using the GridView and DetailsView together
- •Updating, inserting, and deleting rows
- •XmlDataSource Control
- •ObjectDataSource Control
- •SiteMapDataSource Control
- •DataSetDataSource Control
- •Visual Studio 2005
- •Connection Strings
- •Site Maps
- •The PathSeparator property
- •The PathDirection property
- •The ParentLevelsDisplayed property
- •The ShowToolTips property
- •Examining the parts of the TreeView control
- •Binding the TreeView control to an XML file
- •Selecting multiple options in a TreeView
- •Specifying custom icons in the TreeView control
- •Specifying lines used to connect nodes
- •Working with the TreeView control programmatically
- •Applying different styles to the Menu control
- •Menu Events
- •Binding the Menu control to an XML file
- •SiteMap Data Provider
- •SiteMapViewType
- •StartingNodeType
- •SiteMap API
- •Why Do You Need Master Pages?
- •The Basics of Master Pages
- •Coding a Master Page
- •Coding a Content Page
- •Mixing page types and languages
- •Specifying which master page to use
- •Working with the page title
- •Working with controls and properties from the master page
- •Nesting Master Pages
- •Container-Specific Master Pages
- •Event Ordering
- •Caching with Master Pages
- •Using ASP.NET 2.0 Packaged Themes
- •Applying a theme to a single ASP.NET page
- •Applying a theme to an entire application
- •Applying a theme to all applications on a server
- •Removing themes from server controls
- •Removing themes from Web pages
- •Removing themes from applications
- •Creating Your Own Themes
- •Creating the proper folder structure
- •Creating a skin
- •Including CSS files in your themes
- •Having your themes include images
- •Defining Multiple Skin Options
- •Programmatically Working with Themes
- •Themes and Custom Controls
- •Authentication
- •Authorization
- •ASP.NET 2.0 Authentication
- •Setting up your Web site for membership
- •Adding users
- •Asking for credentials
- •Working with authenticated users
- •Showing the number of users online
- •Dealing with passwords
- •ASP.NET 2.0 Authorization
- •Using the LoginView server control
- •Setting up your Web site for role management
- •Adding and retrieving application roles
- •Deleting roles
- •Adding users to roles
- •Getting all the users of a particular role
- •Getting all the roles of a particular user
- •Removing users from roles
- •Checking users in roles
- •Using the Web Site Administration Tool
- •The Personalization Model
- •Adding a simple personalization property
- •Using personalization properties
- •Adding a group of personalization properties
- •Using grouped personalization properties
- •Defining types for personalization properties
- •Using custom types
- •Providing default values
- •Making personalization properties read-only
- •Anonymous Personalization
- •Enabling anonymous identification of the end user
- •Working with anonymous identification events
- •Anonymous options for personalization properties
- •Migrating Anonymous Users
- •Personalization Providers
- •Working with the Access personalization provider
- •Working with the SQL Server personalization provider
- •Using multiple providers
- •Building Dynamic and Modular Web Sites
- •Introducing the WebPartManager control
- •Working with zone layouts
- •Understanding the WebPartZone control
- •Explaining the WebPartPageMenu control
- •Modifying zones
- •Caching in ASP.NET 1.0/1.1
- •Output caching
- •Partial page caching
- •Data caching using the Cache object
- •Cache dependencies
- •ASP.NET 2.0 unseals the CacheDependency class
- •Enabling databases for SQL Server cache invalidation
- •Enabling tables for SQL Server cache invalidation
- •Looking at SQL Server
- •Looking at the tables that are enabled
- •Disabling a table for SQL Server cache invalidation
- •Disabling a database for SQL Server cache invalidation
- •Configuring your ASP.NET Application
- •Adding more than one table to a page
- •Attaching SQL Server cache dependencies to the Request object
- •Attaching SQL Server cache dependencies to the Cache object
- •Customizing the side navigation
- •Examining the AllowReturn attribute
- •Working with the StepType attribute
- •Adding a header to the Wizard control
- •Utilizing Wizard control events
- •Working with images from disk
- •Resizing images
- •Displaying images from streams
- •The MMC ASP.NET Snap-In
- •General
- •Custom Errors
- •Authorization
- •Authentication
- •Application
- •State Management
- •Advanced
- •ASP.NET Web Site Administration Tool
- •Home
- •Security
- •Profile
- •Application
- •Provider
- •Managing the Site Counter System
- •Generics
- •Iterators
- •Anonymous Methods
- •Operator Overloading
- •Visual Basic XML Documentation
- •New Visual Basic Keywords
- •Continue
- •Using
- •Global
- •Index
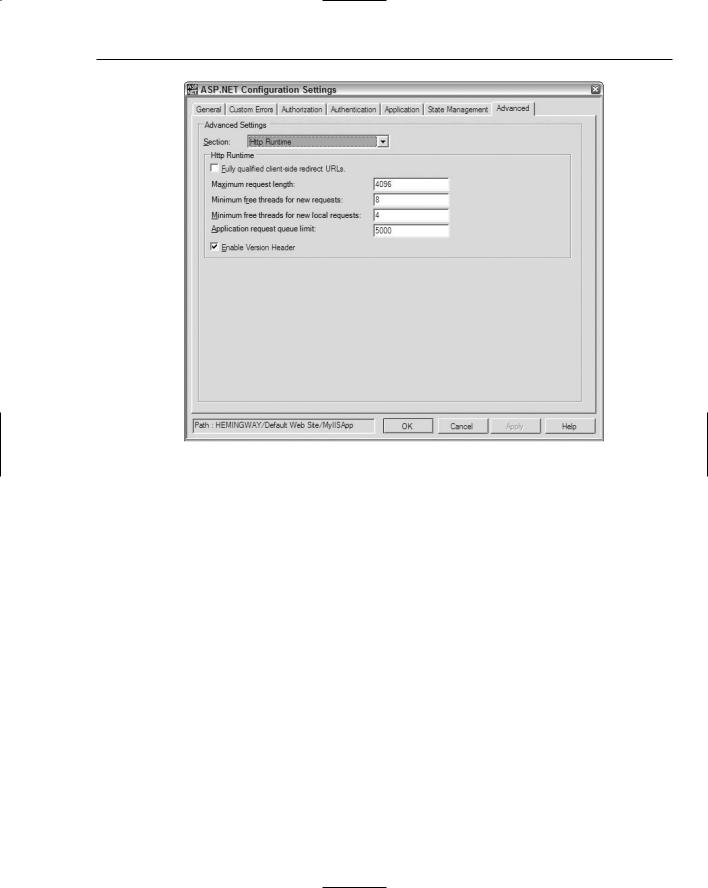
Administration and Management
Figure 14-15
Although a number of other settings are possible through the MMC console, I will stop here. The point is that if you are an administrator of ASP.NET applications, gone are the days when you were required to go to XML files to fiddle with the settings. Fiddling is an error-prone method of administration and is effectively eliminated through the new administration GUIs — one of which is provided by the new ASP.NET MMC snap-in.
Next, I show you the other administration tool for ASP.NET — the ASP.NET Web Site Administration Tool.
ASP.NET Web Site Administration Tool
In addition to the new ASP.NET snap-in for the MMC console, another outstanding new GUI-based tool for administering your Web site is the ASP.NET Web Site Administration Tool (WAT). WAT lets you work in Visual Studio 2005 or directly from the browser to modify the settings stored within the application’s web.config file.
By default, all local users can automatically use WAT to administer settings for their Web applications. The settings are primarily set and stored within your application’s web.config file. If your application doesn’t have a web.config file, WAT creates one for you. The changes that you make using WAT are immediately applied to the web.config file.
399
Chapter 14
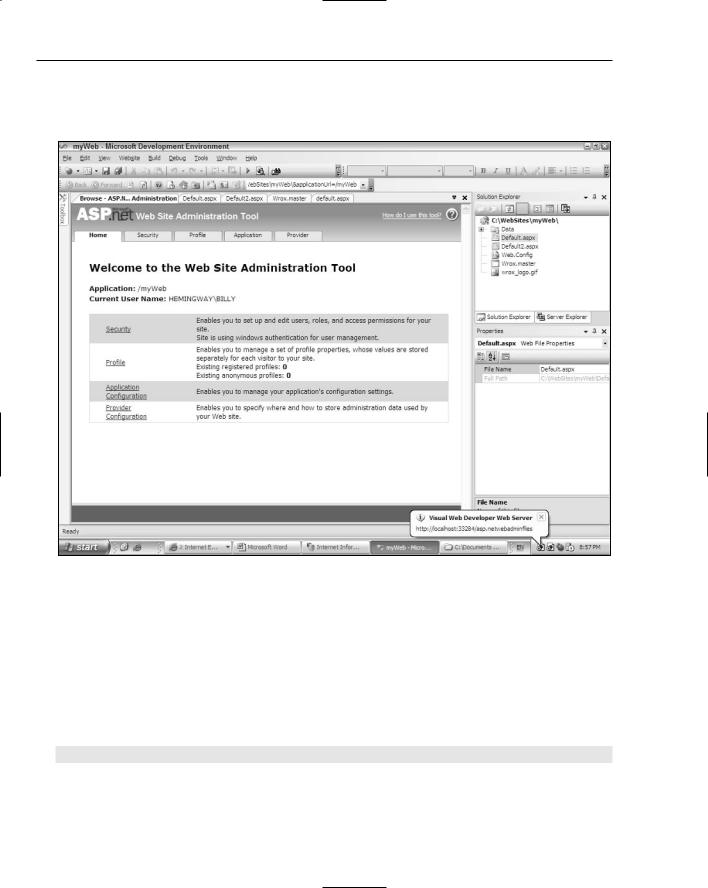
You can get at WAT in a couple of ways. The first is to click the ASP.NET Configuration button in Visual Studio Solution Explorer. This opens up a new tab in the document window, which is basically just a browser view of WAT, as shown in Figure 14-16.
Figure 14-16
This figure shows the ASP.NET Web Site Administration Tool running in Visual Studio 2005 as one of the tabs in the document window. You can see from the screen shot that ASP.NET also fires up a new instance of the built-in ASP.NET Web Server to run the tool. Using WAT directly in Visual Studio allows you to change your application’s settings in a GUI-fashion, as opposed to working from an XML file (as you did with ASP.NET 1.0/1.1).
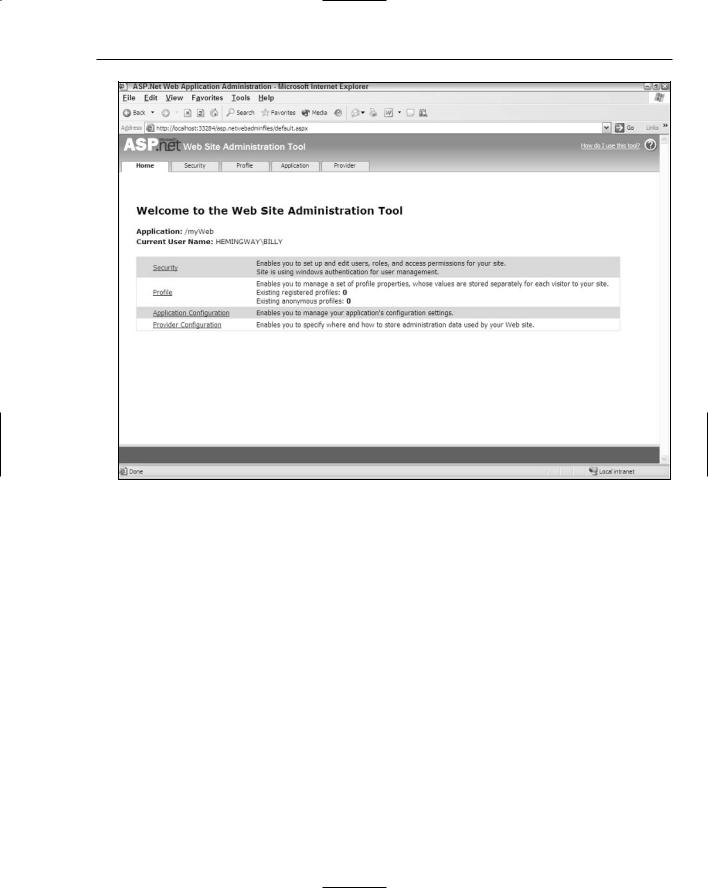
Another option for working with WAT is to pull it up directly in the browser instead of working with it in Visual Studio. To do this, you must call the appropriate http handler. The following URL shows what you type into the browser for an application called myWeb:
http://localhost/myWeb/Webadmin.axd
Typing this line gives you the results shown in Figure 14-17.
400
Administration and Management
Figure 14-17
You can also get at WAT by clicking Website ASP.NET Configuration in the menu bar of Visual Studio. Whether you pull up WAT in Visual Studio or directly in the browser makes no difference. Accessing WAT directly from Internet Explorer is ideal for developers who are working with remote or hosted applications and must change settings on the fly.
Now that you know how to get at WAT, take a look at each of the sections that it provides.
Home
WAT is made up of five tabs. The first tab, Home, is a summary tab that provides you with some basic information about the application you are monitoring or modifying.
Using this tab, you can see the name of the application and the current user context in which you are accessing the application. In addition to these basic items, you see links to the other four tabs of the WAT application — some of which provide you with a summary of the settings contained in them. To make changes to your application, you click the appropriate tab or link.
401
Chapter 14
Security
The second tab, Security (see Figure 14-18), enables you to set up the authentication aspect of your ASP.NET application. You can set the authentication type, roles, and rules for your application.
Figure 14-18
At the bottom of the page on the Security tab, the Select Authentication Type link brings you to a new page that asks whether your application is going to run on a network or be open to the public. If you choose to run your application on a closed network, Windows authentication is applied. If you say that your application will be exposed to the Internet, your application is configured for Forms authentication.
The Roles section enables to create roles that you can apply to your application. First you have to click the Enable Roles link that enables the Create Roles and Manage Roles links. With these two links, you can create roles (by giving a role a specific name) and then assign users to the roles you create.
The Access Rules section offers an outstanding way to give or deny access to certain roles or users down to the folder level. After you create a rule, you can edit or delete it.
402