


Chapter 6
Nesting Master Pages
I hope you see the power that master pages provide to help you create templated Web applications. So far, you have been creating a single master page that the content page can use. Most companies and organizations, however, are not just two layers. Many divisions and groups exist within the organization that might want to use variations of the master by, in effect, having a master page within a master page. With ASP.NET 2.0 this is quite possible.
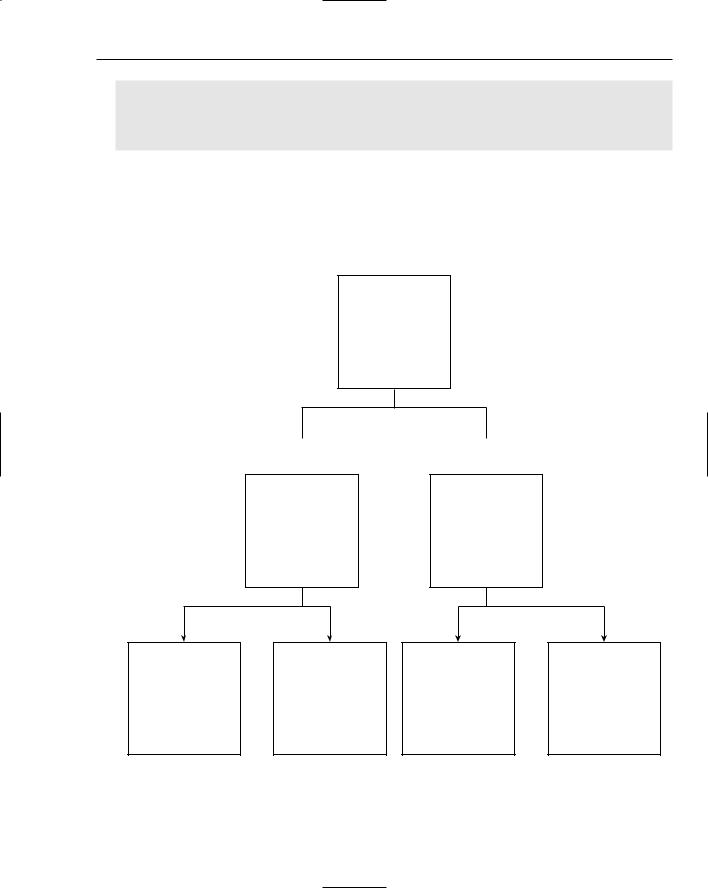
For example, imagine that Reuters is creating a master page to be used throughout the entire company intranet. Not only does the global Reuters entity want to implement this master page company-wide, but various divisions within Reuters also want to provide templates for the subsections of the intranet directly under their control. Reuters Europe and Reuters America, for example, each wants its own unique master page, as illustrated in Figure 6-12.
To do this, the creators of the Reuters Europe and Reuters America master page simply create a master page that inherits from the global master page. All the files are shown here starting with Listing 6-15.
Listing 6-15: The main master page
ReutersMain.master
<%@ Master Language=”VB” %>
<html xmlns=”http://www.w3.org/1999/xhtml” > <head runat=”server”>
<title>Untitled Page</title> </head>
<body>
<form id=”form1” runat=”server”>
<p><asp:Label ID=”Label1” Runat=”server” BackColor=”LightGray” BorderColor=”Black” BorderWidth=”1px” BorderStyle=”Solid” Font-Size=”XX-Large”>Reuters</asp:Label></p>
<asp:ContentPlaceHolder ID=”ContentPlaceHolder1” Runat=”server”> </asp:ContentPlaceHolder>
</form>
</body>
</html>
This is a simple master page, but excellent for showing you how this nesting capability works. The main master page is the master page used globally in the company. It has the ContentPlaceHolder server control with the ID of ContentPlaceHolder1.
Listing 6-16 illustrates how you can work with this main master from a submaster file.
Listing 6-16: The submaster page
ReutersEurope.master
<%@ Master MasterPageFile=”~/ReutersMain.master” %>
<asp:Content ID=”Content1” ContentPlaceHolderId=”ContentPlaceHolder1”
Runat=”server”>
<asp:Label ID=”Label1” Runat=”server” BackColor=”#E0E0E0” BorderColor=”Black”
BorderStyle=”Dotted” BorderWidth=”2px” Font-Size=”Large”>
196
Working with Master Pages
Reuters Europe</asp:Label><br /><hr />
<asp:ContentPlaceHolder ID=”ContentPlaceHolder2” Runat=”server”> </asp:ContentPlaceHolder>
</asp:Content>
When creating the submaster page, notice that Visual Studio 2005 isn’t as friendly when it creates this file for you. This is because Visual Studio 2005 is not expecting the creation of a submaster page. Therefore, to create your submaster page, first create a normal master page and remove all the content in the file except for the directive line. Then you create a Content server control.
Master Page
Reuters.master
R
Reuters America |
Reuters Europe |
ReutersAmerica.master |
ReutersEurope.master |
RA |
RE |
RAC1 |
RAC2 |
REC1 |
REC2 |
Content Page |
Content Page |
Content Page |
Content Page |
Default.aspx |
Default2.aspx |
Default.aspx |
Default2.aspx |
Figure 6-12 |
|
|
|
197

Chapter 6
The objects that you place in the content area defined with this Content control are actually placed in the defined content area within the master page. You can see this by the use of the ContentPlaceHolderId attribute of the Content control. This attribute is tying this content area to the content area ContentPlaceHolder1, which is defined in the master page.
Within this submaster page, you can also now use as many ContentPlaceHolder server controls as you want. Any content page that uses this master can use these controls. Listing 6-17 shows a content page that uses this submaster page, ReutersEurope.master.
Listing 6-17: The content page
Default.aspx
<%@ Page Language=”VB” MasterPageFile=”~/ReutersEurope.master” %>
<asp:Content ID=”Content1” ContentPlaceHolderId=”ContentPlaceHolder2”
Runat=”server”>
Hello World </asp:Content>
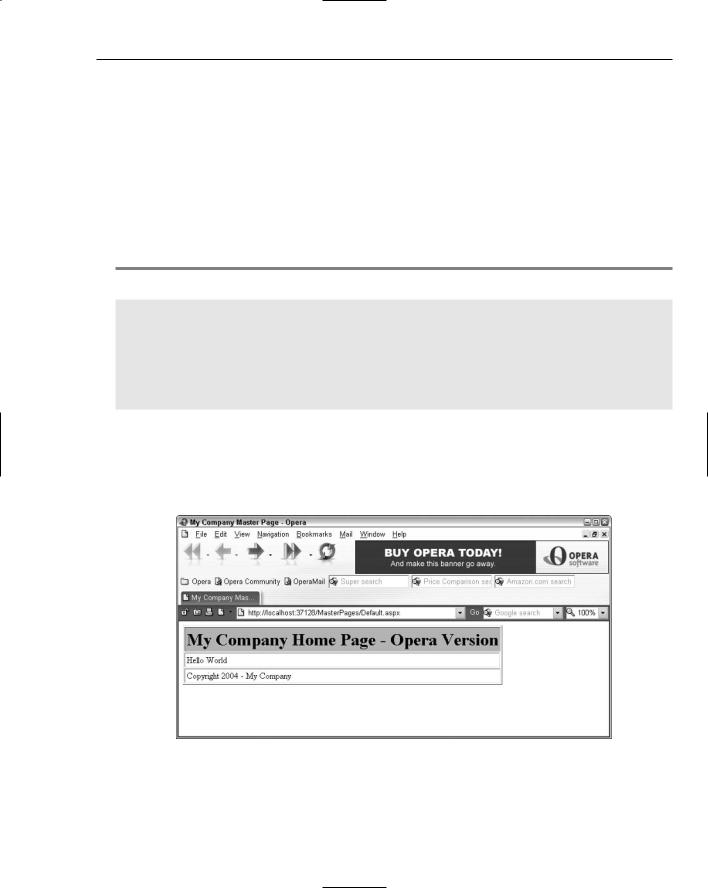
As you can see, in this content page the value of the Master attribute in the Page directive is the submaster page that you created. Inheriting this submaster page actually combines both master pages into a single master page. The Content control in this content page points to the content area defined in the submaster page as well. You can see this with the use of the ContentPlaceHolderId attribute. In the end, you get a very nonartistic page as shown in Figure 6-13.
Figure 6-13
Creating a content page that uses a submaster page works pretty well. One negative point is that Visual Studio 2005 has issues with this construct, and you cannot work in the Design mode when creating your content page.
198
Working with Master Pages
Container-Specific Master Pages
In many cases, developers are building applications that will be viewed in a multitude of different containers. Some viewers may view the application in Microsoft Internet Explorer and some might view it using Opera or Netscape Navigator. And still other viewers may call up the application on a Pocket PC or Nokia cell phone.
For this reason, ASP.NET 2.0 allows you to use multiple master pages within your content page. Depending on the viewing container used by the end user, the ASP.NET engine pulls the appropriate master file. Therefore, you want to build container-specific master pages to provide your end users with the best possible viewing experience by taking advantage of the features that a specific container provides. The capability to use multiple master pages is demonstrated in Listing 6-18.
Listing 6-18: A content page that can work with more than one master page
<%@ Page Language=”VB” MasterPageFile=”~/Wrox.master” Mozilla:MasterPageFile=”~/WroxMozilla.master” Opera:MasterPageFile=”~/WroxOpera.master” %>
<asp:Content ID=”Content1” ContentPlaceHolderId=”ContentPlaceHolder1” Runat=”server”>
Hello World </asp:Content>
As you can see from this example content page, it can work with three different master page files. The first one uses the attribute master. This is the default setting used for any page that doesn’t fit the criteria for any of the other options. This means that if the requestor is not a Mozilla or Opera browser, the default master page, Wrox.master, is used. However, if the requestor is an Opera browser, then WroxOpera.master is used instead. This is illustrated in Figure 6-14.
Figure 6-14
199